
- SAP Community
- Products and Technology
- Technology
- Technology Blogs by SAP
- How to config and consume Push Notification from S...
Technology Blogs by SAP
Learn how to extend and personalize SAP applications. Follow the SAP technology blog for insights into SAP BTP, ABAP, SAP Analytics Cloud, SAP HANA, and more.
Turn on suggestions
Auto-suggest helps you quickly narrow down your search results by suggesting possible matches as you type.
Showing results for
serenayan
Discoverer
Options
- Subscribe to RSS Feed
- Mark as New
- Mark as Read
- Bookmark
- Subscribe
- Printer Friendly Page
- Report Inappropriate Content
03-22-2017
10:32 AM
SAP Cloud Platform Mobile Services (CPms)
Table of Contents
1 PUSH NOTIFICATION OVERVIEW
1.1 Introduction
1.2 Overview
1.2.1 End-to-end flow
1.2.2 Fiori Launchpad Notification Support
1.2.3 Device Platforms and Versions
1.2.4 Application types
2 CONFIGURING PUSH SETTINGS IN THE COCKPIT
2.1 Configuring Notification Role
2.2 Cockpit Settings for iOS
2.3 Cockpit Settings for Android
2.4 Cockpit Settings for Windows
3 CONFIGURING CLIENTS FOR PUSH NOTIFICATIONS
3.1 Configuring iOS Native Clients
3.2 Configuring Android Native Clients
3.3 Configuring Windows Native Clients
3.4 Configuring Hybrid Applications (Kapsel SDK)
3.5 Configuring SAP Fiori Clients
3.6 Configuring Mobile Development Kit Clients (MDK) in WebIDE
3.7 Configuring Baidu Push Clients
3.8 Configuring Custom Fiori Clients built by Cloud Build Service (CBS)
3.9 Configuring Mobile Development Kit Clients (MDK) built by Cloud Build Service (CBS)
3.10 Configuring SAP Mobile Cards for Push Notifications
4 NOTIFICATION DATA FORMATS
4.1 Notification data sent through HTTP headers
4.2 Notification sent in URL format
4.3 Notification data sent using restnotification API
1 Push Notification Overview
1.1 Introduction
In today's mobile-centric world, push notifications are a ubiquitous occurrence in our daily lives. They provide up-to-date relevant information in a simple and effective format, encouraging engagement and increasing involvement from users. It is no doubt that any organization would be wise to leverage the advantage of push notifications in their enterprise applications. SAP Cloud Platform Mobile Services provides the functionality to seamlessly integrate native push notifications end-to-end, with minimum time and effort needed to develop push enabled mobile enterprise applications.
1.2 Overview
SAP Cloud Platform Mobile Services uses the native notification mechanisms APNS , GCM/FCM and WNS provided by the individual device platforms for iOS , Android and Windows respectively , to forward push notifications it receives from notification provides ( back-end systems) to mobile devices. Back-end systems can use either the Push REST service API ( recommended) or HTTP header based API, both exposed by the Mobile Service to notify it about any push messages. In the former case , the notification data is sent as a json payload and in the latter, the notification data is sent as generic HTTP headers or as device platform-specific HTTP headers.
1.2.1 End-to-end flow
Let's have a look at how push notification works from the end user perspective.
- In a typical landscape, Mobile Services and push providers are located in the internet while all the SAP specific systems are protected by the firewall.

- The device registers with a Push Provider ( such as an APNS , GCM / FCM or WNS server ).Each Push Provider shall provide the device with a notification token ( APNS) , canonical ID ( GCM) or Application Secrets and Package SID ( WNS)

- The device sends the notification token (canonical ID or Package SID based on the device platform) obtained from the push provider to the Mobile Services, which in turn adds and stores the token in the existing user on-boarding information. Now the Mobile Services knows how to talk to the platform specific Push Provider server when it needs to send the message to your device.

- In the case of an ABAP based notification provider, the device "subscribes" to business event. Technically it subscribes to the OData collection for which you want to get notified when Create/Update/Delete occurs. Once the subscription step is done, the backend keeps track of which application connection ID subscribes which OData collections.

- If any the business event happens, the backend triggers the notification via SAP Gateway Hub to the Mobile Services. As SAP Gateway knows the firewall proxy configuration, the SAP Cloud Connector is not used during this step. The notification is forwarded by the Mobile Services to the push providers for the specific device platform , which in turn push it to the devices.

1.2.2 Fiori Launchpad Notification Support
SAP Cloud Platform Mobile Services also supports Fiori Launchpad notification functionalites such as capability based push and badge handling on mobile devices for fiori applications running on the SAP Fiori Client.
1.2.3 Device Platforms and Versions
The SAP Cloud platform Mobile Services (alias Mobile Services) uses the native notification services provided by individual device platforms to send notifications. The following platforms are supported via their respective notification services.
| Platform | Notification Service |
| iOS | Apple Push Notification Service ( APNS) |
| Android | Google Cloud Messaging ( GCM) Firebase Cloud Messaging ( FCM) |
| Windows | Windows Notification Service ( WNS) |
| Platform | Supported Versions |
| iOS | 8.x - 12.x |
| Android | 4.1.3 - 9.0 |
| Windows | Windows 8.1, Windows Phone 8.1, Windows 10 |
1.2.4 Application types
As with as the platform services, push notification services are exposed by the Mobile Services, through REST API. It can be easily accessed through the SMP3/SAP Cloud Platform SDK or through REST services from any development platform.
SMP3/SAP Cloud Platform SDK provides APIs to enable push for the following application types:
- Native (iOS, Android, Win)
- Hybrid (Kapsel)
- SAP Fiori Client - Fiori Launchpad Notification Support for Custom & App Store versions
2 Configuring PUSH Settings in the Cockpit
2.1 Configuring Notification Role
In order to send push notifications to an application, you must have 'Notification User' privilege assigned to your user ID in Mobile Services. This must be done in the mobile services cockpit.
By default, Cloud Platform uses SAP Cloud ID service to authenticate users against SAP user accounts. Assign the 'Notification User' role to the SAP user ID to be able to send the push notification to the device.
- Login to SAP Cloud Platform Cockpit.
- Find the Provider and tenant account you want to use. (Need Administrator Permission for the tenant.)
- From the subscribed Java Applications of that tenant, find and select CPms Java application
- In the Left pane, find the "Roles" menu, then add users for "Notification User" role.
- Then that user will be able to send notification to devices.

2.2 NEO and CF Cockpit Settings for iOS
There are two authentication types for APNS: Certificate and Token-based. The advantage of using token-based authentication is that the credentials do not expire automatically, whereas APNS certificates usually expire after one year.
- Log on CPms server, find the corresponding application and click Push Notification (NEO) or Mobile Push Notification (CF) in Assigned Features
- In PUSH tab -> Apple section, choose Sandbox in the APNS Endpoint column, and then either Certificate or Token-Based as the authentication type.
For Certificate:
- Select Browse to navigate to the APNS certificate file, select the file, and click Open.
- Enter a valid password.
- (Optional) Identify the topic bundle ID that is specific to the iOS application you're setting up to receive notifications. If not configured, the bundle ID is extracted from the certificate.

For Token-Based:
Token Properties
- Topic (Bundle ID): The bundle ID that is specific to the iOS application you're setting up to receive notifications.
- Team ID: The 10-character team ID you use for developing your company's apps. Obtain this value from your developer account.
- Key ID: The 10-character string that is provided by Apple when you create a key.
- Key (P8): The authentication token signing key (.p8) file that you've downloaded from Apple. Select Browse to navigate to the APNS key file, select the file, and click Open.

2.3 Cockpit Settings for Android
The senderID needs to be uploaded to the PUSH tab of the application in the cockpit to enable GCM notifications for the application . For details on how to get the sender ID, please refer to section 3.2.2 Get sender ID and API key. To upload the senderID, follow the steps below:
If using previous cockpit:
- Log on SMP3/CPms server, find the corresponding application and click Configure
- In PUSH tab -> Android section, configure the Sender ID and API Key.

If using new cockpit:
- Log on SMP3/CPms server, find the corresponding application and click it
- Click Push Notification from Assigned Features
- In Configuration tab -> Android section, configure the Sender ID and API Key.

2.4 Cockpit Settings for Windows
The Client Secret and Package SID needs to be configured in the PUSH tab of the application in the cockpit to enable WNS notifications for the application . For details on how to get Package SID and Client Secret, please refer section 3.4.1 and 3.4.2 To configure them in the cockpit, follow the steps below:
If using previous cockpit:
- Log on SMP3/CPms server, find the corresponding application and click Configure
- In PUSH tab -> WNS section, configure the Package SID and Client Secret.

If using new cockpit:
- Log on SMP3/CPms server, find the corresponding application and click Configure
- Click Push Notification from Assigned Features
- In Configuration tab -> WNS section, configure the Package SID and Client Secret.

3 Configuring clients for PUSH notifications
3.1 Configuring iOS Native Clients
3.1.1 Prerequisites
- MacBook – OS X version 10.13.x or higher
- Xcode 10.1 or higher with iOS 11 or higher real device
- Required certificate downloaded from iOS provisioning portal
- Required provisioning profile downloaded from iOS provisioning portal and imported to Xcode
- Knowledge of developing an SMP SDK based iOS native project.
- Account on SAP Cloud Platform Mobile Services.
- Valid mobile platform Administrator user credentials
- Application Configuration is created on the mobile platform server
- Postman
- Additional information on the prerequisites for Apple Push Notification Services can be found on the Apple Developer site
3.1.2 Provision the iOS device for APNS
Push notification messages for the iOS platform cannot be tested on a simulator. The first step to receiving push notifications your iOS device is to obtain an APNS enabled certificate and corresponding provisioning profile from the Apple Developer portal. The following section will give a complete step-by-step guide on how to accomplish this task.
- Create a unique application ID for your project. Go to App Settings -> General and change Bundle Identifier to something unique as shown below.

- Next, you need to create the same App ID in your developer account and enable push notification entitlement. Xcode has a simple way to accomplish this. To be able to do this in Xcode, the 'Automatically manage signing' option must be on. Go to App Settings -> Capabilities and flip the switch for Push Notifications to On. After some loading, it should look like this:

- Behind the scenes, this creates the App ID in your member center if it doesn't exist already, then adds the push notifications entitlement to it. You can log in and verify this:

- In your member center, go to Certificates, Identifiers & Profiles -> Identifiers -> App IDs and find the App ID for your app. Under Application Services, Push Notifications should be Configurable:

- Click Edit and scroll down to Push Notifications. In Development SSL Certificate, click Create Certificate... and follow the steps to create a CSR. Once you have your CSR, click continue and Generate your certificate using the CSR.

- Finally, download the certificate and double click it, which should add it to your Keychain, paired with a private key:
 Back in the member center, your App ID should now have push notifications enabled for development:

- There is one last thing you need before you close Keychain Access. Right-click on your new push certificate and choose Export. Save it to Desktop as a .p12 file.You will be prompted to enter a password for the p12. You can either leave this blank or enter a password of your choosing. You'll then need to enter your log-in password to permit the export.


- Create a unique application ID for your project. Go to App Settings -> General and change Bundle Identifier to something unique as shown below.
3.1.3 Modifying the client application
This section describes how to modify an existing SMP SDK based native iOS client application to receive push notifications. The only part of the push implementation code that is specific to Mobile Services; ops is the registering of the APNS token with the mobile service, as described in step 5. All other steps are generic APNS push implementation as required by Apple.
- Ask the user for permission to receive push notifications by calling the registerUserNotificationSettings: method of UIApplication.>
- Call the registerForRemoteNotifications: method of UIApplication , to tell the OS that the application wants to receive push notifications.
Below is some sample code to be added to application: didFinishLaunchingWithOptions: method of the AppDelegate. The call to registerForRemoteNotifications: tells the OS that the app wants to receive push notifications. When the app starts and registers for push notifications, it should show a standard message for push enabled apps stating that the app "...Would Like To Send You Push Notifications..." with the option to confirm with "OK" or "Don't Allow".
- (BOOL)application:(UIApplication *)application didFinishLaunchingWithOptions:(NSDictionary *)launchOptions

{

    UIUserNotificationType types = (UIUserNotificationType)|        (UIUserNotificationTypeBadge |

    UIUserNotificationTypeSound| UIUserNotificationTypeAlert);


    UIUserNotificationSettings *pushSettings =  [UIUserNotificationSettings settingsForTypes:types

    categories:nil];

    [[UIApplication sharedApplication] registerUserNotificationSettings:  pushSettings];


    // Register for notifications

    [application registerForRemoteNotifications];

}
- Implement the application:didRegisterForRemoteNotificationsWithDeviceToken: method of UIApplicationDelegate to receive the unique device token generated by the push service.The code sample below retrieves the token and saves it for future use.
- (void)application:(UIApplication*)applicationdidRegisterForRemoteNotificationsWithDeviceToken:

     (NSData*)deviceToken

{

    NSLog(@"My token is: %@", deviceToken);

    NSUserDefaults *defaults = [NSUserDefaults standardUserDefaults];

    [defaults setObject:deviceToken forKey:@"apnsDeviceToken"];

    [defaults synchronize];

}
- Implement the application:didFailToRegisterForRemoteNotificationsWithError: method of UIApplicationDelegate (iOS) or NSApplicationDelegate (OS X) to receive an error if the registration failed.
In the sample below ,the error information is simply being written to the output log
- (void)application:(UIApplication*)application didFailToRegisterForRemoteNotificationsWithError:(NSError*)error

{

	NSLog(@"Failed to get token, error: %@", error);

}
- Pass the device token to the Mobile Services.
The SAP Mobile Platform server serves as the notification server that receives the notification from the backend and forwards it to the APNS server, which ultimately sends the notification to the device. Before the mobile platform server can serve in this mediation role, the app must register its APNS device token with the mobile platform server using its application connection ID (APPCID).
An appropriate time to make this call to register the token is right after successful user onboarding takes place in the method call logonFinishedWirhError:. Method logonFinishedWithError: is the finish/fail handler for the MAF logon process. The call to register the APNS token is simply added in the finish handler once the user is successfully onboarded.
These lines of code simply retrieves the APNS token from NSUserDefaults and makes a call to a local method that implements the actual call to register the APNS token with the mobile platform. This method implementation takes place in the next step. The original APNS device token retrieved from NSUserDefaults, is in the form of an NSData object. Getting its description results in an NSString object containing whitespace and beginning/ending angle brackets. For example, the resulting token might look like this:
“<407b75b0 4d363ab1 2ab91eae 49cb981c c7cf59a5 e94ebf9f 3c890cd3 4a4349ad>”
The setConfigProperty: method from class SMPAppSettings takes in an NSDictionary object containing properties to set for the application configuration corresponding to the passed in application connection ID. The angle brackets and whitespace must be stripped from the token value prior to adding it to the NSDictionary object and then used by the setConfigProperty: method.The rest of the code simply provides some information on the success/failure of registering the token with the mobile platform.
Now the app is ready for receive push notifications from the mobile platform server.
NSUserDefaults *defaults = [NSUserDefaults standardUserDefaults];

NSString *token = [[defaults objectForKey:@"apnsDeviceToken"] description];

if([token length] > 0) {

    NSString *token = [[[[[defaults objectForKey:@"apnsDeviceToken"] description]

                 stringByReplacingOccurrencesOfString: @"<" withString: @""] stringByReplacingOccurrencesOfString: @">" withString: @""]

               stringByReplacingOccurrencesOfString: @" " withString: @""];


NSError *setConfigTokenError = nil;

NSDictionary *props = @{@"d:ApnsDeviceToken": token};

[appSettings setConfigProperty:props error:&setConfigTokenError];


if (!setConfigTokenError) {

    NSString *successMessage = [NSString stringWithFormat:@"APNS device token (%@) has been registered for CID (%@).", token, data.applicationConnectionId];

    NSLog(@"%@",successMessage);

} else {

    NSString *errorMessage = [NSString stringWithFormat:@"Registering APNS device token(%@) for CID(%@) failed with error: %@.", token, data.applicationConnectionId, [setConfigTokenError localizedDescription]];

    NSLog(@"%@",errorMessage);

}

}
- In the method application: didReceiveRemoteNotification: enter code to retrieve the notification message from the ‘userinfo’ structure. This method handles the case when a notification is received while the app is open. Below is a sample, which parses the userInfo NSDictionary object passed in.
NSLog(@"Received notification: %@", userInfo);


NSString *message = nil;

NSString *dataMessage = nil;

NSString *alertMessage = nil;


id dataMsg = [userInfo objectForKey:@"data"];

if ([dataMsg isKindOfClass:[NSString class]]) {

    dataMessage = dataMsg;

}


id alertMsg = [userInfo objectForKey:@"aps"];

if ([alertMsg isKindOfClass:[NSString class]]) {

    alertMessage = alertMsg;

} else if ([alertMsg isKindOfClass:[NSDictionary class]]) {

    alertMessage = [alertMsg objectForKey:@"alert"];

}


message = [NSString stringWithFormat:@"Alert: %@\nData: %@", alertMessage, dataMessage];

            [Utilities showAlertWithTitle:@"TravelAgencies Push Notification" andMessage:message];
- Build and run the application. The first time you launch the application, you should see a prompt with the standard message for push enabled apps stating that the app “…Would Like To Send You Push Notifications…” with the option to confirm with “OK” or “Don’t Allow”. Select OK.
- In the OS Settings -> Notifications on your device, you should see your application listed.


3.2 Configuring Android Native Clients
3.2.1 Prerequisites
- Android Studio
- Register on Google API website with Google account to get sender ID and API key
- Account on SAP Cloud Platform Mobile Services.
- Valid mobile platform Administrator user credentials
- Application Configuration is created on the mobile platform server
- Postman
- Additional information on the prerequisites for Android Push Notification Services can be found on the Google Developer site
3.2.2 Get sender ID and API key
(1) GCM
- Go to Google Developer site to create a project and select the Cloud Messaging service and click enable it.
- You will see "Sender ID" and Server API Key, take a note of those as you need the number when configuring Android push settings in Cockpit.
(2) FCM
Please refer to 3.2.5 as the detail of FCM support on android Push.
3.2.3 Set up Google Play services
- Install the Google Play services SDK
To implement a GCM (Google Cloud Messaging) client, you need to use the GCM APIs. To use this API, you must set up your project to use the Google Play services SDK
- Open Android Studio
- On the top menu, click on the Android SDK manager icon to open it
- The Android SDK manager will open
- Select Google Play services
- Click Apply
- Import Google Play services
- Open the build.gradle file inside your application module directory
- Add a new build rule under dependencies for the latest version of play-services. Be sure you update this version number each time Google Play services is updated.
compile 'com.google.android.gms:play-services-gcm:9.4.0'
- Save the changes and click Sync Project with Gradle Files in the toolbar
3.2.4 Implement Push Notification APIs in client app
A GCM client is an android app that has GCM enabled and can receive GCM messages. This section uses the sample code provided by the android developer website, click on this link to get more details
You can choose any android project to enable GCM. If you are using your own project, remember to import SMP OData libraries.
If you don’t have an existing android project, you can create an android project from scratch with MAF Logon.
- Add GCM elements to AndroidManifest.xml
- Open the AndroidManifest.xml file and add the following permissions after android.permission.INTERNET. These permissions are needed to enable GCM

- After the application tag, add the following meta-data tag. It’s required for applications using the Google Play services

- Define the GCM receiver. WakefulBroadcastReceiver that will receive intents from GCM services and hand them to the custom IntentService.

- Open the AndroidManifest.xml file and add the following permissions after android.permission.INTERNET. These permissions are needed to enable GCM
- Create GCM Broadcast receiver
Create a receiver that extends WakefulBroadcastReceiver class. This receiver will receive intents from GCM services and hand them to GcmIntentService.
The onReceive method code sample:
public class GcmBroadcastReceiver extends WakefulBroadcastReceiver {


   @Override

   public void onReceive(Context context, Intent intent) {

          // Explicitly specify that GcmIntentService will handle the intent.

     ComponentName comp = new ComponentName(context.getPackageName(),

             GcmIntentService.class.getName());

     // Start the service, keeping the device awake while it is launching.

     startWakefulService(context, (intent.setComponent(comp)));

     setResultCode(Activity.RESULT_OK);

   }

}
- Create GCM Intent Service
This class processes the GCM message based on message type, and posts the result in a notification.
Sample source code:
private void sendNotification(String msg) {

    mNotificationManager = (NotificationManager)

            this.getSystemService(Context.NOTIFICATION_SERVICE);


    PendingIntent contentIntent = PendingIntent.getActivity(this, 0,

            new Intent(this, MAFLogonActivity.class), 0);


    NotificationCompat.Builder mBuilder =

            new NotificationCompat.Builder(this)

     .setSmallIcon(com.sap.dcode.agency.R.drawable.ic_stat_gcm)

    .setContentTitle("GCM Notification")

    .setStyle(new NotificationCompat.BigTextStyle()

    .bigText(msg))

    .setContentText(msg);


    mBuilder.setContentIntent(contentIntent);

    mNotificationManager.notify(NOTIFICATION_ID, mBuilder.build());

}
- Create GenericException class
The GCM client app will use the GenericException to notify the user that an error has occurred.
public class GcmException extends Exception {


   private static final long serialVersionUID = 1L;


   public GcmException(String errorMessage) {

        super(errorMessage);

    }


   public GcmException(Throwable throwable) {

        super(throwable);

    }


}
- Create GcmManager class
Most of the source code included in this class in the sample code provided by the android developer website. However, there are some additional steps to enable this GCM client for push notifications on SMP or CPms.
- Method registerInBackground gets the SENDER ID from the application configuration. This information is very important to get the registration id from the Gcm Server.
- Method sendRegistrationIdToBackend updates the application configuration on the mobile services with the GCM registration ID. This will enable the GCM client to receive push notifications.
	    public static void registerInBackground() {

        new AsyncTask<Void, Void, String>() {

            @Override

            protected String doInBackground(Void... params) {

                String msg = "";

                try {

                    GoogleCloudMessaging gcm = GoogleCloudMessaging.getInstance(context);


                    com.sap.maf.tools.logon.core.reg.AppSettings applicationSettings = LogonCore.getInstance().getAppSettings();

                   String senderID = (String)applicationSettings.getSettingProperties().get(com.sap.maf.tools.logon.core.reg.AppSettings.ANDROID_GCM_SENDER_ID/*PROPERTY_GCM_REGISTRATION_ID*/).getValue();

                    Log.d("SenderID", senderID);


                    regid = gcm.register(senderID);

                    //regid = gcm.register("824532503871");

                    msg = "Device registered, registration ID=" + regid;


                    // You should send the registration ID to your server over HTTP, so it

                    // can use GCM/HTTP or CCS to send messages to your app.

                    sendRegistrationIdToBackend();


                   // Persist the regID - no need to register again.

                    storeRegistrationId(context, regid);

                    Log.d("GCMManager","GCM registration ID-->"+regid);

                } catch (Exception ex) {

                    msg = "Error :" + ex.getMessage();

                    Log.e(TAG, "registerInBackground", ex);

            }

                return msg;

            }


            @Override

            protected void onPostExecute(String msg) {

              Toast.makeText(context, msg,

                    Toast.LENGTH_LONG).show();

            }

        }.execute(null, null, null);

    }


    /**

     * Sends the registration ID to your server over HTTP, so it can use GCM/HTTP or CCS to send

     * messages to your app. Not needed for this demo since the device sends upstream messages

     * to a server that echoes back the message using the 'from' address in the message.

     * @throws GcmException

     */

    private static void sendRegistrationIdToBackend() throws GcmException {


       try {

          com.sap.maf.tools.logon.core.reg.AppSettings applicationSettings = LogonCore.getInstance().getAppSettings();

           String currentRegistartionId = (String)applicationSettings.getSettingProperties().get(com.sap.maf.tools.logon.core.reg.AppSettings.ANDROID_GCM_REGISTRATION_ID/*PROPERTY_GCM_REGISTRATION_ID*/).getValue();


           HashMap<String, AppSettingsProperty> writableProperties = applicationSettings.getWritableSettings();

           writableProperties.get(com.sap.maf.tools.logon.core.reg.AppSettings.ANDROID_GCM_REGISTRATION_ID/*PROPERTY_GCM_REGISTRATION_ID*/).setValue(regid);

           applicationSettings.updateAppSettings(writableProperties);

           applicationSettings.downloadAppSettings();

           String updatedRegistartionId = (String)applicationSettings.getSettingProperties().get("AndroidGcmRegistrationId"/*PROPERTY_GCM_REGISTRATION_ID*/).getValue();

       }

       catch (LogonCoreException le) {

          Log.e(TAG, "sendRegistrationIdToBackendOld", le);

       }


    }


}
- Modify MainActivity
Go to the onCreate method and add the following code to start the registration with GGM service and with SMP
public class MainActivity extends Activity {


   @Override

   protected void onCreate(Bundle savedInstanceState) {

      super.onCreate(savedInstanceState);


      //Initialize MainFragment

      Fragment fragment = Fragment.instantiate(this, MainFragment.class.getName());

        FragmentTransaction fragmentTransaction = getFragmentManager().beginTransaction();

        fragmentTransaction.replace(android.R.id.content, fragment);

        fragmentTransaction.commit();


        // Check device for Play Services APK. If check succeeds,

               // proceed with GCM registration.

               Context context = getApplicationContext();

                 if (GcmManager.checkPlayServices(context)) {

                    String regid = GcmManager.getRegistrationId(context);

                    GcmManager.registerInBackground();


                 } else {

                    Log.d("MainActivity","No valid Google Play Services APK found.");

                 }

   }

}
The application is now ready for receive push notifications from the mobile platform server.
Build and run the application. You should see a prompt with message whether push registration is successful or not. If push registration is successful, it will display "Device registered, registration ID=xxxxx", if push registration failed, it will display "Error : xxxxx"
3.2.5 Push enhancement to use FCM
From SMP SDK SP15 the default push plugin changed to support Firebase Cloud Messaging (FCM) and there are some changes in the Client and server side.
- Change Android Manifest
When the FCM push plugin is added the following section is added to Android manifest XML file. This section says the classes that listening to the incoming FCM message and Listener that communicate with FCM server. This changes will take place automatically when the pug-in is installed.
<meta-data android:name="com.google.android.gms.version" android:value="@integer/google_play_services_version" />
<service android:name="com.sap.mp.push.PushIntentService">
<intent-filter>
<action android:name="com.google.firebase.MESSAGING_EVENT"/>
</intent-filter>
</service>
<service android:name="com.sap.mp.push.PushIDListenerService">
<intent-filter>
<action android:name="com.google.firebase.INSTANCE_ID_EVENT" />
</intent-filter>
</service>
- Preparing and configuring FCM
To use FCM one has to configure an application with Google developer account and make necessary setup. To do this follow the steps.
- Login to http://console.firebase.google.com using your google account.

- Create a New project using "Add project" button or you can click on any of the existing project.

- Click on ”Add app” button and Select Android. Type in the package name and the application name and click "Register app". The package name should be the same as your target app

- Click the ‘Download google-services.json’ button to download the google-services.json which is needed in your android app.

- Login to http://console.firebase.google.com using your google account.
- Use the FCM configuration values on the server push configure.
Server configurations need the project number and Authentication key for configuring the push. You can find the values from the google-services.json
{
"project_info": {
"project_number": "167257137809",
"firebase_url": "https://projectkapsel-c4a5c.firebaseio.com", "project_id": "projectkapsel-c4a5c",
"storage_bucket": "projectkapsel-c4a5c.appspot.com"
},
"client": [
{
"client_info": {
"mobilesdk_app_id": "1:167257137809:android:2a6b4e8180c43ef1", "android_client_info": {
"package_name": "com.sap.kapsel"
}
},
"oauth_client": [
{
"client_id": "167257137809-n13q79b96hof8msq247pvthflrpou48k.apps.googleusercontent
"client_type": 3
}
],
"api_key": [{ "current_key": "AIzaSyCKKrtxmNFhMKrLA8nirZV8StxWINA7pho"}], "services": {
"analytics_service": { "status": 1
},
"appinvite_service": { "status": 1, "other_platform_oauth_client": []
},
"ads_service": { "status": 2
}
}
}
],
"configuration_version": "1"
}
- Add the google-services.json to your android app.
If you have the default Kapsel push plugin added to your Android app from SDK SP15, it used the FCM push. And it required to put the google-services.json to your app root folder. - Configure the push configuration in the server.
In the Google firebase page console, click the project you prepared in step 2. and clicked Project Overview->project settings, and clicked Cloud Messaging tab.You will see the ‘Sender ID’ and ‘Server Key’ in the page.

Open the CPms server Admin UI, go to the specific appid, Info->Push Notification,

Filled in the Server Key and Sender ID with the value in the Google firebase page,

And it is possible for an FCM client to work with GCM based server. In this case we should use the legacy server key and sender ID provided in the Cloud Messaging tab of the project Settings.
3.2.6 Implement Push Notification APIs With SAP Cloud Platform SDK for Android
- Installing the SAP Cloud Platform SDK for Android. More information can be found on user-guide
- Registering a Device Token.
Device tokens are the UUID codes generated by the FCM. The device token which is obtained from the push infrastructure like FCM should be registered with Mobile Services.The registerDeviceToken method of RemoteNotificationClient class can be used for registering the device token with the mobile service.This method must be invoked from the UI thread. It takes device token and RemoteNotificationParameters as parameters. The callback methods are invoked on the UI thread
RemoteNotificationParameters parameters = new RemoteNotificationParameters.Builder().lastKnownLocation(new RemoteNotificationParameters.LastKnownLocation("32.80776", "12.456546")).build();
//This following line specify that the target we are using is for BAIDUsettingsParameters.setPushService(SettingsParameters.PushService.BAIDU);
RemoteNotificationClient remoteNotificationClient = new RemoteNotificationClient(okHttpClient, settingsParameters);
remoteNotificationClient.registerDeviceToken(token,parameters,new RemoteNotificationClient.CallbackListener()
{
@Override
public void onSuccess()
{
//Here goes the code for processing successful response...
}
@Override
public void onError(Throwable result)
{
//Handle your failure handling code here...
if (result instanceof HttpException)
{
//HttpException type com.sap.cloud.mobile.foundation.networking.HttpException HttpException ne = (HttpException)result;
Log.e("Http Exception: " , ne.message() + ", with Error code: " + ne.code());
}
else
{
Log.e("Exception occured: ", result.getMessage());
}
}
});
- Unregistering a device Token.
If the mobile application wants to disable notification, it may delete the device token from the mobile service. The unregisterDeviceToken method can be used for that purpose. Once the deregistration is done, the server will not be able to send a push notification to the device.This method must be invoked from the UI thread. The callback methods are invoked on the UI thread.
RemoteNotificationClient remoteNotificationClient = new RemoteNotificationClient(okHttpClient, settingsParameters);
remoteNotificationClient.unregisterDeviceToken(
new RemoteNotificationClient.CallbackListener()
{
@Override
public void onSuccess()
{
//Here goes the code for processing successful response...
}
@Override
public void onError(Throwable result)
{
//Handle error here...
if (result instanceof HttpException)
{
//HttpException type
com.sap.cloud.mobile.foundation.networking.HttpException
HttpException ne = (HttpException)result;
Log.e("Http Exception: " , ne.message() + ", with Error code: " + ne.code());
}
else
{
Log.e("Exception occurred: ", result.getMessage());
}
}
});
- Notification Feedback.
SAP Cloud Platform Mobile Services provides a feedback service which a mobile application can use to acknowledge the notification. Every notification message from the service carries notificationid that uniquely identifies the notification. Using this unique identification value, the updateNotificationStatus method can be used to update the notification status.The mobile service supports three statuses for feedback: NOTIFICATIONSTATUS.RECEIVED, NOTIFICATIONSTATUS.CONFIRMED and NOTIFICATIONSTATUS.CONSUMED. The code sample below shows how to provide a received feedback.This method must be invoked from the UI thread. It takes device notification id and SettingsParameters as parameters. The callback methods are invoked on the UI thread.
RemoteNotificationClient remoteNotificationClient = new RemoteNotificationClient(okHttpClient, settingsParameters);
remoteNotificationClient.updateNotificationStatus(notificationId, RemoteNotificationClient.NOTIFICATIONSTATUS.RECEIVED,
new RemoteNotificationClient.CallbackListener() {
@Override
public void onSuccess() {
//Here goes the code for processing successful response...
}
@Override
public void onError(Throwable result) {
//Handle error here...
if (result instanceof HttpException) {
//HttpException type com.sap.cloud.mobile.foundation.networking.HttpException
HttpException ne = (HttpException)result;
Log.e("Http Exception: " , ne.message() + ", with Error code: " + ne.code());
} else {
Log.e("Exception occurred: ", result.getMessage());
}
}
}
);
- Support for Baidu Push.
Remote notification API can be used to support the Baidu push service. Registering and unregistering the device token is done by specifying Baidu as the push service through SettingsParameter. The settings parameter should be configured prior to creating a RemoteNotificationClient instance.
This following example shows how to register a Baidu push token to Mobile Services:
RemoteNotificationParameters parameters = new RemoteNotificationParameters.Builder()
.lastKnownLocation(new RemoteNotificationParameters.LastKnownLocation("32.80776", "12.456546"))
.build();
//This following line specify that the target we are using is for BAIDU
settingsParameters.setPushService(SettingsParameters.PushService.BAIDU);
RemoteNotificationClient remoteNotificationClient = new RemoteNotificationClient(okHttpClient, settingsParameters);
remoteNotificationClient.registerDeviceToken(token,parameters,
new RemoteNotificationClient.CallbackListener() {
@Override
public void onSuccess() {
//Here goes the code for processing successful response...
}
@Override
public void onError(Throwable result) {
//Handle your failure handling code here...
if (result instanceof HttpException) {
//HttpException type com.sap.cloud.mobile.foundation.networking.HttpException
HttpException ne = (HttpException)result;
Log.e("Http Exception: " , ne.message() + ", with Error code: " + ne.code());
} else {
Log.e("Exception occured: ", result.getMessage());
}
}
}
);
- This following example shows how to unregister the Baidu push token from Mobile Services:
//This following line specify that the target we are using is for BAIDU
settingsParameters.setPushService(SettingsParameters.PushService.BAIDU);
RemoteNotificationClient remoteNotificationClient = new RemoteNotificationClient(okHttpClient, settingsParameters);
remoteNotificationClient.unregisterDeviceToken(
new RemoteNotificationClient.CallbackListener() {
@Override
public void onSuccess() {
//Here goes the code for processing successful response...
}
@Override
public void onError(Throwable result) {
//Handle error here...
if (result instanceof HttpException) {
//HttpException type com.sap.cloud.mobile.foundation.networking.HttpException
HttpException ne = (HttpException)result;
Log.e("Http Exception: " , ne.message() + ", with Error code: " + ne.code());
} else {
Log.e("Exception occurred: ", result.getMessage());
}
}
}
);
3.3 Configuring Windows Native Clients
Windows 10 Desktop, Windows 10 Tablet Clients and Phone Clients are supported.
3.3.1 Prerequisites
- Visual Studio 2015 professional or enterprise
- Enroll Windows dev account with MSDN Subscription
- Get Application Secrets and Package SID from Windows Live Application Management portal
- Knowledge of developing an SMP SDK based Windows native project.
- Account on SAP Cloud Platform Mobile Services.
- Valid mobile platform Administrator user credentials
- Application Configuration is created on the mobile platform server
- Postman
3.3.2 Get Application Secrets and Package SID
Go to microsoft
Click Add an app, type an app name. After the app is created, you will be able to see the Application Secrets and Package SID, see below screenshot.

3.3.3 Implement Push Notification APIs in client app
- Open your Windows Native project in VS, add a button in any page where you can register for Push. Then add below code in the button click event method: First request a push notification...
                PushNotificationChannel currentChannel = await PushNotificationChannelManager.CreatePushNotificationChannelForApplicationAsync();

                currentChannel.PushNotificationReceived += currentChannel_PushNotificationReceived;
- Get currentChannel URI and upload the settings to SMP3 or HCMPs server for push registration. Below is sample code.
var writableSettings = SharedContext.LogonContext.LogonCore.ApplicationSettings.GetWritableSettings();

await SharedContext.LogonContext.LogonCore.ApplicationSettings.DownloadSettingsAsync();

if (!SharedContext.LogonContext.LogonCore.State.IsGatewayConnectionUsed)

                {

                    writableSettings["WnsChannelURI"].Value = currentChannel.Uri;

                    writableSettings["ApplicationVersion"].Value = "1.1";

                    await SharedContext.LogonContext.LogonCore.ApplicationSettings.UpdateSettingsAsync(writableSettings);

                }
- Catch the exception If Push channel URI could not be fetched
catch (Exception pushChannelURiException)

            {

                System.Diagnostics.Debug.WriteLine("Push channel URI could not be fetched. Ensure you enable proxy or verify other settings" + pushChannelURiException.Message);

            }
- Once notification is received, it will trigger PushNotificationReceived event
void currentChannel_PushNotificationReceived(PushNotificationChannel sender, PushNotificationReceivedEventArgs args)

        {

            // TODO: Change 4 - Event handler method for PushNotificationReceived event

            var notificationContent = String.Empty;

            switch (args.NotificationType)

            {

                case PushNotificationType.Badge:

                    notificationContent = args.BadgeNotification.Content.GetXml();

                    break;

                case PushNotificationType.Tile:

                    notificationContent = args.TileNotification.Content.GetXml();

                    break;

                case PushNotificationType.Toast:

                    notificationContent = args.ToastNotification.Content.GetXml();

                    break;

                case PushNotificationType.Raw:

                    notificationContent = args.RawNotification.Content;

                    break;

            }

            args.Cancel = true;

        }
3.3.4 Associate Windows project with the Windows Store app
- Open the Windows project, right-click on the Windows project name -> Store -> Associate App with the Store...
- In the opened the page, it will show the app you created in 3.4.2 section: Get Application Secrets and Package SID from Microsoft site section. If not, click Refresh
- Select the app and click Next, then click Associate. It will associate your project with the app name you added. Also it will generate a .pfx file in your project
3.3.5 Deploy the native app and Register for Push
After associating, deploy the native app and register, then click the button to register for push. The application is now ready for receive push notifications from the mobile platform server.
3.4 Configuring Hybrid Applications (Kapsel SDK)
3.4.1 Prerequisites
- Have an existing Kapsel App
- Account on SAP Cloud Platform Mobile Services.
- Valid mobile platform Administrator user credentials
- Application Configuration is created on the mobile platform server
- Postman
- Add push plugins to an existing Kapsel app
cordova plugin add kapsel-plugin-push --searchpath %KAPSEL_HOME%/plugins
As from SMP SDK SP15, it starts to support FCM. Additional steps or notes below are needed to make the push notification works.
- Plugin for Firebase
As part of this support there is a new plugin added to which is under the plugin/pushfcm. The name of the plugin is not changed. When we point to this directory for adding the push plugin, the manifest file will be changed in a different way that of the GCM push plugin. - Change to Android Manifest
When the push plugin is added the following sections will be added to the Android manifest XML file. This section says the classes that listening to the incoming FCM message and Listener that communicate with FCM server. This changes will take place automatically when the plug-in is installed.
Note that the GCM and FCM push will not co-exist

- Preparing and configuring FCM
To use FCM one has to configure an application with Google developer account and make necessary setup. To do this follow the steps.
- This step can be done by using your existing google email account. If you don’t have, one should be created
- Login to console using your google account.

- Create a New project using "CREATE NEW PROJECT" button or you can click on any of the existing project.

- Click on ”Add Another App” button and Select Android. Type in the package name and the application name and click "ADD APP".

- This will take you to the new project dashboard page as shown here. From the new application use the the settings options to configure the application

- At this point we need to add firebase cloud messaging for Android by clicking on ”Add Firebase to your android app”
- This will take you to the new project dashboard page as shown here

Here the the package name should match with the package name you are going to provide for the Cordova Kapsel/Fiori application you are going to create. If there is a mismatch FCM push won’t work. If you are making multiple package names, you need to create separate application with FCM console.After you have entered the package name and Nickname, press on ”ADD APP” button. - Click continue on the next screen
- Client Finish on this next screen

- This will take you to the application screen.
- Click on the context menu on the right side of your application name and select ”Settings”

- From the next screen download the google-services.json and copy to the root directory of your project.
- Plugin for Firebase
3.4.2 Implement Push Notification APIs in client app
- add a button in Kapsel project and in its click method, add below code
buttonRegPush: function (evt) {

   if (sap.Push == null) {

      sap.m.MessageBox.show("Push namespace is invalidated",sap.m.MessageBox.Icon.INFORMATION,"Info");

      return false;

       }

    var nTypes = sap.Push.notificationType.SOUNDS | sap.Push.notificationType.ALERT | sap.Push.notificationType.BADGE;

          // sap.Push.registerForNotificationTypes(nTypes, regSuccess, regFailure, proccessNotification, null);  //GCM Sender ID, null for APNS

      var senderId=null;

      if(device.platform=="Android"){

         senderId="XXXXXXX";

      }

          sap.Push.registerForNotificationTypes(

         nTypes,

         function (mesg){sap.m.MessageBox.show("Successfully registered "+mesg,sap.m.MessageBox.Icon.SUCCESS, "Success");},

         function regFailure(errorInfo) {

            alert("Failed to register.\n ErrorInfo: " + JSON.stringify(errorInfo));

            console.log("Error while registering.  " + JSON.stringify(errorInfo));

         },

         function proccessNotification(notification) {

            alert("Received a notifcation:  "+JSON.stringify(notification));

            console.log("Received a notifcation: " +  JSON.stringify(notification));

         },

         senderId);

   },
Need change the senderId accordingly with your own senderId which set in section 2.3.
3.4.3 Associate Windows project with the Windows Store app
If the kapsel application is Windows project, need associate windows project with the Windows store app. If the application is Android/iOS project, this steps is not needed.
- Open the Windows project, right-click on the Windows project name -> Store -> Associate App with the Store...
- In the opened the page, it will show the app you created in 3.3.2 section: Get Application Secrets and Package SID from Microsoft site section. If not, click Refresh
- Select the app and click Next, then click Associate. It will associate your project with the app name you added. Also it will generate a .pfx file in your project
- Right click the .pfx file, select Properties, change Package Action to “Copy always”

- Open package.windows10.appxmanifest file, copy the Package name from Packaging tab
- Replace the package name for Start page field on Application tab

- Copy all text in Start page, replace the URI field on Content URIs tab.

3.4.4 Using GCM based server for push notifiation
This section is for Android specific.
From SMP SDK SP15, it starts to support FCM, to make an FCM client to work with GCM based server, we should use the legacy server key and sender ID provided in the Cloud Messaging tab of the project Settings. As in below screenshot.

You need config the legacy server key and sender ID in CPms which mentioned section 2.3 Cockpit Settings for Android.
3.4.5 Build and Install application
Build and install the application. Click RegPush button, it should show a message that “Successfully registered …”.
3.5 Configuring SAP Fiori Clients
3.5.1 Install the Fiori Client on your mobile device
- Open the app store on your device
- Install the app "SAP Fiori Client"
3.5.2 Configure The Fiori Client on your iPhone
- Open the Fiori Client you just installed
- On the Welcome Screen tip "Log In"
- On the next Screen [Enter SAP Fiori URL or work e-mail provided.
- Confirm the above step with [OK]
- On the next Screen log on with your user credentials for FIA (Frontend Server)
- On the next screen you can define a passcode.
- Select [OK] on the following "SAP Fiori Would like to Send You Notifications" Pop-Up to receive notifications
- After a couple of seconds, you should see the Fiori Launchpad
3.5.3 Test the Notification Delivery
- Open the SAP GUI and logon to the System CWK, client 715.
- Navigate to Transaction SE38 (Enter Transaction Code and Confirm with Enter)

- Start the ABAP Report /IWNGW/R_BEP_DEMO_CREATE_NOTIF
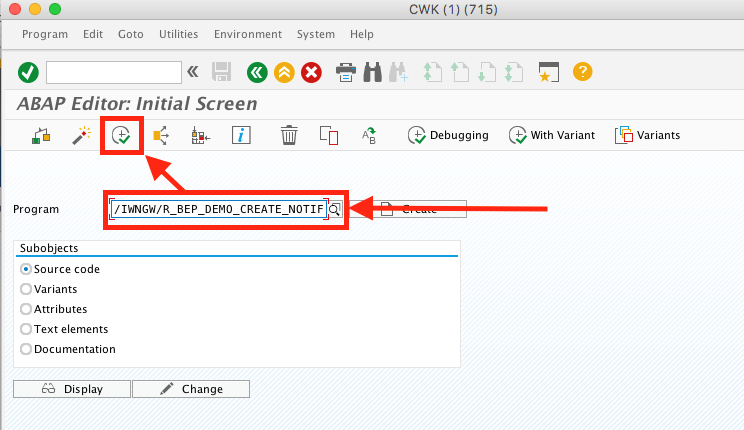
- Choose your Notification Type, Your Recipients (your user name is pre-filled) and Execute the report.

- Now you should receive Notifications. This should work in both cases, the Fiori Client is running in the foreground, the Fiori Client isn't running.
- If you would like to send a notification with a long text (to test truncation and stuff), follow the steps described in 4) but start the ABAP Report Z_SK_CREATE_LONG_NOTIF instead of /IWNGW/R_BEP_DEMO_CREATE_NOTIF. This will send a leave request with a different long text.
3.6 Configuring Mobile Development Kit Clients (MDK) in WebIDE
3.6.1 Configure Push Notification Events of Application.app
- Open WebIDE and enable SAP Cloud Platform Business Application Development Tools in Extensions of Settings

- Open your MDK project and find Application.app
- Create a folder named Push under Rules
- Create 2 rules in folder Push : “ForegroundNotificationEventHandler.js” ,“ContentAvailableEventHandler.js”
ForegroundNotificationEventHandler.js
export default function ForegroundNotificationEventHandler(clientAPI) {


var appEventData = clientAPI.getAppEventData();


clientAPI.setActionBinding({


title: appEventData.title,


message: appEventData.body


});


return clientAPI.executeAction('/ <<Your project Name>> /Actions/PushNotification/PresentNotification/AsAlert.action').then(()=>{


return appEventData.PresentationOptions.All;


});


}
ContentAvailableEventHandler.js
export default function ContentAvailableEventHandler(clientAPI) {


const appEventData = clientAPI.getAppEventData();


const payload = appEventData.payload;


clientAPI.setActionBinding({


message: "received contentAvailable notification with payload: \n" + JSON.stringify(payload, null, 4),


maxNumberOfLines: 15,


duration: 5


});


return clientAPI.executeAction('/<<Your project Name>>/Actions/PushNotification/PresentNotification/AsToast.action').then(()=>{


return appEventData.FetchResult.NewData; // 0


});


}
- Set Push Notification Events of Application.app

- Create two folders which path is PushNotification / PresentNotification in Folder Actions
- Create 2 actions which mentioned in those Rules codes we just created : AsAlert.action, AsToast.action
AsAlert.action
{

    "Message": "{message}",

    "OKCaption": "OK",

    "Title": "{title}",

    "_Type": "Action.Type.Message"

  }
AsToast.action
{

    "Animated": true,

    "Icon": "/onlineShop/Images/medium.png",

    "IsIconHidden": false,

    "Message": "{message}",

    "_Type": "Action.Type.ToastMessage"

}
3.6.2 Add MDK Push Registration Action
- Right click folder PushNotification in Actions of your MDK project
- Select New MDK Action to create a Push Notification Register Action
- Named “PushNotificationRegister.action”
- Add this action to your MDK Client codes
3.6.3 How to build Android push enabled MDK client
Android FCM push requires MDK 3.0 or higher version.
Before execute command install and create-client to build MDK client, do the following two updates:
- Copy googole-services.json to folder MDKClient_SDK\App_SDK\app\App_Resources\Android
- Uncomment the line "apply plugin: 'com.google.gms.google-services'" in app.gradle file in folder MDKClient_SDK\App_SDK\app\App_Resources\Android
3.7 Configuring Baidu Push Clients
3.7.1 Prerequisites
- Register on Push Baidu website (http://push.baidu.com/) with Baidu account to get API Key and Secret Key.
- Account on SAP Cloud Platform Mobile Services.
- Valid mobile platform Administrator user credentials
- Postman
- Application Configuration is created on the mobile platform server
- Additional information on the prerequisites for Baidu Push Notification Services can be found on the Push Baidu Developer site: http://push.baidu.com/document
3.7.2 Get API Key and Secret Key (Android)
- Login Push Baidu website and create an application.
- Select platform for the application: Android.
- Open the config page of the Push Baidu application, get API Key and Secret Key.

3.7.3 Get API Key and Secret Key (iOS)
- Login Push Baidu website and create an application.
- Select platform for the application: iOS.
- Open the config page of the Push Baidu application, get API Key and Secret Key.
- Upload your APNS cert and verify it according to the cert type: Development or Production.

3.7.4 Download Baidu Push SDK
- Login Push Baidu website.
- Download Baidu Push SDK
Baidu Push SDK for Android
Baidu Push SDK for iOS
3.7.5 Get Channel ID
- Login Push Baidu website.
Doc link:
Android API
iOS API
3.7.6 Register for Baidu Push Application in CPms Server (NEO)
- Use Postman to run below Register for Push POST request
URL: https://mobileservices/push/v1/runtime/applications/os/baidu/devices/ - Note: The provider “baidu” in the registration URL indicate use Baidu push.
- Example post body:

3.7.7 Register Baidu Push Application in CPms Server (CF)
- Use Postman to run below Register for Push POST request
URL: https://mobileservices/push/v1/runtime/applications/os/baidu/devices/ - Example post body:

3.8 Configuring Custom Fiori Clients built by Cloud Build Service (CBS)
In CPms Neo cockpit, user can call Cloud Build service to build Custom Fiori client app. Cloud Foundry does not support yet.
3.8.1 New SAP Fiori application in CPms cockpit
- Logon CPms cockpit.
- Go to Mobile Applications -> Native/Hybrid, click New button.
- Select SAP Fiori from Config Templates, input com.sap.FioriTestApp as ID, input FioriTestApp as Name. Click Save button.

3.8.2 Configuring PUSH settings in the Cockpit
Refer to 2 Configuring PUSH settings in the Cockpit

3.8.3 Build Binary files by CBS
- Go to Cloud Build feature, click Create Build Job to open Create Build Job wizard
- Select Custom Fiori Client as Client Type, and fill other fields, click Next.
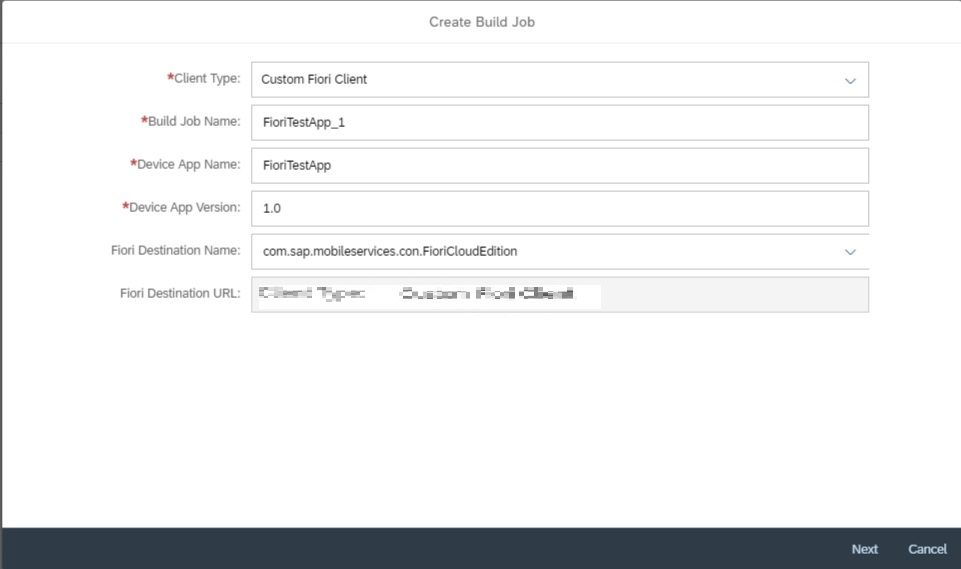
- Click Browser button to select google-services.json for . For other push types, click Next to skip step.

- Click Next to skip Multimedia step.
- Select Platform, Signing Profile and Minimum Platform version. Click Finish.
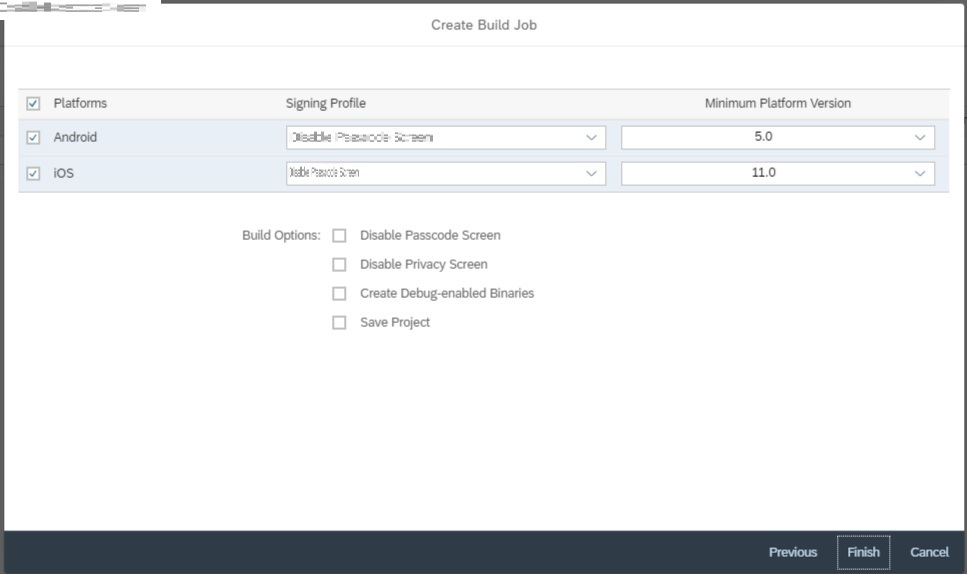
- Now the build job is created, click Build button to trigger build job. The building will take few minutes, it depends on if the CBS server is busy or not.

- When the building complete, the status will show green words Build Completed.

- Click Install button to open the Install page, scan the QR code to install the app on device

3.9 Configuring Mobile Development Kit Clients (MDK) built by Cloud Build Service (CBS)
3.9.1 New MDK application in CPms cockpit
- Logon CPms cockpit.
- Go to Mobile Applications -> Native/Hybrid, click New button.
- Select Mobile Development Kit from Config Templates, input com.sap.MDKTestApp as ID, input MDKTestApp as Name. Click Save button
3.9.2 Configuring PUSH settings in the Cockpit
Refer to 2 Configuring PUSH settings in the Cockpit

3.9.3 Build binary files by CBS
- Go to Cloud Build feature, click Create Build Job to open Create Build Job wizard
- Select Mobile Development Kit Client as Client Type, and fill other fields, click Next.

- Click Next twice to skip iOS Builds and Multimedia steps.
- Check iOS platform, select Signing Profile and Minimum Platform version. Click Finish

- Now the build job is created, click Build button to trigger build job. The building will take few minutes, it depends on if the CBS server is busy or not.

- When the building complete, the status will show green words Build Completed

- Click Install button to open the Install page, scan the QR code to install the app on device

- To run MDK client properly, need to add destination in Connectivity feature, and deploy metadata to App Update feature.
3.10 Configuring SAP Mobile Cards for Push Notifications
Currently, only provide iOS and Android client applications for Mobile Cards. End users can download SAP Mobile Cards application from Apple App Store or Google Play Store, also can build the custom application by themselves via Cloud Build.
3.10.1 Configuring Push Notification for SAP Mobile Cards application from App Store
- Log on CPms server, expand Mobile Applications click on SAP Mobile Cards , Features -> Push Notification

- Choose Use Push Configuration for App Store Client

3.10.2 Configuring Push Notification for SAP Mobile Cards Application built by Cloud Build Service (CBS)
3.10.2.1 Upload Signing Profile
- Log on CPms server, expand Settings -> choose Cloud Build

- Click on Upload option, select Platforms – iOS/Android
For iOS client:
We need to create 3 different signing profiles to pointing to same Signing Profile and respective Provisioning Profile, besides the signing profile, the others 2 are for iMessage and Todays widget.

For Android client:
If you already have an Android Signing Profile, you can directly upload it by clicking on Upload option.

Otherwise, as an Administrator, creating a signing profile for Android is also possible in SAP Could Platform Mobile Services Cockpit.

3.10.2.2 Start Cloud Build Service
- Expand Mobile Applications, click on SAP Mobile Cards -> Cloud Build

- Click on Edit option listed in Actions column to customize Build Job step by step, in the 2nd step, please upload Google Services Json File by clicking on Browser option

- Select Signing Profiles to be used for iOS and Android in the last step

- Click on Build option in Actions column to build both client applications
- Install Mobile Cards application to device
Here you can click Download Binary to download client application and then install to the device, and you also can click Install to display QR code/URL, then install the app on a device by scanning the QR code, or share the installation link by copying the URL

3.10.2.3 Push Configurations for Mobile Cards
This part is same as Native/Hybrid applications, please refer to:
2.2 NEO and CF Cockpit Settings for iOS
2.3 Cockpit settings for Android
4 Notification Data Formats
Notification data can be sent in the following formats:
- Notification data sent through HTTP headers
- Notification sent in URL format
- Notification data sent using PUSH API
4.1 Notification data sent through HTTP headers
Notification data can be sent by the back end as generic HTTP headers or as device platform-specific HTTP headers . SAP recommends that you use the URLs provided in Notification Data Sent Using Push API as detailed in section 4.3
Request URL for a notication using HTTP headers is as follows:
URL: https://<HMC base URL>/Notification/<registration ID>
Add the neessary headers, as described below to the request above.
- Generic header
The generic HTTP header <X-SMP-DATA> is used in the HTTP request to send any notification type such as APNS, GCM, BlackBerry, or WNS. - APNS-specific headers
Use these APNS-specific HTTP headers to send APNS notifications via SAP Cloud Platform Mobile Services:
Header Structure
Consists of
<X-SMP-APNS-ALERT>
A JSON document. You can use this header or other individual headers listed in this table.
<X-SMP-APNS-ALERT-BODY>
Text of the alert message.
<X-SMP-APNS-ALERT-ACTION-LOC-KEY>
If a string is specified, this header shows an alert with two buttons: Close and View. iOS uses the string as a key to get a localized string for the correct button title instead of View. If the value is null, the system shows an alert. Click OK to dismiss the alert.
<X-SMP-APNS-ALERT-LOC-KEY>
Key to an alert-message string in a Localizable.strings file for the current localization.
<X-SMP-APNS-ALERT-LOC-ARGS>
Variable string values to appear in place of the format specifiers in loc-key.
<X-SMP-APNS-ALERT-LAUNCH-IMAGE>
File name of an image file in the application bundle. It may include the extension. Used as the launch image when you tap the action button or move the action slider. If this property is not specified, the system uses on of the following:
- The previous snapshot
- The image identified by the UILaunchImageFile key in the Info.plist file of the application
- The Default.png.
<X-SMP-APNS-BADGE>
Number that appears as the badge on the application icon.
<X-SMP-APNS-SOUND>
Name of the sound file in the application bundle.
<X-SMP-APNS-DATA>
Custom payload data values. These values must use the JSON-structured and primitive types, such as dictionary (object), array, string, number, and boolean.
<X-SMP-APNS-CATEGORY>
Identifies a category that is used to specify notification actions, such as contacts, or messages.
<X-SMP-APNS-CONTENT-AVAILABLE>
Indicates whether the user can take action.
- GCM-specific headers
Use these GCM-specific HTTP headers to send GCM notifications:
Header Structure
Consists of
<X-SMP-GCM-COLLAPSEKEY >
An arbitrary string (such as "Updates Available") that collapses a group of like messages when the device is offline, so that only the last message is sent to the client.
<X-SMP-GCM-DATA>
Payload data, expressed as parameters prefixed with data and suffixed as the key.
<X-SMP-GCM-DELAYWHILEIDLE>
(Optional) Represented as 1 or true for true, any other value for false, which is the default value.
<X-SMP-GCM-TIMETOLIVE>
Number of seconds that the message remains available on GCM storage if the device is offline.
4.1.1 SAP Gateway Notification support
There are no specific handling requirements for sending notifications on the SAP gateway side. SAP Cloud Platform Mobile Services sends notifications using gateway-specific headers.
The SAP Cloud Platform Mobile Services identifies the device type, and based on the device type, converts the gateway notification headers into the third-party notification context data for APNS, GCM,WNS, and MPNS. Non-SAP gateway back ends also use the headers listed below to send generic notifications; the back ends are unaware of the device platform.
- SAP gateway-specific headers that are handled by the SAP Gateway Notification Support for sending notifications.
Structure Header
Consists of
<x-sap-poke-title>
Text of the alert message.
<x-sap-poke-entriesofinterest>
Number that appears as the badge on the application icon.
<x-sap-poke-data>
Custom payload data values. These values must use the JSON structured and primitive types such as dictionary (object), array, string, number, and boolean.
- APNS
SAP Cloud Platform Mobile Services converts the following gateway notification headers into APNS notifications:
Structure Header
Consists of
<x-sap-poke-title>
Text of the alert message.
<x-sap-poke-entriesofinterest>
Number that appears as the badge on the application icon.
<x-sap-poke-data>
Custom payload data values. These values must use the JSON structured and primitive types such as dictionary (object), array, string, number, and boolean.
<x-sap-poke-category>
Identifies a category that is used to specify notification actions, such as contacts, or messages.
<x-sap-poke-content-available>
Indicates that the user can take action.
- GCM
SAP Cloud Platform Mobile Services converts the gateway notification headers into GCM notifications:
Header Structure
Consists of
<x-sap-poke-title>
An arbitrary string (such as "Updates Available") collapses a group of like messages when the device is offline, so that only the last message is sent to the client.
<x-sap-poke-data>
Payload data. Size should not exceed 4KB.
- WNS
SAP Cloud Platform Mobile Services converts the gateway notification headers into WNS notifications:
Structure Header
Consists of
<x-sap-poke-title>
Text of the alert message to be shown on the Tile and Toast notifications
<x-sap-poke-entriesofinterest>
Number that appears as the badge on the application icon
<x-sap-poke-data>
Custom payload data to be sent to the device as a raw notification
4.2 Notification sent in URL format
Notification data can also be sent by using the Postman, using URL arguments as part of the mobile platform push endpoint, or as the delivery address URL. Request URL for a notication in URL format is as follows:
URL: https://<HMC base URL>/Notification/<application connection ID>?alert=<alert>&badge=<badge>&sound=<sound>&data=<data in text format>&category=<category_name>&content_available<true/false>
All URL arguments (zero to many) are optional. The arguments are converted into device-type specific notifications as explained:
- APNS
Parameters
Description
alert
Text of the alert message.
badge
Number that appears as the badge on the application icon.
sound
Name of the sound file in application bundle.
data
Custom payload data values. These values must use the JSON-structured and primitive types, such as dictionary (object), array, string, number, and boolean.
category
Identifies a category that is used to specify notification actions, such as contacts, or messages.
content_available
Indicates whether the user can take action.
- GCM
Parameters
Description
alert
An arbitrary string (such as "Updates Available") that collapses a group of like messages when the device is offline, so that only the last message is sent to the client
data
Payload data, expressed as parameters prefixed with data and suffixed as the key
- WNS
Parameters
Description
alert
The text of the alert message to be sent as a Tile notification
badge
Number that appears as the badge on the application icon
data
Payload data to be sent
- MPNS (Notification for Windows Phone)
Parameters
Description
alert
The text of the alert message to be sent as a Tile notification
badge
Number that appears as the badge on the application icon
data
Payload data to be sent
Based on the data send either in headers or in the URL, corresponding notification is sent to the device:
| Header Notification | Tile Notification | Toast Notification | Raw Notification |
| Alert | Yes | Yes | No |
| Badge | Yes | No | No |
| Data | No | No | Yes |
4.3 Notification data sent using restnotification API
The RESTful service based restnotification API is the recommended way to send push notifications in the Mobile Services, due to its many advantages over interfaces that are based on HTTP headers or URL parameters. Using this API, the notification data is sent as a json payload, instead of a HTTP header or URL parameter as described before.
The next section describes the restnotification API in detail:
How to config and consume Push Notification from SAP Mobile Services (Part2)
- SAP Managed Tags:
- Android,
- iOS,
- SAP Mobile Platform,
- SAP Mobile Platform SDK
Labels:
6 Comments
You must be a registered user to add a comment. If you've already registered, sign in. Otherwise, register and sign in.
Labels in this area
-
ABAP CDS Views - CDC (Change Data Capture)
2 -
AI
1 -
Analyze Workload Data
1 -
BTP
1 -
Business and IT Integration
2 -
Business application stu
1 -
Business Technology Platform
1 -
Business Trends
1,658 -
Business Trends
91 -
CAP
1 -
cf
1 -
Cloud Foundry
1 -
Confluent
1 -
Customer COE Basics and Fundamentals
1 -
Customer COE Latest and Greatest
3 -
Customer Data Browser app
1 -
Data Analysis Tool
1 -
data migration
1 -
data transfer
1 -
Datasphere
2 -
Event Information
1,400 -
Event Information
66 -
Expert
1 -
Expert Insights
177 -
Expert Insights
297 -
General
1 -
Google cloud
1 -
Google Next'24
1 -
Kafka
1 -
Life at SAP
780 -
Life at SAP
13 -
Migrate your Data App
1 -
MTA
1 -
Network Performance Analysis
1 -
NodeJS
1 -
PDF
1 -
POC
1 -
Product Updates
4,577 -
Product Updates
343 -
Replication Flow
1 -
RisewithSAP
1 -
SAP BTP
1 -
SAP BTP Cloud Foundry
1 -
SAP Cloud ALM
1 -
SAP Cloud Application Programming Model
1 -
SAP Datasphere
2 -
SAP S4HANA Cloud
1 -
SAP S4HANA Migration Cockpit
1 -
Technology Updates
6,873 -
Technology Updates
420 -
Workload Fluctuations
1
Related Content
- Consuming SAP with SAP Build Apps - Mobile Apps for iOS and Android in Technology Blogs by SAP
- Demystifying the Common Super Domain for SAP Mobile Start in Technology Blogs by SAP
- Developing & Deploying the UI5 App to Cloud Foundry and Accessing from App-router End-to-End Steps in Technology Blogs by Members
- Services not visible in BAS S/4 Hana Public Cloud. in Technology Q&A
- Accelerate Business Process Development with SAP Build Process Automation Pre-Built Content in Technology Blogs by SAP
Top kudoed authors
| User | Count |
|---|---|
| 37 | |
| 25 | |
| 17 | |
| 13 | |
| 7 | |
| 7 | |
| 7 | |
| 6 | |
| 6 | |
| 6 |