
- SAP Community
- Products and Technology
- Enterprise Resource Planning
- ERP Blogs by Members
- S/4HANA - HowTo: Activate context-sensitive help f...
Enterprise Resource Planning Blogs by Members
Gain new perspectives and knowledge about enterprise resource planning in blog posts from community members. Share your own comments and ERP insights today!
Turn on suggestions
Auto-suggest helps you quickly narrow down your search results by suggesting possible matches as you type.
Showing results for
michaelblickens
Explorer
Options
- Subscribe to RSS Feed
- Mark as New
- Mark as Read
- Bookmark
- Subscribe
- Printer Friendly Page
- Report Inappropriate Content
03-17-2017
7:58 PM
You may preform these steps either on a Web Dispatcher or any application server using ICM as web dispatcher.
Download the required TLS certificate “Verizon Public SureServer CA G14-SHA2” from the internet.
In any Web Browser open the web dispatcher’s admin page
(
You’ll find the right address in the Web Dispatcher’s profile as parameter
Open PSE Management of “SSL and Trust Configuration”

Change “Manage PSE” to Client pse (normally

Click on “Import Certificate”:

Open the TLS certificate in any text editor, copy all lines
(including
and put it into the textfield:

Click on "import" to store the new certificate into
In the list of available certificates within the SSL Client, you shall now find the newly imported Verizon certificate:

Verify the imported certificate is valid (“Not after” – line).
Open the instance profile of your Web Dispatcher using any text editor and add the following two lines to it:
Add, if not exists, the following line to your profile:
Replace the “*” after
Save your new profile and close it.
If not exists, create a new filter_rules.txt file in your profile directory (or any directory specified within the
Add the following lines to the filter_rules.txt:
You’ll now need to restart your Web Dispatcher. For a standalone Web Dispatcher use sapcontrol, for any application server, use the tool supported (eq. SMICM).
If everything is setup correctly, you should be able to call the following URL using your web browser, where FQDN and Port are specified by your Web Dispatcher:
As a result, you should get a JSON string like:
Respectively calling the SAP Cloud XRay using:
The result will be a JSON string bit longer than the upper one, but starts with:
…
Open the following URL in your web browser:
Where <FQDN>, <Port> and <Client> reflect your SAP NetWeaver Gateway.
Login with a user, that has administrative rights on the SAP NetWeaver Gateway.
At the bottom of the customizing page, you’ll find a big “+”. Click on it to create a new catalog:

Use a name, that you may remember. You’ll need it later to create a role for the plugin:

Click on “Target Mapping” in the middle of the window and then on “Create Target Mapping”:

Use the parameters from the table so that the target mapping looks like the following screenshots:


Note, that the parameter “editor” should be switched to “false” in productive environments.
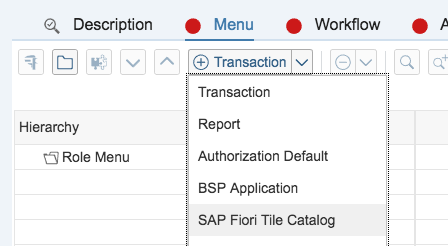
Start your SAP GUI and open transaction

Save your role.
Switch to “Menu” tab and switch “Transaction” to “SAP Fiori Tile Catalog”:
Assign your newly created catalog to the role, including applications:

Add your users to this role and have them check this new functionality.
Prerequisites
Download the required TLS certificate “Verizon Public SureServer CA G14-SHA2” from the internet.
Installation Steps
TLS/SSL Certificate
In any Web Browser open the web dispatcher’s admin page
(
http(s)://<FQDN>:<Port>/sap/wdisp/admin or http(s)://<FQDN>:<Port>/sap/admin)You’ll find the right address in the Web Dispatcher’s profile as parameter
icm/HTTP/admin_0.Open PSE Management of “SSL and Trust Configuration”
Change “Manage PSE” to Client pse (normally
SAPSSLC.pse respectivly "SSL client SSL Client (Standard) in case of an AS ABAP):Click on “Import Certificate”:
Open the TLS certificate in any text editor, copy all lines
(including
-----BEGIN CERTIFICATE----- and -----END CERTIFICATE-----)and put it into the textfield:
Click on "import" to store the new certificate into
SAPSSLC.pse (or the according PSE of your SSL Client (Standard).In the list of available certificates within the SSL Client, you shall now find the newly imported Verizon certificate:
Verify the imported certificate is valid (“Not after” – line).
Profile Preparation
Open the instance profile of your Web Dispatcher using any text editor and add the following two lines to it:
wdisp/system_* = SID=HAC, EXTSRV=https://cp.hana.ondemand.com, SRCURL=/sap/dfa/help/,SRCSRV=*:*,STANDARD_COOKIE_FILTER=OFFwdisp/system_* = SID=HAX, EXTSRV=https://xray.hana.ondemand.com, SRCURL=/resources/sap/dfa/help/,SRCSRV=*:*,STANDARD_COOKIE_FILTER=OFFAdd, if not exists, the following line to your profile:
icm/HTTP/mod_* = PREFIX=/, FILE=$(DIR_DATA)$(DIR_SEP)filter_rules.txtReplace the “*” after
wdisp/system_ and icm/HTTP/mod_ by the next upper unused number.Save your new profile and close it.
Add Redirect Rules
If not exists, create a new filter_rules.txt file in your profile directory (or any directory specified within the
icm/HTTP/mod_* parameter).Add the following lines to the filter_rules.txt:
if %{SID} = CP1

begin

SetHeader HOST cp.hana.ondemand.com

RegRewriteRawUrl ^/sap/dfa/help/(.*) /dps/$1

end
if %{SID} = CP2
begin
SetHeader HOST xray.hana.ondemand.com
RegRewriteRawUrl ^/resources/sap/dfa/help/(.*)/xRayControls/resources/sap/dfa/help/$1
endRestart
You’ll now need to restart your Web Dispatcher. For a standalone Web Dispatcher use sapcontrol, for any application server, use the tool supported (eq. SMICM).
Check Redirect
If everything is setup correctly, you should be able to call the following URL using your web browser, where FQDN and Port are specified by your Web Dispatcher:
http(s)://<FQDN>:<Port>/sap/dfa/help/odata.svc/?$format=jsonAs a result, you should get a JSON string like:
{"d":{"EntitySets":["DeliverableForReplication","TransportHistory","Product","Context","TourIssue","Hotspot","Project","Tile","Deliverable","Transport","ReplicationTourIssue"]}}Respectively calling the SAP Cloud XRay using:
http(s)://<FQDN>:<Port>/resources/sap/dfa/help/sap/cfg/XrayBootstrapHelpConfig.jsonThe result will be a JSON string bit longer than the upper one, but starts with:
{

"description":"This configuration registers the Xray bootstrap plug-in",

"modulePaths":{

"sap.dfa.help":"/resources/sap/dfa/help/~201601071332~"

},
…
Configure Context-sensitive Help Plugin
Open the following URL in your web browser:
http(s)://<FQDN>:<Port>/sap/bc/ui5_ui5/sap/arsrvc_upb_admn/main.html?sap-client=<Client>Where <FQDN>, <Port> and <Client> reflect your SAP NetWeaver Gateway.
Login with a user, that has administrative rights on the SAP NetWeaver Gateway.
At the bottom of the customizing page, you’ll find a big “+”. Click on it to create a new catalog:
Use a name, that you may remember. You’ll need it later to create a role for the plugin:
Click on “Target Mapping” in the middle of the window and then on “Create Target Mapping”:
| Semantic Object | Shell |
| Action | plugin |
| Application Type | SAPUI5 Fiori App |
| Title (optional) | Help4 Plugin - End User View - Relevant for all Users |
| URL | /resources/sap/dfa/help/utils/adapters/fiori/ |
| ID | sap.dfa.help.utils.adapters.fiori |
| Information (optional) | Help4 Plugin - End User View - Relevant for all Users. |
| Device Types | Check all, maybe skip Phone |
| Parameters | product => SAP_S4HANA_ON-PREMISE version => 1511 001 editor => true (for testing & content assignment) false (in productive system) |
Use the parameters from the table so that the target mapping looks like the following screenshots:
Note, that the parameter “editor” should be switched to “false” in productive environments.
Create Role for context-sensitive help
Start your SAP GUI and open transaction
PFCG. Create a new single role and name it according your role concept:Save your role.
Switch to “Menu” tab and switch “Transaction” to “SAP Fiori Tile Catalog”:
Assign your newly created catalog to the role, including applications:
Add your users to this role and have them check this new functionality.
- SAP Managed Tags:
- SAP Fiori for SAP S/4HANA,
- SAP S/4HANA,
- SAP Business Technology Platform
11 Comments
You must be a registered user to add a comment. If you've already registered, sign in. Otherwise, register and sign in.
Labels in this area
-
"mm02"
1 -
A_PurchaseOrderItem additional fields
1 -
ABAP
1 -
ABAP Extensibility
1 -
ACCOSTRATE
1 -
ACDOCP
1 -
Adding your country in SPRO - Project Administration
1 -
Advance Return Management
1 -
AI and RPA in SAP Upgrades
1 -
Approval Workflows
1 -
ARM
1 -
ASN
1 -
Asset Management
1 -
Associations in CDS Views
1 -
auditlog
1 -
Authorization
1 -
Availability date
1 -
Azure Center for SAP Solutions
1 -
AzureSentinel
2 -
Bank
1 -
BAPI_SALESORDER_CREATEFROMDAT2
1 -
BRF+
1 -
BRFPLUS
1 -
Bundled Cloud Services
1 -
business participation
1 -
Business Processes
1 -
CAPM
1 -
Carbon
1 -
Cental Finance
1 -
CFIN
1 -
CFIN Document Splitting
1 -
Cloud ALM
1 -
Cloud Integration
1 -
condition contract management
1 -
Connection - The default connection string cannot be used.
1 -
Custom Table Creation
1 -
Customer Screen in Production Order
1 -
Data Quality Management
1 -
Date required
1 -
Decisions
1 -
desafios4hana
1 -
Developing with SAP Integration Suite
1 -
Direct Outbound Delivery
1 -
DMOVE2S4
1 -
EAM
1 -
EDI
2 -
EDI 850
1 -
EDI 856
1 -
edocument
1 -
EHS Product Structure
1 -
Emergency Access Management
1 -
Energy
1 -
EPC
1 -
Financial Operations
1 -
Find
1 -
FINSSKF
1 -
Fiori
1 -
Flexible Workflow
1 -
Gas
1 -
Gen AI enabled SAP Upgrades
1 -
General
1 -
generate_xlsx_file
1 -
Getting Started
1 -
HomogeneousDMO
1 -
IDOC
2 -
Integration
1 -
learning content
2 -
LogicApps
2 -
low touchproject
1 -
Maintenance
1 -
management
1 -
Material creation
1 -
Material Management
1 -
MD04
1 -
MD61
1 -
methodology
1 -
Microsoft
2 -
MicrosoftSentinel
2 -
Migration
1 -
MRP
1 -
MS Teams
2 -
MT940
1 -
Newcomer
1 -
Notifications
1 -
Oil
1 -
open connectors
1 -
Order Change Log
1 -
ORDERS
2 -
OSS Note 390635
1 -
outbound delivery
1 -
outsourcing
1 -
PCE
1 -
Permit to Work
1 -
PIR Consumption Mode
1 -
PIR's
1 -
PIRs
1 -
PIRs Consumption
1 -
PIRs Reduction
1 -
Plan Independent Requirement
1 -
Premium Plus
1 -
pricing
1 -
Primavera P6
1 -
Process Excellence
1 -
Process Management
1 -
Process Order Change Log
1 -
Process purchase requisitions
1 -
Product Information
1 -
Production Order Change Log
1 -
Purchase requisition
1 -
Purchasing Lead Time
1 -
Redwood for SAP Job execution Setup
1 -
RISE with SAP
1 -
RisewithSAP
1 -
Rizing
1 -
S4 Cost Center Planning
1 -
S4 HANA
1 -
S4HANA
3 -
Sales and Distribution
1 -
Sales Commission
1 -
sales order
1 -
SAP
2 -
SAP Best Practices
1 -
SAP Build
1 -
SAP Build apps
1 -
SAP Cloud ALM
1 -
SAP Data Quality Management
1 -
SAP Maintenance resource scheduling
2 -
SAP Note 390635
1 -
SAP S4HANA
2 -
SAP S4HANA Cloud private edition
1 -
SAP Upgrade Automation
1 -
SAP WCM
1 -
SAP Work Clearance Management
1 -
Schedule Agreement
1 -
SDM
1 -
security
2 -
Settlement Management
1 -
soar
2 -
SSIS
1 -
SU01
1 -
SUM2.0SP17
1 -
SUMDMO
1 -
Teams
2 -
User Administration
1 -
User Participation
1 -
Utilities
1 -
va01
1 -
vendor
1 -
vl01n
1 -
vl02n
1 -
WCM
1 -
X12 850
1 -
xlsx_file_abap
1 -
YTD|MTD|QTD in CDs views using Date Function
1
- « Previous
- Next »
Related Content
- Manage Supply Shortage and Excess Supply with MRP Material Coverage Apps in Enterprise Resource Planning Blogs by SAP
- Business Rule Framework Plus(BRF+) in Enterprise Resource Planning Blogs by Members
- Deep Dive into SAP Build Process Automation with SAP S/4HANA Cloud Public Edition - Retail in Enterprise Resource Planning Blogs by SAP
- Asset Management in SAP S/4HANA Cloud Private Edition | 2023 FPS01 Release in Enterprise Resource Planning Blogs by SAP
- Continuous Influence Session SAP S/4HANA Cloud, private edition: Results Review Cycle for Q4 2023 in Enterprise Resource Planning Blogs by SAP
Top kudoed authors
| User | Count |
|---|---|
| 2 | |
| 2 | |
| 2 | |
| 2 | |
| 2 | |
| 2 | |
| 2 | |
| 2 | |
| 1 | |
| 1 |