
- SAP Community
- Products and Technology
- Technology
- Technology Blogs by SAP
- Using HCP Virtual Machines to use R with SAP HANA ...
Technology Blogs by SAP
Learn how to extend and personalize SAP applications. Follow the SAP technology blog for insights into SAP BTP, ABAP, SAP Analytics Cloud, SAP HANA, and more.
Turn on suggestions
Auto-suggest helps you quickly narrow down your search results by suggesting possible matches as you type.
Showing results for
former_member18
Explorer
Options
- Subscribe to RSS Feed
- Mark as New
- Mark as Read
- Bookmark
- Subscribe
- Printer Friendly Page
- Report Inappropriate Content
01-13-2017
5:13 AM
As mentioned in the first blog, we will look at using R with SAP HANA running on HCP.
Prerequisites
Step 1: Configure communication from SAP HANA to the Virtual machine
Step 2: Configure SAP HANA
Step 3: Use R with SAP HANA
Step 1: Configure communication from SAP HANA to the Virtual machine
By default, outbound communication from the virtual machines to the Internet and other systems is allowed, but inbound communication has to be enabled.
In this exercise we will be enabling communication from SAP HANA system to the virtual machine.
Note: This exercise has to be done through windows command prompt. Switch to your Windows desktop.
Summary: You have enabled communication on the virtual machine by creating security rule, now the HANA system can connect to this VM.
Step 2: Configure SAP HANA
Prerequisites: Depending on your system landscape and your R requirements, you may need to modify some of the SAP HANA database configurations, from the Administration editor in the SAP HANA studio. To enable calling R procedures from the index server, the configuration parameters are under indexserver.inicalcEngine.
Step 3: Use R with SAP HANA
In this part we will test the connection between SAP HANA and Rserve installed on the Virtual Machine.
To create some initial data for our example, we use the dataset ‘spam’ provided by R and upload it to the SAP HANA database.
Note:
- To execute the R procedure successfully you have to install kernlab package and install it.
- You are logged in to VM as ruser
Congratulations! You have successfully used R running on the HCP virtual machine with SAP HANA system running within HCP.
Prerequisites
- You already have a dedicated SAP HANA assigned to your SAP HANA Cloud Platform account.
- You have a user in HANA having the system privilege “CREATE R SCRIPT”.
- You have set up your development environment in Eclipse IDE with SAP HANA Tools.
Step 1: Configure communication from SAP HANA to the Virtual machine
Step 2: Configure SAP HANA
Step 3: Use R with SAP HANA
Step 1: Configure communication from SAP HANA to the Virtual machine
By default, outbound communication from the virtual machines to the Internet and other systems is allowed, but inbound communication has to be enabled.
In this exercise we will be enabling communication from SAP HANA system to the virtual machine.
Note: This exercise has to be done through windows command prompt. Switch to your Windows desktop.
| Step | Screenshot |
|---|---|
| 1. Launch the HCP cockpit and navigate to the account where the HCP VM has been assigned. In the same account, a productive HANA DB should have been assigned. | |
| 2. Click on “Databases & Schemas |  |
| 3. Copy the ID of the HANA DB. | |
4. Create the security rule to specify the ports allowed for inbound communication by executing:neo create-security-rule --account <<account_id>> --host <<>landscpage_host>> --user <<user_id>> --name testvm --source-id hana32 --source-type HANA --from-port 4000 --to-port 4000 Source id: Id of the system from previous step. Source type: HANA, the DB used. This port number is the one used in "Install and Configure Rserve“. |  |
5. Execute the command to list the security rule neo list-security-rules --account <<account_id>> --host <<landscape_host>> --user <<user_id>> --name testvm |  |
Summary: You have enabled communication on the virtual machine by creating security rule, now the HANA system can connect to this VM.
Step 2: Configure SAP HANA
Prerequisites: Depending on your system landscape and your R requirements, you may need to modify some of the SAP HANA database configurations, from the Administration editor in the SAP HANA studio. To enable calling R procedures from the index server, the configuration parameters are under indexserver.inicalcEngine.
| Step | Screenshot |
|---|---|
| 1. Launch the Eclipse IDE. | |
| 2. Click on “Open Perspective" | 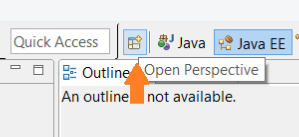 |
| 3. Scroll down and select “SAP HANA Administration Console”. 4. Click “OK” |  |
| 5. On the left pane “Right click” and click on “Add Cloud System” |  |
| 6. Enter the details for the HCP account and click Next. |  |
| 7. Enter the details as:Databases: <<Database ID for your HANA DB>> Database user: HANA DB user Database password: HANA DB password.8. Click “Finish |  |
| 9. You can now see the SAP HANA Cloud system that you have added in the Systems view. |  |
| 10. Right click on HANA System node and then on “Configuration and Monitoring” and then “Open Administration” |  |
| 11. Click on “Configuration” |  |
| 12. Click on indexserver.ini 13. Click on calcengine |   |
| 14. Open the HCP cockpit and click on Virtual Machines (Beta). |  |
| 15. Click on testvm. You will see more details about the VM that you have created. |  |
| 16. Select the IP address. |  |
17. Go to Eclipse. Double click on the IP address. Enter the IP of the virtual machine with the port on which you have created security rules previously.The format should be - IP of the VM: port 18. Click “Save”. |  |
Step 3: Use R with SAP HANA
In this part we will test the connection between SAP HANA and Rserve installed on the Virtual Machine.
To create some initial data for our example, we use the dataset ‘spam’ provided by R and upload it to the SAP HANA database.
Note:
- To execute the R procedure successfully you have to install kernlab package and install it.
- You are logged in to VM as ruser
| Step | Screenshot |
|---|---|
| 1. Execute to download Kernlab package wget https://cran.r-project.org/src/contrib/kernlab_0.9-24.tar.gz |  |
| 2a. Execute R. 2b. Execute install.packages("kernlab_0.9-24.tar.gz", repos = NULL |  |
| 3. Execute: library("kernlab") Note: Successful installation should return no output. |  |
| 4. Execute q(). 5. Press “n” when prompted to save workspace. Press Enter. |  |
| 6. In Eclipse, right click on the HANA system node and select Open SQL Console”. |  |
7. Copy this script and paste on the SQL console and execute it. DROP TABLE "spam"; CREATE COLUMN TABLE "spam"( "make" DOUBLE, "address" DOUBLE, "all" DOUBLE, "num3d" DOUBLE, "our" DOUBLE, "over" DOUBLE, "remove" DOUBLE, "internet" DOUBLE, "order" DOUBLE, "mail" DOUBLE, "receive" DOUBLE, "will" DOUBLE, "people" DOUBLE, "report" DOUBLE, "addresses" DOUBLE, "free" DOUBLE, "business" DOUBLE, "email" DOUBLE, "you" DOUBLE, "credit" DOUBLE, "your" DOUBLE, "font" DOUBLE, "num000" DOUBLE, "money" DOUBLE, "hp" DOUBLE, "hpl" DOUBLE, "george" DOUBLE, "num650" DOUBLE, "lab" DOUBLE, "labs" DOUBLE, "telnet" DOUBLE, "num857" DOUBLE, "data" DOUBLE, "num415" DOUBLE, "num85" DOUBLE, "technology" DOUBLE, "num1999" DOUBLE, "parts" DOUBLE, "pm" DOUBLE, "direct" DOUBLE, "cs" DOUBLE,"meeting" DOUBLE, "original" DOUBLE, "project" DOUBLE, "re" DOUBLE, "edu" DOUBLE, "table" DOUBLE, "conference" DOUBLE, "charSemicolon" DOUBLE, "charRoundbracket" DOUBLE, "charSquarebracket" DOUBLE, "charExclamation" DOUBLE, "charDollar" DOUBLE, "charHash" DOUBLE, "capitalAve" DOUBLE, "capitalLong" DOUBLE, "capitalTotal" DOUBLE, "type" VARCHAR(5000), "group" INTEGER); DROP PROCEDURE LOAD_SPAMDATA; CREATE PROCEDURE LOAD_SPAMDATA(OUT spam "spam") LANGUAGE RLANG AS BEGIN ##--if the kernlab package is missing see Requirements library(kernlab) data(spam) ind <- sample(1:dim(spam)[1],2500) group <- as.integer(c(1:dim(spam)[1]) %in% ind) spam <- cbind(spam, group) END; DROP TABLE "spamTraining"; DROP TABLE "spamEval"; CREATE COLUMN TABLE "spamTraining" like "spam"; CREATE COLUMN TABLE "spamEval" like "spam"; DROP PROCEDURE DIVIDE_SPAMDATA; CREATE PROCEDURE DIVIDE_SPAMDATA() AS BEGIN CALL LOAD_SPAMDATA(spam); Insert into "spamTraining" select * from :spam where "group"=1; Insert into "spamEval" select * from :spam where "group"=0; END; CALL DIVIDE_SPAMDATA(); Alter Table "spamTraining" DROP ("group"); Alter Table "spamEval" DROP ("group"); |  |
| 8. After executing the R procedure, your SAP HANA database instance should contain the following two new tables: spamTraining and spamEval. The log from Rserve call should be: |
Congratulations! You have successfully used R running on the HCP virtual machine with SAP HANA system running within HCP.
- SAP Managed Tags:
- SAP Business Technology Platform
You must be a registered user to add a comment. If you've already registered, sign in. Otherwise, register and sign in.
Labels in this area
-
ABAP CDS Views - CDC (Change Data Capture)
2 -
AI
1 -
Analyze Workload Data
1 -
BTP
1 -
Business and IT Integration
2 -
Business application stu
1 -
Business Technology Platform
1 -
Business Trends
1,658 -
Business Trends
91 -
CAP
1 -
cf
1 -
Cloud Foundry
1 -
Confluent
1 -
Customer COE Basics and Fundamentals
1 -
Customer COE Latest and Greatest
3 -
Customer Data Browser app
1 -
Data Analysis Tool
1 -
data migration
1 -
data transfer
1 -
Datasphere
2 -
Event Information
1,400 -
Event Information
66 -
Expert
1 -
Expert Insights
177 -
Expert Insights
293 -
General
1 -
Google cloud
1 -
Google Next'24
1 -
Kafka
1 -
Life at SAP
780 -
Life at SAP
12 -
Migrate your Data App
1 -
MTA
1 -
Network Performance Analysis
1 -
NodeJS
1 -
PDF
1 -
POC
1 -
Product Updates
4,577 -
Product Updates
340 -
Replication Flow
1 -
RisewithSAP
1 -
SAP BTP
1 -
SAP BTP Cloud Foundry
1 -
SAP Cloud ALM
1 -
SAP Cloud Application Programming Model
1 -
SAP Datasphere
2 -
SAP S4HANA Cloud
1 -
SAP S4HANA Migration Cockpit
1 -
Technology Updates
6,873 -
Technology Updates
416 -
Workload Fluctuations
1
Related Content
- Top Picks: Innovations Highlights from SAP Business Technology Platform (Q1/2024) in Technology Blogs by SAP
- explore the business continuity recovery sap solutions on AWS DRS in Technology Blogs by Members
- Part 2:- SAP Basis OS support on SUSE Linux for beginners in Technology Blogs by Members
- Taking Data Federation to the Next Level: Accessing Remote ABAP CDS View Entities in SAP HANA Cloud in Technology Blogs by SAP
- The What Is... The Why To... The How To... of: ESG & SAP & Enterprise Blockchain 🚀 in Technology Blogs by Members
Top kudoed authors
| User | Count |
|---|---|
| 31 | |
| 24 | |
| 8 | |
| 7 | |
| 7 | |
| 6 | |
| 6 | |
| 5 | |
| 5 | |
| 4 |