
- SAP Community
- Products and Technology
- Human Capital Management
- HCM Blogs by Members
- Syncing your Onboarding Corporate Structure & Inte...
Human Capital Management Blogs by Members
Gain valuable knowledge and tips on SAP SuccessFactors and human capital management from member blog posts. Share your HCM insights with a post of your own.
Turn on suggestions
Auto-suggest helps you quickly narrow down your search results by suggesting possible matches as you type.
Showing results for
kaylatoelle
Active Participant
Options
- Subscribe to RSS Feed
- Mark as New
- Mark as Read
- Bookmark
- Subscribe
- Printer Friendly Page
- Report Inappropriate Content
12-29-2016
7:40 PM
Today, Position Management integrates to Recruiting Management through Requisitions however only field values captured on the Requisition can be mapped to Onboarding. Wouldn't it be nice if all we needed to map from REC to ONB was the Position ID and all other field values would default? This includes values on the requisition and values not on the requisition but on the Position MDF. Like in my previous blogs, Syncing your Onboarding Corporate Structure & Syncing your Onboarding Corporate Structure Relationships, using the integration center makes this is possible.
For example, you send Name, Position ID, and Email from Recruiting. Based on the Position ID, the position attributes are auto populated.
 The below example will walk you through the steps for syncing positions and position attributes to Onboarding.
Adding a New Corporate Structure Level and Level Properties
1. Go to Admin Center > Employee Files > Manage Position. Take note of all of the fields you want to sync. 2. In ONB Super Admin, go to Corporate Structure and click Add Level under Tasks.
Add a level for Position 3. Once the new level is created, click Level Properties under the See Also menu header on the left side.
4. Add a new property for each of the Position fields you want to sync.
**Make sure to check the checkbox next to Map to Key and enter a key. If you receive a message saying the key doesn’t exist in onboarding and asking if you want to continue and create the key, click OK. **
Creating the Integration Center Reports
1. Go to Admin Tools > Company Settings > Integration Center and select click My Integrations
2. Click the Create button and then select Scheduled Flat File Output Integration
3. Search for “Position” and select Position
4. Select Position Code (code) and Position Title (externalName_defaultValue) 6. Uncheck Start Date
7. Select all of the position fields you are syncing to Onboarding
8. Click Select
9. Enter Integration Details
Integration Name: Onboarding Position Export
Output File Type: csv
Header Type: Simple

10. Click Next

11. Click Position Code and change the label to ClientID
12. Click Position Title and change the label to Name
13. Click Position Code and select Insert Field > Insert Fixed Value Field (You can create a calculated field to calculate count but for demo purposes, we will use a fixed value field)
Modify the Import Files
Location Import File
**Like in my previous 2 blogs, I am using the location import file to sync all levels of my corporate structure. It is very important that all of the field names match exactly or the sync will fail.**
1. In Super Admin, Go to Integration > Import/Export Settings
2. Under the Integration section, export the ImportLocation file.
3. Save a backup of the file
4. Update the xslt file to the following code and make sure to use the onboarding keys for the field names.
**The code below includes syncing Location and Position. You can add or remove levels from the ‘Otherwise’ section depending on how many levels you’re syncing. **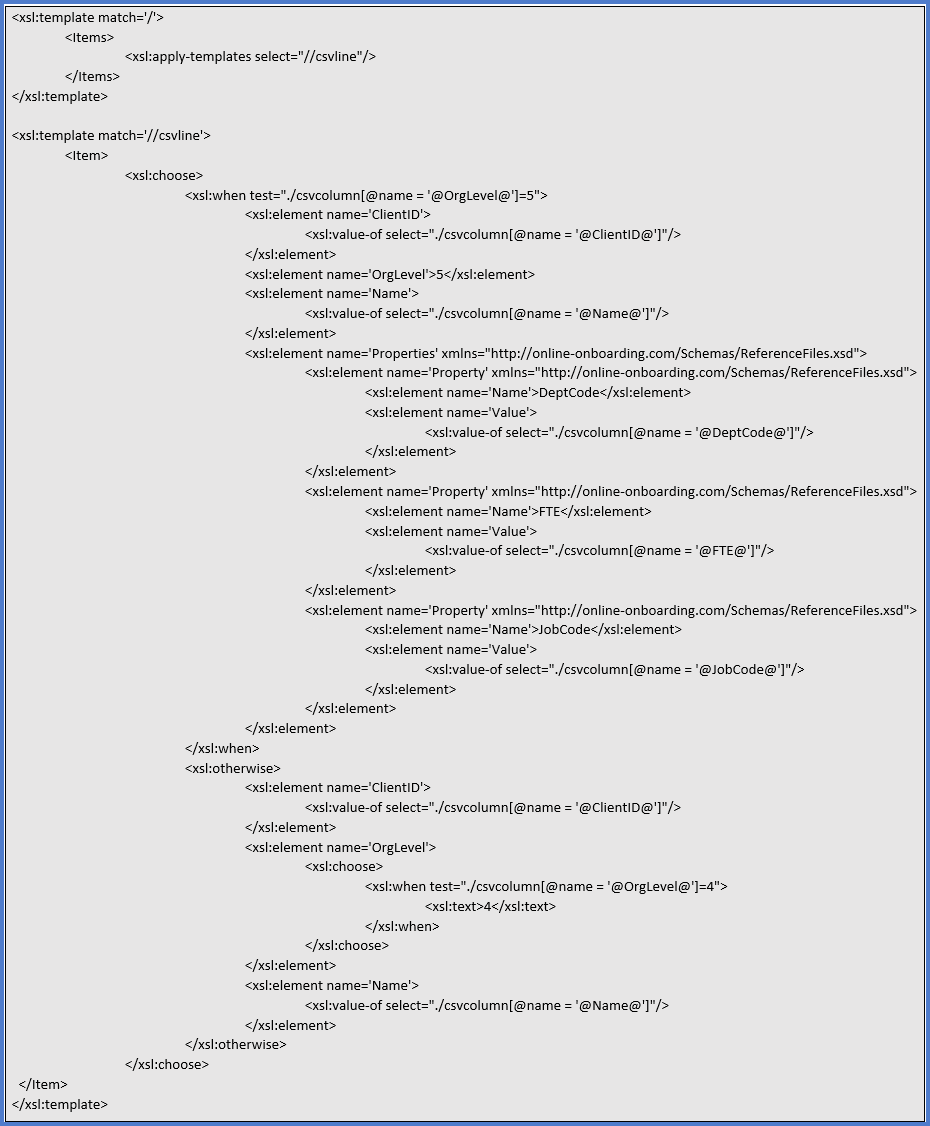 5. Save as a new file
6. Return to Import/Export Settings in Super Admin and import the new location import file
Foundation Import File
1. In Super Admin, Go to Integration > Import/Export Settings
2. Under the Integration section, export the FoundationImport file.
3. Save a backup of the file
4. Update the location fields and add the section for position.
**Make sure to use the Onboarding keys for the field names. **
5. Save as a new file
6. Return to Import/Export Settings in Super Admin and import the new foundation import file
Foundation Import Field Mapping File
1. In Super Admin, Go to Integration > Import/Export Settings
2. Under the Integration section, export the FoundationImportFieldMapping file.
3. Save a backup of the file
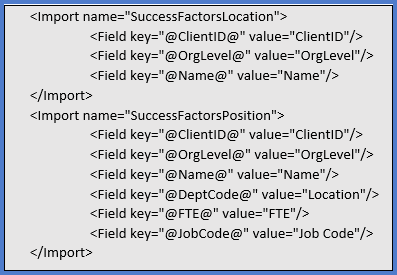
4. Modify the fields under Location and add the Position section (The key is the Onboarding key and the value is the header from the sync file)
5. Save as a new file
6. Return to Import/Export Settings in Super Admin and import the new foundation import field mapping file
Run the Integration Center Reports
1. In Provisioning, go to Manage Scheduled Jobs
2. Find your Position Sync Report and select Run Now from the Actions drop down
Check Import Status in Onboarding Audit Report
1. Once your report has been picked up from the ftp site, the file should no longer be listed in the inbound folder.
2. Other than checking your corporate structure, you can determine the status of the import by going to Onboarding > Settings > Audit Report
3. Select the blank option from the Type dropdown, enter INTEGRATION in the Event Code textbox and click filter
4. Find the import file and see if it is complete

Once your report runs successfully and is processed by Onboarding, your corporate structure will be available in Onboarding.

By syncing position to Onboarding, it reduces the number of fields you have to sync from recruiting, the number of fields you have to update manually, and the time spent on manually maintaining your corporate structure.
For example, you send Name, Position ID, and Email from Recruiting.
Based on the Position ID, the position attributes are auto populated.The below example will walk you through the steps for syncing positions and position attributes to Onboarding.Adding a New Corporate Structure Level and Level Properties
1. Go to Admin Center > Employee Files > Manage Position. Take note of all of the fields you want to sync.
2. In ONB Super Admin, go to Corporate Structure and click Add Level under Tasks.Add a level for Position
3. Once the new level is created, click Level Properties under the See Also menu header on the left side.4. Add a new property for each of the Position fields you want to sync.
**Make sure to check the checkbox next to Map to Key and enter a key. If you receive a message saying the key doesn’t exist in onboarding and asking if you want to continue and create the key, click OK. **
Creating the Integration Center Reports
1. Go to Admin Tools > Company Settings > Integration Center and select click My Integrations
2. Click the Create button and then select Scheduled Flat File Output Integration
3. Search for “Position” and select Position
4. Select Position Code (code) and Position Title (externalName_defaultValue)
6. Uncheck Start Date7. Select all of the position fields you are syncing to Onboarding
8. Click Select
9. Enter Integration Details
Integration Name: Onboarding Position Export
Output File Type: csv
Header Type: Simple
10. Click Next
11. Click Position Code and change the label to ClientID
12. Click Position Title and change the label to Name
13. Click Position Code and select Insert Field > Insert Fixed Value Field (You can create a calculated field to calculate count but for demo purposes, we will use a fixed value field)
Label: Count(User Sys ID)
Default Value: 5

14. Click OK

15. Repeat steps to create OrgLevel
Default Value: 5
14. Click OK
15. Repeat steps to create OrgLevel
Label: OrgLevel
Default Value: Your Position Level in Onboarding (In this demo, it’s 5)
16. Click OK

Your report should now look like this: 17. Click Next
18. Expand the Advanced Filters section and click Browse
19. Search and select ‘Status (effectiveStatus) in Position’
20. Click Change Association to “Status”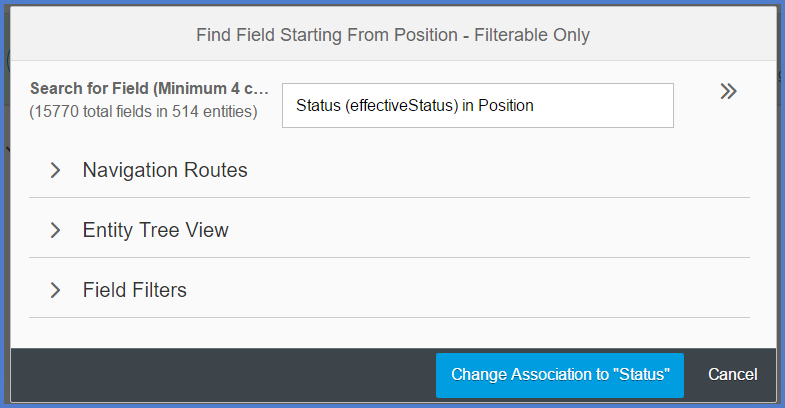
21. Enter A in the Value field to only include Active Positions
22. Click Next
23. Enter Destination Settings
16. Click OK
Your report should now look like this:
17. Click Next18. Expand the Advanced Filters section and click Browse
19. Search and select ‘Status (effectiveStatus) in Position’
20. Click Change Association to “Status”
21. Enter A in the Value field to only include Active Positions
22. Click Next
23. Enter Destination Settings
Enter SFTP Server Host Address, username, and password
File Name Prefix: <case sensitive Company ID>_Position_Sync
Date Suffix Format: yyyyMMdd
File Extension: csv
File Folder: /ONB/Inbound 24. Click Save
File Folder: /ONB/Inbound
24. Click SaveModify the Import Files
Location Import File
**Like in my previous 2 blogs, I am using the location import file to sync all levels of my corporate structure. It is very important that all of the field names match exactly or the sync will fail.**
1. In Super Admin, Go to Integration > Import/Export Settings
2. Under the Integration section, export the ImportLocation file.
3. Save a backup of the file
4. Update the xslt file to the following code and make sure to use the onboarding keys for the field names.
**The code below includes syncing Location and Position. You can add or remove levels from the ‘Otherwise’ section depending on how many levels you’re syncing. **
5. Save as a new file6. Return to Import/Export Settings in Super Admin and import the new location import file
Foundation Import File
1. In Super Admin, Go to Integration > Import/Export Settings
2. Under the Integration section, export the FoundationImport file.
3. Save a backup of the file
4. Update the location fields and add the section for position.
**Make sure to use the Onboarding keys for the field names. **
5. Save as a new file
6. Return to Import/Export Settings in Super Admin and import the new foundation import file
Foundation Import Field Mapping File
1. In Super Admin, Go to Integration > Import/Export Settings
2. Under the Integration section, export the FoundationImportFieldMapping file.
3. Save a backup of the file
4. Modify the fields under Location and add the Position section (The key is the Onboarding key and the value is the header from the sync file)
5. Save as a new file
6. Return to Import/Export Settings in Super Admin and import the new foundation import field mapping file
Run the Integration Center Reports
1. In Provisioning, go to Manage Scheduled Jobs
2. Find your Position Sync Report and select Run Now from the Actions drop down
Check Import Status in Onboarding Audit Report
1. Once your report has been picked up from the ftp site, the file should no longer be listed in the inbound folder.
2. Other than checking your corporate structure, you can determine the status of the import by going to Onboarding > Settings > Audit Report
3. Select the blank option from the Type dropdown, enter INTEGRATION in the Event Code textbox and click filter
4. Find the import file and see if it is complete
Once your report runs successfully and is processed by Onboarding, your corporate structure will be available in Onboarding.
By syncing position to Onboarding, it reduces the number of fields you have to sync from recruiting, the number of fields you have to update manually, and the time spent on manually maintaining your corporate structure.
- SAP Managed Tags:
- SAP SuccessFactors Onboarding
6 Comments
You must be a registered user to add a comment. If you've already registered, sign in. Otherwise, register and sign in.
Labels in this area
-
1H 2024 Product Release
5 -
2H 2023 Product Release
1 -
ACCRUAL TRANSFER
1 -
Advanced Workflow
1 -
Anonymization
1 -
BTP
1 -
Business Rules
1 -
Canvas Report
1 -
Career Development
1 -
Certificate-Based Authentication
1 -
Cloud Platform Integration
1 -
Compensation
1 -
Compensation Information Management
1 -
Compensation Management
1 -
Compliance
2 -
Content
1 -
Conversational AI
2 -
Custom Data Collection
1 -
custom portlet
1 -
Data & Analytics
1 -
Data Integration
1 -
Dayforce
1 -
deep link
1 -
deeplink
1 -
Delimiting Pay Components
1 -
Deprecation
1 -
Employee Central
1 -
Employee Central Global Benefits
1 -
Employee Central Payroll
1 -
employee profile
1 -
Employee Rehires
1 -
external terminal
1 -
external time events
1 -
Generative AI
2 -
Getting Started
1 -
Global Benefits
1 -
Guidelines
1 -
H2 2023
1 -
HR
2 -
HR Data Management
1 -
HR Transformation
1 -
ilx
1 -
Incentive Management Setup (Configuration)
1 -
Integration Center
2 -
Integration Suite
1 -
internal mobility
1 -
Introduction
1 -
learning
3 -
LMS
2 -
LXP
1 -
Massively MDF attachments download
1 -
Mentoring
1 -
Metadata Framework
1 -
Middleware Solutions
1 -
OCN
1 -
OData APIs
1 -
ONB USA Compliance
1 -
Onboarding
2 -
Opportunity Marketplace
1 -
Pay Component Management
1 -
Platform
1 -
portlet
1 -
POSTMAN
1 -
Predictive AI
2 -
Recruiting
1 -
recurring payments
1 -
Role Based Permissions (RBP)
2 -
SAP CPI (Cloud Platform Integration)
1 -
SAP HCM (Human Capital Management)
2 -
SAP HR Solutions
2 -
SAP Integrations
1 -
SAP release
1 -
SAP successfactors
5 -
SAP SuccessFactors Customer Community
1 -
SAP SuccessFactors OData API
1 -
SAP Workzone
1 -
SAP-PAYROLL
1 -
skills
1 -
Skills Management
1 -
sso deeplink
1 -
Stories in People Analytics
3 -
Story Report
1 -
SuccessFactors
2 -
SuccessFactors Employee central home page customization.
1 -
successfactors onboarding i9
1 -
Table Report
1 -
talent
1 -
Talent Intelligence Hub
2 -
talents
1 -
Tax
1 -
Tax Integration
1 -
Time Accounts
1 -
Workflows
1 -
XML Rules
1
Related Content
- First Half 2024 Release: What’s New in SAP SuccessFactors HCM in Human Capital Management Blogs by SAP
- The 1H 2024 Release of SAP SuccessFactors Learning – Release Highlights in Human Capital Management Blogs by Members
- Automatic Hire in Human Capital Management Blogs by SAP
- onboarding 2.0 without recruiting management in Human Capital Management Q&A
- Restrict list of legal entities a manager can choose from when adding a new recruit to onboarding in Human Capital Management Q&A
Top kudoed authors
| User | Count |
|---|---|
| 10 | |
| 5 | |
| 4 | |
| 4 | |
| 4 | |
| 2 | |
| 1 | |
| 1 | |
| 1 | |
| 1 |