
- SAP Community
- Products and Technology
- CRM and Customer Experience
- CRM and CX Blogs by Members
- Steps to create Custom fields in C4C and extend it...
CRM and CX Blogs by Members
Find insights on SAP customer relationship management and customer experience products in blog posts from community members. Post your own perspective today!
Turn on suggestions
Auto-suggest helps you quickly narrow down your search results by suggesting possible matches as you type.
Showing results for
Former Member
Options
- Subscribe to RSS Feed
- Mark as New
- Mark as Read
- Bookmark
- Subscribe
- Printer Friendly Page
- Report Inappropriate Content
12-26-2016
1:00 PM
In this case we are going to add two Reason code field ReasonCodeWR and ReasonCodeFD to line item in ticket document in cloud for customer, once the field is created we will extend the fields so that it can be received at integrated system ECC via HCI system.
So we will be dividing complete development into 3 parts:
A. C4C System


B. Integration System (in our case ECC)

 b. When you click OK either it might create an extension so we need to add our custom fields to that extension or it might give an error “Action is not possible on Idoctype”. Means the basic type cannot be extended.
 c. If you came across the error in step b. then go to WE31 create a segment with custom fields. We have added Item Number to differentiate the custom fields in case of multiple items.

d. Now we need create a copy of standard basic type. And add the above created segment to it.


C. HCI integration


NOTE: Adding only piece of code instead of changing complete wsdl will retain the mapping of fields.


Happy Learning
regards
Gagan Gupta
So we will be dividing complete development into 3 parts:
A. C4C System
- Login to your respective tenant with User ID and Password.
- Now traverse to the screen where you want to add Custom Fields. Go to Adapt and then click on Edit Master Layout.
- Go to the screen where you want to add Custom fields. Click on any field and then click on Add field button. Then Click on New Field button.
- Add the field Details. Click on Save and Close.
- Again go to custom fields. Go to property of field and then to Field Definition.
- Now go to SERVICES tab, Edit and select the check box for object in which you want to extend the Custom fields. We want to extend it to follow up Documents. Then Save.
- Now Go to Adapt and click on End Layout Changes. Go to Adapt again and open a tenant in Silverlight mode by clicking on Launch in Microsoft Silverlight.
- Go to Application and User Management work center and then to Communication Arrangements. Since we need to generate WSDL of our service, we need to find for our communication scenario. Click on it. We will be selecting Ticket Follow Up Document.
- Go to Outbound Communication and select the Service and Click on Download WSDL button. The generated WSDL will be used in HCI to map the custom fields.
B. Integration System (in our case ECC)
- Login to your integration System in our case it’s going to be ECC system.
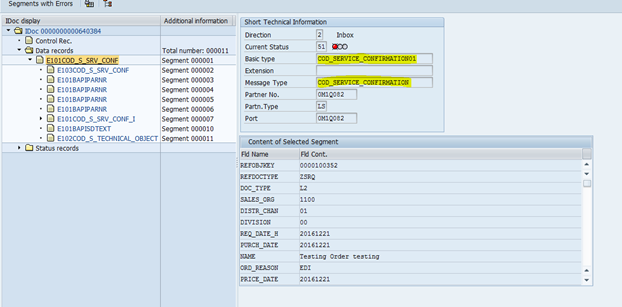
- Check the standard process working as per C4C integration. In WE02 find the standard Idoc which is received when document is processed in C4C.For Ticket Document the IDoc received is COD_SERVICE_CONFIRMATION01.
- Now we need to add our custom fields to above IDoc. a . So now we need to try extend the Idoc Goto WE30, click on EXTENSION radio button and then click create. Enter the basic type and give a description.
b. When you click OK either it might create an extension so we need to add our custom fields to that extension or it might give an error “Action is not possible on Idoctype”. Means the basic type cannot be extended. c. If you came across the error in step b. then go to WE31 create a segment with custom fields. We have added Item Number to differentiate the custom fields in case of multiple items.d. Now we need create a copy of standard basic type. And add the above created segment to it.
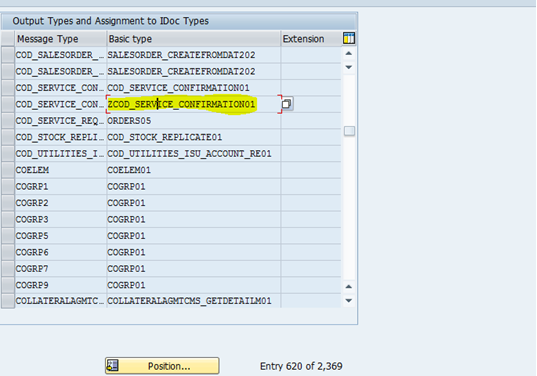
- Maintain the basic type against the message type for complete inbound process. You can create Z message type as well and maintain that message type in partner profile.
- Now for last step we need to generate WSDL file for our Z idoc or extended Idoc. Go to SE38 and execute program ‘SRT_IDOC_WSDL_NS’. Enter the message type and basic type and execute the program to generate the WSDL file.
C. HCI integration
- Open Eclipse, Go to File and Import the standard object.
- In pop-up, go to SAP HANA Cloud Integration and then to Integration Content Archive.
- In open pop-up, Select From location as Tenant Management Node and tenant ID as C4C tenant ID. And select integration content as “Create Ticket Follow Up Document in SAP Business Suit”.
- Enter the project Name.
- A project would be added in Package Explore.
- Select the WSDL COD_SERVICE_CONFIRMATION and go to source code. Open the WSDL which was generated by IDoc in ECC. Pick only the piece of code for custom segment. And add that code to WSDL COD_SERVICE_CONFIRMATION.COD_SERVICE_CONFIRMATION01. Change the basic type in WSDL from standard one to extended/custom basic type.
NOTE: Adding only piece of code instead of changing complete wsdl will retain the mapping of fields.
- Now in a same way, go to second WSDL ServiceRequestFollowUpDocumentReplicationRequest and open the WSDL generated from C4C system. Pick the piece of code for custom fields and add that piece of code to this WSDL at same location.
- Go to Mapping COD_ERP_ServiceRequestConfirmationProcessingRequest.mmap and update the WSDL by replace button.
- Once WSDL is updated, go to design tab and check the mapping. Changing complete WSDL will lead to no mapping. So to avoid that we only added the custom fields to both the WSDL’s. All the standard mapping would be maintained except our custom fields.
- Maintain the mapping for custom field by dragging and dropping the fields. Map segment as Constant 1.
- In mapping go to EDI_DC40 segment and change the constant value for field IDOCTYP and MESTYP to the basic type created in ECC (ZCOD_SERVICE_CONFIRMATION01) and message type if created in ECC.
- Go to Design tab of WSDL’s and check the properties are maintained for each and every connection.
- Deploy the solution. The Custom fields now flow from C4C to integrated system and the fields can be used in integrated system for validation or as a value for any field.
Happy Learning
regards
Gagan Gupta
- SAP Managed Tags:
- SAP Cloud for Customer add-ins,
- SAP Cloud for Customer integration with SAP ERP
5 Comments
You must be a registered user to add a comment. If you've already registered, sign in. Otherwise, register and sign in.
Labels in this area
-
ABAP
1 -
API Rules
1 -
c4c
1 -
CRM
1 -
Custom Key Metrics
1 -
Customer Data
1 -
Determination
1 -
Determinations
1 -
Introduction
1 -
KYMA
1 -
Kyma Functions
1 -
open SAP
1 -
Sales and Service Cloud Version 2
1 -
Sales Cloud
1 -
Sales Cloud v2
1 -
SAP
1 -
SAP Community
1 -
SAP CPQ
1 -
SAP CRM Web UI
1 -
SAP Customer Data Cloud
1 -
SAP Customer Experience
1 -
SAP Integration Suite
1 -
SAP Sales Cloud v2
1 -
SAP Service Cloud v2
1 -
SAP Service Cloud Version 2
1 -
Service Cloud v2
1 -
Validation
1 -
Validations
1
Related Content
- How to Extend Order Integration from SAP Order Management Foundation to SAP S/4HANA in CRM and CX Blogs by SAP
- Innovate Faster: The Power Duo of SAP Activate and Scaled Agile Framework (SAFe) in CRM and CX Blogs by SAP
- SAP Commerce Cloud Q4 ‘23 Release Highlights in CRM and CX Blogs by SAP
- SAP Commerce Cloud Updates in 2023: A Not-So-Brief Summary for Technical Users in CRM and CX Blogs by SAP
- Bridging Web2 and Web3 with I&CX: Harnessing the Power of SAP NFT Management in CRM and CX Blogs by SAP
Top kudoed authors
| User | Count |
|---|---|
| 1 | |
| 1 | |
| 1 | |
| 1 | |
| 1 |