
- SAP Community
- Products and Technology
- Technology
- Technology Blogs by SAP
- How to mobilize your HTML5/SAPUI5 app with Fiori M...
Technology Blogs by SAP
Learn how to extend and personalize SAP applications. Follow the SAP technology blog for insights into SAP BTP, ABAP, SAP Analytics Cloud, SAP HANA, and more.
Turn on suggestions
Auto-suggest helps you quickly narrow down your search results by suggesting possible matches as you type.
Showing results for
Advisor
Options
- Subscribe to RSS Feed
- Mark as New
- Mark as Read
- Bookmark
- Subscribe
- Printer Friendly Page
- Report Inappropriate Content
12-08-2016
9:31 PM
Who develops HTML5 apps for SAP HANA Cloud Platform (HCP) using SAPUI5 and SAP Web IDE and wishes to mobilize it with SAP HANA Cloud Platform, mobile service for development and operations, in general, uses SAP Web IDE, hybrid app toolkit add-on (HAT) to package and create the hybrid mobile app.
Using HAT can be painful, not because it is hard to use, but because there are too many software dependencies (that should be installed locally in your machine), which can change depending on new HAT, SAP Web IDE, Cordova, SAPUI5 or SMP SDK releases. For example, one working app can just stop to work because of that when you try to make some changes and repackage it.
Now, with SAP HANA Cloud Platform mobile service for SAP Fiori and SAP Web IDE, it is possible to package and create the hybrid mobile app on the cloud and then download it directly to your mobile device with the help of an QR code reader app. It saves you a lot of time preparing the environment and avoid that new releases of dependency softwares break the new versions of your app you want to package.
Below you will be guided on how to create a simple SAPUI5 app using SAP Web IDE and how to mobilize it using SAP HANA Cloud Platform mobile service for SAP Fiori (Fiori Mobile).
The first 7 steps are configuration ones that you just need to do one time. Once the they are done, your HCP trial account is ready for next times. So, be patient. You will get there.
Warning: Today cloud build service is not part of Fiori Demo Cloud. But ultimately, Fiori mobile is part of the HCP developer edition and is licensed via Fiori Cloud premium. This blog article can be followed with an HCP trial account.
1. Enable Fiori Mobile and Portal Service services
Some services are not activated by default on the SAP HANA Cloud Platform. You must first enable them prior to use.
First of all, go to https://account.hanatrial.ondemand.com/ and log on. If you are not registered yet, register yourself clicking on Register. The trial account is free and will not be deleted after a certain period of time.
Then go to Services, search mobile in the search input field. Scroll down, find the Fiori Mobile service in the Mobile Services area, then click on it.
Click the enable button if the service is not yet enabled. Wait for the enablement process to be done.
Back to Services, search portal in the search input field, then click on Portal Service.
Click the enable button if the service is not yet enabled. Wait for the enablement process to be done.
2. Assign your user to necessary roles
To call the HCP mobile service for development and operations' REST API that triggers the sending of a push notification, your user must be assigned to the Notification User role. Let us do it for the case you want to add push notifications to your app in the future. Also, to use Fiori Mobile to package your app with Cordova and Kapsel, you need to assign you user to some other roles in different services. Some of them should already be assigned, but this section is intended to you to make sure they really are.
On Services again, click on Development & Operations under Mobile. From where you left off in the previous section, click the Configure Development & Operations link.
On the left hand menu area, select Roles.
Select the Notification User role.
Click on Assign button.
Enter your HCP User ID and click on Assign.
Your user is now assigned and you will be able to call the REST API for push notifications.
Select the Administrator role.
Click on Assign button.
Enter your HCP User ID and click on Assign.
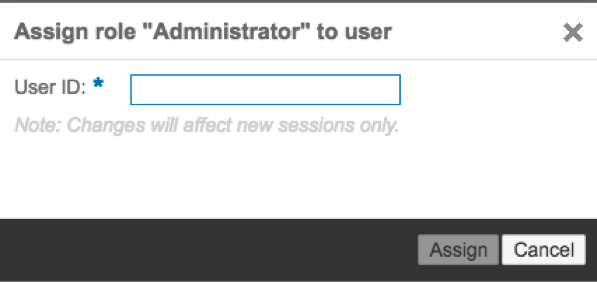
Your user is now assigned.
Now we are going to assign our HCP user to some roles of different HCP services. These are pre-requirements that we need to to follow to use Fiori Mobile as our packager. For more information, please access this: Fiori Mobile Prerequisites.
Go back to Services and click on Fiori Mobile.
Click on Configure Fiori Mobile.

Click on Roles and select the Account Admin role (scrow down to find it).
Click on Assign button.

Enter your HCP User ID and click on Assign.
Your user is now assigned.
Still at Roles, select the App Catalog Admin role.
Click on Assign button.
Enter your HCP User ID and click on Assign.
Your user is now assigned.
Still at Roles, select the App Catalog Publisher role.
Click on Assign button.

Enter your HCP User ID and click on Assign.
Your user is now assigned.
Still at Roles, select the Mobile Place User role.
Click on Assign button.

Enter your HCP User ID and click on Assign.

Your user is now assigned.

Click on Fiori Mobile in the up part of the page and then on Configure Mobile Packager.
Select Administrator and press Assign.

Enter your HCP User ID and click on Assign.
Go back to Services and click on Portal Service.

Click on Configure Portal Service.

Click on Roles and then select the TENANT_ADMIN role.
Click on Assign button.

Enter your HCP User ID and click on Assign.
Your user is now assigned.

3. Create Launchpad site on Portal Service
Fiori Mobile requires that the app be registered to Fiori Launchpad before being packaged. So, let us create a Fiori Launchpad site and make it default.
Go to Services and click on Portal Service.
Click on Go to Service.
Click on + sign.

Enter the Site Name: My Fiori Launchpad, select SAP Fiori Launchpad and click on Create.
A new tab with the Fiori Configuration Cockpit will open. Go back to the Site Directory tab.
Click on the arrow and select Publish.
In the confirmation window, click on Publish.
A confirmation message will appear:

Click on the Arrow and click on Set as Default.
Your Fiori LaunchPad site should have the default check:
4. Create a destination on HCP to access your OData service
When you create an SAPUI5 app that consumes an OData service using Web IDE, you need to create a destination on HCP to access this service. For this example, we will use the Suppliers and Products entity sets from a public OData service called Northwind.
On HCP cockpit, under the hamburger menu at left, click on Connectivity -> Destinations. Then click on New Destination.

Fill the destination configuration and additional properties as the following:
Name: Northwind
Type: HTTP
Description: Northwind OData Service
URL: http://services.odata.org
Proxy Type: NoAuthentication
Authentication: Internet
Additional Properties:
WebIDEEnabled / true
WebIDESystem / Northwind_Data
WebIDEUsage / odata_gen
Then click on Save button and on Check Connection. You should see a successful message.
5. Create a certificate for Mobile Secure
You will need to create a certificate that Fiori Mobile will use to publish your package for download.
Locate your keytool executable file inside the bin folder of you JAVA installation directory. For example, inside C:\Program Files\Java\jdk1.8.0_101\bin.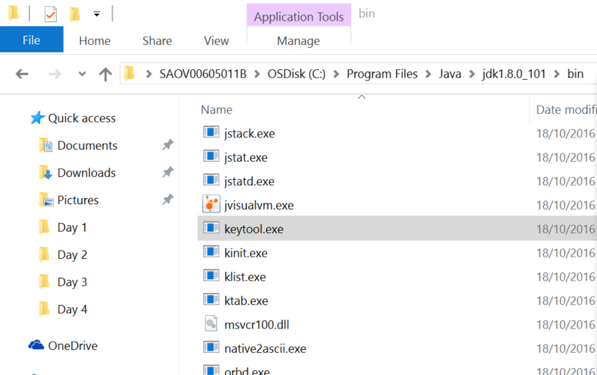
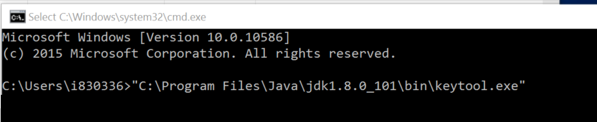
Open a cmd window and drag and drop the keytool executable file to the cmd window. A similar path should appear in your cmd window. You can do the same procedure in a Mac using the keytool command in a terminal if your path is correctly set.
Copy and paste the following parameters to generate the certificate and hit Enter.
To generate the signing key, you will need to answer some questions.
You should have a .jks file in the folder where you have executed the keytool command. You will need it soon.
6. Enable HAT plugin
Still on HCP cockpit, under the hamburger menu at left, click on Services, look for SAP Web IDE and click on SAP Web IDE. If it is not enabled, enable it. Then click on Open SAP Web IDE.
On Web IDE, go into Tools -> Preferences. Click on Plugins and enable Hybrid Application Toolkit. Click on Save.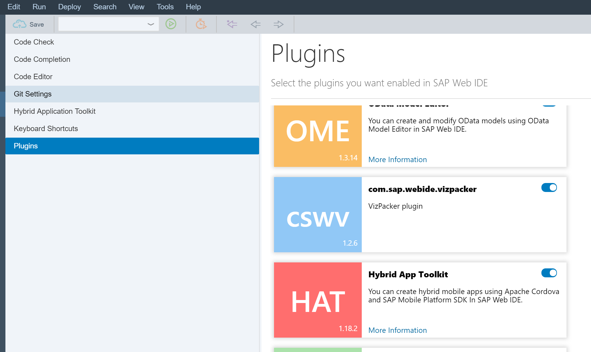
7. Create your SAPUI5 app
Let us finally create our app.
Still on Web IDE, select menu File -> New -> Project from Template.
Select SAP Fiori Master-Detail Application and click on Next.
Fill the Project Name field as FioriMobileEx and click on Next.
Warning: Enable as Mobile App was removed, because it is not necessary anymore.

On the Sources box at the left, click on Service URL. Click on the arrow of the system checkbox and select Northwind OData Service. Fill the next edit field with the following relative URL of the service: /v2/northwind/northwind.svc/. Then click on Test button to check if the OData service is correctly configured and working. Finally click on Next.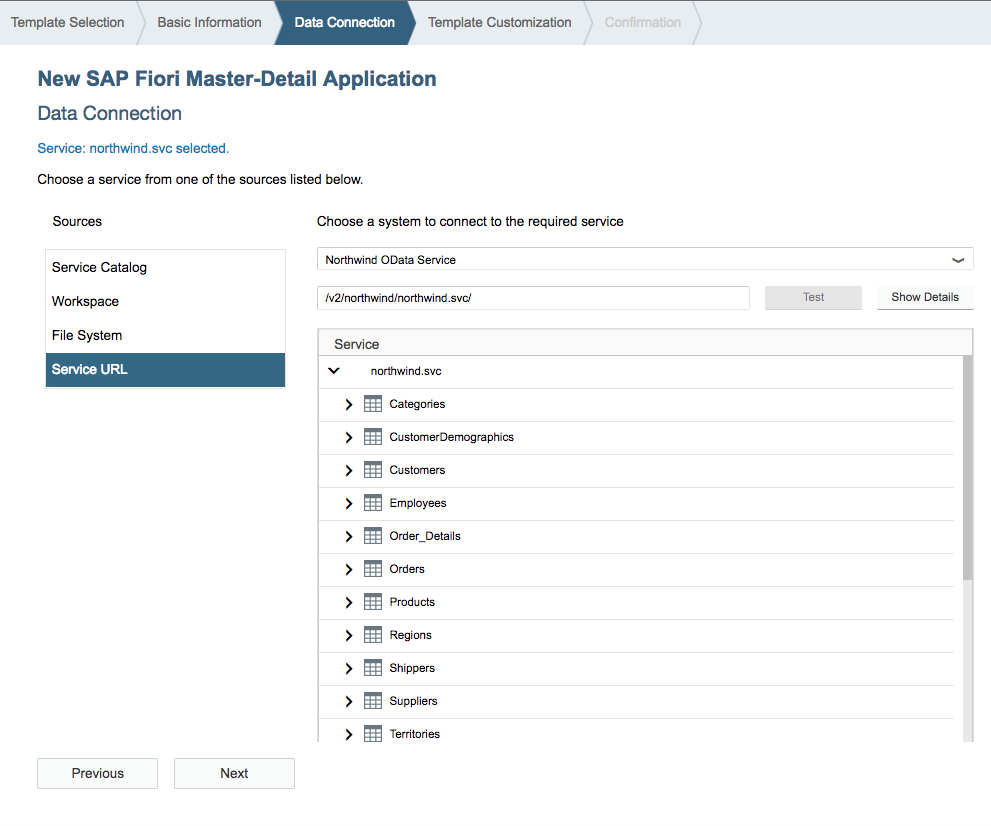
Fill the Template Customization screen with the following data:
Title: Suppliers and Products
Namespace: com.sap.northwind
Object Collection: Suppliers
Object Title: CompanyName
Object Unit of Measure: Country
Line Item Title: ProductName
Line Item Numeric Attribute: UnitPrice
Line Item Unit of Measure: QuantityPerUnit
Then click on Finish.
Check that your FioriMobileEx project was created. Select it and then click on the green play button to test it.

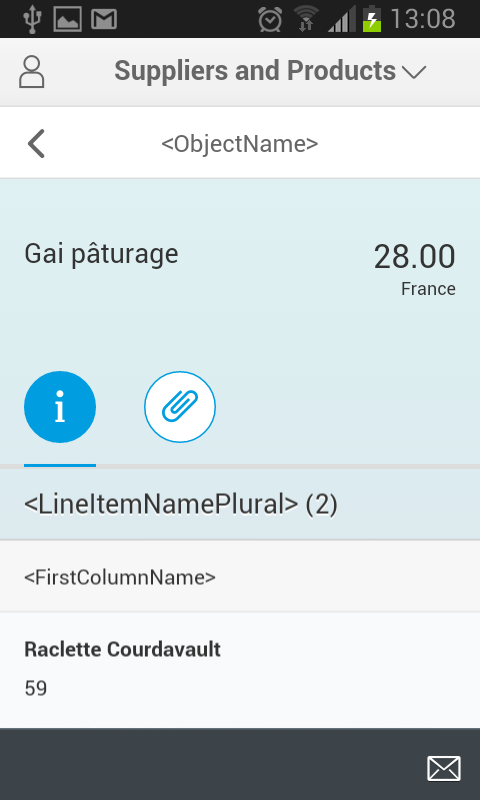
You should see something like this. Test and explore your app.
8. Deploy to HCP and register to Launchpad
Every time you want to package your SAPUI5 app after any change or for the first time, you need to deploy it to HCP first.
So, righ-click the FioriMobileEx project and select Deploy -> Deploy to SAP HANA Cloud Platform.
Click on Deploy button.
You should see a successful window. As you need to register your app to SAP Fiori Launchpad at least one time, click on Register to SAP Fiori launchpad button. Once done, next times when you deploy a new version of your app, you do not need to register to SAP Fiori Launchpad again.
Click on Next.
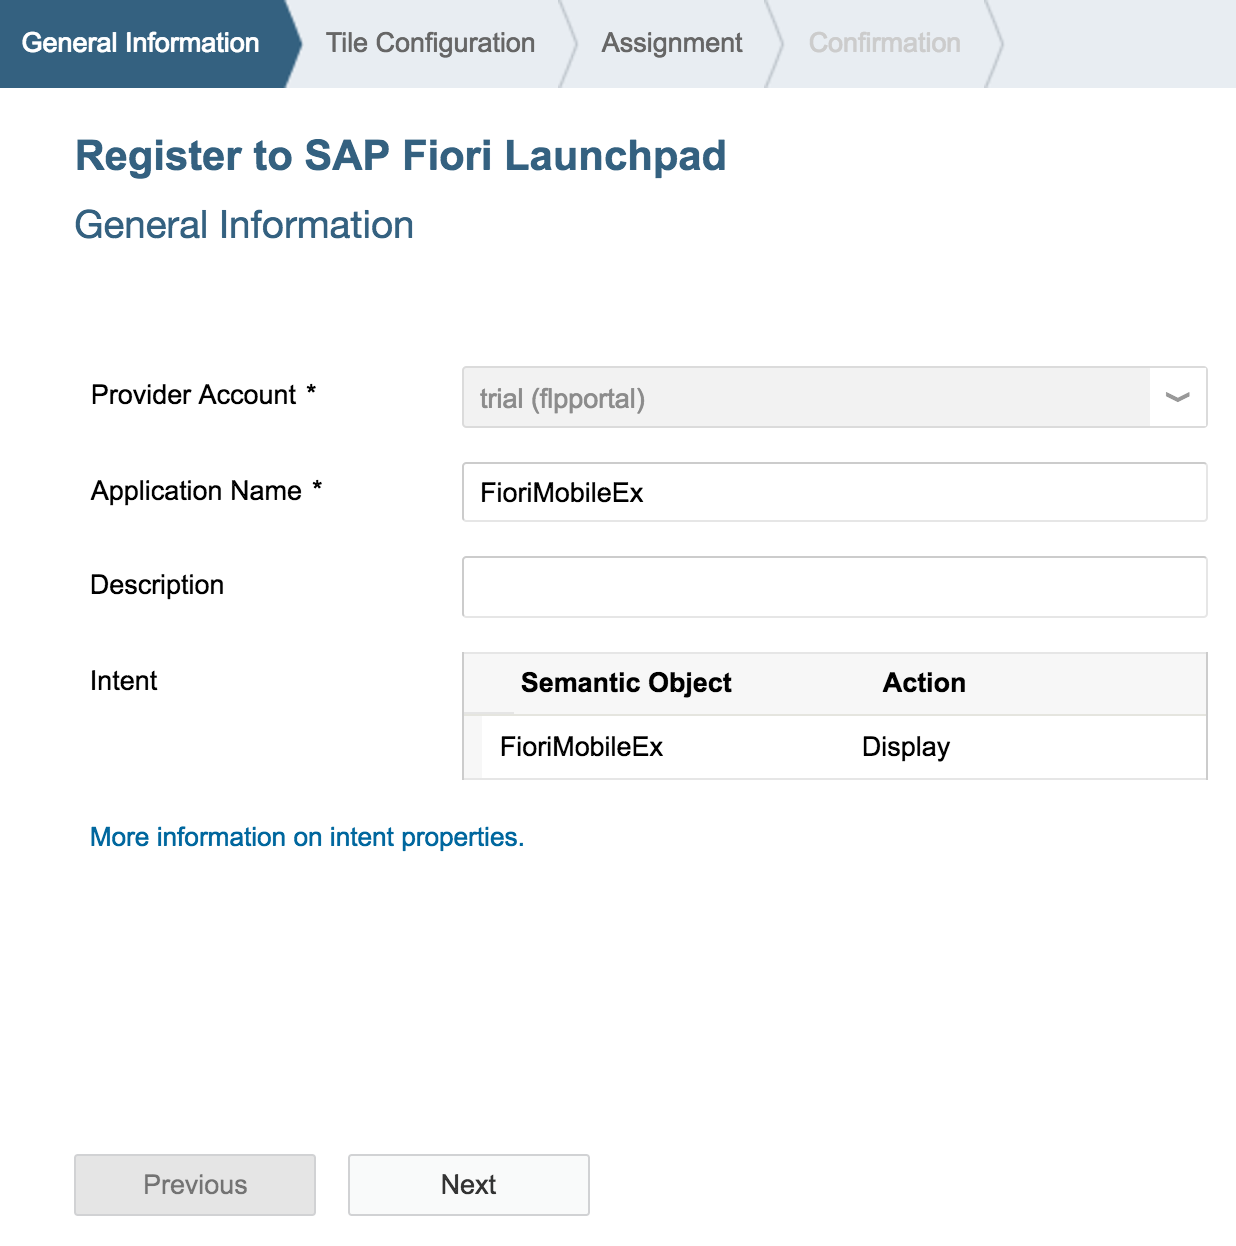
Give your app a title and a subtitle. If you want, change also the assigned icon, then click on Next.
Select the site that you marked as default in previous step. In our case, it is My Fiori LaunchPad. Leave other values as default, then click on Next.
Finally, click on Finish.

You should see a successful message. Click on OK.
9. Build packaged app with Fiori Mobile
The key step of this article has come. Let us package our app to use in an Android device.
Still on Web IDE, righ-click the FioriMobileEx project and select Fiori Mobile -> Build Packaged App.
If you want, insert a description and choose an icon for your app. Then click on Next.
Select the Android checkbox, click on the drop-down menu and select New Signing Profile. Then click on Next.

Enter any name you want. Import the signing key (jks file) you created in previous step, enter the password you defined when the signing key was generated and insert the KeyChain Alias: e2eworkshop. Finally, click on OK.

Click on Next and then on Build.

The build process will start and it will take a while. In the future, build time will be reduced.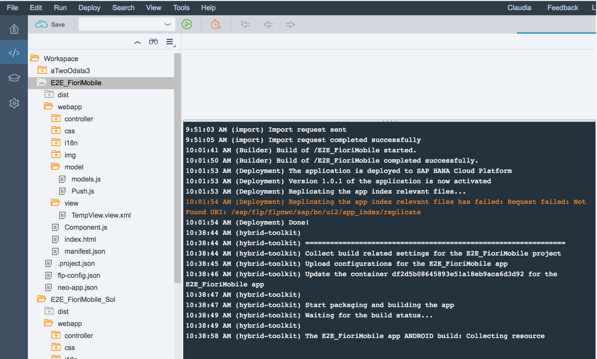
Once the build process ends, a QR code should appear in your screen.
10. Download and install the app
With your Android device, use a QR Code reader app to read the generated QR code.
Open the read URL in a browser, enter your HCP credentials and click on Log On.
Download and install the generated apk file.


11. Test
The last step now is to test your app. So, open it.

Insert your HCP credentials and press Log On.

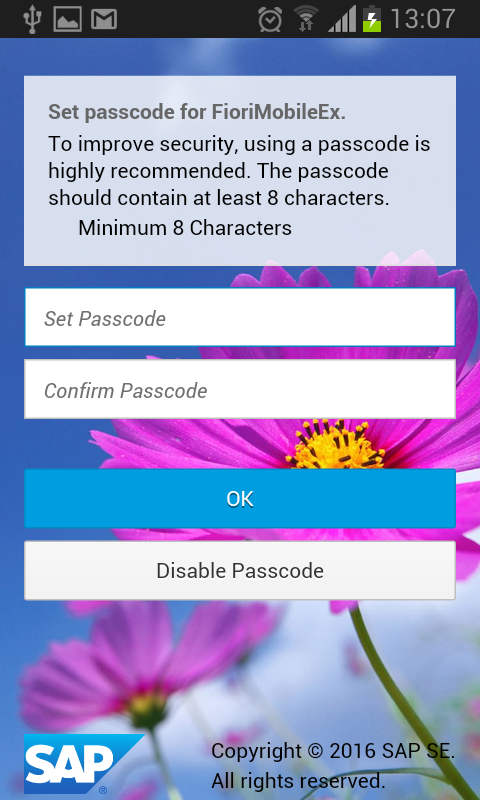
Press Disable Passcode or just define a password for your app.
Finally, you should see your app working. Play with it!

Congratulations! It's done.
A last comment that I need to write here is that today, all Kapsel plugins are added to an app packaged by Fiori Mobile. This is why your app is that big. In the future, you will be able to choose wich pugins you want to add, what should decrease dramatically the size of your app.
Using HAT can be painful, not because it is hard to use, but because there are too many software dependencies (that should be installed locally in your machine), which can change depending on new HAT, SAP Web IDE, Cordova, SAPUI5 or SMP SDK releases. For example, one working app can just stop to work because of that when you try to make some changes and repackage it.
Now, with SAP HANA Cloud Platform mobile service for SAP Fiori and SAP Web IDE, it is possible to package and create the hybrid mobile app on the cloud and then download it directly to your mobile device with the help of an QR code reader app. It saves you a lot of time preparing the environment and avoid that new releases of dependency softwares break the new versions of your app you want to package.
Below you will be guided on how to create a simple SAPUI5 app using SAP Web IDE and how to mobilize it using SAP HANA Cloud Platform mobile service for SAP Fiori (Fiori Mobile).
The first 7 steps are configuration ones that you just need to do one time. Once the they are done, your HCP trial account is ready for next times. So, be patient. You will get there.
Warning: Today cloud build service is not part of Fiori Demo Cloud. But ultimately, Fiori mobile is part of the HCP developer edition and is licensed via Fiori Cloud premium. This blog article can be followed with an HCP trial account.
1. Enable Fiori Mobile and Portal Service services
Some services are not activated by default on the SAP HANA Cloud Platform. You must first enable them prior to use.
First of all, go to https://account.hanatrial.ondemand.com/ and log on. If you are not registered yet, register yourself clicking on Register. The trial account is free and will not be deleted after a certain period of time.
Then go to Services, search mobile in the search input field. Scroll down, find the Fiori Mobile service in the Mobile Services area, then click on it.
Click the enable button if the service is not yet enabled. Wait for the enablement process to be done.
Back to Services, search portal in the search input field, then click on Portal Service.
Click the enable button if the service is not yet enabled. Wait for the enablement process to be done.
2. Assign your user to necessary roles
To call the HCP mobile service for development and operations' REST API that triggers the sending of a push notification, your user must be assigned to the Notification User role. Let us do it for the case you want to add push notifications to your app in the future. Also, to use Fiori Mobile to package your app with Cordova and Kapsel, you need to assign you user to some other roles in different services. Some of them should already be assigned, but this section is intended to you to make sure they really are.
On Services again, click on Development & Operations under Mobile. From where you left off in the previous section, click the Configure Development & Operations link.
On the left hand menu area, select Roles.
Select the Notification User role.
Click on Assign button.
Enter your HCP User ID and click on Assign.
Your user is now assigned and you will be able to call the REST API for push notifications.
Select the Administrator role.
Click on Assign button.
Enter your HCP User ID and click on Assign.
Your user is now assigned.
Now we are going to assign our HCP user to some roles of different HCP services. These are pre-requirements that we need to to follow to use Fiori Mobile as our packager. For more information, please access this: Fiori Mobile Prerequisites.
Go back to Services and click on Fiori Mobile.
Click on Configure Fiori Mobile.
Click on Roles and select the Account Admin role (scrow down to find it).
Click on Assign button.
Enter your HCP User ID and click on Assign.
Your user is now assigned.
Still at Roles, select the App Catalog Admin role.
Click on Assign button.
Enter your HCP User ID and click on Assign.
Your user is now assigned.
Still at Roles, select the App Catalog Publisher role.
Click on Assign button.
Enter your HCP User ID and click on Assign.
Your user is now assigned.
Still at Roles, select the Mobile Place User role.
Click on Assign button.
Enter your HCP User ID and click on Assign.
Your user is now assigned.
Click on Fiori Mobile in the up part of the page and then on Configure Mobile Packager.
Select Administrator and press Assign.
Enter your HCP User ID and click on Assign.
Go back to Services and click on Portal Service.
Click on Configure Portal Service.
Click on Roles and then select the TENANT_ADMIN role.
Click on Assign button.
Enter your HCP User ID and click on Assign.
Your user is now assigned.
3. Create Launchpad site on Portal Service
Fiori Mobile requires that the app be registered to Fiori Launchpad before being packaged. So, let us create a Fiori Launchpad site and make it default.
Go to Services and click on Portal Service.
Click on Go to Service.
Click on + sign.
Enter the Site Name: My Fiori Launchpad, select SAP Fiori Launchpad and click on Create.
A new tab with the Fiori Configuration Cockpit will open. Go back to the Site Directory tab.
Click on the arrow and select Publish.
In the confirmation window, click on Publish.
A confirmation message will appear:
Click on the Arrow and click on Set as Default.
Your Fiori LaunchPad site should have the default check:
4. Create a destination on HCP to access your OData service
When you create an SAPUI5 app that consumes an OData service using Web IDE, you need to create a destination on HCP to access this service. For this example, we will use the Suppliers and Products entity sets from a public OData service called Northwind.
On HCP cockpit, under the hamburger menu at left, click on Connectivity -> Destinations. Then click on New Destination.
Fill the destination configuration and additional properties as the following:
Name: Northwind
Type: HTTP
Description: Northwind OData Service
URL: http://services.odata.org
Proxy Type: NoAuthentication
Authentication: Internet
Additional Properties:
WebIDEEnabled / true
WebIDESystem / Northwind_Data
WebIDEUsage / odata_gen
Then click on Save button and on Check Connection. You should see a successful message.
5. Create a certificate for Mobile Secure
You will need to create a certificate that Fiori Mobile will use to publish your package for download.
Locate your keytool executable file inside the bin folder of you JAVA installation directory. For example, inside C:\Program Files\Java\jdk1.8.0_101\bin.
Open a cmd window and drag and drop the keytool executable file to the cmd window. A similar path should appear in your cmd window. You can do the same procedure in a Mac using the keytool command in a terminal if your path is correctly set.
Copy and paste the following parameters to generate the certificate and hit Enter.
C:\Users\i830336> “C:\Program Files\Java\jdk1.8.0_0_101\bin\keytool.exe” -genkey -v -keystore e2eworkshop.jks -keypass e2eworkshop -alias e2eworkshop -keyalg RSA -keysize 2048 -validity 9999To generate the signing key, you will need to answer some questions.
You should have a .jks file in the folder where you have executed the keytool command. You will need it soon.
6. Enable HAT plugin
Still on HCP cockpit, under the hamburger menu at left, click on Services, look for SAP Web IDE and click on SAP Web IDE. If it is not enabled, enable it. Then click on Open SAP Web IDE.
On Web IDE, go into Tools -> Preferences. Click on Plugins and enable Hybrid Application Toolkit. Click on Save.
7. Create your SAPUI5 app
Let us finally create our app.
Still on Web IDE, select menu File -> New -> Project from Template.
Select SAP Fiori Master-Detail Application and click on Next.
Fill the Project Name field as FioriMobileEx and click on Next.
Warning: Enable as Mobile App was removed, because it is not necessary anymore.
On the Sources box at the left, click on Service URL. Click on the arrow of the system checkbox and select Northwind OData Service. Fill the next edit field with the following relative URL of the service: /v2/northwind/northwind.svc/. Then click on Test button to check if the OData service is correctly configured and working. Finally click on Next.
Fill the Template Customization screen with the following data:
Title: Suppliers and Products
Namespace: com.sap.northwind
Object Collection: Suppliers
Object Title: CompanyName
Object Unit of Measure: Country
Line Item Title: ProductName
Line Item Numeric Attribute: UnitPrice
Line Item Unit of Measure: QuantityPerUnit
Then click on Finish.
Check that your FioriMobileEx project was created. Select it and then click on the green play button to test it.
You should see something like this. Test and explore your app.
8. Deploy to HCP and register to Launchpad
Every time you want to package your SAPUI5 app after any change or for the first time, you need to deploy it to HCP first.
So, righ-click the FioriMobileEx project and select Deploy -> Deploy to SAP HANA Cloud Platform.
Click on Deploy button.
You should see a successful window. As you need to register your app to SAP Fiori Launchpad at least one time, click on Register to SAP Fiori launchpad button. Once done, next times when you deploy a new version of your app, you do not need to register to SAP Fiori Launchpad again.
Click on Next.
Give your app a title and a subtitle. If you want, change also the assigned icon, then click on Next.
Select the site that you marked as default in previous step. In our case, it is My Fiori LaunchPad. Leave other values as default, then click on Next.
Finally, click on Finish.
You should see a successful message. Click on OK.
9. Build packaged app with Fiori Mobile
The key step of this article has come. Let us package our app to use in an Android device.
Still on Web IDE, righ-click the FioriMobileEx project and select Fiori Mobile -> Build Packaged App.
If you want, insert a description and choose an icon for your app. Then click on Next.
Select the Android checkbox, click on the drop-down menu and select New Signing Profile. Then click on Next.
Enter any name you want. Import the signing key (jks file) you created in previous step, enter the password you defined when the signing key was generated and insert the KeyChain Alias: e2eworkshop. Finally, click on OK.
Click on Next and then on Build.
The build process will start and it will take a while. In the future, build time will be reduced.
Once the build process ends, a QR code should appear in your screen.
10. Download and install the app
With your Android device, use a QR Code reader app to read the generated QR code.
Open the read URL in a browser, enter your HCP credentials and click on Log On.
Download and install the generated apk file.
11. Test
The last step now is to test your app. So, open it.
Insert your HCP credentials and press Log On.
Press Disable Passcode or just define a password for your app.
Finally, you should see your app working. Play with it!
Congratulations! It's done.
A last comment that I need to write here is that today, all Kapsel plugins are added to an app packaged by Fiori Mobile. This is why your app is that big. In the future, you will be able to choose wich pugins you want to add, what should decrease dramatically the size of your app.
65 Comments
- « Previous
-
- 1
- 2
- Next »
You must be a registered user to add a comment. If you've already registered, sign in. Otherwise, register and sign in.
Labels in this area
-
ABAP CDS Views - CDC (Change Data Capture)
2 -
AI
1 -
Analyze Workload Data
1 -
BTP
1 -
Business and IT Integration
2 -
Business application stu
1 -
Business Technology Platform
1 -
Business Trends
1,658 -
Business Trends
91 -
CAP
1 -
cf
1 -
Cloud Foundry
1 -
Confluent
1 -
Customer COE Basics and Fundamentals
1 -
Customer COE Latest and Greatest
3 -
Customer Data Browser app
1 -
Data Analysis Tool
1 -
data migration
1 -
data transfer
1 -
Datasphere
2 -
Event Information
1,400 -
Event Information
66 -
Expert
1 -
Expert Insights
177 -
Expert Insights
296 -
General
1 -
Google cloud
1 -
Google Next'24
1 -
Kafka
1 -
Life at SAP
780 -
Life at SAP
13 -
Migrate your Data App
1 -
MTA
1 -
Network Performance Analysis
1 -
NodeJS
1 -
PDF
1 -
POC
1 -
Product Updates
4,577 -
Product Updates
342 -
Replication Flow
1 -
RisewithSAP
1 -
SAP BTP
1 -
SAP BTP Cloud Foundry
1 -
SAP Cloud ALM
1 -
SAP Cloud Application Programming Model
1 -
SAP Datasphere
2 -
SAP S4HANA Cloud
1 -
SAP S4HANA Migration Cockpit
1 -
Technology Updates
6,873 -
Technology Updates
420 -
Workload Fluctuations
1
Related Content
- Consuming SAP with SAP Build Apps - Mobile Apps for iOS and Android in Technology Blogs by SAP
- Demystifying the Common Super Domain for SAP Mobile Start in Technology Blogs by SAP
- What’s new in Mobile development kit client 24.4 in Technology Blogs by SAP
- ad-hoc analysis on BW Querys in SAP Analytics Cloud on iOS mobile devices in Technology Q&A
- Launching an application built with SAP Mobile Services directly through SAP Mobile Start in Technology Q&A
Top kudoed authors
| User | Count |
|---|---|
| 36 | |
| 25 | |
| 17 | |
| 13 | |
| 8 | |
| 7 | |
| 6 | |
| 6 | |
| 6 | |
| 6 |