
- SAP Community
- Products and Technology
- Technology
- Technology Blogs by SAP
- SAP Analytics Cloud: Live Data Connection to HANA ...
Technology Blogs by SAP
Learn how to extend and personalize SAP applications. Follow the SAP technology blog for insights into SAP BTP, ABAP, SAP Analytics Cloud, SAP HANA, and more.
Turn on suggestions
Auto-suggest helps you quickly narrow down your search results by suggesting possible matches as you type.
Showing results for
julian_jimenez
Active Contributor
Options
- Subscribe to RSS Feed
- Mark as New
- Mark as Read
- Bookmark
- Subscribe
- Printer Friendly Page
- Report Inappropriate Content
11-27-2016
9:52 PM
In my previous blog, I was able to create a Calculation View in my HANA in SAP Cloud Platform (SAPCP) trial account to be consumed in SAP Analytics Cloud (formerly known as BOC). My goal is to be able to set up Live Data Connection to HANA in SAPCP using Single sign-on (SSO). You can find all the information in the complete documentation of the product.
To simplify the steps to configure SSO, I am breaking the process in few steps. I will use my calculation View in SAP Analytics Cloud just to confirm that everything works fine before configuring SSO.
1. Using the calculation view from HANA in SAP Cloud Platform (username/password)
2. Configuring SSO to HANA in SAP Cloud Platform
2.1 Getting the Service Provider information from HANA
2.2 Creating a Connection using SSO
2.3 Import the metadata.xml from SAP Analytics Cloud to your HANA SAML Identity Provider
2.4 Enable SAML in HANA XS Administration for INA service
2.5 Map your HANA user to trust the SAP Analytics Cloud user when using that connection
2.5.1 Copy the SAML User mapping from SAP Analytics Cloud
2.5.2.In your HANA database add that Identity for your HCPUSER account
This seems silly as you probably landed in this blog looking for SSO. However, before we start configuring authentication I would like to confirm that your user in SAP Analytics Cloud is authorized to create connections, models, etc. and your HANA user has the correct privileges and roles to use the Calculation View in SAP Analytics Cloud.
Connect to your SAP Analytics Cloud (SAC) tenant:
https://yourcompany.region.sapanalytics.cloud
Your user must have the following roles:
Modeler
BI_Content_Creator
Go to the menu Connection and select to add + a new connection to Live HANA


You need to select:
Connection Type: SAP Cloud Platform
SAP HANA Cloud Platform Account: PXXXX
Database Name: YourDatabase
Landscape Host: Trial (in my case)
I leave the setting
User Name and Password
User Name: HCPUSER
If everything goes well, you should be able to create the connection. Next step: Creating the model.
You may receive the following message:
For this message, make sure that the BOC user account has the correct roles assigned, as detailed in my previous blog post.
We should use the menu Create > Model > User datasource > Live Data Connection

Information required:
System: Connection previously created
Data Source: name of the Calculation View
You should be able to see the measure from your Calculation View along with some details on decimals and aggregation types that you can modify.
Now you can create a Story or explore your data.
Now that we know that everything is working using username and password, we can go ahead and configure SSO between SAP Analytics Cloud and HANA in SAPCP.
2.1 Getting the Service Provider information from HANA
We need to access the XS Admin page:
For SAP Cloud Platform Trial you can do it from your cockpit link or directly by typing:
https://DBName+AccountName.hanatrial.ondemand.com/sap/hana/xs/admin
Where <DBName> is the name of your database and <AccountName> is the name of your trial account.
In my case, this URL is:
https://salesjuliantrial.hanatrial.ondemand.com/sap/hana/xs/admin
You should see the typical XS admin login page:
If you get a 403 error Forbidden, it means that you forgot to add the following roles to the account used to log in:
Remember that this can be done easily using the SAP HANA Web-based Development Workbench:
https://DBName+AccountName.hanatrial.ondemand.com/sap/hana/ide/security/

Once you are in the XS Admin Tool, you will need to copy the name in the following menu:
Main Menu > SAML Service Provider > Copy the name that appears in the Provider information page:
We will need this name later on in SAP Analytics Cloud to establish relationship between the two.
2.2 Create a new connection in SAP Analytics Cloud that will use SSO
Connect to your SAP Analytics Cloud tenant and create a new connection using the menu Connections > + (Add Connection) > Live Database Connection > SAP HANA
Complete the information required:
SAP Cloud Platform Account: <your SAPCP account>
Database Name: <Name of your DB>
Landscape Host: Select from the list according to your SAPCP account
Credentials: SAML Single Sign On
SAML Provider Name: <name copied from XS Admin in previous step>
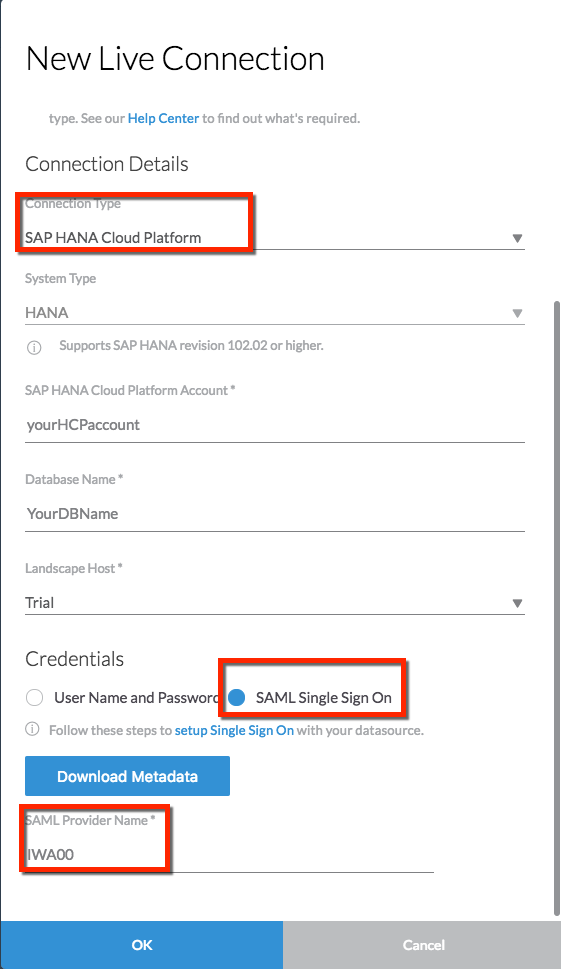
Click on the button Download Metadata and save the XML file: metadata.xml.
2.3 Import the metadata.xml from SAC to your HANA SAML Identity Provider
We now need to indicate in HANA that we will be trusting the connections coming from our BOC tenant. We achieve this by importing the metadata.xml that we just saved during the creation of the connection.
We go back to our HANA in SAPCP XS Admin tool:
https://DBName+AccountName.hanatrial.ondemand.com/sap/hana/xs/admin
We go to the menu:
Menu > SAML Identity Provider > click on + sign and copy the content of the metadata.xml file that you saved from BOC.
Some information should be populated in the General Data and Destination section. We will only modify the following two entries:
When we click on save, we will see the name in the list of Identity Providers. We will use it later.
2.4 Enable SAML in HANA XS Administration for INA service
Without leaving the HANA XS Admin tool we will go to the menu:
Menu > XS Artifact Administration
In the Packages area we select:
sap> bc > ina > service > v2
Warning! Make sure you are in that v2 package or you may affect the authentication to your XS Admin tool
Select the SAML checkbox if the checkbox is not already enabled.

Save the SAML identity provider.
2.5 Map your HANA user to trust the SAP Analytics Cloud user when using that connection
To make it simple and understand what is happening, I will manually map a single user. You can always follow the steps to automatically map your users.
2.5.1 Copy the SAML User mapping from SAP Analytics Cloud
Login to your SAP Analytics Cloud tenant and go to the menu:
Menu > Security > Users
Find your user and copy the value in the column SAML USER MAPPING. For example: P009128

Note that from Wave 24 this column is disabled by default and this PNumber is nod displayed. You can obtained if you export to CSV the list of users.
2.5.2 In your HANA in SAPCP add that Identity for your HCPUSER account
I will execute the SQL command using SAP Cloud Platform Cockpit > SAP HANA Web-based Development Workbench > Catalog
https://DBName+AccountName.hanatrial.ondemand.com/sap/hana/ide/

You need to use an account with enough rights to make the changes: in my example I am using SYSTEM that has these roles assigned
The SQL command to execute is:
<HANA USER>: HANA user with enough rights to execute the Calculation View. HCPUSER from my previous blog
<SAML MAPPING> : SAML ID copied from BOC. In our case P004320
<IMPORTED IdP NAME>: The name we had in step 2.4 after importing in XS the metadata.xml file. in our case user_businessobjects_cloud
Using HANA Studio or the Web-based Development Workbench I will verify that SAML is activated for my user HCPUSER and the Identity Provider is correctly listed:

Note that if SAML is not configured, you will receive the following error message when trying to use the connection in BOC:
The last steps is to create a model in SAC to verify that the connection works correctly and that we can retrieve data using SSO.
We login in to our SAC tenant and use the menu > (+) Create > Model to select the connection we created: HCPSSO.
We should be able to create a model and use it in Stories. For more information on Models and Stories, check the Videos created for SAP Analytics Cloud.
To simplify the steps to configure SSO, I am breaking the process in few steps. I will use my calculation View in SAP Analytics Cloud just to confirm that everything works fine before configuring SSO.
1. Using the calculation view from HANA in SAP Cloud Platform (username/password)
2. Configuring SSO to HANA in SAP Cloud Platform
2.1 Getting the Service Provider information from HANA
2.2 Creating a Connection using SSO
2.3 Import the metadata.xml from SAP Analytics Cloud to your HANA SAML Identity Provider
2.4 Enable SAML in HANA XS Administration for INA service
2.5 Map your HANA user to trust the SAP Analytics Cloud user when using that connection
2.5.1 Copy the SAML User mapping from SAP Analytics Cloud
2.5.2.In your HANA database add that Identity for your HCPUSER account
1. Using the calculation view from HANA in SAP Cloud Platform using login and password
This seems silly as you probably landed in this blog looking for SSO. However, before we start configuring authentication I would like to confirm that your user in SAP Analytics Cloud is authorized to create connections, models, etc. and your HANA user has the correct privileges and roles to use the Calculation View in SAP Analytics Cloud.
Connect to your SAP Analytics Cloud (SAC) tenant:
https://yourcompany.region.sapanalytics.cloud
Your user must have the following roles:
Modeler
BI_Content_Creator
1. Creating a connection
Go to the menu Connection and select to add + a new connection to Live HANA
You need to select:
Connection Type: SAP Cloud Platform
SAP HANA Cloud Platform Account: PXXXX
Database Name: YourDatabase
Landscape Host: Trial (in my case)
I leave the setting
User Name and Password
User Name: HCPUSER
If everything goes well, you should be able to create the connection. Next step: Creating the model.
You may receive the following message:
For this message, make sure that the BOC user account has the correct roles assigned, as detailed in my previous blog post.
2. Creating a model
We should use the menu Create > Model > User datasource > Live Data Connection
Information required:
System: Connection previously created
Data Source: name of the Calculation View
You should be able to see the measure from your Calculation View along with some details on decimals and aggregation types that you can modify.
Now you can create a Story or explore your data.
2. Configuring SSO to HANA in SAP Cloud Platform (old name HCP)
Now that we know that everything is working using username and password, we can go ahead and configure SSO between SAP Analytics Cloud and HANA in SAPCP.
2.1 Getting the Service Provider information from HANA
We need to access the XS Admin page:
For SAP Cloud Platform Trial you can do it from your cockpit link or directly by typing:
https://DBName+AccountName.hanatrial.ondemand.com/sap/hana/xs/admin
Where <DBName> is the name of your database and <AccountName> is the name of your trial account.
In my case, this URL is:
https://salesjuliantrial.hanatrial.ondemand.com/sap/hana/xs/admin
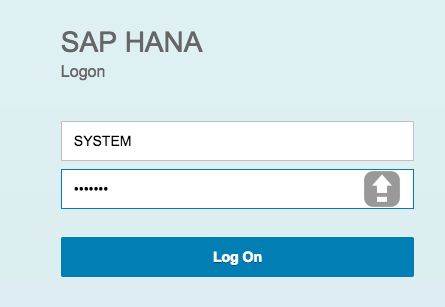
You should see the typical XS admin login page:
If you get a 403 error Forbidden, it means that you forgot to add the following roles to the account used to log in:
sap.hana.xs.admin.roles::SAMLAdministrator

sap.hana.xs.admin.roles::RuntimeConfAdministrator
Remember that this can be done easily using the SAP HANA Web-based Development Workbench:
https://DBName+AccountName.hanatrial.ondemand.com/sap/hana/ide/security/
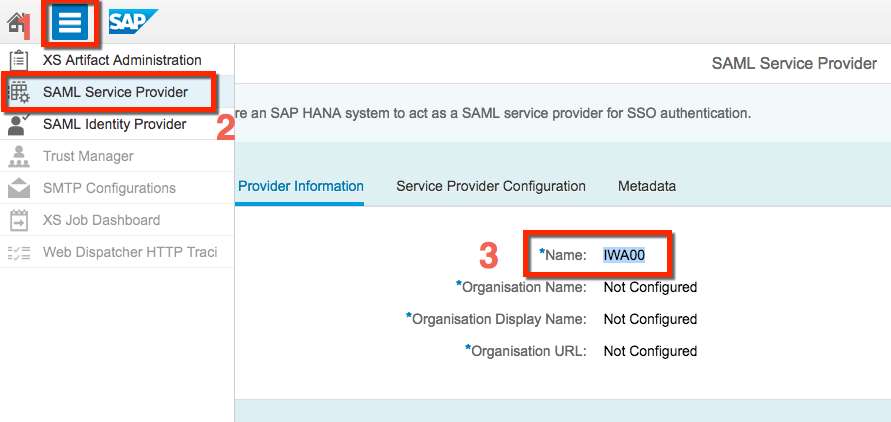
Once you are in the XS Admin Tool, you will need to copy the name in the following menu:
Main Menu > SAML Service Provider > Copy the name that appears in the Provider information page:
We will need this name later on in SAP Analytics Cloud to establish relationship between the two.
2.2 Create a new connection in SAP Analytics Cloud that will use SSO
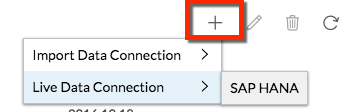
Connect to your SAP Analytics Cloud tenant and create a new connection using the menu Connections > + (Add Connection) > Live Database Connection > SAP HANA
Complete the information required:
SAP Cloud Platform Account: <your SAPCP account>
Database Name: <Name of your DB>
Landscape Host: Select from the list according to your SAPCP account
Credentials: SAML Single Sign On
SAML Provider Name: <name copied from XS Admin in previous step>
Click on the button Download Metadata and save the XML file: metadata.xml.
2.3 Import the metadata.xml from SAC to your HANA SAML Identity Provider
We now need to indicate in HANA that we will be trusting the connections coming from our BOC tenant. We achieve this by importing the metadata.xml that we just saved during the creation of the connection.
We go back to our HANA in SAPCP XS Admin tool:
https://DBName+AccountName.hanatrial.ondemand.com/sap/hana/xs/admin
We go to the menu:
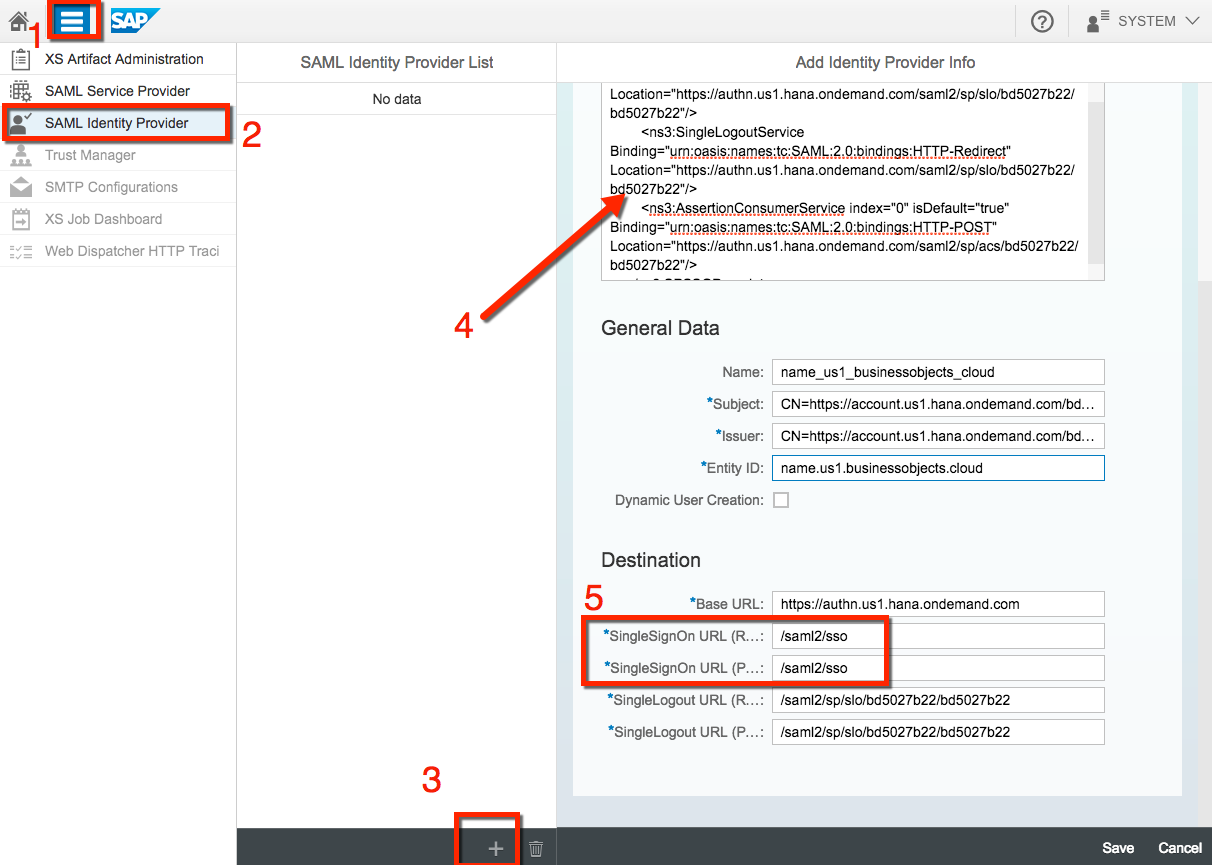
Menu > SAML Identity Provider > click on + sign and copy the content of the metadata.xml file that you saved from BOC.
Some information should be populated in the General Data and Destination section. We will only modify the following two entries:
SingleSignOn URL (RedirectBinding): /saml2/sso

SingleSignOn URL (PostBinding): /saml2/sso
When we click on save, we will see the name in the list of Identity Providers. We will use it later.
2.4 Enable SAML in HANA XS Administration for INA service
Without leaving the HANA XS Admin tool we will go to the menu:
Menu > XS Artifact Administration
In the Packages area we select:
sap> bc > ina > service > v2
Warning! Make sure you are in that v2 package or you may affect the authentication to your XS Admin tool
Select the SAML checkbox if the checkbox is not already enabled.
Choose a SAML IdP: the name created in the previous step.
Save the SAML identity provider.
2.5 Map your HANA user to trust the SAP Analytics Cloud user when using that connection
To make it simple and understand what is happening, I will manually map a single user. You can always follow the steps to automatically map your users.
2.5.1 Copy the SAML User mapping from SAP Analytics Cloud
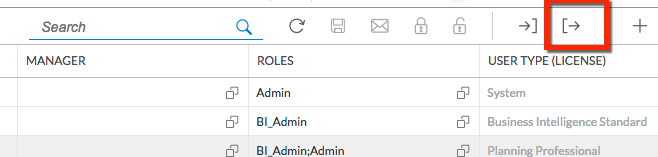
Login to your SAP Analytics Cloud tenant and go to the menu:
Menu > Security > Users
Find your user and copy the value in the column SAML USER MAPPING. For example: P009128
Note that from Wave 24 this column is disabled by default and this PNumber is nod displayed. You can obtained if you export to CSV the list of users.
2.5.2 In your HANA in SAPCP add that Identity for your HCPUSER account
I will execute the SQL command using SAP Cloud Platform Cockpit > SAP HANA Web-based Development Workbench > Catalog
https://DBName+AccountName.hanatrial.ondemand.com/sap/hana/ide/
You need to use an account with enough rights to make the changes: in my example I am using SYSTEM that has these roles assigned
sap.hana.ide.roles::CatalogDeveloper

sap.hana.ide.roles::SecurityAdmin
The SQL command to execute is:
ALTER USER <HANA USER> ADD IDENTITY '<SAML MAPPING>' FOR SAML PROVIDER <IMPORTED IdP NAME>;
Where:
<HANA USER>: HANA user with enough rights to execute the Calculation View. HCPUSER from my previous blog
<SAML MAPPING> : SAML ID copied from BOC. In our case P004320
<IMPORTED IdP NAME>: The name we had in step 2.4 after importing in XS the metadata.xml file. in our case user_businessobjects_cloud
ALTER USER HCPUSER ADD IDENTITY 'P004320' FOR SAML PROVIDER USER_BUSINESSOBJECTS_CLOUD;

ALTER USER HCPUSER ENABLE SAML;
I added the second line to make sure we activate SAML for this account.
Using HANA Studio or the Web-based Development Workbench I will verify that SAML is activated for my user HCPUSER and the Identity Provider is correctly listed:
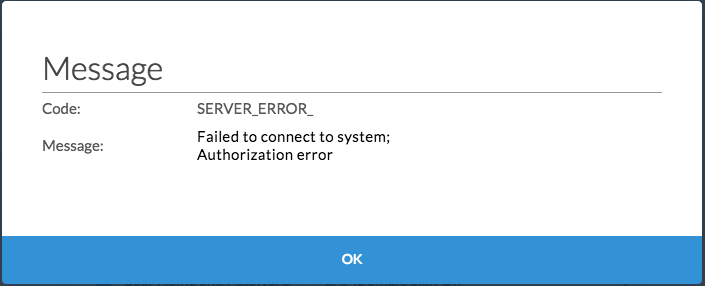
Note that if SAML is not configured, you will receive the following error message when trying to use the connection in BOC:
Firefly Error: Error [Protocol]: (#500) Internal Server Error StatusCode in ResponseMessage != OK; please refer to the database trace for more informationThe last steps is to create a model in SAC to verify that the connection works correctly and that we can retrieve data using SSO.
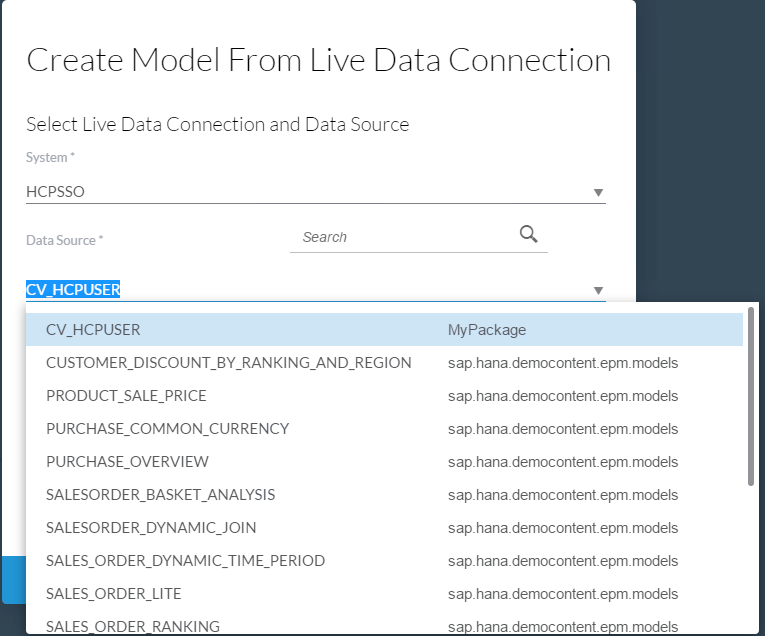
We login in to our SAC tenant and use the menu > (+) Create > Model to select the connection we created: HCPSSO.
We should be able to create a model and use it in Stories. For more information on Models and Stories, check the Videos created for SAP Analytics Cloud.
- SAP Managed Tags:
- SAP Analytics Cloud
23 Comments
You must be a registered user to add a comment. If you've already registered, sign in. Otherwise, register and sign in.
Labels in this area
-
ABAP CDS Views - CDC (Change Data Capture)
2 -
AI
1 -
Analyze Workload Data
1 -
BTP
1 -
Business and IT Integration
2 -
Business application stu
1 -
Business Technology Platform
1 -
Business Trends
1,658 -
Business Trends
91 -
CAP
1 -
cf
1 -
Cloud Foundry
1 -
Confluent
1 -
Customer COE Basics and Fundamentals
1 -
Customer COE Latest and Greatest
3 -
Customer Data Browser app
1 -
Data Analysis Tool
1 -
data migration
1 -
data transfer
1 -
Datasphere
2 -
Event Information
1,400 -
Event Information
66 -
Expert
1 -
Expert Insights
177 -
Expert Insights
293 -
General
1 -
Google cloud
1 -
Google Next'24
1 -
Kafka
1 -
Life at SAP
780 -
Life at SAP
12 -
Migrate your Data App
1 -
MTA
1 -
Network Performance Analysis
1 -
NodeJS
1 -
PDF
1 -
POC
1 -
Product Updates
4,577 -
Product Updates
340 -
Replication Flow
1 -
RisewithSAP
1 -
SAP BTP
1 -
SAP BTP Cloud Foundry
1 -
SAP Cloud ALM
1 -
SAP Cloud Application Programming Model
1 -
SAP Datasphere
2 -
SAP S4HANA Cloud
1 -
SAP S4HANA Migration Cockpit
1 -
Technology Updates
6,873 -
Technology Updates
417 -
Workload Fluctuations
1
Related Content
- SAP Analytics Cloud, add-in for Microsoft Excel and SAP Datasphere connection in Technology Blogs by SAP
- IoT - Ultimate Data Cyber Security - with Enterprise Blockchain and SAP BTP 🚀 in Technology Blogs by Members
- I cannot cancel an import in SAP Analytics Cloud from SAP Hana. in Technology Q&A
- 10+ ways to reshape your SAP landscape with SAP Business Technology Platform - Blog 7 in Technology Blogs by SAP
- 10+ ways to reshape your SAP landscape with SAP BTP - Blog 4 Interview in Technology Blogs by SAP
Top kudoed authors
| User | Count |
|---|---|
| 34 | |
| 25 | |
| 12 | |
| 7 | |
| 7 | |
| 6 | |
| 6 | |
| 6 | |
| 5 | |
| 4 |