
- SAP Community
- Products and Technology
- Technology
- Technology Blogs by SAP
- SMP 3.0 setting up Scheduled Tasks in SAP Control ...
Technology Blogs by SAP
Learn how to extend and personalize SAP applications. Follow the SAP technology blog for insights into SAP BTP, ABAP, SAP Analytics Cloud, SAP HANA, and more.
Turn on suggestions
Auto-suggest helps you quickly narrow down your search results by suggesting possible matches as you type.
Showing results for
waynesmith
Participant
Options
- Subscribe to RSS Feed
- Mark as New
- Mark as Read
- Bookmark
- Subscribe
- Printer Friendly Page
- Report Inappropriate Content
11-08-2016
5:56 PM
SMP 3.0 setting up Scheduled Tasks in SAP Control Center and Domain Log cleanup.
Purpose
This technical document explains how configure the four SAP Control Center Scheduled Tasks and Domain log cleanup in order to keep SAP SMP 3.0 clean and manageable.
Required Software
Assumption
Issue 1 – Large logs database growing large:
The SAP SMP Server generates logs and will become stale over time. During the day to
day processing of data and user are recorded in SMP MBO server will be collect there is a lot of historical data over time would need to be clean out. For example logical deletes. Also users registering and unregistering will also be collected and stored in the database and in the log file.
So it is very important to run the schedule on a daily basis to minimize the overall growth of the logs and databases.
Solution
Setup schedules Task cleanup to refresh the logs and remove Logical deletes from the database. The combination of all the Schedules are required in order to clean the database and log files.
Subscription Cleanup: Is used for removing device user that no longer using the system. Use caution when enabling or running this task. If an active user has not logged in within the time you schedule for the users will be removed. Make sure all the users have connected and processed before running this task. The task handles the devices differently for example.
Messaging based Removes Subscription if unwired Server has not received a Synchronization message since the given date in the schedule.
Replication based Removes Subscription not used since the last Synchronization. Let’s get start with the configurations.
Open the desktop icon for SAP SMP Control Center.
Login (default user ID): supAdmin. cPassword (default password): s3pAdmin (default).
You should see the following screen below.
Tree open Domains
Click on the default crown.
Click on Scheduled Tasks tab.
The default setting are disabled, we will walk thru each on and setup a schedule and enable them.
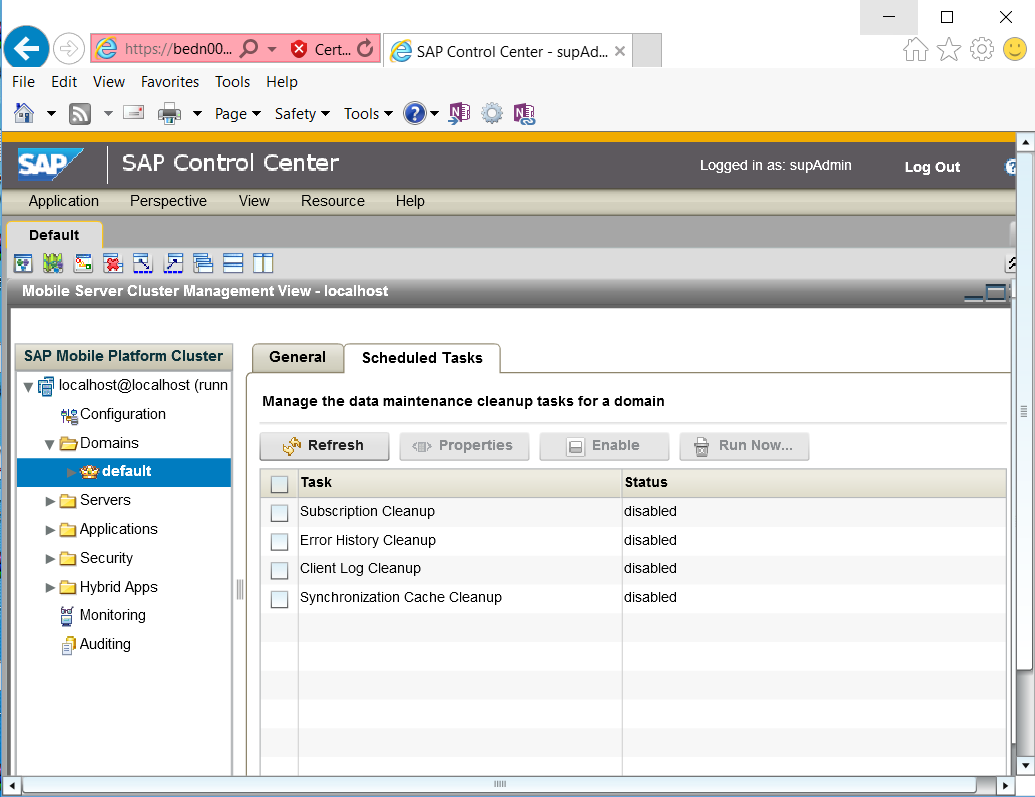
Figure 1.
Place a check in Subscription Cleanup box then Select Enable Button.

Figure 2
A pop dialog box will ask you if you want to enable click YES.

Figure 3.
Once enabled then Select Properties Button.

Figure 4.
In the task properties select schedule Tab. Here we need to set our start time and the days we want to run the cleanup operation. Days of the week click Select all button. We select the Start date and set the start time. There is no need to select the End date or end time as we want this to never stop want to have end time until we want to stop it.
Ideally we would like to run the schedule every day but we have to consider how it will impact performance in production. So at first it is best practices to run the schedules off peak time or on weekends.
Next Select the Option Button.
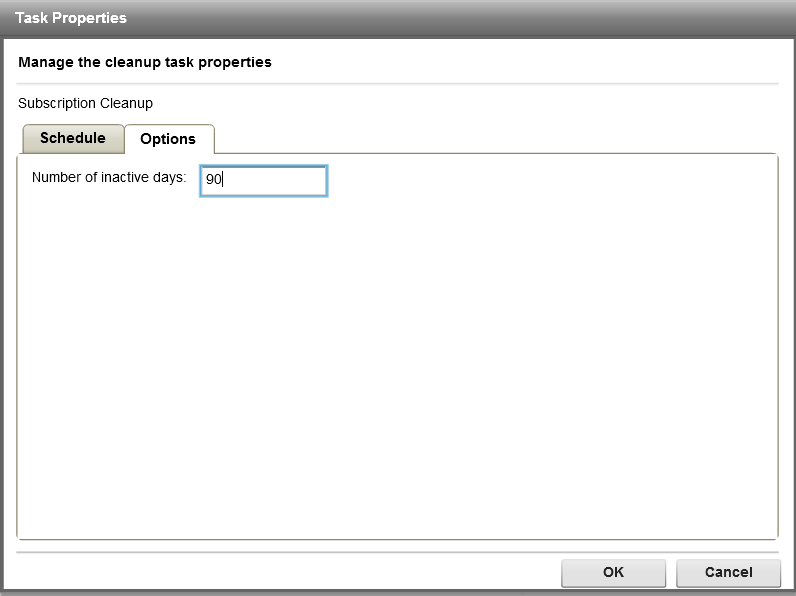
Figure 5.
We now need to set the number of inactive days add the number the default is 90 days
What this means it a user has not done any Syncing within 90 days and we can be removed them from the SMP server. You have to make sure this value exceeds the longed time for any one user in the system before there last Sync. If all users Sync with in a 30 day time frame set the value to 30 days
If all users Sync within 60 days set the value to 60 and so on in this scenario we will leave the default 90 days
There is a safety day count build in the threshold is seven days so if the Admin sets the value to 30 we automatically add on 7 days. The delete operation will execute 30+7=37 days this is to give the system some space for users that may be within a few days of 30 days they may sync within say 31 days or 32 days this is done to protect the users so they are not impacted. Set the value or take the default and select OK.

Figure 6.
This completes the setting up Subscription Cleanup steps.
Step - 2 Error History Clean up:
Is used for removing historical data on an MBO data refresh and operation replay failures Caused by Network failures, System failures, user log in issues and back end data base issues.
Place a check in the box for Error History Cleanup.
Click Enable button.

Figure 7.
A POPUP dialog box will ask you if you want to enable click YES.

Figure 8.
Select Schedule Tab.
Select the Sart date and add you start day.
Days of the week select Saturday and Sunday.

Figure 9.
Click on the Options Tab.

Figure 10.
Number of days to preserve default 7.
Take the default of 7 days.
Click the OK button to finish.

Figure 11.
This completes the configuration for Error History Cleanup.
Step -3 Client Log Clean up:
Is used for removing client log records that have already been synchronized to the device and are no longer associated with any active user.
Place a check in the Client Log Cleanup.
Click the Enable Button

Figure 12.
The dialog box will popup asking you if you want to enable this task click YES.
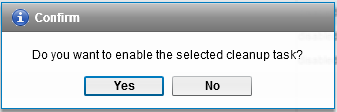
Figure 13.
Select the days you want to run the schedule in this example Saturday and Sunday.
Next select the Options tab.

Figure 16.
Number of days to preserve the log record the default 7.
Take the default of seven days.
Click on the OK Button.

Figure 17.
This completes the configuration for Client Log Clean up.
Steps – 4 Synchronization Cache Clean up.
Is used for removing logical deleted rows in the cache that are older than the oldest synchronization time on a record in the system it also cleans up unused and stale partitions.
Place a check in the Synchronization Cache Cleanup.
Click the Enable Button.

Figure 18.
You will get a popup dialog box to confirm that you want to enable the task Click YES.

Figure 19.
Next Click the Properties Button.
Select Schedule Tab.

Figure 20..
Select the Start date and the Start time.
Next we select the days in this example Saturday and Sunday.
Next we select the options tab.

Figure 21.
We can leave the Purge interval for the EIS to their respective defaults.
Click on the OK Button.

Figure 22.
You are now done configuring the Synchronization Cache Cleanup.
It is highly recommended to run the schedules once a week during off peak hours if possible. It is also important to understand that all of the schedule task needed to be enables due to the fact that each schedule has a target areas to clean there for they all need to up and running.
Domain Log Auto-purge and flush threshold configuration.
In order to keep the SMP’s domain log clean and manageable we need to enable and set the Domain log auto purge.
First go to the default and open the view directly below the SMP domain you will see the log.

Figure 23.
Select or highlight the log.
On the right hand side go to the settings tab.

Figure 24.
Select the Configuration button.

Figure 25.
NOTE: You cannot select any other database other than the domainlogdb. If you do it will not work and you will get an error if you do happen to select a different database
Click OK and you are finished.
Monitoring Log Auto-purge and flush threshold configuration
Logon to the SCC and go to Monitoring.

Figure 26.
Next on the left hand side select the General TAB then select Configuration button.

Figure 27.
You will be presented with the following screen.

Figure 28.
First Enable the auto-purg
Next set the days or leave the default of 7 days is fine.
Enable the flush threshold
Next set the Time Interval the default is five Minuted take the default or you can increase the
values for example 30 min in Production
Make sure the Monitor Database enpoint is selected monitordb.
NOTE if you select any other database will cause an error.
Once done with the above steps click OK
Now the Monitor clean up task in now enabled
Summary
This document explained in details about the steps needed to enable Schedule task and the Domain Log clean up for SAP MBO Server. Each task will help ensure the cleanup of old data that is no longer needed and keep the logs to a manageable size. The main consideration is enabling the schedule and domain log cleanup. This needs to be done on day one of the installed produce so not to have a large amount of data in the logs and database. If not enables it will take a very long time to clean up the logs and databases of the old data.
The overall size of the logs and database will not shrink. What will happen is white space or blank pages will be in the database. They blank pages will get reused over time. Also if you perform a dbunload and dbload you can also claim the empty pages in the database.
NOTE: It was determined that the schedules where not cleaning up as well as they should be for example Logical deletes and subscription cleanup. This has been fixed in 2.3. In 3.0 the fix will be included in the sevice pack 12 there for it is 100% needed as soon as that is released customer should install that service pack and run the schedules and if needed manually purge all the schedules
Purpose
This technical document explains how configure the four SAP Control Center Scheduled Tasks and Domain log cleanup in order to keep SAP SMP 3.0 clean and manageable.
Required Software
- SAP SMP 3.0 or higher.
- SAP SMP Control Center 3.0
Assumption
- This document assumes you have a working SAP SMP environment.
- You need to have access to the Admin role.
- You need to understand each role the schedule task perform and their impact.
Issue 1 – Large logs database growing large:
The SAP SMP Server generates logs and will become stale over time. During the day to
day processing of data and user are recorded in SMP MBO server will be collect there is a lot of historical data over time would need to be clean out. For example logical deletes. Also users registering and unregistering will also be collected and stored in the database and in the log file.
So it is very important to run the schedule on a daily basis to minimize the overall growth of the logs and databases.
Solution
Setup schedules Task cleanup to refresh the logs and remove Logical deletes from the database. The combination of all the Schedules are required in order to clean the database and log files.
Subscription Cleanup: Is used for removing device user that no longer using the system. Use caution when enabling or running this task. If an active user has not logged in within the time you schedule for the users will be removed. Make sure all the users have connected and processed before running this task. The task handles the devices differently for example.
Messaging based Removes Subscription if unwired Server has not received a Synchronization message since the given date in the schedule.
Replication based Removes Subscription not used since the last Synchronization. Let’s get start with the configurations.
Open the desktop icon for SAP SMP Control Center.
Login (default user ID): supAdmin. cPassword (default password): s3pAdmin (default).
You should see the following screen below.
Tree open Domains
Click on the default crown.
Click on Scheduled Tasks tab.
The default setting are disabled, we will walk thru each on and setup a schedule and enable them.
Figure 1.
Place a check in Subscription Cleanup box then Select Enable Button.
Figure 2
A pop dialog box will ask you if you want to enable click YES.
Figure 3.
Once enabled then Select Properties Button.
Figure 4.
In the task properties select schedule Tab. Here we need to set our start time and the days we want to run the cleanup operation. Days of the week click Select all button. We select the Start date and set the start time. There is no need to select the End date or end time as we want this to never stop want to have end time until we want to stop it.
Ideally we would like to run the schedule every day but we have to consider how it will impact performance in production. So at first it is best practices to run the schedules off peak time or on weekends.
Next Select the Option Button.
Figure 5.
We now need to set the number of inactive days add the number the default is 90 days
What this means it a user has not done any Syncing within 90 days and we can be removed them from the SMP server. You have to make sure this value exceeds the longed time for any one user in the system before there last Sync. If all users Sync with in a 30 day time frame set the value to 30 days
If all users Sync within 60 days set the value to 60 and so on in this scenario we will leave the default 90 days
There is a safety day count build in the threshold is seven days so if the Admin sets the value to 30 we automatically add on 7 days. The delete operation will execute 30+7=37 days this is to give the system some space for users that may be within a few days of 30 days they may sync within say 31 days or 32 days this is done to protect the users so they are not impacted. Set the value or take the default and select OK.
Figure 6.
This completes the setting up Subscription Cleanup steps.
Step - 2 Error History Clean up:
Is used for removing historical data on an MBO data refresh and operation replay failures Caused by Network failures, System failures, user log in issues and back end data base issues.
Place a check in the box for Error History Cleanup.
Click Enable button.
Figure 7.
A POPUP dialog box will ask you if you want to enable click YES.
Figure 8.
Select Schedule Tab.
Select the Sart date and add you start day.
Days of the week select Saturday and Sunday.
Figure 9.
Click on the Options Tab.
Figure 10.
Number of days to preserve default 7.
Take the default of 7 days.
Click the OK button to finish.
Figure 11.
This completes the configuration for Error History Cleanup.
Step -3 Client Log Clean up:
Is used for removing client log records that have already been synchronized to the device and are no longer associated with any active user.
Place a check in the Client Log Cleanup.
Click the Enable Button
Figure 12.
The dialog box will popup asking you if you want to enable this task click YES.
Figure 13.
- Click the Properties Button.
 Figure 14.Select Schedule Tab
Check the start Date and the start time.
Figure 15.
Select the days you want to run the schedule in this example Saturday and Sunday.
Next select the Options tab.
Figure 16.
Number of days to preserve the log record the default 7.
Take the default of seven days.
Click on the OK Button.
Figure 17.
This completes the configuration for Client Log Clean up.
Steps – 4 Synchronization Cache Clean up.
Is used for removing logical deleted rows in the cache that are older than the oldest synchronization time on a record in the system it also cleans up unused and stale partitions.
Place a check in the Synchronization Cache Cleanup.
Click the Enable Button.
Figure 18.
You will get a popup dialog box to confirm that you want to enable the task Click YES.
Figure 19.
Next Click the Properties Button.
Select Schedule Tab.
Figure 20..
Select the Start date and the Start time.
Next we select the days in this example Saturday and Sunday.
Next we select the options tab.
Figure 21.
We can leave the Purge interval for the EIS to their respective defaults.
Click on the OK Button.
Figure 22.
You are now done configuring the Synchronization Cache Cleanup.
It is highly recommended to run the schedules once a week during off peak hours if possible. It is also important to understand that all of the schedule task needed to be enables due to the fact that each schedule has a target areas to clean there for they all need to up and running.
Domain Log Auto-purge and flush threshold configuration.
In order to keep the SMP’s domain log clean and manageable we need to enable and set the Domain log auto purge.
First go to the default and open the view directly below the SMP domain you will see the log.
Figure 23.
Select or highlight the log.
On the right hand side go to the settings tab.
Figure 24.
Select the Configuration button.
Figure 25.
- Add a check Enable auto-purge configuration
- Add a check Enable flush threshold
- Make sure the Domain Log Database endpoint is select.
- Leave the rest of the values at their default setting
NOTE: You cannot select any other database other than the domainlogdb. If you do it will not work and you will get an error if you do happen to select a different database
Click OK and you are finished.
Monitoring Log Auto-purge and flush threshold configuration
Logon to the SCC and go to Monitoring.
Figure 26.
Next on the left hand side select the General TAB then select Configuration button.
Figure 27.
You will be presented with the following screen.
Figure 28.
First Enable the auto-purg
Next set the days or leave the default of 7 days is fine.
Enable the flush threshold
Next set the Time Interval the default is five Minuted take the default or you can increase the
values for example 30 min in Production
Make sure the Monitor Database enpoint is selected monitordb.
NOTE if you select any other database will cause an error.
Once done with the above steps click OK
Now the Monitor clean up task in now enabled
Summary
This document explained in details about the steps needed to enable Schedule task and the Domain Log clean up for SAP MBO Server. Each task will help ensure the cleanup of old data that is no longer needed and keep the logs to a manageable size. The main consideration is enabling the schedule and domain log cleanup. This needs to be done on day one of the installed produce so not to have a large amount of data in the logs and database. If not enables it will take a very long time to clean up the logs and databases of the old data.
The overall size of the logs and database will not shrink. What will happen is white space or blank pages will be in the database. They blank pages will get reused over time. Also if you perform a dbunload and dbload you can also claim the empty pages in the database.
NOTE: It was determined that the schedules where not cleaning up as well as they should be for example Logical deletes and subscription cleanup. This has been fixed in 2.3. In 3.0 the fix will be included in the sevice pack 12 there for it is 100% needed as soon as that is released customer should install that service pack and run the schedules and if needed manually purge all the schedules
- SAP Managed Tags:
- SAP Mobile Platform,
- Mobile
You must be a registered user to add a comment. If you've already registered, sign in. Otherwise, register and sign in.
Labels in this area
-
ABAP CDS Views - CDC (Change Data Capture)
2 -
AI
1 -
Analyze Workload Data
1 -
BTP
1 -
Business and IT Integration
2 -
Business application stu
1 -
Business Technology Platform
1 -
Business Trends
1,658 -
Business Trends
93 -
CAP
1 -
cf
1 -
Cloud Foundry
1 -
Confluent
1 -
Customer COE Basics and Fundamentals
1 -
Customer COE Latest and Greatest
3 -
Customer Data Browser app
1 -
Data Analysis Tool
1 -
data migration
1 -
data transfer
1 -
Datasphere
2 -
Event Information
1,400 -
Event Information
66 -
Expert
1 -
Expert Insights
177 -
Expert Insights
299 -
General
1 -
Google cloud
1 -
Google Next'24
1 -
Kafka
1 -
Life at SAP
780 -
Life at SAP
13 -
Migrate your Data App
1 -
MTA
1 -
Network Performance Analysis
1 -
NodeJS
1 -
PDF
1 -
POC
1 -
Product Updates
4,577 -
Product Updates
344 -
Replication Flow
1 -
RisewithSAP
1 -
SAP BTP
1 -
SAP BTP Cloud Foundry
1 -
SAP Cloud ALM
1 -
SAP Cloud Application Programming Model
1 -
SAP Datasphere
2 -
SAP S4HANA Cloud
1 -
SAP S4HANA Migration Cockpit
1 -
Technology Updates
6,873 -
Technology Updates
422 -
Workload Fluctuations
1
Related Content
- What’s New in SAP Datasphere Version 2024.8 — Apr 11, 2024 in Technology Blogs by Members
- Workload Analysis for HANA Platform Series - 2. Analyze the CPU, Threads and Numa Utilizations in Technology Blogs by SAP
- Getting Started with SAP BW Request Housekeeping in Technology Blogs by SAP
- Automatic Creation of One Time Payments from Time Collectors Using Integration Center in Technology Blogs by Members
- Integration of a SAP MaxDB into CCMS of an SAP System : Part 2 in Technology Blogs by Members
Top kudoed authors
| User | Count |
|---|---|
| 40 | |
| 25 | |
| 17 | |
| 13 | |
| 8 | |
| 7 | |
| 7 | |
| 7 | |
| 6 | |
| 6 |