
- SAP Community
- Products and Technology
- Technology
- Technology Blogs by SAP
- SAP HCP Internet of Things(IoT) Service - Cookbook
Technology Blogs by SAP
Learn how to extend and personalize SAP applications. Follow the SAP technology blog for insights into SAP BTP, ABAP, SAP Analytics Cloud, SAP HANA, and more.
Turn on suggestions
Auto-suggest helps you quickly narrow down your search results by suggesting possible matches as you type.
Showing results for
Product and Topic Expert
Options
- Subscribe to RSS Feed
- Mark as New
- Mark as Read
- Bookmark
- Subscribe
- Printer Friendly Page
- Report Inappropriate Content
11-07-2016
9:42 PM
Hello There,
In this blog, I will take you through steps involved in enabling, configuring IoT service in HCP and testing few key APIs provided by the framework, so that you can build applications using IoT services.
Prerequisite - Create your HCP Trial Account:
Go to link: https://account.hanatrial.ondemand.com/
First time users, click on register and fill the Form. An activation link would be sent to provided email address. Alternatively, SAP employees can click on ‘Log On’ , you will login using SSO.
Once the registration is completed, you can open the HCP Cockpit using this link:
https://account.hanatrial.ondemand.com/cockpit
Since you need a Database to work with, In your ‘SAP Hana Cloud Platform Cockpit’, Go to ‘Databases & Schemas’ and create a new Database & Schema.
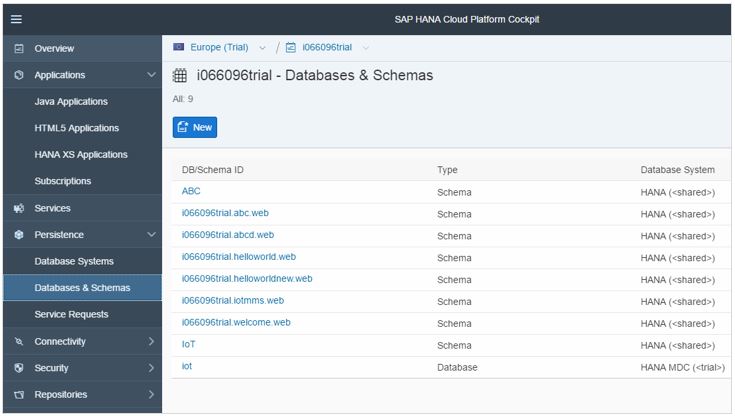
Significance of this Database & Schema(in IoT context) is to bind the IoT MMS application to the HANA DB schema so that the system automatically creates the table to store messages sent by devices configured in MMS.
Note: In the hana trial landscape you may not have a Database system. In production/customer landscapes there will be a database system(or you can create a new Database system).
Enabling and Configuring IoT Service in HCP:
Open the SAP Hana Cloud Platform Cockpit and go to the ‘Services’.

Under the ‘Internet of Things’ category, Select the ‘Internet of Things Services’ tile.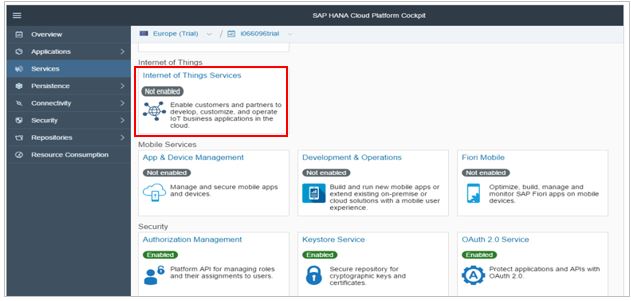
If the service is disabled, click on the ‘Enable’ button to enable it.
Upon clicking ‘Enable’ the service will now be enabled.
From the same page, click on ‘Configure Internet of Things Services’ link.
In the left tab, select ‘Roles’. Role ‘IoT-User’ would already be present as it is a predefined Role.
This role needs to be assigned to users accessing the service.
Add your user to the role ‘IoT-User’ in the ‘Individual Users’ table.
Click on ‘Assign’ and enter the user Id to assign the role.
To access the Internet of Things Services Cockpit, IoT services Overview page and click on ‘Go to Service’ link.
It will take you to Internet of Things Services Cockpit - shown below.
Deploy the Message Management Service (MMS): Under ‘Message Management’ click on the ‘Deploy the Message Management Service’ tile in the IoT services cockpit.
In the subsequent page, the Account Settings would be filled already. In the user settings, enter the username and password. Note: for SAP employees, it would be your domain password (as the Hana trial account is linked to SAP ID service).
After entering your credentials, click on the ‘Deploy’ button. Wait for deployment to complete as it would take few mins.
Assign the Role ‘IoT-MMS-User’ for the Java Application iotmms:
Once the MMS is deployed successfully, it can be seen under Applications-> Java Applications. It should be in status ‘Started’ (i.e., running).
Click on ‘iotmms’ java application. In the application overview page select ‘Roles’.
By default the ‘IoT-MMS-User’ role would be added.
Assign this role to your user by clicking on ‘Assign’ in the Individual Users section.
Bind the MMS to a Data Source:
The default schema would be bound by default. If you want to change it, then delete the existing binding and select New Binding.
Device Management in Internet of Things Services Cockpit:

Create a ‘Message Type’: From the IoT Services Cockpit, under ‘Device Management’ tab, click on the tile ‘Message Types’. Click on the ‘+’ sign at the bottom right of the master pane.
Provide a name to Message Type. Enter the required fields and choose their data type. Click on the ‘Create’ button at the bottom. To add more fields, click on the ‘+ Add Field’ button.
Create a ‘Device Type’: From the IoT Services Cockpit, under ‘Device Management’ tab, click on the tile ‘Device Types’. Click on the ‘+’ sign at the bottom right of the master pane. Provide a name to Device Type. In the Message Type section, click on ‘+ Add Message Type’.
Provide a name to the assignment and select the Message Type created in the previous step. Select the message direction and click on the ‘Create’ button at the bottom.
Create a ‘Device’: From the IoT Services Cockpit, under ‘Device Management’ tab, click on the tile ‘Device’. Click on the ‘+’ sign at the bottom right of the master pane.
Provide a name to Device. Select the Device Type created in the earlier step.
Click on the ‘Create’ button at the bottom.
Upon creation of Device, the system automatically generates an OAuth token for the newly created device.

Note that this OAuth token needs to be passed from the sender to send data to the IoT service.
In case if you want to re-generate the OAuth token any time, it can be done under ‘Authentication’ tab of a Device.
Open Message Management Service Cockpit: To test MMS (i.e., to send receive message in IoT service), Go to IoT Service cockpit and click on ‘Send and view messages, or perform other actions’ to view ‘Message Management Service Cockpit’.
To send data to the IoT service, go to MMS cockpit. Under the ‘Data Services’ section, click on ‘Messaging through HTTP’ tile.
In the ‘Send Message’ section replace the ‘d000-e000-v000-i000-c000-e001’ in the Data Endpoint url with your Device ID.
To get the device id, go to IoT Services cockpit -> Devices -> Information tab -> ID. Similarly to get the Message Type id, go to IoT Services cockpit -> Message Types -> Information tab -> ID.
Replace the default messageType value ‘m0t0y0p0e1’ with the Message Type ID. Also replace the default messages(sensor, value, timestamp) with your Message Type fields(e.g: pressure, temperature) and its values in name value format.
Data Endpoint:
https://<your hana trial account>/com.sap.iotservices.mms/v1/api/http/data/<device_ID>
Message:
{"mode":"sync","messageType":"<your message type ID>","messages":[{"<field1>”:"<value>","<field2>":<value>}]}
Click on ‘Send’ to post the date into IoT service. Response for the above Send action can be seen in the Reply From Server section.
View posted data in MMS:
In the Message Management Service cockpit, click on tile ‘Display Stored Messages’.
System by default creates a table called ‘T_IOT_<MESSAGE_TYPE_ID>’ to store data coming from devices of the message type. In our case since our message_type_id is ‘662467f5fca1a5c6db0f’, the table name is ‘T_IOT_662467F5FCA1A5C6DB0F’.
Click on the table name to view the table contents.
In actual production/customer usage scenario, the IoT service MMS can be bound to an application specific schema in HANA so that the table is created in that schema.
Data stored in such table(s) can be processed in the applications that are built on top(Native HANA Applications or other approach).
Also, the IoT service MMS can be used to send acknowledgement and/or data to the devices connected to IoT Service.
For more on HCP IoT Services, Please refer to documentation: https://help.hana.ondemand.com/iot/frameset.htm
Hope you find this blog useful.
Happy Coding. 🙂
Ashok.
In this blog, I will take you through steps involved in enabling, configuring IoT service in HCP and testing few key APIs provided by the framework, so that you can build applications using IoT services.
Prerequisite - Create your HCP Trial Account:
Go to link: https://account.hanatrial.ondemand.com/
First time users, click on register and fill the Form. An activation link would be sent to provided email address. Alternatively, SAP employees can click on ‘Log On’ , you will login using SSO.
Once the registration is completed, you can open the HCP Cockpit using this link:
https://account.hanatrial.ondemand.com/cockpit
Since you need a Database to work with, In your ‘SAP Hana Cloud Platform Cockpit’, Go to ‘Databases & Schemas’ and create a new Database & Schema.
Significance of this Database & Schema(in IoT context) is to bind the IoT MMS application to the HANA DB schema so that the system automatically creates the table to store messages sent by devices configured in MMS.
Note: In the hana trial landscape you may not have a Database system. In production/customer landscapes there will be a database system(or you can create a new Database system).
Enabling and Configuring IoT Service in HCP:
Open the SAP Hana Cloud Platform Cockpit and go to the ‘Services’.
Under the ‘Internet of Things’ category, Select the ‘Internet of Things Services’ tile.
If the service is disabled, click on the ‘Enable’ button to enable it.
Upon clicking ‘Enable’ the service will now be enabled.
From the same page, click on ‘Configure Internet of Things Services’ link.
In the left tab, select ‘Roles’. Role ‘IoT-User’ would already be present as it is a predefined Role.
This role needs to be assigned to users accessing the service.
Add your user to the role ‘IoT-User’ in the ‘Individual Users’ table.
Click on ‘Assign’ and enter the user Id to assign the role.
To access the Internet of Things Services Cockpit, IoT services Overview page and click on ‘Go to Service’ link.
It will take you to Internet of Things Services Cockpit - shown below.
Deploy the Message Management Service (MMS): Under ‘Message Management’ click on the ‘Deploy the Message Management Service’ tile in the IoT services cockpit.
In the subsequent page, the Account Settings would be filled already. In the user settings, enter the username and password. Note: for SAP employees, it would be your domain password (as the Hana trial account is linked to SAP ID service).
After entering your credentials, click on the ‘Deploy’ button. Wait for deployment to complete as it would take few mins.
Assign the Role ‘IoT-MMS-User’ for the Java Application iotmms:
Once the MMS is deployed successfully, it can be seen under Applications-> Java Applications. It should be in status ‘Started’ (i.e., running).
Click on ‘iotmms’ java application. In the application overview page select ‘Roles’.
By default the ‘IoT-MMS-User’ role would be added.
Assign this role to your user by clicking on ‘Assign’ in the Individual Users section.
Bind the MMS to a Data Source:
The default schema would be bound by default. If you want to change it, then delete the existing binding and select New Binding.
Device Management in Internet of Things Services Cockpit:
Create a ‘Message Type’: From the IoT Services Cockpit, under ‘Device Management’ tab, click on the tile ‘Message Types’. Click on the ‘+’ sign at the bottom right of the master pane.
Provide a name to Message Type. Enter the required fields and choose their data type. Click on the ‘Create’ button at the bottom. To add more fields, click on the ‘+ Add Field’ button.
Create a ‘Device Type’: From the IoT Services Cockpit, under ‘Device Management’ tab, click on the tile ‘Device Types’. Click on the ‘+’ sign at the bottom right of the master pane. Provide a name to Device Type. In the Message Type section, click on ‘+ Add Message Type’.
Provide a name to the assignment and select the Message Type created in the previous step. Select the message direction and click on the ‘Create’ button at the bottom.
Create a ‘Device’: From the IoT Services Cockpit, under ‘Device Management’ tab, click on the tile ‘Device’. Click on the ‘+’ sign at the bottom right of the master pane.
Provide a name to Device. Select the Device Type created in the earlier step.
Click on the ‘Create’ button at the bottom.
Upon creation of Device, the system automatically generates an OAuth token for the newly created device.
Note that this OAuth token needs to be passed from the sender to send data to the IoT service.
In case if you want to re-generate the OAuth token any time, it can be done under ‘Authentication’ tab of a Device.
Open Message Management Service Cockpit: To test MMS (i.e., to send receive message in IoT service), Go to IoT Service cockpit and click on ‘Send and view messages, or perform other actions’ to view ‘Message Management Service Cockpit’.
To send data to the IoT service, go to MMS cockpit. Under the ‘Data Services’ section, click on ‘Messaging through HTTP’ tile.
In the ‘Send Message’ section replace the ‘d000-e000-v000-i000-c000-e001’ in the Data Endpoint url with your Device ID.
To get the device id, go to IoT Services cockpit -> Devices -> Information tab -> ID.
Similarly to get the Message Type id, go to IoT Services cockpit -> Message Types -> Information tab -> ID.Replace the default messageType value ‘m0t0y0p0e1’ with the Message Type ID. Also replace the default messages(sensor, value, timestamp) with your Message Type fields(e.g: pressure, temperature) and its values in name value format.
Data Endpoint:
https://<your hana trial account>/com.sap.iotservices.mms/v1/api/http/data/<device_ID>
Message:
{"mode":"sync","messageType":"<your message type ID>","messages":[{"<field1>”:"<value>","<field2>":<value>}]}
Click on ‘Send’ to post the date into IoT service. Response for the above Send action can be seen in the Reply From Server section.
View posted data in MMS:
In the Message Management Service cockpit, click on tile ‘Display Stored Messages’.
System by default creates a table called ‘T_IOT_<MESSAGE_TYPE_ID>’ to store data coming from devices of the message type. In our case since our message_type_id is ‘662467f5fca1a5c6db0f’, the table name is ‘T_IOT_662467F5FCA1A5C6DB0F’.
Click on the table name to view the table contents.
In actual production/customer usage scenario, the IoT service MMS can be bound to an application specific schema in HANA so that the table is created in that schema.
Data stored in such table(s) can be processed in the applications that are built on top(Native HANA Applications or other approach).
Also, the IoT service MMS can be used to send acknowledgement and/or data to the devices connected to IoT Service.
For more on HCP IoT Services, Please refer to documentation: https://help.hana.ondemand.com/iot/frameset.htm
Hope you find this blog useful.
Happy Coding. 🙂
Ashok.
- SAP Managed Tags:
- SAP Business Technology Platform
8 Comments
You must be a registered user to add a comment. If you've already registered, sign in. Otherwise, register and sign in.
Labels in this area
-
ABAP CDS Views - CDC (Change Data Capture)
2 -
AI
1 -
Analyze Workload Data
1 -
BTP
1 -
Business and IT Integration
2 -
Business application stu
1 -
Business Technology Platform
1 -
Business Trends
1,658 -
Business Trends
91 -
CAP
1 -
cf
1 -
Cloud Foundry
1 -
Confluent
1 -
Customer COE Basics and Fundamentals
1 -
Customer COE Latest and Greatest
3 -
Customer Data Browser app
1 -
Data Analysis Tool
1 -
data migration
1 -
data transfer
1 -
Datasphere
2 -
Event Information
1,400 -
Event Information
66 -
Expert
1 -
Expert Insights
177 -
Expert Insights
293 -
General
1 -
Google cloud
1 -
Google Next'24
1 -
Kafka
1 -
Life at SAP
780 -
Life at SAP
13 -
Migrate your Data App
1 -
MTA
1 -
Network Performance Analysis
1 -
NodeJS
1 -
PDF
1 -
POC
1 -
Product Updates
4,577 -
Product Updates
340 -
Replication Flow
1 -
RisewithSAP
1 -
SAP BTP
1 -
SAP BTP Cloud Foundry
1 -
SAP Cloud ALM
1 -
SAP Cloud Application Programming Model
1 -
SAP Datasphere
2 -
SAP S4HANA Cloud
1 -
SAP S4HANA Migration Cockpit
1 -
Technology Updates
6,873 -
Technology Updates
418 -
Workload Fluctuations
1
Related Content
- App to automatically configure a new ABAP Developer System in Technology Blogs by Members
- How to host static webpages through SAP CPI-Iflow in Technology Blogs by Members
- IoT - Ultimate Data Cyber Security - with Enterprise Blockchain and SAP BTP 🚀 in Technology Blogs by Members
- ABAP Cloud Developer Trial 2022 Available Now in Technology Blogs by SAP
- It has never been easier to print from SAP with Microsoft Universal Print in Technology Blogs by Members
Top kudoed authors
| User | Count |
|---|---|
| 35 | |
| 25 | |
| 13 | |
| 7 | |
| 7 | |
| 6 | |
| 6 | |
| 6 | |
| 5 | |
| 4 |