
- SAP Community
- Products and Technology
- Technology
- Technology Blogs by SAP
- Guide to installing Apache Reverse proxy on Redhat...
Technology Blogs by SAP
Learn how to extend and personalize SAP applications. Follow the SAP technology blog for insights into SAP BTP, ABAP, SAP Analytics Cloud, SAP HANA, and more.
Turn on suggestions
Auto-suggest helps you quickly narrow down your search results by suggesting possible matches as you type.
Showing results for
Product and Topic Expert
Options
- Subscribe to RSS Feed
- Mark as New
- Mark as Read
- Bookmark
- Subscribe
- Printer Friendly Page
- Report Inappropriate Content
10-27-2016
9:27 PM
This blog post will cover the detailed steps required to install Apache 2.4.23 on Redhat Linux so that it can be used as a reverse proxy for SAP BusinessObjects Cloud system to allow Live Data connections from SAP BusinessObject Cloud to on-premise HANA systems. The blog is created using Redhat 7, but similar steps will also apply for other Linux flavors.
Apache can be installed from binaries available through the OS distributor or from source. I will cover both options in my blog, but whenever possible it's best to install Apache directly from binaries. I've documented the differences between the two options below:

Option 1: Install Apache from Binaries
Step 1: Run the command to install apache. Default Install location: /etc/httpd
Ÿyum install httpd
Step Ÿ2: Install openssl module.
Ÿyum install openssl
Step 3: Verify ssl module is available under the install directory(/etc/httpd/modules). In addition, ssl.conf file should now also be available under /etc/httpd/conf.d directory.


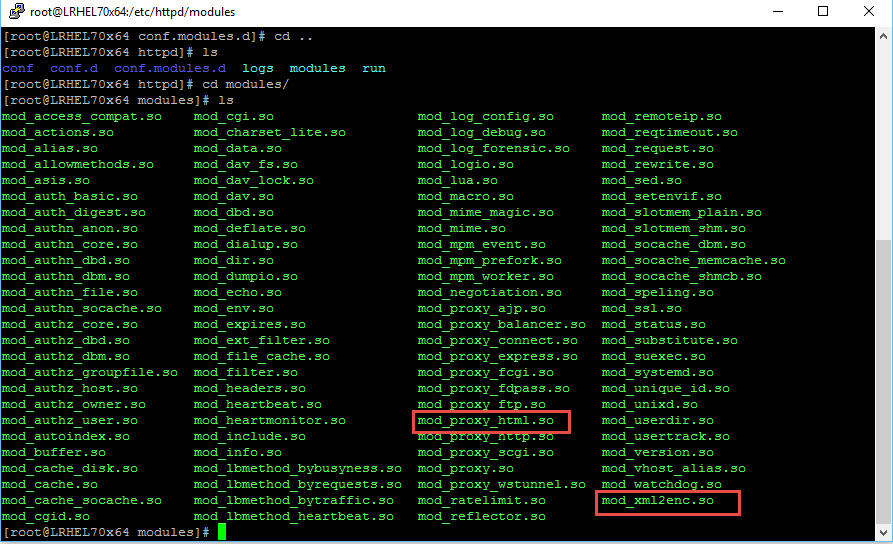
Step Ÿ4: Install proxy_html module and verify the modules(mod_proxy_html.so and mod_xml2enc.so) are available under install directory. These modules are critical for BOC to work correctly as some of the BOC proxy rules require rewriting of html headers.
Ÿyum install mod_proxy_html
Step 5: Run apachectl start to start Apache server.
Launch a browser and access https://<your apache server hostname> to confirm Apache is running correctly.

Step 6: Add BOC proxy rules to ssl.conf file under /etc/httpd/conf.d directory. For further instructions on setting up correct reverse proxy rules to SAP BusinessObjects Cloud to connect to on-premise HANA, refer to SAP BusinessObjects Cloud help documentation:
https://uacp2.hana.ondemand.com/doc/00f68c2e08b941f081002fd3691d86a7/release/en-US/5b4dad4d97664c41a...
or use the blogs below created by my colleague.
https://blogs.sap.com/2016/06/16/sap-businessobjects-cloud-setup-connection-to-remote-hana-systems-v...
https://blogs.sap.com/2016/10/11/whats-changed-setup-remote-hana-connection-saml-sso-sap-businessobj...
Option 2: Install Apache from Source files
As mentioned above, the preferred option is to use the Apache binaries for installation, but in some cases you may need to compile Apache from source. This option is only required when the version of Apache installed by OS distribution is older than what's supported for Business Objects Cloud. For eg. older versions of Linux distributions may install Apache 2.2 using the binary method, but Business Objects Cloud requires Apache 2.4 to work correctly. In this scenario, either update the Linux OS or use the method below to compile a later(supported) version of Apache from source.
Note: For the purpose of this blog, I will install all required components under /home/apache directory.
Step 1: Install Pre-requisites
Depending upon your Linux version you may or may not have to install the packages below
Log into Linux as root user and run the following commands.
yum install gcc
yum install gcc-c++
yum install zlib //This is required if compiling apache with mod_deflate module
Step 2: Download Apache 2.4.23
mkdir /home/apache
cd /home/apache
Apache is available for download from https://httpd.apache.org/download.cgi

Either download the Apache installation on Windows and transfer the files to your Linux machine or use the wget command to download directly to the Linux box.
From /home/apache folder run the following command to download the apache install media. To find the exact http link to use in the wget command, right click http-2.4.23.tar.gz and click properties.

wget http://mirror.olnevhost.net/pub/apache//httpd/httpd-2.4.23.tar.gz
Extract the downloaded installation files.
tar xvzf httpd-2.4.23.tar.gz

You should see a httpd-2.4.23 directory under /home/apache.
Step 3: Download APR and APR-util
Navigate to /home/apache/httpd-2.4.23/srclib directory.
Download APR and APR-util fromhttp://apr.apache.org/download.cgi using wget. As before right click on the links on the page to see the full URL to use in the wget command to download the files.
wget http://apache.osuosl.org//apr/apr-1.5.2.tar.gz
wget http://apache.osuosl.org//apr/apr-util-1.5.4.tar.gz

Extract both files.
tar xvfz apr-1.5.2.tar.gz
tar xvfz apr-util-1.5.4.tar.gz
The APR directory names will have version numbers attached which must be removed. Use mv command to accomplish this:
mv apr-1.5.2 apr
mv apr-util-1.5.4 apr-util
Remove the downloaded .gz file as they are no longer need.
rm apr-1.5.2.tar.gz apr-util-1.5.4.tar.gz
The /home/apache/http-2.4.23/srclib should now have apr and apr-util directories.

Step 4: Download and compile PCRE
Navigate back up to /home/apache directory.
Download PCRE from http://www.pcre.org/


wget ftp://ftp.csx.cam.ac.uk/pub/software/programming/pcre/pcre-8.39.tar.gz
Extract the file.
tar xvfz pcre-8.39.tar.gz
cd into pcre-8.39 directory and run the following commands in sequence:
./configure --prefix=/home/apache/pcre
make
make install
While running the ./configure if you see "no acceptable C compiler found in $PATH" or "You need a C++ compiler for C++ support" ensure gcc and c++ packages are installed and accessible on your system. Run the following commands:
yum install gcc
yum install gcc-c++
Step 5: Install mod_proxy_html module
This module allows Apache to rewrite html content. This module must be installed in order to use Apache Reverse proxy with SAP BusinessObjects Cloud to allow for Live Data Connection to on-premise HANA.
mod_proxy_html module is available for download from http://apache.webthing.com/mod_proxy_html/

Navigate to /home/apache/httpd-2.4.23/modules directory and download the module.
wget http://apache.webthing.com/mod_proxy_html/mod_proxy_html.tar.bz2
Extract the file.
tar -jxvf mod_proxy_html.tar.bz2
You should see mod_proxy_html directory under modules as per the screenshot below. Optionally remove the mod_proxy_html.tar.bz2 file using rm mod_proxy_html.tar.bz2

Step 6: Install and compile openSSL
Ensure you Linux system has latest version of openssl installed. OpenSSL is available for download from https://www.openssl.org/source
Most Linux systems will have openssl installed already, but it may not be the version required for Apache to work correctly. If you see the errors while compiling Apache(see below), you will need to make sure openSSL is updated on your Linux system.

Navigate to /home/apache folder and run wget command to download openssl and use tar to extract the file
wget https://www.openssl.org/source/openssl-1.0.2j.tar.gz
tar xvfz openssl-1.0.2j.tar.gz
Run cd /home/apache/openssl-1.02.j to navigate to the directory
Run the following commands in sequence. Note that the -fPIC flag should be set when running config to avoid errors with apache setup later.
./config –fPIC shared –prefix=/home/apache/openssl
make
make install
Step 7: Compile Apache
Navigate to /home/apache/httpd-2.4.23 directory and run the following commands in sequence
Note: In the configure command I am using the version of openssl that I installed to compile Apache. If your linux system already has openssl installed there is no need to download and install it again. Ensure that version of openssl is supported by Apache. If you see an error like the one in screenshot below, update the openssl version on your linux system.

If the commands execute without any errors, Apache will successfully installed under /home/apache/apache24 directory with all the modules required for use with SAP BusinessObjects Cloud.
Confirm that mod_proxy_html.so and mod_xml2enc.so modules are visible under /home/apache/apache24/modules directory.

Post Installation Steps
Navigate to /home/apache/apache24/bin
Run ./apachectl start to start Apache server.
Launch a browser and access http://<your apache server hostname> to confirm Apache is running correctly.

Step 8: Configure Apache for SSL
Navigate to /home/apache/opensslbin directory.
Run the command below to generate a certificate request. Enter the appropriate information for your certificate request when prompted. DO NOT enter anything for "A Challenge Password" when prompted
openssl req -newkey rsa:2048 -nodes -keyout reverseproxy.key -out reverseproxy.csr

Find the certificate request file(reverseproxy.csr) under /home/apache/openssl/bin directory and submit the certificate request to your Certificate Authority and retrieve the certificate response.
Make a new directory call ssl under the /home/apache/apache24 to store the ssl certificates using command below:
mkdir /home/apache/apache24/ssl
Copy the reverseproxy.key file from openssl/bin folder to ssl folder under apache24
cp /home/apache/openssl/bin/reverseproxy.key /home/apache/apache24/ssl
Also Save the X.509 certificate response from your certificate authority in a file named reverseproxy.crt into /home/apache/apache24/ssl directory.
While it's recommended to have your certificate signed by certificate authority, for testing purposes you can use self-signed certificate.
To create self-signed certificate:
Under /home/apache/openssl/bin directory run the following command:
openssl x509 -req -sha256 -days 365 -in reverseproxy.csr -signkey reverseproxy.key -out reverseproxy.crt
Copy the generate reverseproxy.crt file to /home/apache/apache24/ssl directory.
Step 9: Modify Apache Configuration files
Navigate to /home/apache/apache24/conf directory.
Use vi to edit httpd.conf file.
Ensure the modules and sections highlighted in the screenshots below are NOT commented. Remove the # sign to uncomment the line.


Navigate to /home/apache/apache24/conf/extra directory.
Use vi to edit httpd-ssl.conf file.
Ensure SSLCertificateFile and SSLCertificateKeyFile lines are pointing to the correct location of those files. In our case, this SSL certificates are under /home/apache/apache24/ssl directory.

Navigate to /home/apache/apache24/bin folder. Stop and Start Apache
./apachectl stop
./apachectl start
If Apache fails to start, confirm there are no typos in either httpd.conf or httpd-ssl.conf files. You may also have to modify the LD_LIBRARY_PATH to include /home/apache/openssl/lib.
export LD_LIBRARY_PATH=/home/apache/openssl/lib:$LD_LIBRARY_PATH
Launch a browser window and access https://<your Apache server hostname> to confirm https URL also works.

Step 10: Configure BOC rules
You are now ready to use Apache Reverse Proxy to use with SAP Business Objects Cloud. For further instructions on setting up correct reverse proxy rules to SAP BusinessObjects Cloud to connect to on-premise HANA, refer to SAP BusinessObjects Cloud help documentation:
https://uacp2.hana.ondemand.com/doc/00f68c2e08b941f081002fd3691d86a7/release/en-US/5b4dad4d97664c41a...
or use the blogs below created by my colleague.
https://blogs.sap.com/2016/06/16/sap-businessobjects-cloud-setup-connection-to-remote-hana-systems-v...
https://blogs.sap.com/2016/10/11/whats-changed-setup-remote-hana-connection-saml-sso-sap-businessobj...
Apache can be installed from binaries available through the OS distributor or from source. I will cover both options in my blog, but whenever possible it's best to install Apache directly from binaries. I've documented the differences between the two options below:
Option 1: Install Apache from Binaries
Step 1: Run the command to install apache. Default Install location: /etc/httpd
Ÿyum install httpd
Step Ÿ2: Install openssl module.
Ÿyum install openssl
Step 3: Verify ssl module is available under the install directory(/etc/httpd/modules). In addition, ssl.conf file should now also be available under /etc/httpd/conf.d directory.
Step Ÿ4: Install proxy_html module and verify the modules(mod_proxy_html.so and mod_xml2enc.so) are available under install directory. These modules are critical for BOC to work correctly as some of the BOC proxy rules require rewriting of html headers.
Ÿyum install mod_proxy_html
Step 5: Run apachectl start to start Apache server.
Launch a browser and access https://<your apache server hostname> to confirm Apache is running correctly.
Step 6: Add BOC proxy rules to ssl.conf file under /etc/httpd/conf.d directory. For further instructions on setting up correct reverse proxy rules to SAP BusinessObjects Cloud to connect to on-premise HANA, refer to SAP BusinessObjects Cloud help documentation:
https://uacp2.hana.ondemand.com/doc/00f68c2e08b941f081002fd3691d86a7/release/en-US/5b4dad4d97664c41a...
or use the blogs below created by my colleague.
https://blogs.sap.com/2016/06/16/sap-businessobjects-cloud-setup-connection-to-remote-hana-systems-v...
https://blogs.sap.com/2016/10/11/whats-changed-setup-remote-hana-connection-saml-sso-sap-businessobj...
Option 2: Install Apache from Source files
As mentioned above, the preferred option is to use the Apache binaries for installation, but in some cases you may need to compile Apache from source. This option is only required when the version of Apache installed by OS distribution is older than what's supported for Business Objects Cloud. For eg. older versions of Linux distributions may install Apache 2.2 using the binary method, but Business Objects Cloud requires Apache 2.4 to work correctly. In this scenario, either update the Linux OS or use the method below to compile a later(supported) version of Apache from source.
Note: For the purpose of this blog, I will install all required components under /home/apache directory.
Step 1: Install Pre-requisites
Depending upon your Linux version you may or may not have to install the packages below
Log into Linux as root user and run the following commands.
yum install gcc
yum install gcc-c++
yum install zlib //This is required if compiling apache with mod_deflate module
Step 2: Download Apache 2.4.23
mkdir /home/apache
cd /home/apache
Apache is available for download from https://httpd.apache.org/download.cgi
Either download the Apache installation on Windows and transfer the files to your Linux machine or use the wget command to download directly to the Linux box.
From /home/apache folder run the following command to download the apache install media. To find the exact http link to use in the wget command, right click http-2.4.23.tar.gz and click properties.
wget http://mirror.olnevhost.net/pub/apache//httpd/httpd-2.4.23.tar.gz
Extract the downloaded installation files.
tar xvzf httpd-2.4.23.tar.gz
You should see a httpd-2.4.23 directory under /home/apache.
Step 3: Download APR and APR-util
Navigate to /home/apache/httpd-2.4.23/srclib directory.
Download APR and APR-util fromhttp://apr.apache.org/download.cgi using wget. As before right click on the links on the page to see the full URL to use in the wget command to download the files.
wget http://apache.osuosl.org//apr/apr-1.5.2.tar.gz
wget http://apache.osuosl.org//apr/apr-util-1.5.4.tar.gz
Extract both files.
tar xvfz apr-1.5.2.tar.gz
tar xvfz apr-util-1.5.4.tar.gz
The APR directory names will have version numbers attached which must be removed. Use mv command to accomplish this:
mv apr-1.5.2 apr
mv apr-util-1.5.4 apr-util
Remove the downloaded .gz file as they are no longer need.
rm apr-1.5.2.tar.gz apr-util-1.5.4.tar.gz
The /home/apache/http-2.4.23/srclib should now have apr and apr-util directories.
Step 4: Download and compile PCRE
Navigate back up to /home/apache directory.
Download PCRE from http://www.pcre.org/
wget ftp://ftp.csx.cam.ac.uk/pub/software/programming/pcre/pcre-8.39.tar.gz
Extract the file.
tar xvfz pcre-8.39.tar.gz
cd into pcre-8.39 directory and run the following commands in sequence:
./configure --prefix=/home/apache/pcre
make
make install
While running the ./configure if you see "no acceptable C compiler found in $PATH" or "You need a C++ compiler for C++ support" ensure gcc and c++ packages are installed and accessible on your system. Run the following commands:
yum install gcc
yum install gcc-c++
Step 5: Install mod_proxy_html module
This module allows Apache to rewrite html content. This module must be installed in order to use Apache Reverse proxy with SAP BusinessObjects Cloud to allow for Live Data Connection to on-premise HANA.
mod_proxy_html module is available for download from http://apache.webthing.com/mod_proxy_html/
Navigate to /home/apache/httpd-2.4.23/modules directory and download the module.
wget http://apache.webthing.com/mod_proxy_html/mod_proxy_html.tar.bz2
Extract the file.
tar -jxvf mod_proxy_html.tar.bz2
You should see mod_proxy_html directory under modules as per the screenshot below. Optionally remove the mod_proxy_html.tar.bz2 file using rm mod_proxy_html.tar.bz2
Step 6: Install and compile openSSL
Ensure you Linux system has latest version of openssl installed. OpenSSL is available for download from https://www.openssl.org/source
Most Linux systems will have openssl installed already, but it may not be the version required for Apache to work correctly. If you see the errors while compiling Apache(see below), you will need to make sure openSSL is updated on your Linux system.
Navigate to /home/apache folder and run wget command to download openssl and use tar to extract the file
wget https://www.openssl.org/source/openssl-1.0.2j.tar.gz
tar xvfz openssl-1.0.2j.tar.gz
Run cd /home/apache/openssl-1.02.j to navigate to the directory
Run the following commands in sequence. Note that the -fPIC flag should be set when running config to avoid errors with apache setup later.
./config –fPIC shared –prefix=/home/apache/openssl
make
make install
Step 7: Compile Apache
Navigate to /home/apache/httpd-2.4.23 directory and run the following commands in sequence
- ./configure --prefix=/home2/apache/apache24 --enable-so --with-ssl=/home/apache/openssl --with-pcre=/home/apache/pcre --enable-mods-shared="proxy cache ssl all" --with-included-apr --enable-xml2enc –enable-proxy-html
- make
- make install
Note: In the configure command I am using the version of openssl that I installed to compile Apache. If your linux system already has openssl installed there is no need to download and install it again. Ensure that version of openssl is supported by Apache. If you see an error like the one in screenshot below, update the openssl version on your linux system.
If the commands execute without any errors, Apache will successfully installed under /home/apache/apache24 directory with all the modules required for use with SAP BusinessObjects Cloud.
Confirm that mod_proxy_html.so and mod_xml2enc.so modules are visible under /home/apache/apache24/modules directory.
Post Installation Steps
Navigate to /home/apache/apache24/bin
Run ./apachectl start to start Apache server.
Launch a browser and access http://<your apache server hostname> to confirm Apache is running correctly.
Step 8: Configure Apache for SSL
Navigate to /home/apache/opensslbin directory.
Run the command below to generate a certificate request. Enter the appropriate information for your certificate request when prompted. DO NOT enter anything for "A Challenge Password" when prompted
openssl req -newkey rsa:2048 -nodes -keyout reverseproxy.key -out reverseproxy.csr
Find the certificate request file(reverseproxy.csr) under /home/apache/openssl/bin directory and submit the certificate request to your Certificate Authority and retrieve the certificate response.
Make a new directory call ssl under the /home/apache/apache24 to store the ssl certificates using command below:
mkdir /home/apache/apache24/ssl
Copy the reverseproxy.key file from openssl/bin folder to ssl folder under apache24
cp /home/apache/openssl/bin/reverseproxy.key /home/apache/apache24/ssl
Also Save the X.509 certificate response from your certificate authority in a file named reverseproxy.crt into /home/apache/apache24/ssl directory.
While it's recommended to have your certificate signed by certificate authority, for testing purposes you can use self-signed certificate.
To create self-signed certificate:
Under /home/apache/openssl/bin directory run the following command:
openssl x509 -req -sha256 -days 365 -in reverseproxy.csr -signkey reverseproxy.key -out reverseproxy.crt
Copy the generate reverseproxy.crt file to /home/apache/apache24/ssl directory.
Step 9: Modify Apache Configuration files
Navigate to /home/apache/apache24/conf directory.
Use vi to edit httpd.conf file.
Ensure the modules and sections highlighted in the screenshots below are NOT commented. Remove the # sign to uncomment the line.
Navigate to /home/apache/apache24/conf/extra directory.
Use vi to edit httpd-ssl.conf file.
Ensure SSLCertificateFile and SSLCertificateKeyFile lines are pointing to the correct location of those files. In our case, this SSL certificates are under /home/apache/apache24/ssl directory.
Navigate to /home/apache/apache24/bin folder. Stop and Start Apache
./apachectl stop
./apachectl start
If Apache fails to start, confirm there are no typos in either httpd.conf or httpd-ssl.conf files. You may also have to modify the LD_LIBRARY_PATH to include /home/apache/openssl/lib.
export LD_LIBRARY_PATH=/home/apache/openssl/lib:$LD_LIBRARY_PATH
Launch a browser window and access https://<your Apache server hostname> to confirm https URL also works.
Step 10: Configure BOC rules
You are now ready to use Apache Reverse Proxy to use with SAP Business Objects Cloud. For further instructions on setting up correct reverse proxy rules to SAP BusinessObjects Cloud to connect to on-premise HANA, refer to SAP BusinessObjects Cloud help documentation:
https://uacp2.hana.ondemand.com/doc/00f68c2e08b941f081002fd3691d86a7/release/en-US/5b4dad4d97664c41a...
or use the blogs below created by my colleague.
https://blogs.sap.com/2016/06/16/sap-businessobjects-cloud-setup-connection-to-remote-hana-systems-v...
https://blogs.sap.com/2016/10/11/whats-changed-setup-remote-hana-connection-saml-sso-sap-businessobj...
- SAP Managed Tags:
- SAP Analytics Cloud
1 Comment
You must be a registered user to add a comment. If you've already registered, sign in. Otherwise, register and sign in.
Labels in this area
-
ABAP CDS Views - CDC (Change Data Capture)
2 -
AI
1 -
Analyze Workload Data
1 -
BTP
1 -
Business and IT Integration
2 -
Business application stu
1 -
Business Technology Platform
1 -
Business Trends
1,658 -
Business Trends
91 -
CAP
1 -
cf
1 -
Cloud Foundry
1 -
Confluent
1 -
Customer COE Basics and Fundamentals
1 -
Customer COE Latest and Greatest
3 -
Customer Data Browser app
1 -
Data Analysis Tool
1 -
data migration
1 -
data transfer
1 -
Datasphere
2 -
Event Information
1,400 -
Event Information
66 -
Expert
1 -
Expert Insights
177 -
Expert Insights
293 -
General
1 -
Google cloud
1 -
Google Next'24
1 -
Kafka
1 -
Life at SAP
780 -
Life at SAP
12 -
Migrate your Data App
1 -
MTA
1 -
Network Performance Analysis
1 -
NodeJS
1 -
PDF
1 -
POC
1 -
Product Updates
4,577 -
Product Updates
340 -
Replication Flow
1 -
RisewithSAP
1 -
SAP BTP
1 -
SAP BTP Cloud Foundry
1 -
SAP Cloud ALM
1 -
SAP Cloud Application Programming Model
1 -
SAP Datasphere
2 -
SAP S4HANA Cloud
1 -
SAP S4HANA Migration Cockpit
1 -
Technology Updates
6,873 -
Technology Updates
417 -
Workload Fluctuations
1
Related Content
- DO NOT Install BusinessObjects BI 4.3 SP04 or 4.3 SP04 Patch 1 in Technology Blogs by Members
- Data Architecture with SAP – Modern Data Stack in Technology Blogs by Members
- How many CMS in a BusinessObjects Business Intelligence Cluster Platform in Technology Q&A
- Are the SP34 MSM Modules broken? in Technology Q&A
- Installing SAP BusinessObjects 4.3 sp4 in Technology Q&A
Top kudoed authors
| User | Count |
|---|---|
| 33 | |
| 25 | |
| 10 | |
| 7 | |
| 7 | |
| 7 | |
| 6 | |
| 6 | |
| 5 | |
| 4 |