The SAP Microsoft Management Console (SAP MMC) provides a common framework for system management. It allows various tools that were previously implemented separately to be integrated in a common user-interface enabling centralized system management. The SAP MMC itself does not offer any management functionality, however it provides an environment for incorporating and accessing tools. Tools are integrated in the SAP MMC in the form of
snap-ins that allow standardized access to functions.
SAP has developed the SAP Systems Manager snap-in which allows you to monitor, start or stop the SAP system centrally from the SAP MMC. SAP recommends to use the SAP MMC because it simplifies system administration and provides many new features.
For the detailed features, please see
SAP Microsoft Management Console: Windows
If the system is installed in an environment other than Windows, like Linux, and you still would like to use this tool, you can see the following part to install MMC on a client PC.
- Download SAP Snap-In for Microsoft Management Console (MMC)
The SAP Snap-In for Microsoft Management Console (MMC) provides a graphical user interface to administer SAP systems from Windows PCs.
See Download Latest SAP MMC Snap-In Released Build in wiki page "SAP MMC Snap-In".

- Select the server type and any version of MMC. Usually, the latest patch is recommended.

- Double click on the downloaded file and install.

- There are three ways in which you can start the MMC:
- From the NT Start menu
- At the command prompt
- With a configuration file
Choose the method that best meets your requirements.
> NT Start Menu
Normally you start the MMC from the NT Start menu:
Choose Start ® Programs ® SAP System Management Console
The MMC opens. When you expand the SAP R/3 Systems node, all the instances running on the current host are displayed. If you want to change the configuration so that the instances on other hosts of your system are also displayed, follow the instructions given in
Changing the Configuration of the MMC.
> Command Prompt
To start the MMC at the command prompt enter the following:
mmc.exe <MMC_configuration_file>
Where
<MMC_configuration_file> is the name of a previously stored MMC snap-in configuration file. Use this method to start the MMC, if you have changed the configuration of the console and saved this in a file.
See also:
Changing the Configuration of the MMC.
> Alternatively, you can specify an instance:
mmc.exe <MMC_configuration_file > -SAP_R/3_MANAGERHOST <instance _name>
Where
<instance_name> is the instance that you want to monitor, for example, p18357_BIN_53. If other instances are already specified in the <MMC_configuration_file> file, the instance entered here will be added to the list.
Configuration File
If you have saved various configurations of the MMC, you can start the console simply by double-clicking on the appropriate configuration file.
Starting the MMC
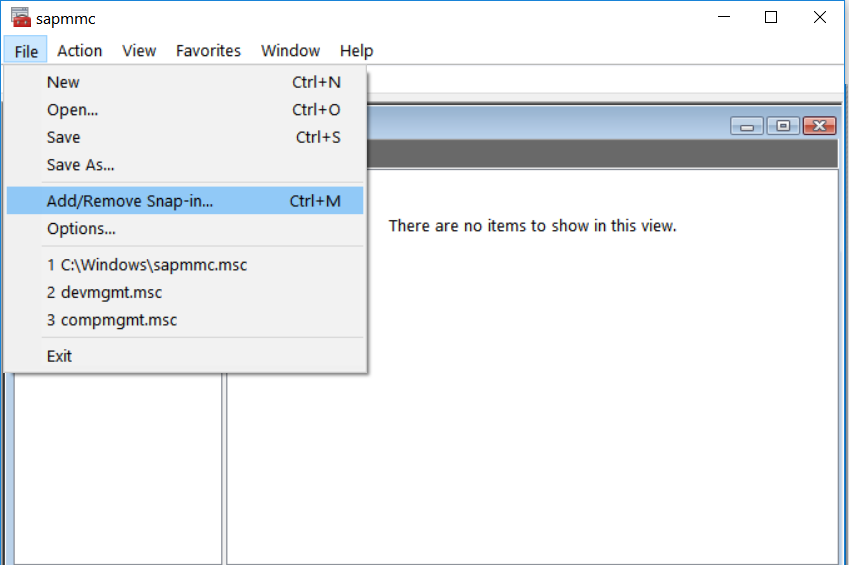
- Once the tool is opened, the display is as below

- Click File on the upper left hand corner, then select Add/Remove Snap-in.
- Find SAP Systems Manager in Available snap-ins, confirm your selection with Add.

- In the General Settings dialog box, enter data as follows:For Options
Select Use fixed SAP instance list.For Auto Refreshment
Enter the periods in which you want system information in the MMC to be updated automatically.For Options
Select Expert user mode if you want to access more detailed system information later when you start working with the SAP snap in.
Deselect Always show local SAP instances. These are automatically displayed in the MMC when the configuration is complete.
Deselect Always show all SAP instances of SAP systems. These are automatically displayed in the MMC when the configuration is complete.
Select Enable Single Sign-On, if you want to use single sign-on for logon to SAP instances that support SNC.

- Choose Next to close the General Settings dialog box.
- In the Security dialog box, choose a security level for communication between the snap-in and remote SAP instances. If you need to manage SAP instances prior to SAP NetWeaver 2004s you need to enable DCOM communication. With SAP NetWeaver 2004s and higher web service communication based on http or https is available. It is strongly recommended to use https, since some actions like starting or stopping require user authentication via basic authentication. Therefore SSL encryption should be used. However you first need to setup SSL correctly for the monitored SAP instances.

- Choose Next to close the Security dialog box.
- In the Proxy dialog box, specify a proxy server to connect to the SAP instances if you cannot use a direct network connection.
- Choose Next to close the "Proxy" dialog box.
- In the Fixed Server List dialog box, specify the System ID, Hostname and Instance Number.

- Choose Finish.
- Close all dialog boxes that are still open.
- Result.

- Save the change when you leave MMC.

