
- SAP Community
- Products and Technology
- Technology
- Technology Blogs by SAP
- Getting Started with Kapsel – Part 2 — Logon (SP13...
Technology Blogs by SAP
Learn how to extend and personalize SAP applications. Follow the SAP technology blog for insights into SAP BTP, ABAP, SAP Analytics Cloud, SAP HANA, and more.
Turn on suggestions
Auto-suggest helps you quickly narrow down your search results by suggesting possible matches as you type.
Showing results for
Product and Topic Expert
Options
- Subscribe to RSS Feed
- Mark as New
- Mark as Read
- Bookmark
- Subscribe
- Printer Friendly Page
- Report Inappropriate Content
10-20-2016
12:40 AM
Previous Home Next
Overview
Registering using the Logon Plugin
SAPUI5 and the Logon Plugin
Customizing the Logon Plugin's UI
Timing and Performance
Registering using an X.509 Certificate on Android with SMP(SP15+)
Registering using an X.509 Certificate on Android with SAP Cloud Platform Mobile Services(SP15+)
Multiple Users
The Logon plugin manages the onboarding or registration process with a SAP Cloud Platform Mobile Services or SMP 3.0 server. When an application onboards to to a server, it receives a registration ID (also known as an application connection ID). In all subsequent requests to the server, the registration ID is sent via a cookie named X-SMP-APPCID that is set following a successful registration. This enables tracing functionality for each app instance.
The server integrates with common security providers such as HTTP/HTTPS Authentication, Directory Service (LDAP), SAML, or x.509 User Certificate. The Logon plugin provides a registration screen where the user can enter values needed to connect to the server. The server will validate the registration using one of the security providers and the connection details will be stored in the Logon plugin's secure data vault. A basic authentication challenge can be handled automatically by the AuthProxy plugin using the stored registration credentials retrieved from the Logon plugin's data vault.
The data vault used by the Logon plugin is separate from storage provided with the Encrypted Storage plugin and is used to store user names, passwords, keys and certificates while the Encrypted Storage plugin is better suited to storing application data.
For additional details on the Logon plugin, see C:\SAP\MobileSDK3\KapselSDK\docs\api\sap.Logon.html or Using the Logon Plugin.
For additional information on the underlying component that is exposed via the Logon plugin, the Developing with MAF Logon section explains how to use the MAF Logon in a native application.
If you have not already done so, complete the previous section, Creating an Apache Cordova Project.
In SP14, a new plugin named kapsel-plugin-ui5 contains a minimal set of the SAPUI5 libraries that are used by the logon plugin.
A change was also made to use the belize theme where in previous versions of the SDK, the blue_crystal theme was used. This is specified in the following file:
The plugin will install UI5 to the resources folder at the root of the www folder if the following file is not found.
If you want to use your own copy of UI5, delete the resources folder in the www folder and add your own copy of UI5 there. Run cordova prepare to update the platforms with that copy.
If your application is always online and you wish to reduce the size of your app, you could change iab.html to load SAPUI5 from saoui5.hana.ondemand.com. This may also improve the speed of building and deploying your app during development.
Note, this requires removing the logon plugin, then adding it back after making this change. Also delete the all the contents in the www\resources folder of your application and replace sap-ui-core.js with an empty file. The size of the app prior to making this change was about 12 MB vs 5 MB after.
The text that is displayed as part of the Logon's UI can be modified as the strings are loaded from the file i18n.properties.
Make a change to the above file and then remove and add back the logon plugin as shown below.
See also the Localization section of this guide.
As of SP13, the custom field in the context object can be used to further customize the screens of the Logon plugin as shown in the following example context.
Note, the above files such as nightsky.jpg should be placed in www folder and the ../ above is necessary as they are referenced from iab.html within the logon plugin.
The contents of the custom.css file follow.
The background and logo images and custom.css files should be placed in the www folder.
Prepare, build and deploy the app with the following command.

Notice that the background, and copyright logo and text have been customized. Also, note that the option to set a passcode screen is not shown after pressing the OK button due to the context option disablePasscode being set to true.
Note that this example contains some additional logging and timing of events using the term EventLogging. To enable the capturing of the time taken from the when the app is initially started till the datavault is unlocked, make the following modification.
On Android, modify the following file and change the below line to pass in to the index.html the time the app was started.
With this change, the time taken from the MainActivity which should occur shortly after the user clicks on the app icon till the time the logonSucccessCallback is called can be calculated. In the below example, the time taken is about 2 1/2 seconds.

The time taken by the datavault to unlock can be reduced (using SP15 or greater is recommended for Android) by modifying the useLocalStorage setting in the serverContext.js file as shown below.

Notice above that the time taken from clicking on the app icon till the datavault unlocks has decreased from 2 1/2 seconds to 1.3 seconds.
For further details see Storing configuration data outside of the datavault.
In SP15, a built in certificate provider was added to the Logon plugin for Android(Logon Plugin Includes System Certificate Provider).
In SP16 a file and shared keychain certificate provider was added to the Logon plugin for iOS (Keychain Certificate Provider Plugin).
A certificate provider enables the logon plugin to perform a registration against a SMP or SCPMS server using a certificate to identify the user. The following instructions will demonstrate using it. Additional details are available at Using the X.509 Certificate Provider Interface to Integrate with Third-Party Certificate Providers.
The steps are the same as above except the Management Cockpit of the SAP Cloud Platform Mobile Services has a different UI and an additional step to upload the CA is required.
Implemented on iOS and Windows only.
Android has multi user built-in to the Android OS via Settings -> Users.
To try it out, follow the instructions below.
Previous Home Next
Overview
Registering using the Logon Plugin
SAPUI5 and the Logon Plugin
Customizing the Logon Plugin's UI
Timing and Performance
Registering using an X.509 Certificate on Android with SMP(SP15+)
Registering using an X.509 Certificate on Android with SAP Cloud Platform Mobile Services(SP15+)
Multiple Users
Overview
The Logon plugin manages the onboarding or registration process with a SAP Cloud Platform Mobile Services or SMP 3.0 server. When an application onboards to to a server, it receives a registration ID (also known as an application connection ID). In all subsequent requests to the server, the registration ID is sent via a cookie named X-SMP-APPCID that is set following a successful registration. This enables tracing functionality for each app instance.
The server integrates with common security providers such as HTTP/HTTPS Authentication, Directory Service (LDAP), SAML, or x.509 User Certificate. The Logon plugin provides a registration screen where the user can enter values needed to connect to the server. The server will validate the registration using one of the security providers and the connection details will be stored in the Logon plugin's secure data vault. A basic authentication challenge can be handled automatically by the AuthProxy plugin using the stored registration credentials retrieved from the Logon plugin's data vault.
The data vault used by the Logon plugin is separate from storage provided with the Encrypted Storage plugin and is used to store user names, passwords, keys and certificates while the Encrypted Storage plugin is better suited to storing application data.
For additional details on the Logon plugin, see C:\SAP\MobileSDK3\KapselSDK\docs\api\sap.Logon.html or Using the Logon Plugin.
For additional information on the underlying component that is exposed via the Logon plugin, the Developing with MAF Logon section explains how to use the MAF Logon in a native application.
Registering using the Logon Plugin
If you have not already done so, complete the previous section, Creating an Apache Cordova Project.
- Add the Logon plugin and dialogs plugin.The following steps assume that a KAPSEL_HOME environment variable has been set to the location of the KapselSDK.
Note the way to access an environment variable on windows is with a % sign while on a Mac it is a $.
on Windows

cordova plugin add kapsel-plugin-logon --searchpath %KAPSEL_HOME%/plugins


on a Mac

cordova plugin add kapsel-plugin-logon --searchpath $KAPSEL_HOME/plugins


cordova plugin add cordova-plugin-dialogs
An added plugin can be removed by calling
cordova plugin remove plugin_id
- A list of the plugins now included in the project can be seen by entering the below command.
cordova plugins

cordova-plugin-device 1.1.6 "Device"

cordova-plugin-dialogs 1.3.3 "Notification"

cordova-plugin-whitelist 1.3.2 "Whitelist"

kapsel-plugin-authproxy 3.15.2 "AuthProxy"

kapsel-plugin-corelibs 3.15.2 "CoreLibs"

kapsel-plugin-i18n 3.15.2 "i18n"

kapsel-plugin-inappbrowser 3.15.2 "InAppBrowser"

kapsel-plugin-logon 3.15.2 "Logon"

kapsel-plugin-ui5 3.15.2 "ui5"
Notice that the plugins that the Logon plugin depends on are added if they are not present. This is defined in
C:\Kapsel_Projects\KapselGSDemo\plugins\kapsel-plugin-logon\plugin.xml
- This sample requires the application previously created in Configuring a Kapsel App in the Management Cockpit.
- Replace www\index.html with the following contents.
<!DOCTYPE html>
<html>
<head>
<!--<meta http-equiv="Content-Security-Policy" content="default-src http://10.7.171.234:8080 'self' 'unsafe-inline' data: gap: https://ssl.gstatic.com 'unsafe-eval'; style-src 'self' 'unsafe-inline'; media-src *">-->
<meta name="viewport" content="user-scalable=no, initial-scale=1, maximum-scale=1, minimum-scale=1, width=device-width">
<script type="text/javascript" charset="utf-8" src="datajs-1.1.2.min.js"></script>
<script type="text/javascript" charset="utf-8" src="serverContext.js"></script>
<script type="text/javascript" charset="utf-8" src="cordova.js"></script>
<script>
var t0 = Number(location.href.split("startTime=")[1]); //Time passed in from main activity.
var t1 = performance.now();
var t2; //onLoad
var t3; //deviceready
var readStartTime;
var logonInitTime;
var unlockTime;
var resumeTime;
var applicationContext = null;
window.onerror = onError;
function onError(msg, url, line) {
var idx = url.lastIndexOf("/");
var file = "unknown";
if (idx > -1) {
file = url.substring(idx + 1);
}
alert("An error occurred in " + file + " (at line # " + line + "): " + msg);
return false; //suppressErrorAlert;
}
function init() {
updateStatus2("EventLogging: deviceready called");
t3 = performance.now();
console.log("EventLogging Perf: " + ((t3 - t1)/1000).toFixed(3) + " seconds from onLoad until deviceready");
if (sap.Logger) {
sap.Logger.setLogLevel(sap.Logger.DEBUG); //enables the display of debug log messages from the Kapsel plugins.
sap.Logger.debug("EventLogging: Log level set to DEBUG");
}
if (navigator.notification) { // Override default HTML alert with native dialog. alert is not supported on Windows
window.alert = navigator.notification.alert;
}
register();
}
function logonSuccessCallback(result) {
updateStatus2("logonSuccessCallback called");
var endTime = performance.now();
var endTime2 = new Date();
console.log("EventLogging Perf: " + ((endTime - logonInitTime)/1000).toFixed(3) + " seconds for logon.init to complete");
console.log("EventLogging Perf: " + ((endTime - t1)/1000).toFixed(3) + " seconds from onload till datavault is unlocked");
console.log("EventLogging Perf: " + ((endTime2 - t0)/1000).toFixed(3) + " seconds from main activity till datavault is unlocked. Requires modifying MainActivity.java"); //loadUrl(launchUrl + "?startTime=" + new java.util.Date().getTime());
console.log("EventLogging: logonSuccessCallback " + JSON.stringify(result));
applicationContext = result;
showScreen("MainDiv");
}
//used when the logon plugin does not register with a server
function logon2SuccessCallback(result) {
console.log("EventLogging: logon2SuccessCallback " + JSON.stringify(result));
applicationContext = result;
applicationContext.applicationEndpointURL = "https://sapes4.sapdevcenter.com/sap/opu/odata/IWFND/RMTSAMPLEFLIGHT";
showScreen("MainDiv");
}
function logonErrorCallback(error) { //this method is called if the user cancels the registration.
alert("An error occurred: " + JSON.stringify(error));
if (device.platform == "Android") { //Not supported on iOS
navigator.app.exitApp();
}
}
function read() {
updateStatus2("Read request started");
readStartTime = performance.now();
if (!applicationContext) {
alert("Register or unlock before proceeding");
return;
}
clearTable();
sUrl = applicationContext.applicationEndpointURL + "/CarrierCollection?$format=json"; //JSON format is less verbose than atom/xml
var oHeaders = {};
//oHeaders['X-SMP-APPCID'] = applicationContext.applicationConnectionId; //not needed as this will be sent by the logon plugin
var request = {
headers : oHeaders,
requestUri : sUrl,
method : "GET"
};
if (device.platform == "windows") { //provided by the authproxy and logon plugins on Android and iOS but not on Windows
request.user = applicationContext.registrationContext.user;
request.password = applicationContext.registrationContext.password;
}
OData.read(request, readSuccessCallback, errorCallback);
}
function readSuccessCallback(data, response) {
var endTime = performance.now();
updateStatus2("Read " + data.results.length + " records in " + ((endTime - readStartTime)/1000).toFixed(3) + " seconds");
var carrierTable = document.getElementById("carrierTable");
for (var i = data.results.length -1; i >= 0; i--) {
var row = carrierTable.insertRow(1);
var cell1 = row.insertCell(0);
var cell2 = row.insertCell(1);
cell1.innerHTML = data.results[i].carrid;
cell2.innerHTML = data.results[i].CARRNAME;
}
}
function clearTable() {
var carrierTable = document.getElementById("carrierTable");
while(carrierTable.rows.length > 1) {
carrierTable.deleteRow(1);
}
}
function errorCallback(e) {
alert("An error occurred: " + JSON.stringify(e));
showScreen("MainDiv");
}
function register() {
logonInitTime = performance.now();
updateStatus2("Calling Logon.init");
sap.Logon.init(logonSuccessCallback, logonErrorCallback, appId, context);
//sap.Logon.initPasscodeManager(logon2SuccessCallback, errorCallback, appId); //initialize the datavault without registering with an SMP server
}
function unRegister() {
updateStatus2("Calling deleteRegistration");
showScreen("LoadingDiv");
sap.Logon.core.deleteRegistration(logonUnregisterSuccessCallback, errorCallback);
//sap.Logon.deletePasscodeManager(logonUnregisterSuccessCallback, errorCallback); //Used when the datavault is initialized with initPasscodeManager
clearTable();
}
function logonUnregisterSuccessCallback(result) {
updateStatus2("Successfully Unregistered");
console.log("EventLogging: logonUnregisterSuccessCallback " + JSON.stringify(result));
applicationContext = null;
register();
}
function lock() {
sap.Logon.lock(logonLockSuccessCallback, errorCallback);
clearTable();
}
function logonLockSuccessCallback(result) {
console.log("EventLogging: logonLockSuccessCallback " + JSON.stringify(result));
showScreen("LockedDiv");
}
function unlock() {
unlockTime = performance.now();
sap.Logon.unlock(unlockSuccessCallback, errorCallback);
}
function unlockSuccessCallback(result) {
updateStatus2("unLockSuccessCallback called");
var endTime = performance.now();
console.log("EventLogging Perf: " + ((endTime - unlockTime)/1000).toFixed(3) + " seconds to unlock the datavault");
showScreen("MainDiv");
}
function managePasscode() {
sap.Logon.managePasscode(managePasscodeSuccessCallback, errorCallback);
}
function managePasscodeSuccessCallback() {
console.log("EventLogging: managePasscodeSuccess");
}
function showScreen(screenIDToShow) {
var screenToShow = document.getElementById(screenIDToShow);
screenToShow.style.display = "block";
var screens = document.getElementsByClassName('screenDiv');
for (var i = 0; i < screens.length; i++) {
if (screens[i].id != screenToShow.id) {
screens[i].style.display = "none";
}
}
}
function updateStatus2(msg) {
var d = new Date();
document.getElementById('statusID2').innerHTML = msg + " at " + addZero(d.getHours()) + ":" + addZero(d.getMinutes()) + ":" + addZero(d.getSeconds());
console.log("EventLogging: " + msg + " at " + addZero(d.getHours()) + ":" + addZero(d.getMinutes()) + ":" + addZero(d.getSeconds() + "." + addZero(d.getMilliseconds())));
}
function addZero(input) {
if (input < 10) {
return "0" + input;
}
return input;
}
function onLoad() {
console.log("EventLogging: onLoad");
t2 = performance.now();
var endTime = new Date();
console.log("EventLogging Perf: " + ((endTime - t0)/1000).toFixed(3) + " seconds between MainActivity and onLoad");
}
function onBeforeUnload() {
console.log("EventLogging: onBeforeUnLoad");
}
function onUnload() {
console.log("EventLogging: onUnload");
}
function onPause() {
console.log("EventLogging: onPause");
}
function onResume() {
resumeTime = performance.now();
console.log("EventLogging: onResume");
}
function onSapResumeSuccess() {
console.log("EventLogging: onSapResumeSuccess");
var endTime = performance.now();
console.log("EventLogging Perf: " + ((endTime - resumeTime)/1000).toFixed(3) + " seconds from onresume to onSapResumeSuccess");
}
function onSapLogonSuccess() {
console.log("EventLogging: onSapLogonSuccess");
}
function onSapResumeError(error) {
console.log("EventLogging: onSapResumeError " + JSON.stringify(error));
}
document.addEventListener("deviceready", init, false);
document.addEventListener("pause", onPause, false);
document.addEventListener("resume", onResume, false);
document.addEventListener("onSapResumeSuccess", onSapResumeSuccess, false);
document.addEventListener("onSapLogonSuccess", onSapLogonSuccess, false);
document.addEventListener("onSapResumeError", onSapResumeError, false);
</script>
</head>
<body onload="onLoad()" onunload="onUnload()" onbeforeunload="onBeforeUnload()">
<div class="screenDiv" id="LoadingDiv">
<h1>Loading ...</h1>
</div>
<div class="screenDiv" id="LockedDiv" style="display: none">
<h1>Locked</h1>
<button id="unlock2" onclick="unlock()">Unlock</button>
</div>
<div class="screenDiv" id="MainDiv" style="display: none">
<h1>Logon Sample</h1>
<button id="read" onclick="read()">Read</button>
<button id="unregister" onclick="unRegister()">Unregister</button>
<button id="lock" onclick="lock()">Lock</button>
<button id="unlock" onclick="unlock()">Unlock</button>
<button id="managePasscode" onclick="managePasscode()">Manage Passcode</button><br>
<span id="statusID2"></span>
<table id="carrierTable"><tr><th>Carrier ID</th><th>Carrier Name</th></tr></table>
</div>
</body>
</html>
Create a file named serverContext.js in the www folder and copy the content from below.
var appId = "com.kapsel.gs"; // Change this to app id on server


// Optional initial connection context

var context = {

    //"serverHost": "10.7.168.212", //Place your SMP 3.0 server name here

    "serverHost": "hcpms-XXXXXXXtrial.hanatrial.ondemand.com", //SAP Cloud Platform Mobile Services

    "https": true,

    "serverPort": "443",  //443 for SAP Cloud Platform Mobile Services, may be different for an on premise SAP Mobile Platform server

    //"multiUser": true,

    //"useLocalStorage": false,

    "user": "i82XXXX",          //For demo purposes, specify the user name and password you wish to register with here to save typing on the device

    "password": "XXXXX",        //Note, if you wish to use this user name and password to be passed to the backend OData producer, choose Basic as the SSO mechanism

                                //The AuthProxy plugin with the Logon plugin can respond to 401 Authentication challenges if the same credentials used to register are also used to make OData requests

                                //Once set the credentials can be changed by calling sap.Logon.changePassword()

    "passcode": "password",     //Hardcoding passwords and unlock passcodes are strictly for ease of use during development

                                //Passcode can be changed by calling sap.Logon.managePasscode()

    "unlockPasscode": "password",

    "passcode_CONFIRM": "password",

    "oldPasscode" : "password",

    "communicatorId": "REST",


    //"auth": [ { "type": "saml2.web.post" } ], //Indicates that a redirect to a SAML IDP should be used for registration

    //"refreshSAMLSessionOnResume": "skip",  // Useful for offline apps when you may not wish for a saml check to be performed when the app is resumed since you may be offline


    "custom": {

        "hiddenFields": ["farmId", "resourcePath", "securityConfig", "serverPort", "https"]

    }

};
Edit the serverHost, user, and password variables in serverContext.js.
Note if you are using an Android emulator and your server is running on the same machine, 10.0.2.2 can be used to reach the host machine from the emulator.
Note, that the application ID is com.kapsel.gs and is passed in as a parameter to the method sap.Logon.init(). The logonSuccessCallback method stores an object containing the logon parameters into the applicationContext variable.
function logonSuccessCallback(result) {

    ...

    applicationContext = result;

    showScreen("MainDiv")

}
- Place a copy of datajs-1.1.2.min.js into the www folder. For additional details on datajs and OData see Appendix A: OData.
- Add the Logon plugin and dialogs plugin.The following steps assume that a KAPSEL_HOME environment variable has been set to the location of the KapselSDK.
- If you are deploying to iOS, ensure that Keychain Sharing is enabled.

- If you are targeting Windows 10, add the following to your config.xml file.
<preference name="windows-target-version" value="10.0" />
- Prepare, build and deploy the app with the following commands.
cordova run android

or

cordova run windows -- --archs=x64

or

cordova run windows --device -- --archs=arm --phone

or

cordova run ios
- Alternatively, use Android Studio, Xcode or Visual Studio to deploy and run the project after first running the below command.
cordova prepare
- The registration screen allows a user to enter the connection information for their SAP Mobile Platform server. As of SP15, this screen will return the following error messages.
- Not connected to network.
- Please check your credentials.
- Server certificate failed validation.
- Server unreachable.
- Secure channel error. (occurs if http is used on an https port or vice versa)

In serverContext.js, the context object can be used to set default values such as port to be used.
If you need to enter text on an Android device and wish to use your computers keyboard try the following.
adb shell input text some_text_to_enter
The hiddenFields which was added to the context object in SP 13 can be used to hide fields. Notice above that serverPort and whether to use HTTPS or not are not shown.
var context = {

    "serverHost": "10.7.186.3", //Place your SMP 3.0 server name here

    "https": "false",

    "serverPort": "8080",

    "custom": {

        "hiddenFields": ["farmId", "resourcePath", "securityConfig", "serverPort", "https"]

    }

};
For additional security, the application can have a passcode screen. The client password policy such as password length and retry limit can be centrally managed in the management cockpit. It is also possible to disable this feature via the custom property disablePasscode as shown in the customization section below.

The Logon plugin's data vault which stores the entered credentials needs to be unlocked when the application opens and is locked when it closes. The data vault will also lock if it the app is in the background for a certain length of time. This is configurable via the lock timeout setting.
SAP Mobile Platform Cockpit

SAP Cloud Platform Mobile Services Cockpit

As of SP14, it is possible to use a fingerprint instead of a passcode to unlock the app. The following instructions demonstrate this on an Android 7.1 emulator. A few issues were found using an earlier emulator so it may be best to use the latest available emulator or a device. Note, a passcode is still required as a fallback in case the device is unable to successfully scan your fingerprint. For additional instructions see Understanding Fingerprint Authentication.
Settings > Security> Fingerprint.


The following command simulates a fingerprint touch.
adb -e emu finger touch 1
Alternatively, from the emulators extended controls menu select Fingerprint > Touch Sensor.


Provide the previously entered fingerprint to unlock.
adb -e emu finger touch 1
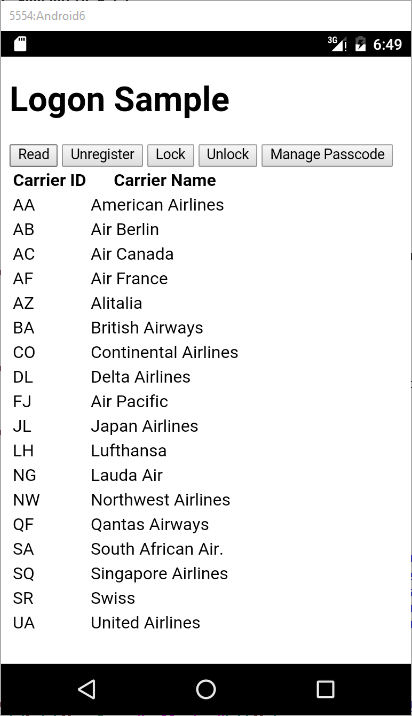
It is possible to use the Logon plugin's data vault without using its features for registering with an SMP server using the sap.Logon.initPasscodeManager method. See the index.html in the Encrypted Storage plugin for a complete example. - Try out the rest of the application. The following are a few more screenshots showing the lock screen and the results of performing a read.

- Note, if the server host, port or application id changes; sap.Logon.core.reset() must be called followed by calling init sap.Logon.init().In SP10 of the SMP server a new setting was added called Automatic Removal which means that registrations that have not been used for a specified time will be deleted automatically.

- If the registration fails one quick test to verify basic connectivity to the SMP 3.0 server from the device or emulator is to open the following URL from a browser on the device or emulator.
http://SMP_Server_IP_Address:8080/sapui5/ or http://SMP_Server_IP_Address:8080
If the above URL opens correctly in a browser on the machine that the SMP server is running on but not from the browser on another machine or on a mobile device there is likely something such as a firewall preventing communication over port 8080. - When the app is opened, the deviceready event fires and the code in the init() method is called including a call to sap.Logon.init() which will open either the registration screen, the unlock screen, or if the no passcode option is enabled, the first screen of the app.
- Note that this example contains some additional logging and timing of events using the term EventLogging. Event listeners for pause, resume, onload, onunload, onbeforeunload, onSapResumeSuccess, on SapLogonSuccess and onSapResumeError events have been added. See also Events.
- Note that on iOS versions greater than 6, the status bar can overlay the contents of the WebView. The org.apache.cordova.statusbar plugin can be added to prevent this. See iOS 7 Status Bar Overlays the App.
SAPUI5 and the Logon Plugin
In SP14, a new plugin named kapsel-plugin-ui5 contains a minimal set of the SAPUI5 libraries that are used by the logon plugin.
A change was also made to use the belize theme where in previous versions of the SDK, the blue_crystal theme was used. This is specified in the following file:
C:\SAP\MobileSDK3\KapselSDK\plugins\logon\www\common\assets\ui\iab.htmlThe plugin will install UI5 to the resources folder at the root of the www folder if the following file is not found.
C:\Kapsel_Projects\KapselGSDemo\www\resources\sap-ui-core.jsIf you want to use your own copy of UI5, delete the resources folder in the www folder and add your own copy of UI5 there. Run cordova prepare to update the platforms with that copy.
If your application is always online and you wish to reduce the size of your app, you could change iab.html to load SAPUI5 from saoui5.hana.ondemand.com. This may also improve the speed of building and deploying your app during development.
src="../../../resources/sap-ui-core.js"

to

src="https://sapui5.hana.ondemand.com/resources/sap-ui-core.js"
Note, this requires removing the logon plugin, then adding it back after making this change. Also delete the all the contents in the www\resources folder of your application and replace sap-ui-core.js with an empty file. The size of the app prior to making this change was about 12 MB vs 5 MB after.
Customizing the Logon Plugin's UI
The text that is displayed as part of the Logon's UI can be modified as the strings are loaded from the file i18n.properties.
C:\SAP\MobileSDK3\KapselSDK\plugins\logon\www\common\assets\i18n\i18n_en.propertiesMake a change to the above file and then remove and add back the logon plugin as shown below.
cordova plugin remove kapsel-plugin-logon

cordova plugin add kapsel-plugin-logon --searchpath %KAPSEL_HOME%/plugins

cordova run android
See also the Localization section of this guide.
As of SP13, the custom field in the context object can be used to further customize the screens of the Logon plugin as shown in the following example context.
var context = {

    "serverHost": "10.7.168.124", //Place your SMP 3.0 server name here

    "https": "false",

    "serverPort": "8080",

        "custom": {

            "hiddenFields": ["farmId", "resourcePath", "securityConfig", "serverPort", "https"],

            "backgroundImage": "../../../nightsky.jpg",

            "copyrightLogo":"../../../logo.png",

            "styleSheet": "../../../custom.css",

            "copyrightMsg": ["Copyright @2016 Mycompany Inc.", "All rights reserved."],

            "hideLogoCopyright" : false,

            "disablePasscode": true

        }

    }

};
Note, the above files such as nightsky.jpg should be placed in www folder and the ../ above is necessary as they are referenced from iab.html within the logon plugin.
The contents of the custom.css file follow.
/* company logo */

#panel_footer_hbox > .sapMFlexItem:not(#copyright) {

    /* uncomment to hide logo */

    /*display: none;*/


    /* uncomment to right align logo */

    /*position: absolute;

    right: 0px;*/

}


#logo {

    /* change size of logo */

    height: 40px !important;

}


/* copyright message */

#copyright{

    /* uncomment to hide copyright message */

    /*visibility: hidden;*/


    /* uncomment to right align text */

    /*text-align: right;*/


    /* uncomment to left align copyright message */

    /*left: 0px;*/


}


/* copyright message first line */

#copyright1{

    /* change text color */

    color: white;


    /* change text size */

    font-size: 20px;

}

/* copyright message second line */

#copyright2 {

    /* change text color */

    color: yellow;
The background and logo images and custom.css files should be placed in the www folder.
Prepare, build and deploy the app with the following command.
cordova run android

or

cordova run windows -- --archs=x64

or

cordova run ios
Notice that the background, and copyright logo and text have been customized. Also, note that the option to set a passcode screen is not shown after pressing the OK button due to the context option disablePasscode being set to true.
Timing and Performance
Note that this example contains some additional logging and timing of events using the term EventLogging. To enable the capturing of the time taken from the when the app is initially started till the datavault is unlocked, make the following modification.
On Android, modify the following file and change the below line to pass in to the index.html the time the app was started.
C:\Kapsel_Projects\KapselGSDemo\platforms\android\src\com\kapsel\gs\MainActivity.java//loadUrl(launchUrl);
loadUrl(launchUrl + "?startTime=" + new java.util.Date().getTime());
With this change, the time taken from the MainActivity which should occur shortly after the user clicks on the app icon till the time the logonSucccessCallback is called can be calculated. In the below example, the time taken is about 2 1/2 seconds.
The time taken by the datavault to unlock can be reduced (using SP15 or greater is recommended for Android) by modifying the useLocalStorage setting in the serverContext.js file as shown below.
"useLocalStorage": true,Notice above that the time taken from clicking on the app icon till the datavault unlocks has decreased from 2 1/2 seconds to 1.3 seconds.
For further details see Storing configuration data outside of the datavault.
Registering using an X.509 Certificate with SMP(SP16+)
In SP15, a built in certificate provider was added to the Logon plugin for Android(Logon Plugin Includes System Certificate Provider).
In SP16 a file and shared keychain certificate provider was added to the Logon plugin for iOS (Keychain Certificate Provider Plugin).
A certificate provider enables the logon plugin to perform a registration against a SMP or SCPMS server using a certificate to identify the user. The following instructions will demonstrate using it. Additional details are available at Using the X.509 Certificate Provider Interface to Integrate with Third-Party Certificate Providers.
- Configure the app com.kapsel.gs to use the Certificate Authentication provider.

Set Validated Certificate Is Identity to ON and Certificate Attribute as Principal to be CN which is the Common Name field from the user's certificate.
- Configure the SMP server to trust certificates signed by the certificate authority that signed the user certificates by ensuring that the CA that signed the user certificates is listed in the Shared Keystore Entries.

- Modify the serverContext.js file to use port 8082 and ensure the fully qualified machine name is used for the host.
- Add the following code to the start of the JavaScript code in index.html just below the line var resumeTime = null;
var operation = {};


var appConfig = {};

appConfig.appID = appId;

appConfig.isForSMP = true;

appConfig.certificate = "com.sap.SystemCertProvider";

//appConfig.certificate = "com.sap.x509filecertprovider";  //iOS

//appConfig.certificate = "com.sap.keychaincertprovider";  //iOS
var context2 = {};

context2.smpConfig = context;

context2.appConfig = appConfig;

context2.operation = operation;

var appDelegate = {

    onRegistrationSuccess: logonSuccessCallback,

    onRegistrationError: logonErrorCallback,

};
- Comment out the sap.Logon.init method and replace it with the following code.
operation.logonView = sap.logon.LogonJsView;

sap.Logon.startLogonInit(context2, appDelegate);
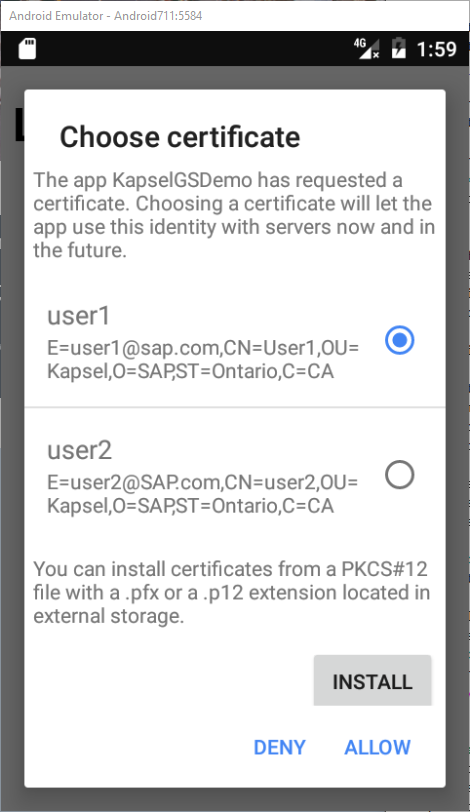
- Run the app and notice that the user is prompted to select a certificate to be used for the registration.

- One way to add the certificate to an iOS device or simulator is to rename the certificate to have an extension of fccert. On the device, if such a file is opened perhaps via a link from mobile Safari or from an email, it will open the Kapsel app that contains the plugin kapsel-plugin-keychaincertprovider and will add the certificate to the app's keychain.

- Note that on iOS the certificate gets added to the keychain of the app and will persist even if the app is uninstalled. To delete the certificate the following method can be called which will also delete the registration.
sap.Logon.core.reset()
Registering using an X.509 Certificate on Android with SAP Cloud Platform Mobile Services(SP16+)
The steps are the same as above except the Management Cockpit of the SAP Cloud Platform Mobile Services has a different UI and an additional step to upload the CA is required.
- Configure the app com.kapsel.gs to use the Certificate Authentication provider.

- Configure the server to trust certificates signed by the certificate authority that signed the user certificates.
Download the Neo Environment SDK from SAP Cloud Platform Neo Environment SDK.
For additional details see the following links.
Configuring X.509 Certificate Authentication
upload-keystore
    keytool -import -trustcacerts -alias sapsso -file c:\certs\SSO_CA.cer -keystore hcpms_trusted_ca.jks

    neo.bat upload-keystore --account i8XXXXtrial --application sapmobile:hcpms --user i82XXXX --location ./hcpms_trusted_ca.jks --host hanatrial.ondemand.com
Note above that the application name should not be changed as this is the name of the SAP Cloud Platform Mobile Service. - Modify the serverContext.js file and change the serverHost to use the new domain for the application.

Multi User (SP14+)
Implemented on iOS and Windows only.
Android has multi user built-in to the Android OS via Settings -> Users.
To try it out, follow the instructions below.
- Uncomment the line "multiUser": true in the context object in serverContext.js
Ensure that the disablePasscode option is either not present or set to false.
Ensure that the option useLocalStorage is either not present or set to false. - Add the following code to the start of the JavaScript code in index.html just below the line var resumeTime = null;
var appConfig = {};

appConfig.appID = appId;

appConfig.isForSMP = true;


var operation = {};


var context2 = {};

context2.smpConfig = context;

context2.appConfig = appConfig;

context2.operation = operation;


var appDelegate = {

    onRegistrationSuccess: logonSuccessCallback,

    onRegistrationError: logonErrorCallback,

};
- Comment out the sap.Logon.init method and replace it with the following code:
operation.logonView = sap.logon.LogonJsView;

sap.Logon.startLogonInit(context2, appDelegate);
- Add the following method:
function signOutSuccessCallback() {

    console.log("signOutSuccess");

    unlock();  //shows the pick user screen

}
- Add in a new button to enable the sign out.
<button id="signOut" onclick="sap.logon.Core.deactivateCurrentUser(signOutSuccessCallback, errorCallback)">Sign Out</button>
- Delete the app from the device or emulator before redeploying.
Previous Home Next
- SAP Managed Tags:
- Android,
- iOS,
- SAP Mobile Platform,
- SAP Mobile Platform SDK
Labels:
68 Comments
- « Previous
-
- 1
- 2
- Next »
You must be a registered user to add a comment. If you've already registered, sign in. Otherwise, register and sign in.
Labels in this area
-
ABAP CDS Views - CDC (Change Data Capture)
2 -
AI
1 -
Analyze Workload Data
1 -
BTP
1 -
Business and IT Integration
2 -
Business application stu
1 -
Business Technology Platform
1 -
Business Trends
1,661 -
Business Trends
87 -
CAP
1 -
cf
1 -
Cloud Foundry
1 -
Confluent
1 -
Customer COE Basics and Fundamentals
1 -
Customer COE Latest and Greatest
3 -
Customer Data Browser app
1 -
Data Analysis Tool
1 -
data migration
1 -
data transfer
1 -
Datasphere
2 -
Event Information
1,400 -
Event Information
64 -
Expert
1 -
Expert Insights
178 -
Expert Insights
273 -
General
1 -
Google cloud
1 -
Google Next'24
1 -
Kafka
1 -
Life at SAP
784 -
Life at SAP
11 -
Migrate your Data App
1 -
MTA
1 -
Network Performance Analysis
1 -
NodeJS
1 -
PDF
1 -
POC
1 -
Product Updates
4,577 -
Product Updates
326 -
Replication Flow
1 -
RisewithSAP
1 -
SAP BTP
1 -
SAP BTP Cloud Foundry
1 -
SAP Cloud ALM
1 -
SAP Cloud Application Programming Model
1 -
SAP Datasphere
2 -
SAP S4HANA Cloud
1 -
SAP S4HANA Migration Cockpit
1 -
Technology Updates
6,886 -
Technology Updates
403 -
Workload Fluctuations
1
Related Content
- FCO-00011 The step start with step key |NW_ABAP_OneHost|ind|ind|ind|ind|0|0|NW_Onehost_System|ind|i in Technology Q&A
- 10+ ways to reshape your SAP landscape with SAP Business Technology Platform - Blog 7 in Technology Blogs by SAP
- How to set an Aactive ATC run in ATC result browser in Eclipse in Technology Q&A
- It has never been easier to print from SAP with Microsoft Universal Print in Technology Blogs by Members
- explore the business continuity recovery sap solutions on AWS DRS in Technology Blogs by Members
Top kudoed authors
| User | Count |
|---|---|
| 12 | |
| 10 | |
| 10 | |
| 7 | |
| 7 | |
| 7 | |
| 6 | |
| 6 | |
| 5 | |
| 4 |