
- SAP Community
- Products and Technology
- Technology
- Technology Blogs by SAP
- HCP IoT Showcase using Sphero - Part 7: XS Applica...
Technology Blogs by SAP
Learn how to extend and personalize SAP applications. Follow the SAP technology blog for insights into SAP BTP, ABAP, SAP Analytics Cloud, SAP HANA, and more.
Turn on suggestions
Auto-suggest helps you quickly narrow down your search results by suggesting possible matches as you type.
Showing results for
Advisor
Options
- Subscribe to RSS Feed
- Mark as New
- Mark as Read
- Bookmark
- Subscribe
- Printer Friendly Page
- Report Inappropriate Content
10-13-2016
8:22 AM
Hello everyone! This is the seventh blog post based on the following table.
This blog explains the highlighted section in the overall architecture below.

The first thing is building a XS application for user registration process. It will receive user inputs for storing user name and company name in HANA database which I created in the part 4.
In order to achieve this, Korea team leveraged "PersonList" Web Application code from jens.glander.


We created userreg package first then also created empty XS application.


In order to enable cross-origin resource sharing, .xsaccess file was modified as below.

.xsaccess
Then, we created another package data with userreg.hdbdd file to create table and procedure for OData service as below.

userreg.hdbdd
If you go to catalog and refresh tables and procedures, you can see they are created successfully.

The next thing we did is creating a sequence userreg.hdbsequence under data for increasing ID number automatically.
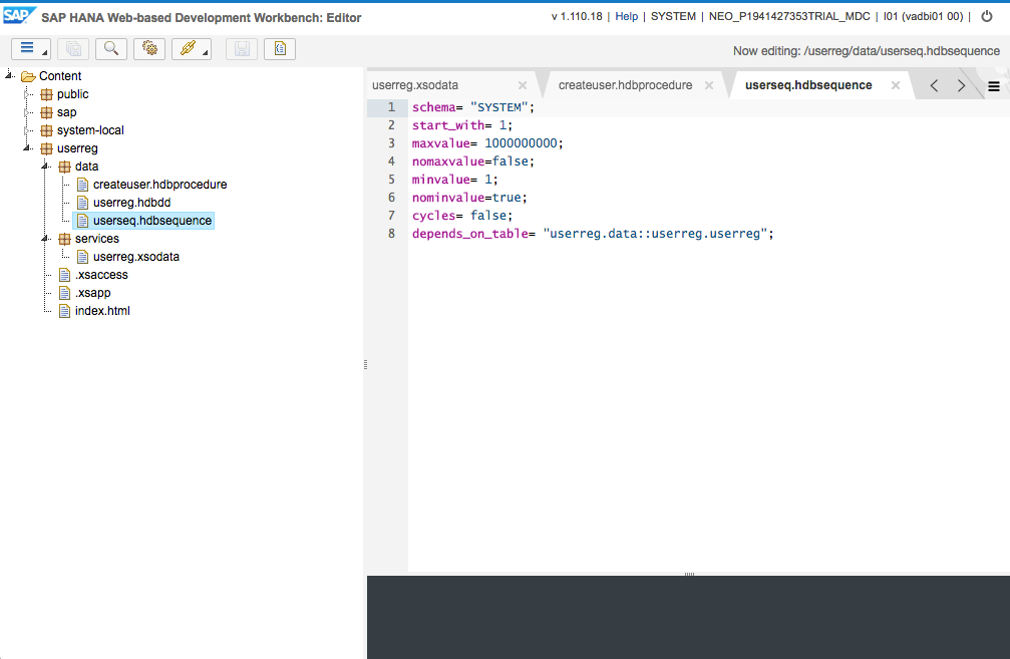
userreg.hdbsequence
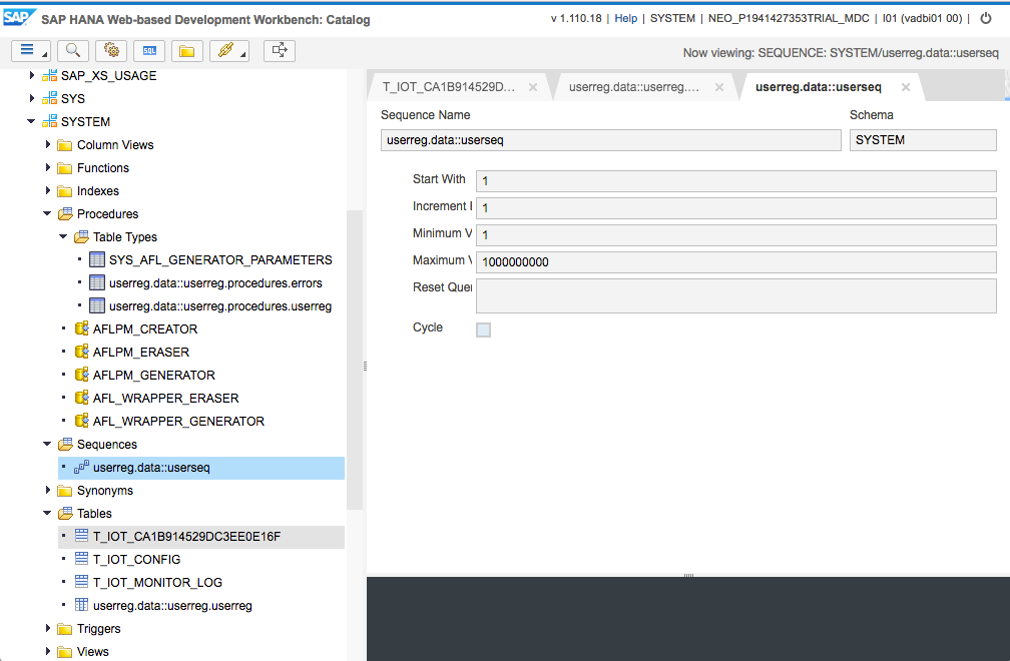
You can also check it in catalog as below.
Then we created creatuser.hdbprocedure under data for user registration process as below.

createuser.hdbprocedure
And you can also check it in catalog.

The last thing we did is creating userreg.xsodata file under services package for OData provisioning.

userreg.xsodata
If you run this file and everything is OK then you will see the following XML result.

Now let's test this OData service using a REST client. Basically, you can use any REST client but in my case, I used Postman which is available in chrome web store.

In order to test the service, we used Basic Auth and SYSTEM credentials of our HANA MDC and updated request.

Then add key Content-Type and value application/jsonlcharset=utf-8 as below and if you send http GET request, you will see the same result as above XML.

Now, if you send http POST request and check HANA database, you will see the following results.


That's all about XS application for user registration.
Now, let's create a HANA view for calculating lap time for each user. You can create this view as below using the SQL statement.

Here is the SQL statement we used for creating a view.
Then you can find that the view is successfully created and data in it.


The next thing is creating leaderboard.xsodata file under services package for OData provisioning.

leaderboard.xsodata
If everything is OK, you can test it as below.

The last thing remained is creating destinations for OData services we created. I created 2 destinations Sphero_Userreg and Sphero_Leaderboard as below.


Sphero_Userreg
Type=HTTP
Authentication=BasicAuthentication
WebIDEUsage=odata_gen
Name=Sphero_Userreg
WebIDEEnabled=true
CloudConnectorVersion=2
URL=https\://mdc[Account]trial.hanatrial.ondemand.com/userreg/services/userreg.xsodata
ProxyType=Internet
User=SYSTEM
Sphero_Leaderboard
Type=HTTP
Authentication=BasicAuthentication
WebIDEUsage=odata_gen
Name=Sphero_Leaderboard
WebIDEEnabled=true
CloudConnectorVersion=2
URL=https\://mdc[Account]trial.hanatrial.ondemand.com/userreg/services/leaderboard.xsodata
ProxyType=Internet
User=SYSTEM
You can test these destinations using Web IDE url with destination name as below.
https://webide-[Account]trial.dispatcher.hanatrial.ondemand.com/destinations/[Destination Name]
That's it! Now we are ready for developing UI with some additional logics.
However, unfortunately, this posting will be the last one regarding 'HCP IoT Showcase using Sphero' due to some reasons. Since there are many ways to build UI, I would like to leave it to readers.
Best,
Seungjoon
| HCP IoT Showcase using Sphero • Part 1: Overview • Part 2: Controlling Sphero using Raspberry Pi and Xbox 360 controller • Part 3: Maze Setup (Hardware) • Part 4: Unit Test (Gathering & Sending Data) • Part 5: Unit Test (MQTT) • Part 6: Integration Test • Part 7: XS Application • |
This blog explains the highlighted section in the overall architecture below.
The first thing is building a XS application for user registration process. It will receive user inputs for storing user name and company name in HANA database which I created in the part 4.
In order to achieve this, Korea team leveraged "PersonList" Web Application code from jens.glander.
We created userreg package first then also created empty XS application.
In order to enable cross-origin resource sharing, .xsaccess file was modified as below.
.xsaccess
{

    "exposed": true,

    "authentication": [{

        "method": "Form"

    }],


    "mime_mapping": [{

        "extension": "jpg",

        "mimetype": "image/jpeg"

    }],

    "force_ssl": false,

    "enable_etags": false,

    "prevent_xsrf": false,

    "anonymous_connection": null,

    "cors": [{

      "enabled":true,

      "allowMethods": ["GET","POST","DELETE","PUT"],

      "allowOrigin": ["*"],

      "maxAge":"3600"

    }],

    "cache_control": "no-cache, no-store",

    "default_file": "index.html"

}
Then, we created another package data with userreg.hdbdd file to create table and procedure for OData service as below.
userreg.hdbdd
namespace userreg.data;

@Schema: 'SYSTEM'

context userreg {

  type SString: String(60);

  @Catalog.tableType: #COLUMN

  Entity userreg {

    key ID: String(10);

    USERNAME: SString;

    COMPANYNAME: SString;

  };

  context procedures{

    type userreg {

      ID: String(10);

      USERNAME: SString;

      COMPANYNAME: SString;

    };

    type errors {

      HTTP_STATUS_CODE : Integer;

      ERROR_MESSAGE : String(100);

      DETAIL : String(100);

    };

  };

}
If you go to catalog and refresh tables and procedures, you can see they are created successfully.
The next thing we did is creating a sequence userreg.hdbsequence under data for increasing ID number automatically.
userreg.hdbsequence
schema= "SYSTEM";

start_with= 1;

maxvalue= 1000000000;

nomaxvalue=false;

minvalue= 1;

nominvalue=true;

cycles= false;

depends_on_table= "userreg.data::userreg.userreg";
You can also check it in catalog as below.
Then we created creatuser.hdbprocedure under data for user registration process as below.
createuser.hdbprocedure
PROCEDURE

 "SYSTEM"."userreg.data::createuser" (

 IN intab "SYSTEM"."userreg.data::userreg.procedures.userreg",

 OUT outtab "SYSTEM"."userreg.data::userreg.procedures.errors"

 )

 LANGUAGE SQLSCRIPT

 SQL SECURITY INVOKER AS

 --DEFAULT SCHEMA <schema>

 --READS SQL DATA AS

begin

declare lv_users_no string;

declare lv_username string;

declare lv_companyname string;

select ID, USERNAME, COMPANYNAME into lv_users_no, lv_username, lv_companyname from :intab;

if :lv_username = '' then

 outtab = select 500 as http_status_code,

 'Invalid user name ' || lv_username as error_message,

'No Way! User name field must not be empty' as detail from dummy;

else

 insert into "userreg.data::userreg.userreg"

 values ("userreg.data::userseq".NEXTVAL, lv_username, lv_companyname);

end if;

end;
And you can also check it in catalog.
The last thing we did is creating userreg.xsodata file under services package for OData provisioning.
userreg.xsodata
service {

 "userreg.data::userreg.userreg" as "user"

create using "userreg.data::createuser";

}
If you run this file and everything is OK then you will see the following XML result.
Now let's test this OData service using a REST client. Basically, you can use any REST client but in my case, I used Postman which is available in chrome web store.
In order to test the service, we used Basic Auth and SYSTEM credentials of our HANA MDC and updated request.
Then add key Content-Type and value application/jsonlcharset=utf-8 as below and if you send http GET request, you will see the same result as above XML.
Now, if you send http POST request and check HANA database, you will see the following results.
That's all about XS application for user registration.
Now, let's create a HANA view for calculating lap time for each user. You can create this view as below using the SQL statement.
Here is the SQL statement we used for creating a view.
CREATE VIEW LEADERBOARD_VIEW

AS

	SELECT "userreg.data::userreg.userreg"."ID" AS UID,

			"userreg.data::userreg.userreg"."USERNAME",

			"userreg.data::userreg.userreg"."COMPANYNAME",

			NANO100_BETWEEN(

				MIN("T_IOT_CA1B914529DC3EE0E16F"."C_TIMESTAMP"),

				MAX("T_IOT_CA1B914529DC3EE0E16F"."C_TIMESTAMP")

			) AS TIMELAP

		FROM "T_IOT_CA1B914529DC3EE0E16F"

			INNER JOIN "userreg.data::userreg.userreg"

			ON "T_IOT_CA1B914529DC3EE0E16F"."C_USERNAME" = "userreg.data::userreg.userreg"."ID"

		GROUP BY "userreg.data::userreg.userreg"."ID",

			"userreg.data::userreg.userreg"."USERNAME",

			"userreg.data::userreg.userreg"."COMPANYNAME";
Then you can find that the view is successfully created and data in it.
The next thing is creating leaderboard.xsodata file under services package for OData provisioning.
leaderboard.xsodata
service {

 "SYSTEM"."LEADERBOARD_VIEW" keys generate local "GeneratedID";

}
If everything is OK, you can test it as below.
The last thing remained is creating destinations for OData services we created. I created 2 destinations Sphero_Userreg and Sphero_Leaderboard as below.
Sphero_Userreg
Type=HTTP
Authentication=BasicAuthentication
WebIDEUsage=odata_gen
Name=Sphero_Userreg
WebIDEEnabled=true
CloudConnectorVersion=2
URL=https\://mdc[Account]trial.hanatrial.ondemand.com/userreg/services/userreg.xsodata
ProxyType=Internet
User=SYSTEM
Sphero_Leaderboard
Type=HTTP
Authentication=BasicAuthentication
WebIDEUsage=odata_gen
Name=Sphero_Leaderboard
WebIDEEnabled=true
CloudConnectorVersion=2
URL=https\://mdc[Account]trial.hanatrial.ondemand.com/userreg/services/leaderboard.xsodata
ProxyType=Internet
User=SYSTEM
You can test these destinations using Web IDE url with destination name as below.
https://webide-[Account]trial.dispatcher.hanatrial.ondemand.com/destinations/[Destination Name]
That's it! Now we are ready for developing UI with some additional logics.
However, unfortunately, this posting will be the last one regarding 'HCP IoT Showcase using Sphero' due to some reasons. Since there are many ways to build UI, I would like to leave it to readers.
Best,
Seungjoon
- SAP Managed Tags:
- SAP Business Technology Platform
Labels:
2 Comments
You must be a registered user to add a comment. If you've already registered, sign in. Otherwise, register and sign in.
Labels in this area
-
ABAP CDS Views - CDC (Change Data Capture)
2 -
AI
1 -
Analyze Workload Data
1 -
BTP
1 -
Business and IT Integration
2 -
Business application stu
1 -
Business Technology Platform
1 -
Business Trends
1,661 -
Business Trends
87 -
CAP
1 -
cf
1 -
Cloud Foundry
1 -
Confluent
1 -
Customer COE Basics and Fundamentals
1 -
Customer COE Latest and Greatest
3 -
Customer Data Browser app
1 -
Data Analysis Tool
1 -
data migration
1 -
data transfer
1 -
Datasphere
2 -
Event Information
1,400 -
Event Information
64 -
Expert
1 -
Expert Insights
178 -
Expert Insights
273 -
General
1 -
Google cloud
1 -
Google Next'24
1 -
Kafka
1 -
Life at SAP
784 -
Life at SAP
11 -
Migrate your Data App
1 -
MTA
1 -
Network Performance Analysis
1 -
NodeJS
1 -
PDF
1 -
POC
1 -
Product Updates
4,577 -
Product Updates
325 -
Replication Flow
1 -
RisewithSAP
1 -
SAP BTP
1 -
SAP BTP Cloud Foundry
1 -
SAP Cloud ALM
1 -
SAP Cloud Application Programming Model
1 -
SAP Datasphere
2 -
SAP S4HANA Cloud
1 -
SAP S4HANA Migration Cockpit
1 -
Technology Updates
6,886 -
Technology Updates
403 -
Workload Fluctuations
1
Related Content
- Consolidation Extension for SAP Analytics Cloud – Automated Eliminations and Adjustments (part 1) in Technology Blogs by Members
- SAP Sustainability Footprint Management: Q1-24 Updates & Highlights in Technology Blogs by SAP
- Custom data as table, CDS, Domain, Business object and all that jazz... in Technology Blogs by SAP
- Harnessing Generative AI Capabilities with SAP HANA Cloud Vector Engine - Part 1 [Architecture] in Technology Blogs by SAP
- Advanced Event Mesh Connectors and Easy Event-Driven Example of S/4HANA with Amazon S3 Integration in Technology Blogs by Members
Top kudoed authors
| User | Count |
|---|---|
| 12 | |
| 10 | |
| 9 | |
| 7 | |
| 7 | |
| 7 | |
| 6 | |
| 6 | |
| 5 | |
| 4 |