
- SAP Community
- Products and Technology
- Technology
- Technology Blogs by SAP
- Add PDF417 Barcode Scanning to your Fiori Applicat...
Technology Blogs by SAP
Learn how to extend and personalize SAP applications. Follow the SAP technology blog for insights into SAP BTP, ABAP, SAP Analytics Cloud, SAP HANA, and more.
Turn on suggestions
Auto-suggest helps you quickly narrow down your search results by suggesting possible matches as you type.
Showing results for
Product and Topic Expert
Options
- Subscribe to RSS Feed
- Mark as New
- Mark as Read
- Bookmark
- Subscribe
- Printer Friendly Page
- Report Inappropriate Content
10-11-2016
6:15 PM
One thing customers want to do with some of their Fiori applications is have the ability to do Barcode scanning. There is a tutorial that describes how to do this by simmaco.ferriero called How to use Kapsel Barcode Scanner Plugin with SAP Web IDE and HAT. The current supported plugin is the PhoneGap-BarcodeScanner which works well for most scenario's, however there is a limitation with it currently where it does not support PDF417 barcodes on iOS devices. This may be resolved in the future, but in the meantime this tutorial is to help add support for this format through the PDF417-Phonegap Plugin provided by Mobi.
This tutorial can also serve as a tutorial on how to add a Custom Plugin to your Fiori client through SAP HCP, mobile service for SAP Fiori. A similar approach to any needed plugin can be taken in order to enhance your Fiori application with the many Plugins that are available for a Cordova based application.
This tutorial assumes that you are familiar with accessing your WebIDE environment and that you have an understanding of using SAP HCP, mobile service for SAP Fiori. Some steps may not be shown in this tutorial based on that assumption. If you need a How-To on the mobile service please see Dhimant Patel's blog.
In order to not repeat a lot of what has been done in the two above mentioned Blog's, I'm going to assume you have already created the application with WebIDE to the point where you are getting a list of products from the Northwind oData service as mentioned in Dhimant's post. Where we will start is by adding the Barcode Scanner code to the project.
The project that was used for this tutorial was based off the Kapsel Fiori Master-Detail template, if you are using a different project template your code will be placed in the View that you want the barcode scan button to appear. In SAP Web IDE open the Master view (view/Master.view.xml) of the app. Add the following code just after the last “/contentmiddle” tag and save the file.
Your code should look similar to this

As with above if you used a different template place the code in the corresponding controller file. Open the Master view controller (view/Master.controller.js) and add the following function at the beginning of the file, just after the init function. Save the file
For iOS PDF417 plugin needs a license generated in order to associate it with the Bundle Identifier. Once you have generated the license you'll replace the licenseIOS in your code with your license key. Similar, if you are using Android you will replace the licenseAndroid. To generate a demo license key you will need to first get your Application ID, this can be obtained after you have created your Fioir Client through the mobile service.
First you need to upload the Plugin into Fiori Mobile. Download the Plugin by selecting the "Clone or download" drop down option and then selecting "Download ZIP"
Once the Download is complete extract the files and then create a new zip file that contains the contents that is found in the Pdf417 folder. Name this zip file PDF417.zip. This is important because the plugin.xml must be at the root, if it is not you will see an error indicating that the plugin.xml cannot be found.

To add the custom plugin in Fiori Mobile you will need to have the App Catalog Admin Role assigned. This is done through HCP->Services->Fiori Mobile->Configure Fiori Mobile
As an App Catalog Admin go to your Fiori Mobile account and select Applications->Manage Plugins
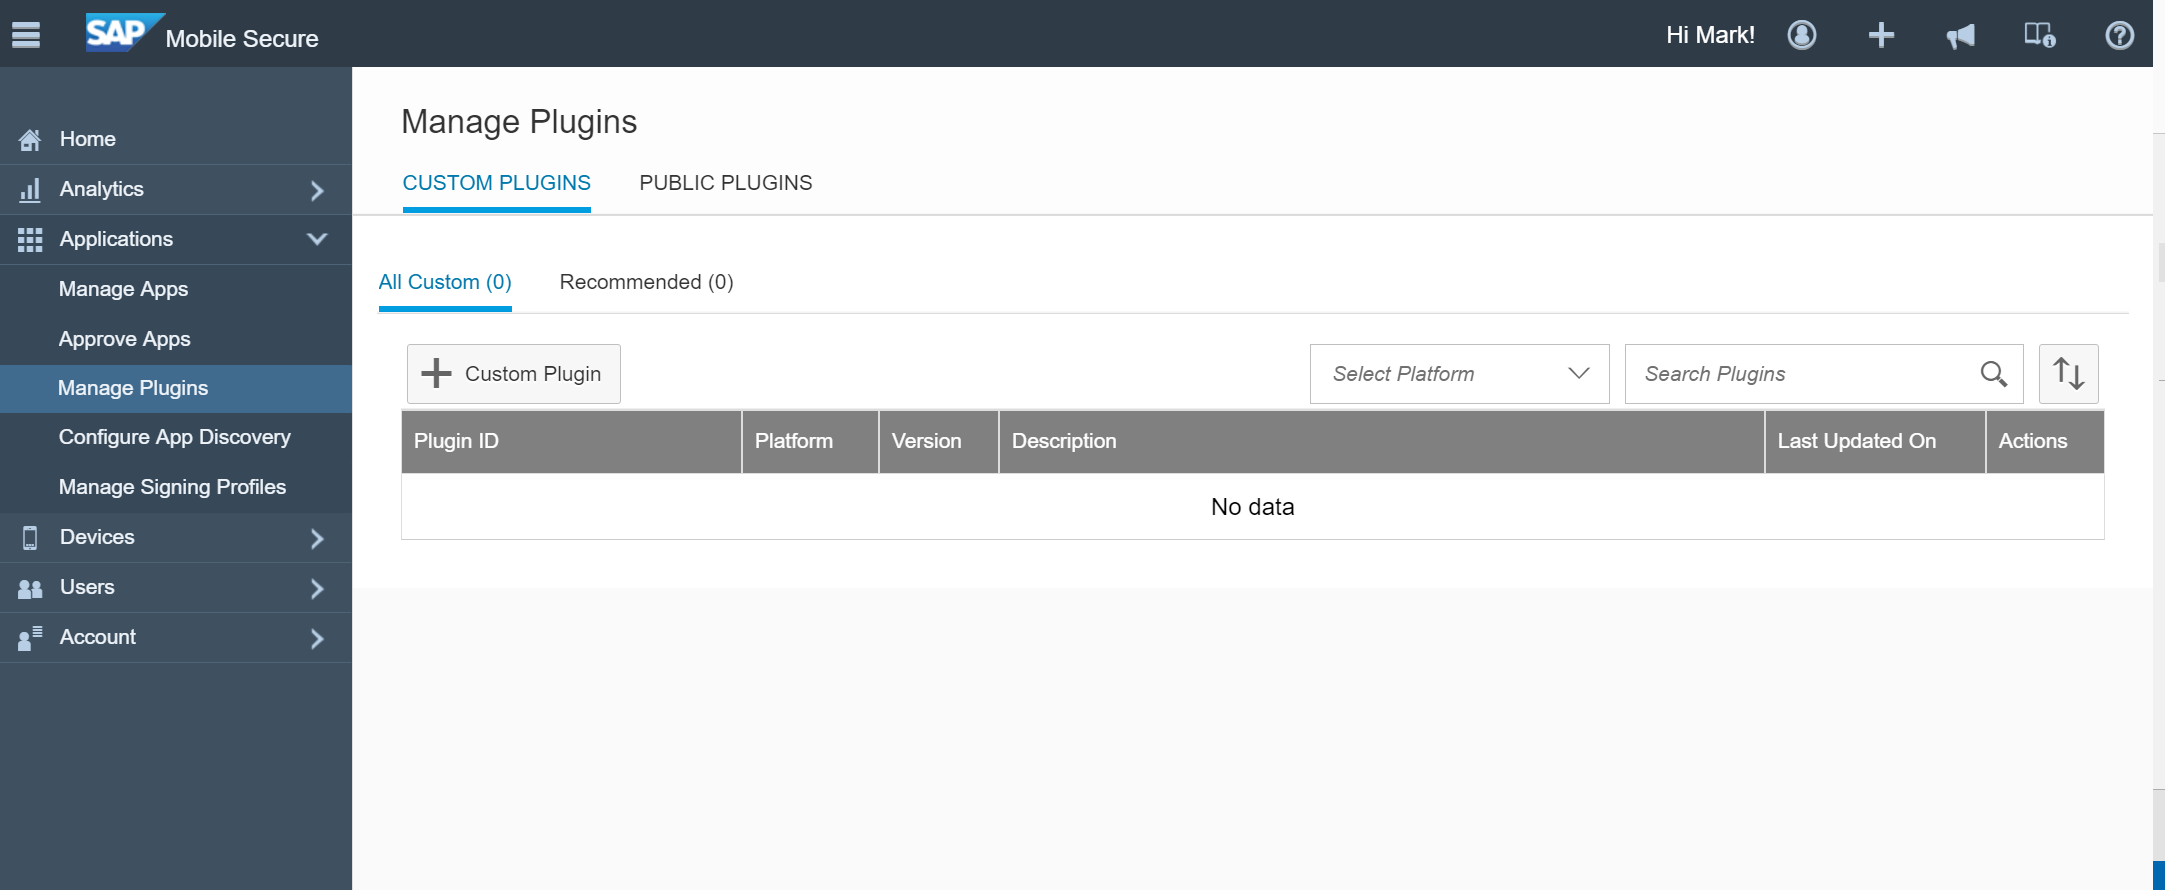
Select the + Custom Plugin button

Select the Browse... button and find the PDF417.zip file and then press OK

Don't navigate away from the screen until you've seen the screen that shows the Custom Plugin has been successfully added. Once it's been added you can now begin creating your Fiori Mobile Client.

From Applications->Manage Apps select to +New Application and select Fiori Mobile

Next select the option "I want to mobilize an existing launchpad or Fiori Application". You can select the first option as well, however the second option makes it easier to change your code in WebIDE and redeploy without having to rebuild the Fiori Mobile client, making it easier to debug and change your UI code until it performs as desired.

Select the Fiori Launchpad

Make sure to select the option for "I want SAP to build an application for me"

Select the option "No, I wold like to customize my application" so that you can now add the Custom Plugin and do any other customization you'd like.

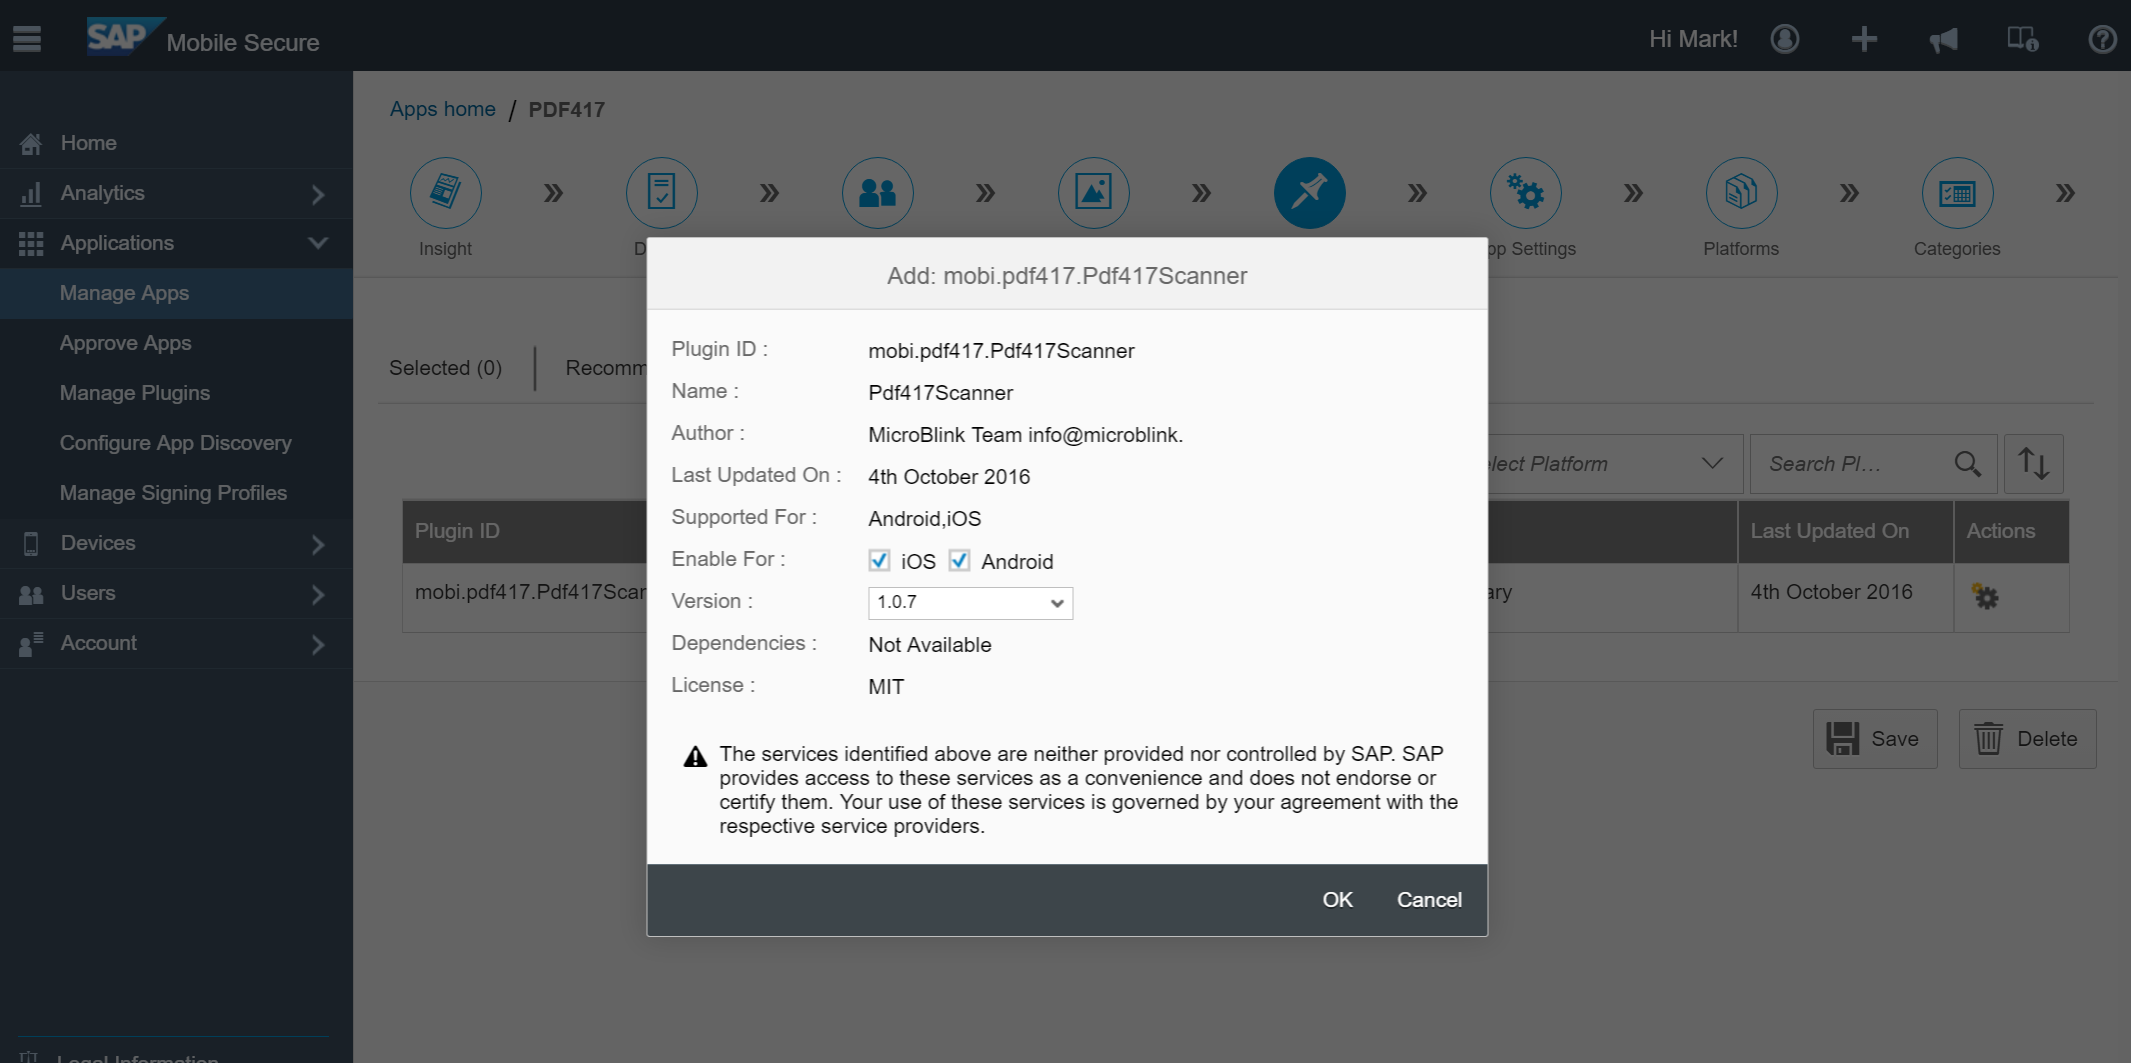
Select Plugins from the tool bar, and then choose Custom and from the Actions icon select Add. This tutorial shows you how you use a Custom Plugin, Fiori Mobile also allows the use of over 1500 Public Plugins. If the Plugin you would like to use is Public you can select the Public option and Search for it to see if it's available. This option allows you to not go through the steps of adding a Custom Plugin by uploading the zip file.

You will receive a prompt that the plugin was added
Set any other options you'd like in your application and then select to Build your application

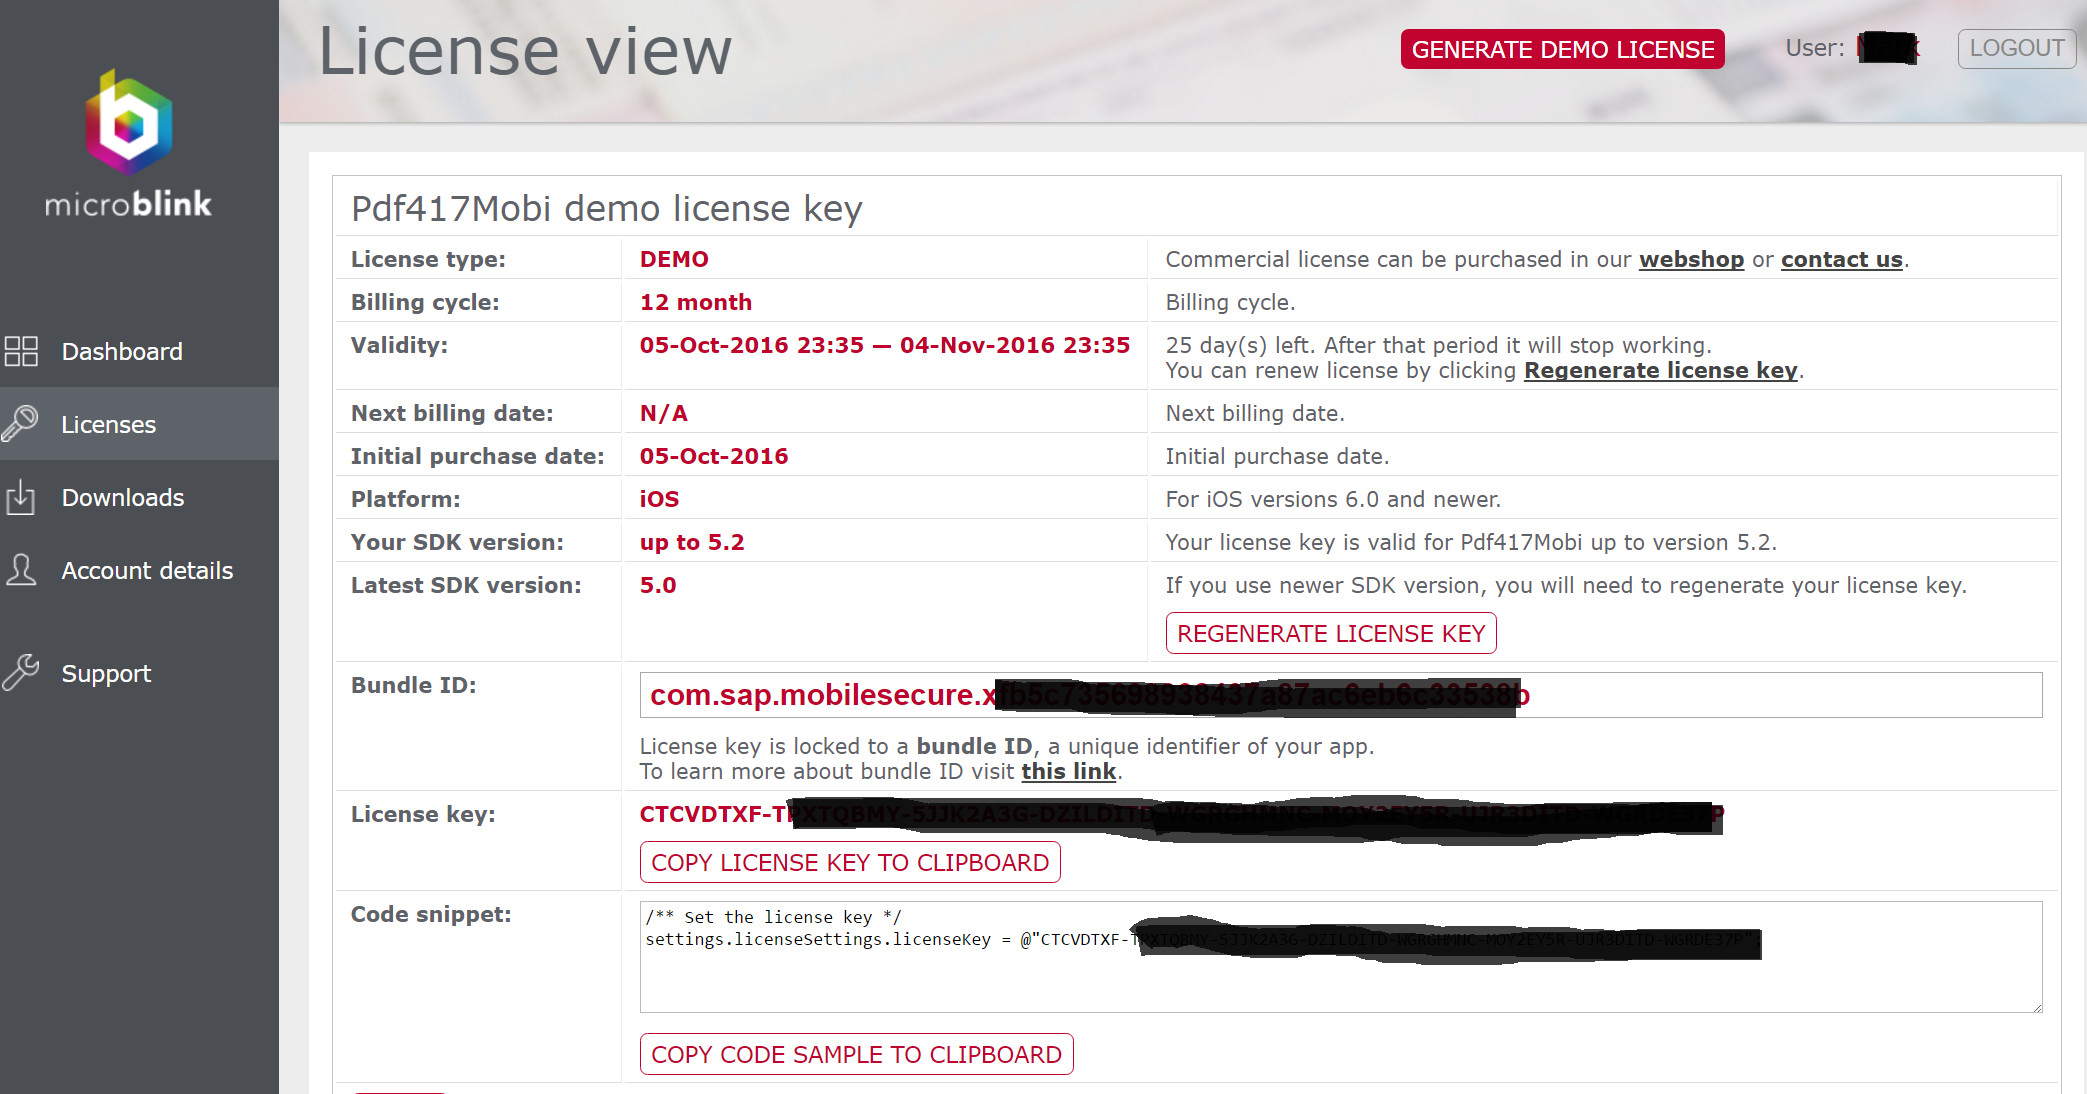
Now that the client is built you can go get the Application Identifier. Go to the App Settings->Notifications and copy the Application Identifier.

Go to the Microblink website and create an account to generate a Demo License. Enter in the Application Identifer for the Bundle ID in step 3/3

For Android it will look like this

Once you select to Generate your license you can copy the License Key and set it as your licenseiOs and similar for licenseAndroid in WebIDE in the controller file. Copy the license key from the "License key" field using the "Copy License key to Clipboard".
Now that you have the license and the application written, go ahead and Deploy your application to HCP and SAP Fiori Launchpad

On your device go to Mobile Place and install the application. The screen shots below are based on iOS.


Once installed open the application and select the tile for your Fiori Application. You may need to login and configure your Fiori Launchpad first (not shown).

You should now see your list of products, and next to the Search bar you should see the Barcode Icon. Select that icon to start the camera to scan the barcode.

On first use you will be asked to give permission to use the camera.
Here is an example PDF417 generated barcode that encodes "Boston" in the barcode. You can find barcode generators online to create a barcode that contains information that you'd like to scan.

You will see that once the barcode has been scanned the word Boston will appear in the search bar

Press the magnifying glass icon to perform the search for Product Names containing "Boston"

You have now successfully scanned a PDF417 formatted barcode.
In this tutorial you should have seen how you can use Fiori Mobile to use any available Cordova Plugin in your application as well as add support for PDF417 barcodes.
This tutorial can also serve as a tutorial on how to add a Custom Plugin to your Fiori client through SAP HCP, mobile service for SAP Fiori. A similar approach to any needed plugin can be taken in order to enhance your Fiori application with the many Plugins that are available for a Cordova based application.
This tutorial assumes that you are familiar with accessing your WebIDE environment and that you have an understanding of using SAP HCP, mobile service for SAP Fiori. Some steps may not be shown in this tutorial based on that assumption. If you need a How-To on the mobile service please see Dhimant Patel's blog.
In order to not repeat a lot of what has been done in the two above mentioned Blog's, I'm going to assume you have already created the application with WebIDE to the point where you are getting a list of products from the Northwind oData service as mentioned in Dhimant's post. Where we will start is by adding the Barcode Scanner code to the project.
The project that was used for this tutorial was based off the Kapsel Fiori Master-Detail template, if you are using a different project template your code will be placed in the View that you want the barcode scan button to appear. In SAP Web IDE open the Master view (view/Master.view.xml) of the app. Add the following code just after the last “/contentmiddle” tag and save the file.
<contentRight>

<Button id="barcodeButton" icon="sap-icon://bar-code" tooltip="Bar Code Scanner" press="onBarCodeScan"></Button>

</contentRight>
Your code should look similar to this
As with above if you used a different template place the code in the corresponding controller file. Open the Master view controller (view/Master.controller.js) and add the following function at the beginning of the file, just after the init function. Save the file
onBarCodeScan: function() {


		/**

		 * Scan these barcode types

		 * Available: "PDF417", "USDL", "QR Code", "Code 128", "Code 39", "EAN 13", "EAN 8", "ITF", "UPCA", "UPCE"

		 */

		var types = ["PDF417", "USDL", "QR Code"];

		var barcode = "";

		var that=this;

		/**

		 * Initiate scan with options

		 * NOTE: Some features are unavailable without a license

		 * Obtain your key at http://pdf417.mobi

		 */

		var options = {

			beep: true, // Beep on

			noDialog: true, // Skip confirm dialog after scan

			uncertain: false, //Recommended

			quietZone: false, //Recommended

			highRes: false, //Recommended

			inverseScanning: false,

			frontFace: false

		};


		// Note that each platform requires its own license key

		var licenseiOs = "Your license key here";

var licenseAndroid="Your Android key here";


		cordova.plugins.pdf417Scanner.scan(

			function(result) {

				var recognizerList = result.resultList;


				for (var i = 0; i < recognizerList.length; i++) {

					var recognizerResult = recognizerList[i];

					console.log("This is the code: " + recognizerResult.data);

					barcode=recognizerResult.data;

					that.getView().byId("searchField").setValue(barcode);


				}


			},


			function(error) {

				alert("Scanning failed: " + error);

			},

			types, options, licenseiOs, licenseAndroid

		);


	},
For iOS PDF417 plugin needs a license generated in order to associate it with the Bundle Identifier. Once you have generated the license you'll replace the licenseIOS in your code with your license key. Similar, if you are using Android you will replace the licenseAndroid. To generate a demo license key you will need to first get your Application ID, this can be obtained after you have created your Fioir Client through the mobile service.
First you need to upload the Plugin into Fiori Mobile. Download the Plugin by selecting the "Clone or download" drop down option and then selecting "Download ZIP"
Once the Download is complete extract the files and then create a new zip file that contains the contents that is found in the Pdf417 folder. Name this zip file PDF417.zip. This is important because the plugin.xml must be at the root, if it is not you will see an error indicating that the plugin.xml cannot be found.
To add the custom plugin in Fiori Mobile you will need to have the App Catalog Admin Role assigned. This is done through HCP->Services->Fiori Mobile->Configure Fiori Mobile
As an App Catalog Admin go to your Fiori Mobile account and select Applications->Manage Plugins
Select the + Custom Plugin button
Select the Browse... button and find the PDF417.zip file and then press OK
Don't navigate away from the screen until you've seen the screen that shows the Custom Plugin has been successfully added. Once it's been added you can now begin creating your Fiori Mobile Client.
From Applications->Manage Apps select to +New Application and select Fiori Mobile
Next select the option "I want to mobilize an existing launchpad or Fiori Application". You can select the first option as well, however the second option makes it easier to change your code in WebIDE and redeploy without having to rebuild the Fiori Mobile client, making it easier to debug and change your UI code until it performs as desired.
Select the Fiori Launchpad
Make sure to select the option for "I want SAP to build an application for me"
Select the option "No, I wold like to customize my application" so that you can now add the Custom Plugin and do any other customization you'd like.
Select Plugins from the tool bar, and then choose Custom and from the Actions icon select Add. This tutorial shows you how you use a Custom Plugin, Fiori Mobile also allows the use of over 1500 Public Plugins. If the Plugin you would like to use is Public you can select the Public option and Search for it to see if it's available. This option allows you to not go through the steps of adding a Custom Plugin by uploading the zip file.
You will receive a prompt that the plugin was added
Set any other options you'd like in your application and then select to Build your application
Now that the client is built you can go get the Application Identifier. Go to the App Settings->Notifications and copy the Application Identifier.
Go to the Microblink website and create an account to generate a Demo License. Enter in the Application Identifer for the Bundle ID in step 3/3
For Android it will look like this
Once you select to Generate your license you can copy the License Key and set it as your licenseiOs and similar for licenseAndroid in WebIDE in the controller file. Copy the license key from the "License key" field using the "Copy License key to Clipboard".
Now that you have the license and the application written, go ahead and Deploy your application to HCP and SAP Fiori Launchpad
On your device go to Mobile Place and install the application. The screen shots below are based on iOS.
Once installed open the application and select the tile for your Fiori Application. You may need to login and configure your Fiori Launchpad first (not shown).
You should now see your list of products, and next to the Search bar you should see the Barcode Icon. Select that icon to start the camera to scan the barcode.
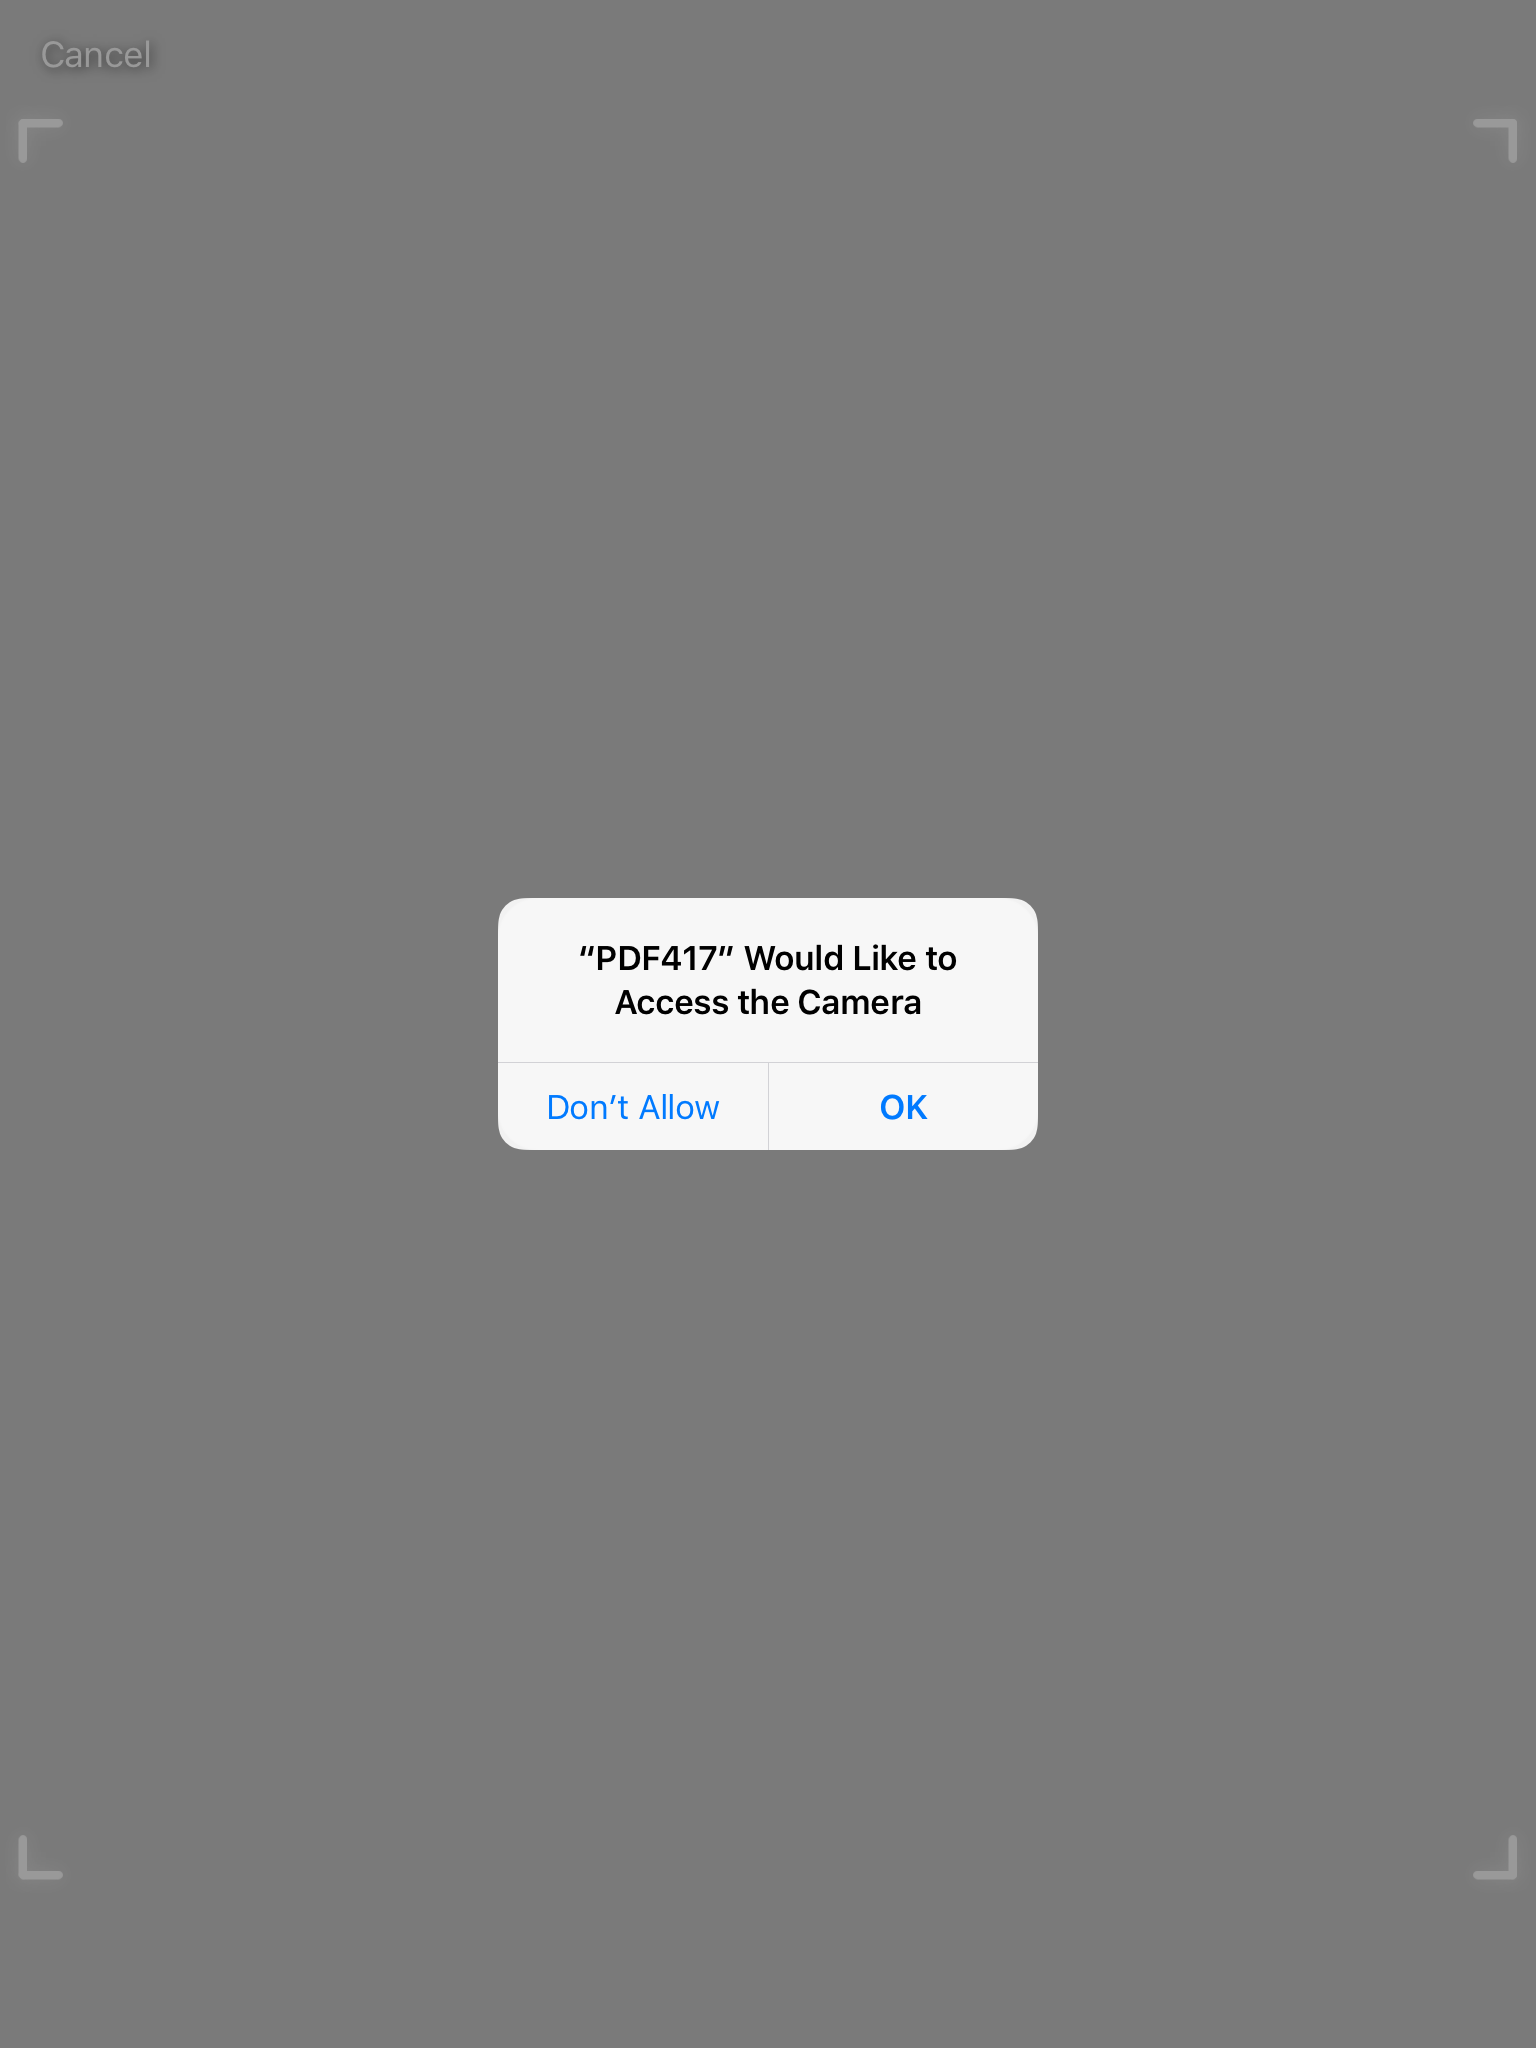
On first use you will be asked to give permission to use the camera.
Here is an example PDF417 generated barcode that encodes "Boston" in the barcode. You can find barcode generators online to create a barcode that contains information that you'd like to scan.
You will see that once the barcode has been scanned the word Boston will appear in the search bar
Press the magnifying glass icon to perform the search for Product Names containing "Boston"
You have now successfully scanned a PDF417 formatted barcode.
In this tutorial you should have seen how you can use Fiori Mobile to use any available Cordova Plugin in your application as well as add support for PDF417 barcodes.
- SAP Managed Tags:
- SAP Fiori,
- SAP Fiori Cloud,
- SAP Mobile Secure,
- SAP Web IDE, hybrid app toolkit add-on,
- Mobile
4 Comments
You must be a registered user to add a comment. If you've already registered, sign in. Otherwise, register and sign in.
Labels in this area
-
ABAP CDS Views - CDC (Change Data Capture)
2 -
AI
1 -
Analyze Workload Data
1 -
BTP
1 -
Business and IT Integration
2 -
Business application stu
1 -
Business Technology Platform
1 -
Business Trends
1,658 -
Business Trends
91 -
CAP
1 -
cf
1 -
Cloud Foundry
1 -
Confluent
1 -
Customer COE Basics and Fundamentals
1 -
Customer COE Latest and Greatest
3 -
Customer Data Browser app
1 -
Data Analysis Tool
1 -
data migration
1 -
data transfer
1 -
Datasphere
2 -
Event Information
1,400 -
Event Information
66 -
Expert
1 -
Expert Insights
177 -
Expert Insights
294 -
General
1 -
Google cloud
1 -
Google Next'24
1 -
Kafka
1 -
Life at SAP
780 -
Life at SAP
13 -
Migrate your Data App
1 -
MTA
1 -
Network Performance Analysis
1 -
NodeJS
1 -
PDF
1 -
POC
1 -
Product Updates
4,577 -
Product Updates
340 -
Replication Flow
1 -
RisewithSAP
1 -
SAP BTP
1 -
SAP BTP Cloud Foundry
1 -
SAP Cloud ALM
1 -
SAP Cloud Application Programming Model
1 -
SAP Datasphere
2 -
SAP S4HANA Cloud
1 -
SAP S4HANA Migration Cockpit
1 -
Technology Updates
6,873 -
Technology Updates
419 -
Workload Fluctuations
1
Related Content
- GroupBy CDS annotation is not working in Technology Q&A
- What’s new in Mobile development kit client 24.4 in Technology Blogs by SAP
- NCO 2.0 and UNICODE compatibility in Technology Q&A
- How to use AI services to translate Picklists in SAP SuccessFactors - An example in Technology Blogs by SAP
- New Certificate Validity Metric to Keep You Updated on Expiring Certificates in the Neo Environment in Technology Blogs by SAP
Top kudoed authors
| User | Count |
|---|---|
| 35 | |
| 25 | |
| 14 | |
| 7 | |
| 7 | |
| 6 | |
| 6 | |
| 5 | |
| 4 | |
| 4 |