
- SAP Community
- Products and Technology
- Technology
- Technology Blogs by SAP
- Installing and Securing the Relay Server on Window...
Technology Blogs by SAP
Learn how to extend and personalize SAP applications. Follow the SAP technology blog for insights into SAP BTP, ABAP, SAP Analytics Cloud, SAP HANA, and more.
Turn on suggestions
Auto-suggest helps you quickly narrow down your search results by suggesting possible matches as you type.
Showing results for
stefan_kremke
Explorer
Options
- Subscribe to RSS Feed
- Mark as New
- Mark as Read
- Bookmark
- Subscribe
- Printer Friendly Page
- Report Inappropriate Content
08-31-2016
10:59 AM
The following document shows multiple options to install a Relay Server on a Windows Server and secure it. There are multiple options to harden the server and there will be new ways after this document is published.
Foundation
- The following Blog Post uses the CIS Mocrosoft IIS Benchmark Documentation. The current Version is v1.4.0 released on 24. July 2015, downloadable at https://benchmarks.cisecurity.org/tools2/iis/CIS_Microsoft_IIS_8_Benchmark_v1.4.0.pdf Please use a search engine to use the latest version
- The basic Relay Server Setup is executed with http://service.sap.com/sap/support/notes/2014282
- SSL Security can be tested with https://www.ssllabs.com/ssltest/analyze.html
- If you do not only use the Windows Registry to configure the cryptographic functionality of the IIS, you can use https://www.nartac.com/Products/IISCrypto
Prerequisites
- Windows Server 2012 R2
- A non-system drive (e.g. D or E)
- Administrative Access to the Windows Server with RDP or with VMWare Player
- The Relay Server Installation Script http://service.sap.com/sap/support/notes/2014282
Prepare the Windows Server
Setup the Firewall
Depending on your use case, you need to open the following TCP ports
- Your SSL port inbound from everywhere, a device would connect (e.g. 443)
- Your HTTP port inbound from everywhere, a device would connect (e.g. 80)
- Your SSL port inbound from the backend servers
- Your HTTP port inbound from the backend servers
- Your RDP port inbound from the administrative network, if you cannot work on the machine with VMware Player
if you want, you can use custom ports for http and SSL


Create a local user
- Create a local user with a strong password as a service user for the Relay Server
- The password should not expire
- The user must be member of the Administrators group during the installation
- The user must be removed from this group after the installation
Relay Server Installation
Preparation
- Download the script files and unzo it
- Create the following folder
- D:\RelayServer
- D:\RelayServer\RsConfig
- D:\Logs\RelayServer
- D:\Logs\IIS
- Edit the settings.ini file to manage the file and folder locations of the relay server installation


- Copy the RS.config into the D:\RelayServer\RSConfig folder

Installation
- Run CMD as Administrator
- Run setup.cmd in the installation folder
- SetupMode=1 and your Parameters of Settings.ini should be correct.
- Press Y to confirm
- A long list of configuration parameter and installation log is shown
- Enter the RelayServer Service User Account and confirm with Enter
- Enter the Password of the Account and confirm with Enter
The relay server will start, if the RS.config is configured correctly. If it starts, remove the Relay Server User Account from the Administrator Group
IIS Post Configuration
Bindings
- Install the Servers SSL certificate to "Server Certificates"
- Ensure, that the certificate chain is installed in Windows intermediate and/or trusted root certificate store
- Configure Bindings
- Only the required Bindings should be configured. If only SSL is used, http should not be configured
- The IP Address (*) can be configured. this should be done, if the access should be restricted

Logging
- Change the log file destination folder to D:\Logs\IIS and Apply the change.
Security Settings
Move Web Content to D drive
- Create D:\IIS\wwwroot
- Move Data from C:\inetpub\wwwroot to this folder
- Configure the physical path of the default website [Basic Settings…]
- Test with CMD: %systemroot%\system32\inetsrv\appcmd list vdir
- Nothing should be on C:\
Remove Or Rename Well Known URLs
- Remove the %systemdrive%\inetpub\AdminScripts folder if it exists
- Remove the %systemdrive%\inetpub\scripts\IISSamples folder if it exists
- Remove the iissamples Virtual Directory mapping if it exists
- Restrict access to the iisadmpwd Virtual Directory to Windows Authenticated users if exists or remove the Virtual Directory mapping
- Remove the IISHelp Virtual Directory mapping if it exists
- Remove the Printers Virtual Directory mapping if it exists
- Remove the %programfiles%\Common Files\System\msadc folder if it exists
renamed to ____msadc
Disable Directory Browsing
- Open Server Manager
- Remove Roles
- Uncheck Directory Browsing
- Click Next… Next… Finish
- Restart the Server

Set Default Application Pool Identity To Least Least Privilege Principal
- Execute the following command to determine if the DefaultAppPool identity has been changed to ApplicationPoolIdentity:
- %systemroot%\system32\inetsrv\appcmd list config /section:applicationPools
Ensure Unique Application Pools for Sites, Configure Application Pools to Run As Application Pool Identity
- Change Application Pool for the monitor and admin folder to “RelayServer_Server”
- Default Admin Pool should have
- Default Web Site
- ias_relay_server
- RelayServer_Client should have
- Client
- RelayServer_Server should have
- Server
- Monitor
- Admin
Use Only Strong Encryption Protocols, Disable Weak Cipher Suites
TLS 1.0 should NOT be deactivated, because the RDP connection only works with TLS 1.0
- The tool IISCrypto can be used to manage the allowed cipher suites
- After applying the changes, the Server must be restarted
- Test cipher protocols depending on device requirements. Use the SSL test site to check the handshake protocols for your devices. Only the strongest cipher suites should be active for your connecting devices. It is possible to see the handshakes with https://www.ssllabs.com/ssltest/analyze.html

Configure Global Authorization Rule to restrict access, Ensure Access to Sensitive Site Features Is Restricted To Authenticated Principals Only,
- Install the Role IP and Domain Restrictions

- Use "Deny Action Type" Not Found
- Configure the IP and Domain Restrictions Feature for the Admin and Monitor application [...]/monitor and [...]/admin
- Add Afaria, SMP and Admin Station IP addresses to allow access
- [...]/server folder
- Add only Afaria, SMP and other backend machine addresses to allow access


- [...]/ias_relay_server folder
- deny all
- [...]/client folder
- allow all connections from IP addresses that should access the Relay Server as a client. Usually you can allow all IP addresses here and let the firewall do the rest

- If you do not use the root folder of the Relay Server for any other purpose like certificate download, client download, deny access to it, too.
Ensure Custom Error Messages Are Not Off, Detailed Error Only Showed Locally
- Use "Detailed errors for local requests and custom error pages for remote requests during productive usage. In test phases you can send detailed error messages, if required, but set it back to custom error pages, if you finished testing and return to productive usage.
- If you have standard error messages, use them else use simple error messages like you can find e.g. at http://www.404errorpages.com/

Ensure Failed Request Tracing is Not Enabled
Verify Failed Request Tracing is turned off by using the IIS Manager GUI:
- On the taskbar, click Start, point to Administrative Tools, and then click Internet Information Services (IIS) Manager
- In the Connections pane, select the server connection, site, application, or directory on which failed request tracing will be configured
- In the Actions pane, click Failed Request Tracing...
- In the Edit Web Site Failed Request Tracing Settings dialog box, verify that the Enable check box is not checked

Disallow Unlisted File Extensions
- Open Internet Information Services (IIS) Manager
- In the Connections pane, select the server
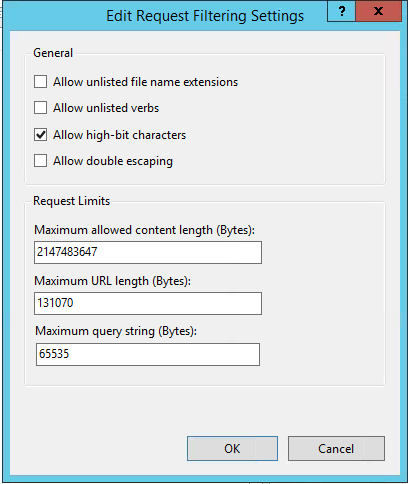
- In the Home pane, double-click Request Filtering
- Click Edit Feature Settings... in the Actions pane
- Under the General section, uncheck Allow unlisted file name extensions
Request Filtering
- Disallow unlisted file name extensions and unlisted verbs in Request filtering globally
- Allow .dll for execution in the [...]/ias_relay_server/ folder and its subfolders

- Allow only GET, HEAD, POST, PUT, DELETE for all Relay Server Sites globally
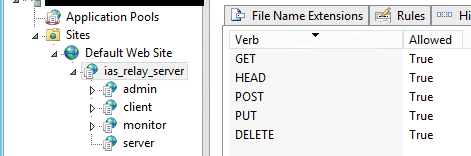
- Allow Only POST and CONNECT for server folder

Additional Tasks
Scheduled Job: Log Cleanup
- Copy the “LogCleaner.bat” and the “Log Cleaner.xml” from the Setup Folder to the folder D:\Logs. Executing the .bat file would delete all log files that are older than 45 days.
- Open the LogCleaner.bat to check, if folder settings and file locations are correct

- Open the Windows Task Scheduler and Import the Task
- Choose Log Cleaner.xml file
- Confirm
- Check, if file location is correct and choose the correct one, if necessary
- Activate the schedule, if necessary

You must be a registered user to add a comment. If you've already registered, sign in. Otherwise, register and sign in.
Labels in this area
-
ABAP CDS Views - CDC (Change Data Capture)
2 -
AI
1 -
Analyze Workload Data
1 -
BTP
1 -
Business and IT Integration
2 -
Business application stu
1 -
Business Technology Platform
1 -
Business Trends
1,658 -
Business Trends
91 -
CAP
1 -
cf
1 -
Cloud Foundry
1 -
Confluent
1 -
Customer COE Basics and Fundamentals
1 -
Customer COE Latest and Greatest
3 -
Customer Data Browser app
1 -
Data Analysis Tool
1 -
data migration
1 -
data transfer
1 -
Datasphere
2 -
Event Information
1,400 -
Event Information
66 -
Expert
1 -
Expert Insights
177 -
Expert Insights
293 -
General
1 -
Google cloud
1 -
Google Next'24
1 -
Kafka
1 -
Life at SAP
780 -
Life at SAP
13 -
Migrate your Data App
1 -
MTA
1 -
Network Performance Analysis
1 -
NodeJS
1 -
PDF
1 -
POC
1 -
Product Updates
4,577 -
Product Updates
341 -
Replication Flow
1 -
RisewithSAP
1 -
SAP BTP
1 -
SAP BTP Cloud Foundry
1 -
SAP Cloud ALM
1 -
SAP Cloud Application Programming Model
1 -
SAP Datasphere
2 -
SAP S4HANA Cloud
1 -
SAP S4HANA Migration Cockpit
1 -
Technology Updates
6,873 -
Technology Updates
419 -
Workload Fluctuations
1
Related Content
- Explore Business Continuity Options for SAP workload using AWS Elastic DisasterRecoveryService (DRS) in Technology Blogs by Members
- SAP SABRIX UPGRADE in Technology Blogs by Members
- Exciting updates from TTA Cloud in Technology Blogs by Members
- How to install SAPHANA Studio in Windows in Technology Q&A
- Installing Composable Storefront for SAP Commerce 2211.20 in Technology Blogs by SAP
Top kudoed authors
| User | Count |
|---|---|
| 35 | |
| 25 | |
| 14 | |
| 13 | |
| 7 | |
| 7 | |
| 6 | |
| 6 | |
| 5 | |
| 5 |