Integration of SFSF Intelligent Services with SAP ...
Technology Blogs by SAP
Learn how to extend and personalize SAP applications. Follow the SAP technology blog for insights into SAP BTP, ABAP, SAP Analytics Cloud, SAP HANA, and more.
When an employee is hired in SuccessFactors, a corresponding User should be created in SAP Cloud Identity. And if the User is terminated the corresponding SAP Cloud Identity User should be deactivated.
Scenario:
For the employee termination event, the iFlow will follow a similar path for the new hire as well. Instead of creating an account on the SAP Cloud Identity, the process should either delete the account (delete REST method) or disable the account (put REST method). The following direction below will describe a simple approach to leverage the SFSF Intelligent Services event notification.
High Level:
Listen to incoming event
Extract SFSF userID
Query SAP Cloud Identity for the userID using SFSF userID as a reference
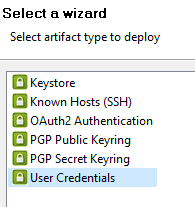
Deploy 2 credential artifacts to the tenant, one is the SFSF credential and the other is the SAP Cloud Identity
Start a new integration project
Add the SFSF WSDL file to the project
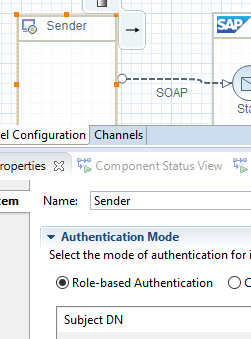
Set the inbound “Sender” element authentication to basic since that is currently the only available option for the SFSF Intelligent Services
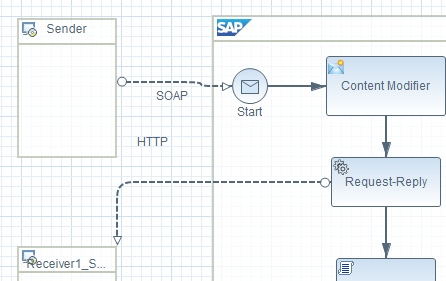
For the “Sender” element channel, set the protocol to use “SOAP” and bind the SFSF WSDL file then give it an address name
Add a “Content Modifier” after the “Start” message element, use this element to set the header content to conform to the SAP Cloud Identity requirement and extract SFSF UserID from the incoming payload. At this point you can declare other property for usage later during the creation of the iFlow
Add 2 more elements (“Service Call” and “Receiver”) onto the canvas and connect them accordingly
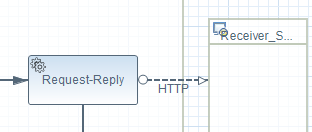
For the “Sender” element channel, set the protocol to use “HTTP” and set the “Adapter Specific” accordingly. Also, set the “Query” parameter to the incoming SFSF UserID Note: this demo follow the user creation mapping so the “userName” field should contain the SFSF userID
Add “Script” element to the canvas and create a script for it
For the script, analysis the response and extract the SAP Cloud Identity value then set the property value that was declare earlier. Example:
def body = message.getBody(String.class);
def match = body =~ /P\d{6}/;
if (match) {
message.setHeader("_SCI_response", "true");
message.setHeader("_SCI_UserID", match[0]);
}
return message;
Note: this is just one method of doing it
Add “Router” element to the canvas, set the condition to the router
Add two “Content Modifier” element to the canvas and connect them accordingly
Set the fail “Content Modifier” element body according to the SFSF fail response request
Set the success “Content Modifier” element body for the SAP Cloud Identity update request. Example:


 Note: this demo follow the user creation mapping so the “userName” field should contain the SFSF userID


 Note: this is just one method of analyzing the result
