
- SAP Community
- Products and Technology
- Enterprise Resource Planning
- ERP Blogs by Members
- Your S/4HANA environment - Part 1 - Maintenance Pl...
Enterprise Resource Planning Blogs by Members
Gain new perspectives and knowledge about enterprise resource planning in blog posts from community members. Share your own comments and ERP insights today!
Turn on suggestions
Auto-suggest helps you quickly narrow down your search results by suggesting possible matches as you type.
Showing results for
BJarkowski
Active Contributor
Options
- Subscribe to RSS Feed
- Mark as New
- Mark as Read
- Bookmark
- Subscribe
- Printer Friendly Page
- Report Inappropriate Content
07-25-2016
8:43 AM
Overview
S/4HANA introduces a lot of new functionality for customers. SAP gives the choice to deploy and use software as an on-premise installation or cloud service.
Over the few next days, I would like to present to you, how to deploy the whole S/4HANA environment:
1) How to install the S/4HANA system using Maintenance Planner and update it with SUM
2) How to perform initial configuration of SAP Gateway for S/4HANA
3) How to activate S/4HANA Best Practices
Today I will show you the first part – Installation and initial configuration of S/4HANA.
Prerequisites
If you would like to follow my guide, you need to have:
1) Access to SAP Service Marketplace
2) Operating system installed and configured according to SAP requirements
I’m using SLES 12, but you can use also SLES 11 or Red Hat.
3) SAP HANA database already installed
You can convert it to MDC with this blog: Convert to a multi tenant HANA database.
In case you have an older release, update it with frank.schuler2: How to update your sandbox HANA system to SPS 12
4) A bit of time :smile:
Although I will try to show you the complete installation scenario, I’m expecting you have some understanding of SAP Netweaver and you have already performed a Netweaver installation before.
I highly recommend that you also read all available documentation (like Installation Guide, SAP Notes) before installation.
Let’s start!
USE MAINTENANCE PLANNER TO PLAN A NEW SYSTEM
Maintenance planner is a place where our journey starts. It enables to us to plan a new installation and calculate the update path.
Link: Maintenance Planner
Just a few days ago, SAP released an update to Maintenance Planner and now you can find an additional tile just for S/4HANA.

During the next step we need to define our change scope:
- Installation of the new SAP S/4HANA system
- System conversion
Our task for this guide is to install a brand new system, so we choose the first option.

I found it very convenient that SAP already includes a link to the Installation Guide.
The ‘Select Backend System’ step allows us to define the exact system version we want to install. I chose the newest possible:
Target Version: SAP S/4HANA On-Premise 1511
Target Stack: FPS 02

Our goal is to have full environment consisting of two systems:
a) S/4HANA - back-end server
b) SAP Gateway - front-end server in Central Hub Deployment scenario

During this part we can choose which UI components we want to install along with Gateway:

Finally, we get confirmation that our preparation is complete. But that’s not the end. Now we need to confirm the files we want to download.

We are getting to the end of Maintenance Planner. On the last screen you can see the summary of selected files and the download stack file, that we will use in few moments to run Software Provisioning Manager.

After pushing files to Download Basket we can run Download Manager. Unfortunately, Maintenance Planner doesn’t show you the initial installation files. To get them, you need to follow the “old fashioned” way, by using SAP Marketplace and selecting the appropriate media.
During the download we can have a moment to install and prepare the SAP HANA database. I already have one working – the only thing I want to do is to create the tenant database that I will use for S/4HANA. It can easily be done executing SQL command:

It took around 2 minutes to have the database ready.
When the download is complete we can unpack archives and run SWPM. This time I decided to start it together with the stack file generated by Maintenance Planner.

SYSTEM INSTALLATION WITH SOFTWARE PROVISIONING MANAGER
The SWPM part is pretty straightforward, so I will focus on the most important and interesting parts.
The first screen let us choose what we want to install. But as we are using a stack file, we don’t have a big choice – list of available systems is limited to our previous choice from Maintenance Planner:

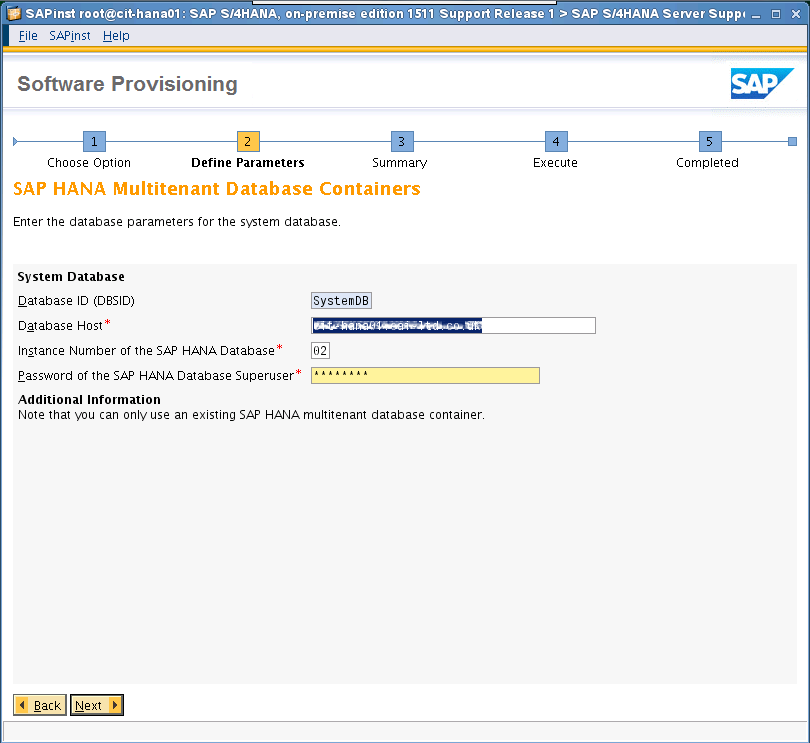
After typing our system SID, FQDN and master password, we need to point to our HANA database. Look that we need to give not only a password for the tenant database, but also for the system database.

On Software Package Browser we can point to SAR archives with SAP kernel – the easiest way is to type directory with our Download Folder. SWPM finds the files automatically.

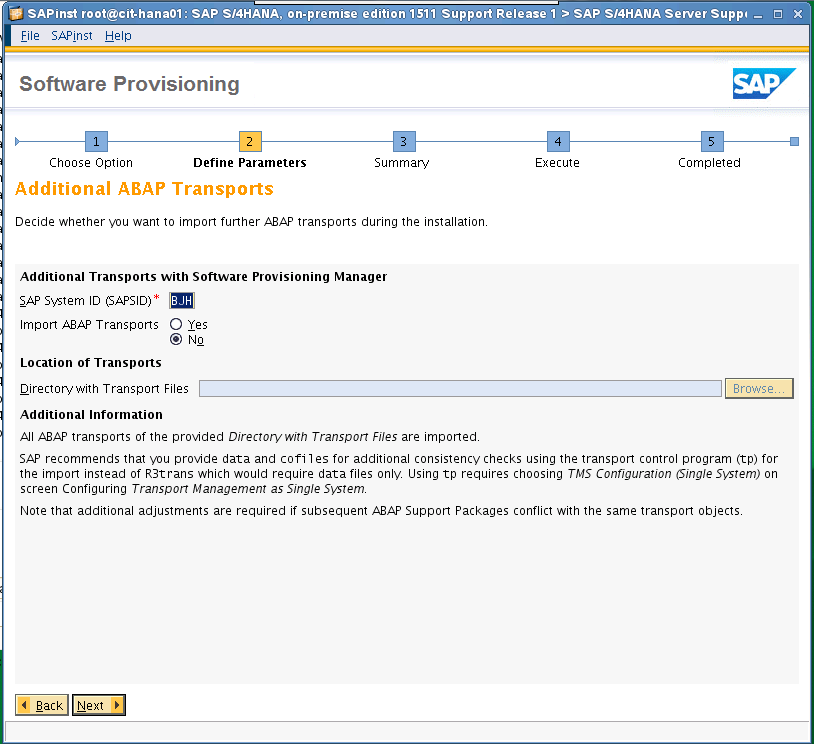
Another nice idea is to configure STMS along with system installation, import newest SPAM package and import ABAP transports.


One of the last steps is to configure SUM. It will start directly after SWPM and enables us to import support packages.

The very last screen is confirmation of our parameters. After clicking Next, the installation starts:

The installation in my case took around 4 hours. As usual the longest part was Import ABAP.
To install the SAP system, we used a stack file, so the last task during the installation is to start Software Update Manager to import corrections.

To login to SUM we need to provide <sid>adm user and password. Execution of SUM is again pretty straightforward, so I will focus mainly on the important bits. SAP recently released new installation media with S/4HANA SR1, so SUM will update only minor components – all core components are already on the highest release.
SYSTEM UPDATE USING SOFTWARE UPDATE MANAGER
First thing after log in to SUM you need to provide stack file. It’s exactly the same file that was previously generated by Maintenance Planner and was used as the input for SWPM.

As usual during an update process we can choose configuration. To make the update quickest I chose Single System without creating shadow instance.

We can now check what components will be updated. In our case there are not too many changes, but when a new release comes, the following screens will contain more information.


During the update you will be prompted to perform a system backup – this is of course highly recommended.
Finally, when SUM execution is finished, we receive the relevant message:

Now we can finally enter the system.
When we go to menu System -> Status we can see the exact S/4HANA version.

That’s all for today. I hope you enjoyed this course. In a few days I will publish the next episode where I focus mainly on front-end server configuration and connection to S/4HANA back-end.
- SAP Managed Tags:
- SAP HANA,
- SAP NetWeaver,
- SAP S/4HANA
14 Comments
You must be a registered user to add a comment. If you've already registered, sign in. Otherwise, register and sign in.
Labels in this area
-
"mm02"
1 -
A_PurchaseOrderItem additional fields
1 -
ABAP
1 -
ABAP Extensibility
1 -
ACCOSTRATE
1 -
ACDOCP
1 -
Adding your country in SPRO - Project Administration
1 -
Advance Return Management
1 -
AI and RPA in SAP Upgrades
1 -
Approval Workflows
1 -
Ariba
1 -
ARM
1 -
ASN
1 -
Asset Management
1 -
Associations in CDS Views
1 -
auditlog
1 -
Authorization
1 -
Availability date
1 -
Azure Center for SAP Solutions
1 -
AzureSentinel
2 -
Bank
1 -
BAPI_SALESORDER_CREATEFROMDAT2
1 -
BRF+
1 -
BRFPLUS
1 -
Bundled Cloud Services
1 -
business participation
1 -
Business Processes
1 -
CAPM
1 -
Carbon
1 -
Cental Finance
1 -
CFIN
1 -
CFIN Document Splitting
1 -
Cloud ALM
1 -
Cloud Integration
1 -
condition contract management
1 -
Connection - The default connection string cannot be used.
1 -
Custom Table Creation
1 -
Customer Screen in Production Order
1 -
Customizing
1 -
Data Quality Management
1 -
Date required
1 -
Decisions
1 -
desafios4hana
1 -
Developing with SAP Integration Suite
1 -
Direct Outbound Delivery
1 -
DMOVE2S4
1 -
EAM
1 -
EDI
3 -
EDI 850
1 -
EDI 856
1 -
edocument
1 -
EHS Product Structure
1 -
Emergency Access Management
1 -
Energy
1 -
EPC
1 -
Financial Operations
1 -
Find
1 -
FINSSKF
1 -
Fiori
1 -
Flexible Workflow
1 -
Gas
1 -
Gen AI enabled SAP Upgrades
1 -
General
1 -
generate_xlsx_file
1 -
Getting Started
1 -
HomogeneousDMO
1 -
How to add new Fields in the Selection Screen Parameter in FBL1H Tcode
1 -
IDOC
2 -
Integration
1 -
Learning Content
2 -
Ledger Combinations in SAP
1 -
LogicApps
2 -
low touchproject
1 -
Maintenance
1 -
management
1 -
Material creation
1 -
Material Management
1 -
MD04
1 -
MD61
1 -
methodology
1 -
Microsoft
2 -
MicrosoftSentinel
2 -
Migration
1 -
mm purchasing
1 -
MRP
1 -
MS Teams
2 -
MT940
1 -
Newcomer
1 -
Notifications
1 -
Oil
1 -
open connectors
1 -
Order Change Log
1 -
ORDERS
2 -
OSS Note 390635
1 -
outbound delivery
1 -
outsourcing
1 -
PCE
1 -
Permit to Work
1 -
PIR Consumption Mode
1 -
PIR's
1 -
PIRs
1 -
PIRs Consumption
1 -
PIRs Reduction
1 -
Plan Independent Requirement
1 -
POSTMAN
1 -
Premium Plus
1 -
pricing
1 -
Primavera P6
1 -
Process Excellence
1 -
Process Management
1 -
Process Order Change Log
1 -
Process purchase requisitions
1 -
Product Information
1 -
Production Order Change Log
1 -
purchase order
1 -
Purchase requisition
1 -
Purchasing Lead Time
1 -
Redwood for SAP Job execution Setup
1 -
RISE with SAP
1 -
RisewithSAP
1 -
Rizing
1 -
S4 Cost Center Planning
1 -
S4 HANA
1 -
S4HANA
3 -
S4HANACloud audit
1 -
Sales and Distribution
1 -
Sales Commission
1 -
sales order
1 -
SAP
2 -
SAP Best Practices
1 -
SAP Build
1 -
SAP Build apps
1 -
SAP CI
1 -
SAP Cloud ALM
1 -
SAP CPI
1 -
SAP Data Quality Management
1 -
SAP ERP
1 -
SAP Maintenance resource scheduling
2 -
SAP Note 390635
1 -
SAP S4HANA
2 -
SAP S4HANA Cloud private edition
1 -
SAP Upgrade Automation
1 -
SAP WCM
1 -
SAP Work Clearance Management
1 -
Schedule Agreement
1 -
SDM
1 -
security
2 -
Settlement Management
1 -
soar
2 -
Sourcing and Procurement
1 -
SSIS
1 -
SU01
1 -
SUM2.0SP17
1 -
SUMDMO
1 -
Teams
2 -
Time Management
1 -
User Administration
1 -
User Participation
1 -
Utilities
1 -
va01
1 -
vendor
1 -
vl01n
1 -
vl02n
1 -
WCM
1 -
X12 850
1 -
xlsx_file_abap
1 -
YTD|MTD|QTD in CDs views using Date Function
1
- « Previous
- Next »
Related Content
- SAP Activate Realize and Deploy phase activities in the context of Scaled Agile Framework in Enterprise Resource Planning Blogs by SAP
- Why YCOA? The value of the standard Chart of Accounts in S/4HANA Cloud Public Edition. in Enterprise Resource Planning Blogs by SAP
- Speeding up your SAP HCM move to the cloud in 2024 - Part 2: Customer Evolution Kit for HCM in Enterprise Resource Planning Blogs by SAP
- SAP Enterprise Support Academy Newsletter May 2024 in Enterprise Resource Planning Blogs by SAP
- Recap of SAP S/4HANA 2023 Highlights Webinar: Asset Management in Enterprise Resource Planning Blogs by SAP
Top kudoed authors
| User | Count |
|---|---|
| 3 | |
| 2 | |
| 2 | |
| 2 | |
| 2 | |
| 1 | |
| 1 | |
| 1 | |
| 1 |