
- SAP Community
- Products and Technology
- Technology
- Technology Blogs by SAP
- How to use Push Notifications with iOS and Android...
Technology Blogs by SAP
Learn how to extend and personalize SAP applications. Follow the SAP technology blog for insights into SAP BTP, ABAP, SAP Analytics Cloud, SAP HANA, and more.
Turn on suggestions
Auto-suggest helps you quickly narrow down your search results by suggesting possible matches as you type.
Showing results for
Advisor
Options
- Subscribe to RSS Feed
- Mark as New
- Mark as Read
- Bookmark
- Subscribe
- Printer Friendly Page
- Report Inappropriate Content
05-25-2016
2:43 PM
Introduction
This is the continuation of the blog started here. This is the final part of this blog. In this part you will learn how to use the information collected in the previous two parts within HCPms and how to send push notifications to a hybrid application deployed to your mobile devices.
This blog has been split in 3 parts:
| Link | Content |
|---|---|
| How to use Push Notifications with iOS and Android Hybrid applications - part 1 | Step 1 - Enable push notifications for Android |
| How to use Push Notifications with iOS and Android Hybrid applications - part 2 | Step 2 - Enable push notifications for iOS |
| This part | Steps 3 -> 6 - Create an app on HCPms, then another in SAP Web IDE, deploy the app to mobile services and test the app with some push notifications |
Step 3 - Create an application on HCPms
1 - Go to your HCPms Administration page (https://hcpmsadmin-<your_trial_account>.dispatcher.hanatrial.ondemand.com). Replace the string "<your_trial_account>" with your HCP Trial Landscape account
2 - From the toolbar click on the button to create a new application

3 - Specify an Application ID and other parameters and click on Save
| Parameter | Value |
|---|---|
| Application ID | com.sap.pushnotific |
| Name | Acme Products |
| Type | Hybrid |
| Description | Products for Push Notifications |
| Vendor | SAP |
| Security Configuration | None |
NOTE: The application ID must be the same you used to create the Server API Key on Google and the certificate on the Apple Developer portal, otherwise the application will not be recognized as recipient of the incoming notifications.

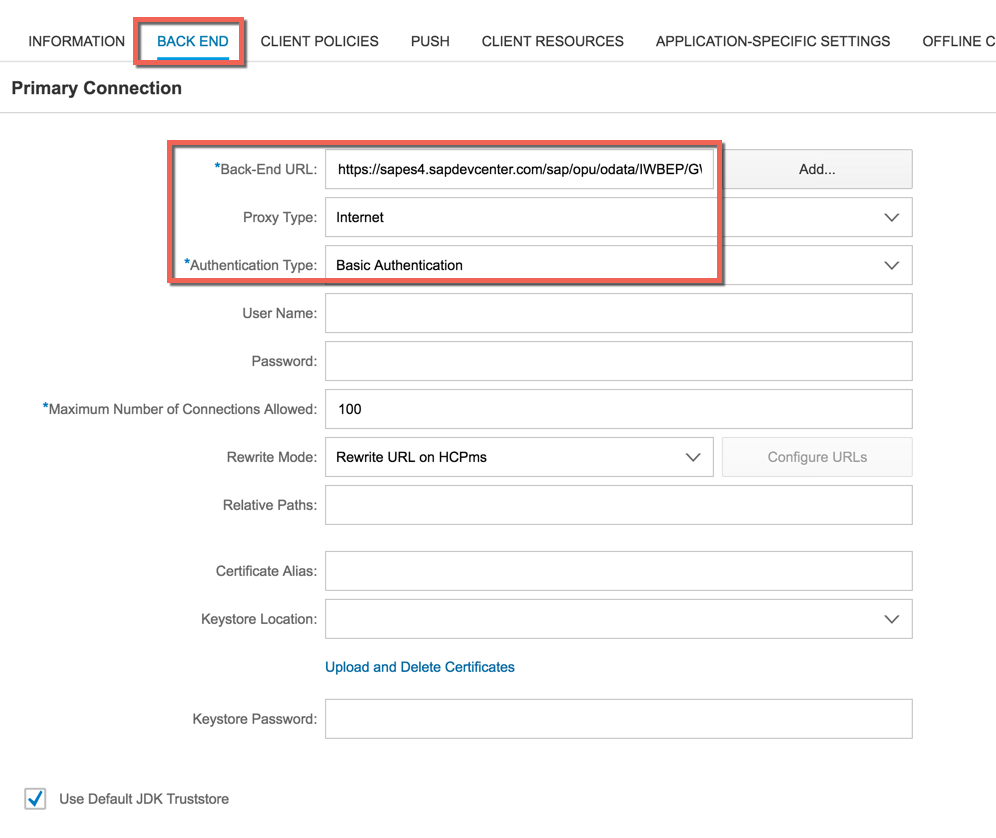
4 - Click on the Back End tab and configure your back end connection. This step is not really required, because we are not going to consume data from the backend, but for the sake of completeness we are going to specify this information as well. I'm using here, as back-end URL, the public SAP Gateway service.
| Parameter | Value |
|---|---|
| Back-end URL | https://sapes4.sapdevcenter.com/sap/opu/odata/IWBEP/GWSAMPLE_BASIC |
| Proxy-Type | Internet |
| Authentication Type | Basic Authentication |
5 - Click on the Push tab and here you have the possibility to configure the push mechanism. Depending on which platform you want to use you can configure push notifications for Apple or for Android. In my case I'm going to specify both, because I want to show you how to deal with both platforms.
So for Apple I'm going to specify that I want to use the Sandbox as APNS Endpoint (I'm not going on production right now!), I load the certificate I generated in the previous part and I enter the password I assigned to it.
For Android I just need to specify the API Key and the Sender ID I've got in the first part of this blog
When finished click on Save

6 - The application on HCPms is correctly configured.

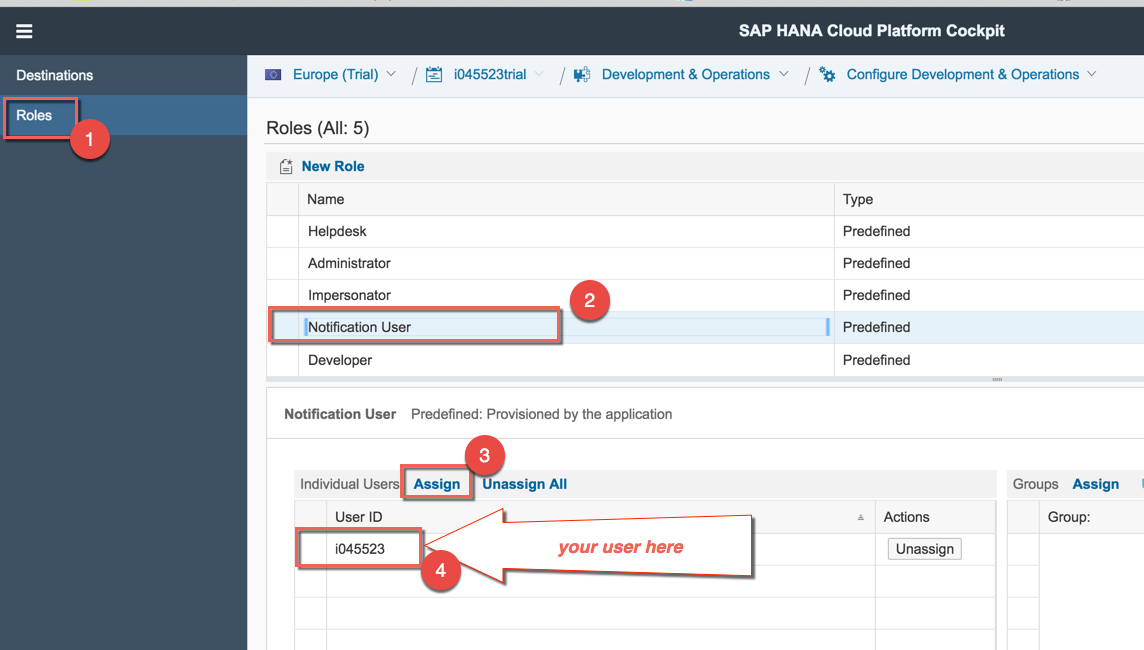
7 - Open your HCP cockpit and go to Services --> Development & Operations
8 - Click on Configure Development & Operations
9 - Click on Roles on the left toolbar
10 - Select the Notification User role and assign your user to it, if not yet assigned
Step 4 - Create an application in SAP Web IDE
Let's create now our hybrid application with SAP Web IDE which will be deployed on mobile devices to receive push notifications. The application I'm creating here is really basic, but feel free to extend it with the necessary enhancements.
1 - Open SAP Web IDE and go to File --> New --> Project From Template
2 - Choose a SAPUI5 Application
3 - Enter a name for the project (i.e. PushNotificationsDemo) and a namespace (i.e. com.push.notifications). The namespace I'm using here is important because it's referenced several times in the code you'll see later in this article. So I recommend you to use the same for this testing phase: if you want to specify a different namespace you will have to change the code accordingly. Don't forget to set this project as Hybrid Mobile Application

4 - Keep the proposed Type and Name for the view and click on Next

5 - Click on Finish
6 - Your application is ready. Starting the app you will only get a blank window with a title
7 - Inside the webapp folder create a new subfolder named util
8 - Inside the util subfolder create a new javascript file named PushController.js
9 - Paste the following code:
jQuery.sap.declare("com.push.notifications.util.PushController");

com.push.notifications.util.PushController = {

  regSuccess: function(result) {

  console.log("Successfully registered: " + JSON.stringify(result));

  },

  regFailure: function(errorInfo) {

  console.log("Error while registering.  " + JSON.stringify(errorInfo));

  },

  resetBadgeSuccess: function(result) {

  console.log("Badge has been reset: " + JSON.stringify(result));

  },

  processNotification: function(notification) {

  console.log("Received a notifcation: " + JSON.stringify(notification));

  if (sap.Push.isPlatformIOS()) {

  var notif_alert = JSON.parse(notification).payload.aps.alert;

  var notif_sound = JSON.parse(notification).payload.aps.sound;

  var notif_badge = JSON.parse(notification).payload.aps.badge;

  var notif_data = JSON.parse(notification).payload.data;

  } else {

  var notif_alert = notification.payload.alert;

  var notif_sound = notification.payload.sound;

  var notif_badge = notification.payload.badge;

  var notif_data = notification.payload.data;

  }

  jQuery.sap.require("sap.m.MessageBox");

  sap.m.MessageBox.show(

  notif_data, {

  icon: sap.m.MessageBox.Icon.INFORMATION,

  title: notif_alert,

  actions: [sap.m.MessageBox.Action.OK]

  }

  );

  if (sap.Push.isPlatformIOS()) {

  sap.Push.resetBadge(this.resetBadgeSuccess);

  }

  },

  registerForPush: function() {

  console.log("Device is = " + sap.ui.Device.os);

  var sender = (sap.ui.Device.os.android ? "XXXXXXXXXXXX" : "");

  console.log("Sender is [" + sender + "]");

  console.log("attempting to register for notifications");

  var nTypes = sap.Push.notificationType.SOUNDS | sap.Push.notificationType.BADGE | sap.Push.notificationType.ALERT;

  sap.Push.registerForNotificationTypes(nTypes, this.regSuccess, this.regFailure, this.processNotification, sender); //GCM Sender ID, null for APNS

  },

  unregCallback: function(result) {

  console.log("Successfully unregistered: " + JSON.stringify(result));

  },

  unregisterForPush: function() {

  sap.Push.unregisterForNotificationTypes(this.unregCallback);

  },

  processMissedNotification: function(notification) {

  if (notification) {

  console.log("Received a missed notification: " + JSON.stringify(notification));

  alert("Received a missed notification: " + JSON.stringify(notification));

  }

  if (sap.Push.isPlatformIOS()) {

  sap.Push.resetBadge(this.resetBadgeSuccess);

  }

  },

  checkForNotification: function(notification) {

  setTimeout(function() {

  console.log("Checking for notifications...");

  sap.Push.checkForNotification(this.processMissedNotification);

  // TODO: do your thing!

  }, 0);

  }

};
10 - There is one thing that you need to change in this file. It's the Sender ID you can find at line 39: you need to replace the string "XXXXXXXXXXXX" with the Sender ID you got in the first step
11 - Save the file
12 - Open the file webapp/controller/View1.controller.js, paste the following code and save the file:
sap.ui.define([

  "sap/ui/core/mvc/Controller",

  "com/push/notifications/util/PushController"

], function(Controller, PushController) {

  "use strict";

  return Controller.extend("com.push.notifications.controller.View1", {

  onBeforeRendering: function() {

  if (!sap.ui.Device.system.desktop) {

  //push notifications

  PushController.registerForPush();

  alert("Registered for push!");

  }

  }

  });

});
13 - Open the webapp/index.html file and add the following code just before closing the last <script> tag. Then save the file
  window.onload = function() {

    console.log("In the onload function");

  if (window.cordova || getUrlParameterName("companionbuster")) {

    console.log("is cordova");

    //push notifications

            document.addEventListener("resume",com.push.notifications.util.PushController.checkForNotification,false);

  }

  }

NOTE: Again, pay attention to the fact if you used a different namespace you need to replace it around all the proposed javascript code. The same if you used different paths.
14 - Your application is ready. You just need to deploy it on your mobile device.
Step 5 - Deploy the app to mobile devices
Let's deploy it first on your local hybrid application toolkit.
1 - Start your HAT tool. You can check that HAT is running from the settings menu

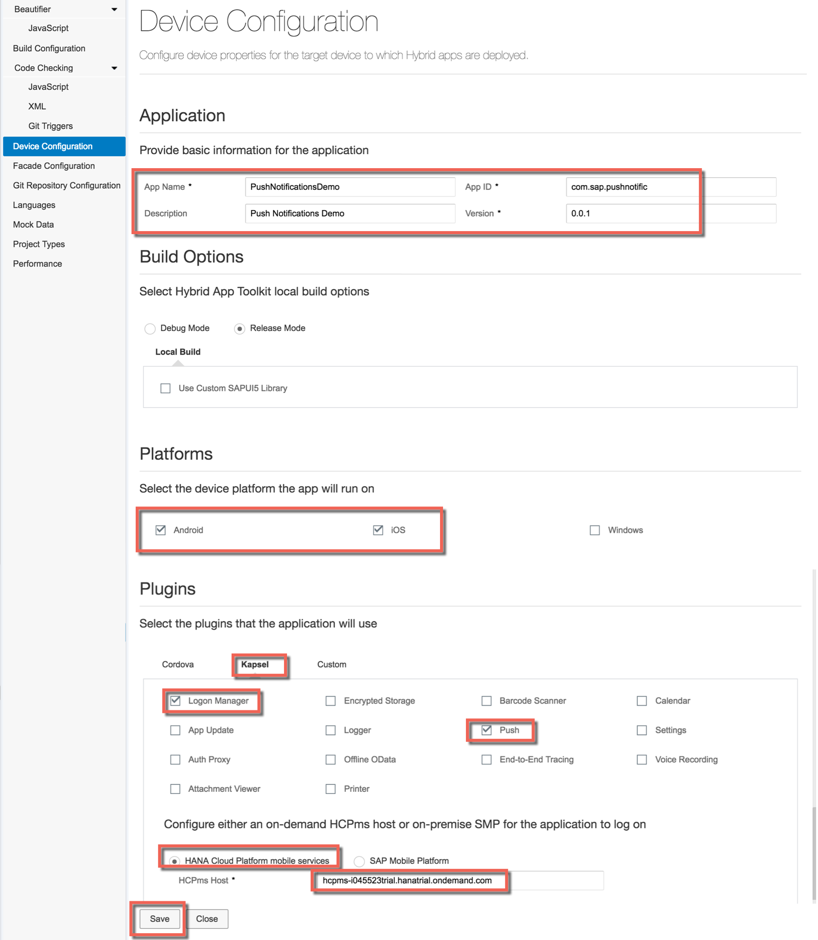
2 - In SAP Web IDE right click on the name of the project and configure HAT settings
| Parameter | Value |
|---|---|
| App Name | PushNotificationsDemo |
| App ID | com.sap.pushnotific |
| Description | Push Notifications Demo |
| Version | 0.0.1 |
| Platforms | Android, iOS or both |
| Plugins --> Kapsel | Logon Manager, Push |
| HCPms Host | hcpms-<your_trial_account>.hanatrial.ondemand.com |
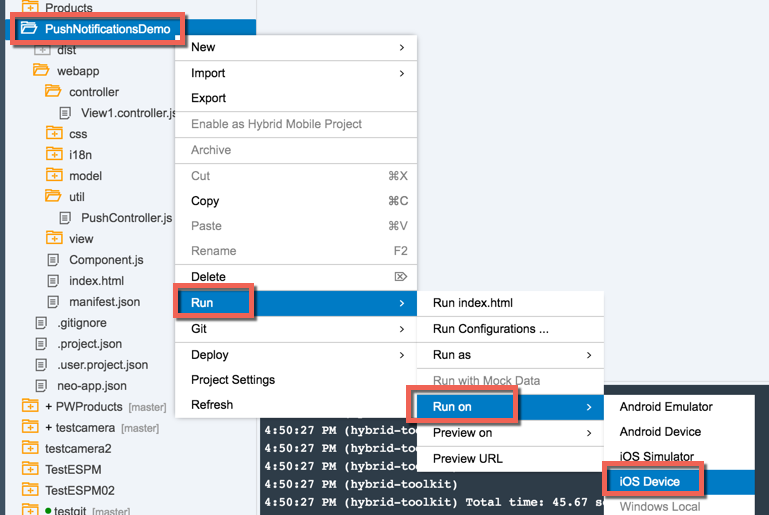
3 - We are ready to deploy the app on our devices. Let's start with iOS. If you don't need this part you can go directly to point 9. Do Deploy --> Deploy to Local Hybrid Application toolkit and wait until the project is successfully deployed
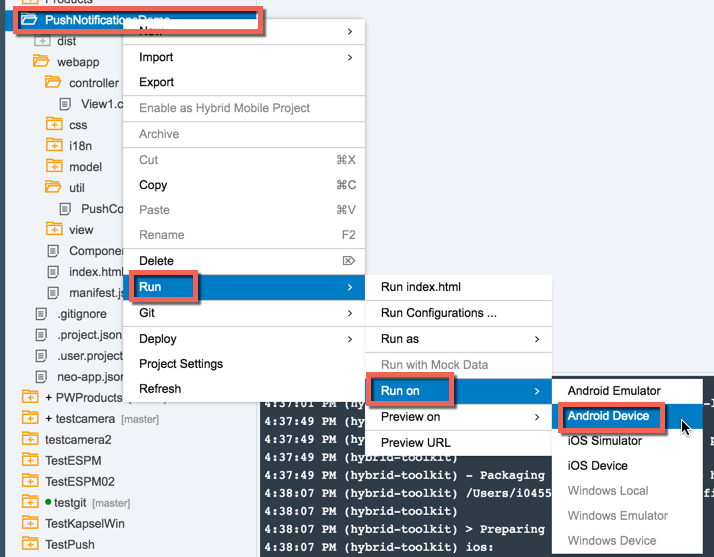
4 - Right click again on the name of the project and run it on the iOS Device
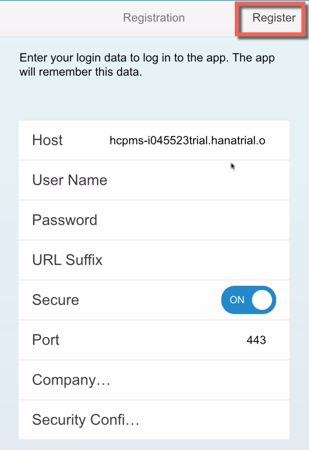
5 - The application starts on the device. Just click on Register. We are not going to authenticate with any backend because with this basic app we don't consume it
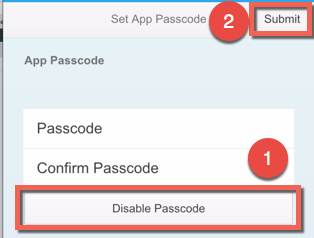
6 - Click on Disable Pascode and then on Submit
7 - You might be requested to allow this app to receive push notifications. Accept the request by pressing OK

8 - The application is successfully registered for receiving push notifications

9 - Do the same for Android if you need it
10 - For Android you need to specify if you want to use a Test or a Custom Key. For the purpose of this exercise, just choose to use a Test Key and click on OK

11 - Even the Android application is ready and registered for push notifications

Step 6 - Send push notifications and test the apps
All is ready now. We just need to find a way to send push notifications to our application on the two different devices. For this goal I'm going to present here 2 ways. The first way is to send push notifications through a NodeJS application; the second way is to use a REST Client like Postman that you can install as a pluing in Google Chrome. Both ways are valid and will send a post request to the notification end point.
1 - Let's start with the first way. You need NodeJS installed. I'm using version 5.4.1, but even older versions are fine.
2 - Create a new push.js file on your machine and fill it with the following code:
var requestify = require('requestify');

requestify.request('https://hcpms-<your_trial_account>.hanatrial.ondemand.com/restnotification/application/com.sap.pushnotific/', {

    method: 'POST',

  body: {"alert": "Information!", "badge": 1, "data": "You just received a push notification!", "sound": "soundval"},

    headers: {

        'Content-Type': 'application/json'

    },

    auth: {

        username: '<your_trial_user>',

        password: '<your_trial_password>'

    },

    dataType: 'json'

})

.then(function(response) {

    // get the response body

    console.log(response.getBody());

    // get the response headers

    //console.log(response.getHeaders());

    // get specific response header

    //response.getHeader('Accept');

    // get the code

    //console.log(response.getCode());

    // Get the response raw body

    //console.log(response.body);

});
3 - Replace the following strings
| String | Information |
|---|---|
| <your_trial_account> | with your HCP Trial Landscape account |
| <your_trial_user> | with your HCP Trial Username |
| <your_trial_password> | with your HCP Trial password |
4 - Save the file
5 - From the terminal window, install the needed "requestify" module by running the command
npm install requestify
in the same folder where you have put the push.js file
6 - Run the command "node push.js"
7 - The script is executed. In a few seconds your mobile devices should be able to receive the notification

8 - If you feel more comfortable to use Postman, just create a new request with the following parameters and click on Send
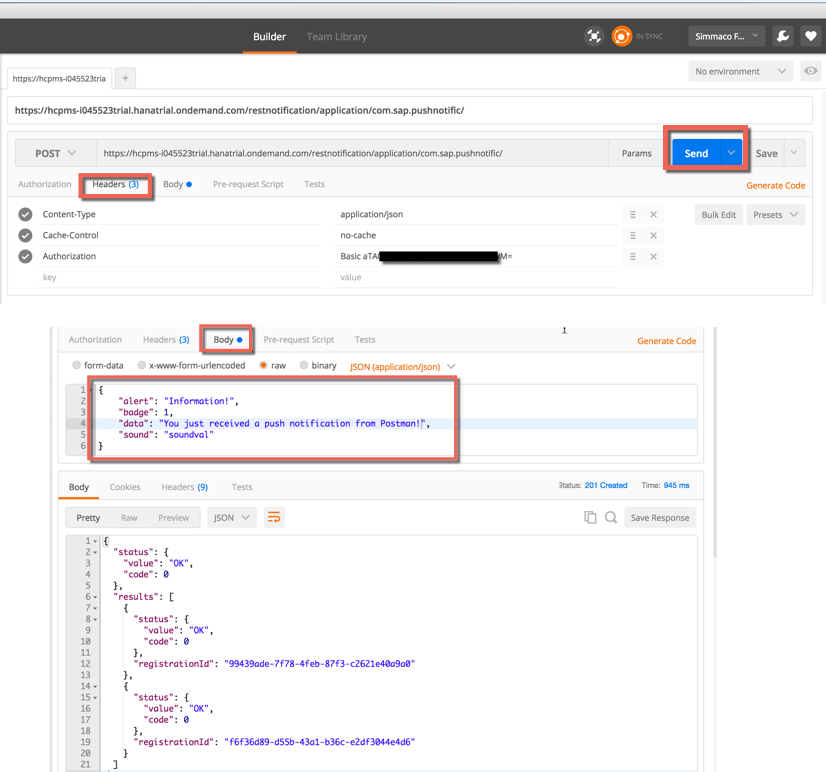
9 - The result should be exactly the same

10 - Congratulations! You successfully sent push notifications to your devices!
- SAP Managed Tags:
- SAPUI5,
- SAP Enterprise Portal
10 Comments
You must be a registered user to add a comment. If you've already registered, sign in. Otherwise, register and sign in.
Labels in this area
-
ABAP CDS Views - CDC (Change Data Capture)
2 -
AI
1 -
Analyze Workload Data
1 -
BTP
1 -
Business and IT Integration
2 -
Business application stu
1 -
Business Technology Platform
1 -
Business Trends
1,661 -
Business Trends
86 -
CAP
1 -
cf
1 -
Cloud Foundry
1 -
Confluent
1 -
Customer COE Basics and Fundamentals
1 -
Customer COE Latest and Greatest
3 -
Customer Data Browser app
1 -
Data Analysis Tool
1 -
data migration
1 -
data transfer
1 -
Datasphere
2 -
Event Information
1,400 -
Event Information
64 -
Expert
1 -
Expert Insights
178 -
Expert Insights
270 -
General
1 -
Google cloud
1 -
Google Next'24
1 -
Kafka
1 -
Life at SAP
784 -
Life at SAP
11 -
Migrate your Data App
1 -
MTA
1 -
Network Performance Analysis
1 -
NodeJS
1 -
PDF
1 -
POC
1 -
Product Updates
4,578 -
Product Updates
323 -
Replication Flow
1 -
RisewithSAP
1 -
SAP BTP
1 -
SAP BTP Cloud Foundry
1 -
SAP Cloud ALM
1 -
SAP Cloud Application Programming Model
1 -
SAP Datasphere
2 -
SAP S4HANA Cloud
1 -
SAP S4HANA Migration Cockpit
1 -
Technology Updates
6,886 -
Technology Updates
395 -
Workload Fluctuations
1
Related Content
- SAP Document and Reporting Compliance - 'Colombia' - Contingency Process in Technology Blogs by SAP
- 2405 Early Release Series for SAP Procurement and SAP Business Network releases in Technology Blogs by SAP
- SAP Mobile Start leverages Google Chrome's latest Picture-in-Picture (PiP) Mode in Technology Blogs by SAP
- SAP BTP SDK for Android 24.4.0 is now available in Technology Blogs by SAP
- Gamifying SAP C4C with BTP, the Flutter or Build Apps way. in Technology Blogs by SAP
Top kudoed authors
| User | Count |
|---|---|
| 11 | |
| 10 | |
| 10 | |
| 9 | |
| 8 | |
| 7 | |
| 7 | |
| 7 | |
| 7 | |
| 6 |