
- SAP Community
- Products and Technology
- CRM and Customer Experience
- CRM and CX Blogs by Members
- How to Create Custom Approval Process and Configur...
CRM and CX Blogs by Members
Find insights on SAP customer relationship management and customer experience products in blog posts from community members. Post your own perspective today!
Turn on suggestions
Auto-suggest helps you quickly narrow down your search results by suggesting possible matches as you type.
Showing results for
dpksghl_30
Participant
Options
- Subscribe to RSS Feed
- Mark as New
- Mark as Read
- Bookmark
- Subscribe
- Printer Friendly Page
- Report Inappropriate Content
05-18-2016
12:54 PM
This document contains the information regarding approval process in detailed manner step by step.
Thanks to my colleagues atul.malhotra ,vaibhav.kwatra , kartik.saini , jayant.saini as they have helped and contributed in preparation of this document.
Basically there are 3 Steps which covers complete functionality of approval processes in SAP Cloud Studio :-
1. Create the Custom Approval Process in Cloud Studio
2. UI designer work and Screen generation
3. Configure and Test the Approval Process in Cloud Solution
Step 1: Create the Custom Approval Process
- Go to SAP cloud studio and create a Business Object and enter elements as shown in below screenshot :
- 'Save and Activate' BO.

- Right click on BO and select Create Approval Process as shown above, Approval Wizard opens showing task types - Approval, Notification, Revision. Select Notification Check box and Click Next as shown in below Screenshot.

- Here we need to define the tasks and texts for the Approvals or Rejections, Also we can add parameters to show element from Custom BO in the texts as shown in below screenshot

- On Clicking Add Parameter a window opens,give the parameter name as "Request" and click on 3 dot button to bind it to the BO element as shown below
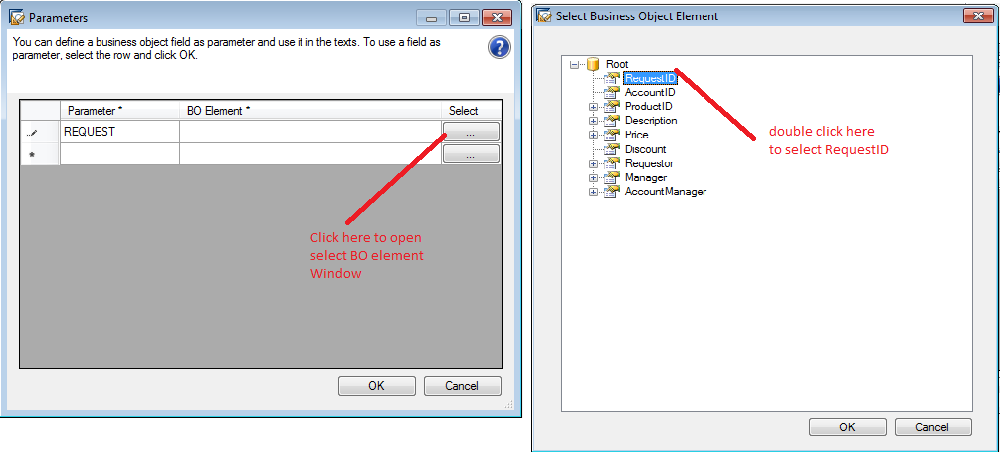
- Click 'OK' on Parameter window then Approval task will be shown as in below screenshot :

- Do the same activity for Approval notification and Revision notification as show in below screenshot:

- Click on Next ,we move to next step of task assignment where we decide the responsible person for the different task types , here give the task type and bind it to the responsible person defined in BO as shown in below screenshot:

- here we have two level of approvals "Manager" and "Account Manager" and "Requestor" will get the notifications so binding will be done as shown in below table :
| Task Type | Description | BO element |
|---|---|---|
| Approval | Manager Approval | Root.Manager |
| Notification | Requestor Notification | Root.Requestor |
| Approval | Account Manager Approval | Root.AccountManager |
- Task Assignment in Approval Wizard will look like in below screenshot :

- Click 'Next' , in this step we select BO elements which will be used in Cloud Solution to specify Conditions (to be shown later in step 3) Select BO element as shown in below screenshot

- Now Click 'Next' and Review all the steps then Click on 'Finish'.
- Activate the 'Approval process' and Right click the solution to Deploy Business Configuration , it may take some time to appear Approval Process in SAP Cloud Solution due to background processes.
Step 2 : UI designer and Screen generation
- Right Click the BO and select 'Create Screen' and give a 'Short ID' as shown in below screenshot :

- Click 'Ok',all screens are generated now open ApprovalWork_WCView.WCVIEW.uiwocview in UI designer and goto Properties > RBAM Data > AssignedObject.
- Click AssignedObject, a wizard opens to add Objects as shown in below screenshot:

- Click Add Row and Select AssignedObjectType as TaskListView and bind ComponentId to ApprovalWork-Root-APP1-Approval ( go to [solutionname_Main > SRC]) as shown in below screenshot:

- Perform same activity to bind another ComponentId - ApprovalWork-Root-APP1-notification.
- Now add two more rows then select AssignedObjectType for both as Navigation Target and bind ComponentId to ApprovalWork-Root-APP1_NotificationUI and ApprovalWork-Root-APP1 as shown in below screenshot :

- Click 'Ok', Save and Activate WCView UI.
Step 3: Configuration and Testing Approval Process
- Go to Approval Processes under Application and User Management tab in Cloud Solution.
- Search for ApprovalWork and click Go , 'Default process for ApprovalWork' appears in Cloud Solution as shown in below screenshot:

- Select Default Process and Click Copy , here give Process Step name - Manager Approval and select the same under Work Distribution.
- Also specify the Conditions below as shown in screenshot :

- For Condition , Click Add Group then select parameter (price or discount as specified during approval creation) and then give the Condition set price >= 5000 INR and discount >= 10% for Manager Approval as shown in below screenshots:


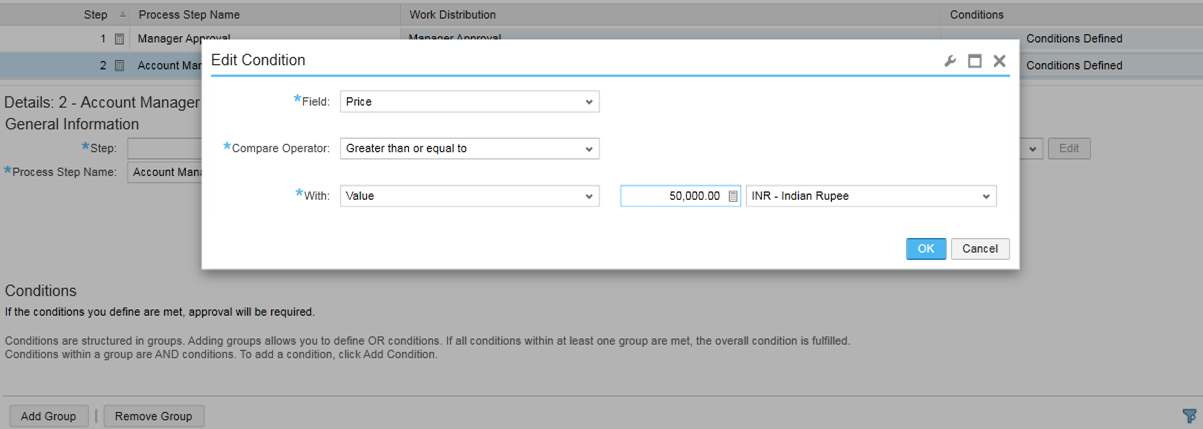
- Now Add Row under Process Steps and give Step Name - Account Manager Approval and select the same under Work Distribution , perform same activity as for Manager Approval Step.
- Give condition for Account Manager price >= 50000 INR as shown in below screenshot:
- Click 'Ok' , two steps are added successfully Save and close the screen. Now go back to Default Approval Process for ApprovalWork and Click Edit Validity.
- Set here Unlimited Validity of the Copied Approval Process as shown in below screenshot :

- Once From Date starts Status will be changed to 'Active' of copied process.
- Click 'Check' then Save and Close.
- Now Approval Process Configuration is complete , for testing assign the Work Center to your solution.
- Open ApprovalWork in Cloud Solution and Click 'New' button as show in below screenshot :

- Fill the appropriate details Click SubmitForApproval_APP1 as shown in below screenshot :
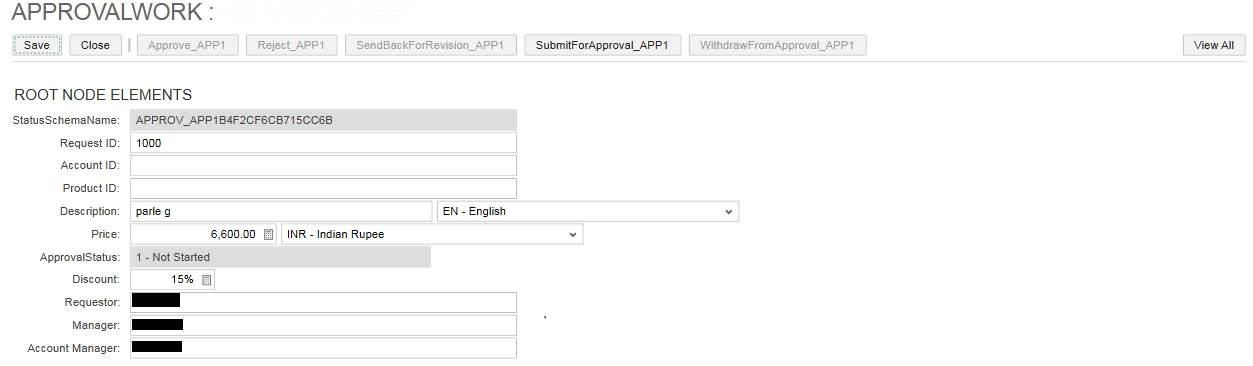
- Approval status is changed to 'In Approval' then Click 'Save' as shown in below screenshot:

- Click over notification we move to new screen there click on 'Approve_App1' button as shown in below screenshot :

- Close this screen go back OWL screen and Click Edit Object with request ID 1000 , there status will be changed to 'Approved' as shown in below screenshot

- SAP Managed Tags:
- SAP Business ByDesign,
- SAP Cloud for Customer add-ins,
- SAP Customer Relationship Management
19 Comments
You must be a registered user to add a comment. If you've already registered, sign in. Otherwise, register and sign in.
Labels in this area
-
ABAP
1 -
API Rules
1 -
CRM
1 -
Custom Key Metrics
1 -
Customer Data
1 -
Determination
1 -
Determinations
1 -
Introduction
1 -
KYMA
1 -
Kyma Functions
1 -
open SAP
1 -
Sales and Service Cloud Version 2
1 -
Sales Cloud v2
1 -
SAP
1 -
SAP Community
1 -
SAP CPQ
1 -
SAP CRM Web UI
1 -
SAP Customer Data Cloud
1 -
SAP Customer Experience
1 -
SAP Integration Suite
1 -
SAP Sales Cloud v2
1 -
SAP Service Cloud v2
1 -
SAP Service Cloud Version 2
1 -
Service Cloud v2
1 -
Validation
1 -
Validations
1
Related Content
- SAP Commerce Cloud Q1 ‘24 Release Highlights in CRM and CX Blogs by SAP
- SAP Customer Data Cloud Integration with Commerce Cloud and Composable Storefront in CRM and CX Blogs by SAP
- Implementing Dynamic Case Flows Based on Case Type in CRM and CX Blogs by Members
- Upload Mass Data for Shared Service Framework Configuration in CRM and CX Questions
- Enhance your Sales Growth and Quotation Efficiency through the Power of SAP Commerce and Sales Cloud in CRM and CX Blogs by SAP