
- SAP Community
- Products and Technology
- CRM and Customer Experience
- CRM and CX Blogs by Members
- Standard customizing of survey (CRM SURVEY SUITE) ...
CRM and CX Blogs by Members
Find insights on SAP customer relationship management and customer experience products in blog posts from community members. Post your own perspective today!
Turn on suggestions
Auto-suggest helps you quickly narrow down your search results by suggesting possible matches as you type.
Showing results for
anais_jaussaud
Participant
Options
- Subscribe to RSS Feed
- Mark as New
- Mark as Read
- Bookmark
- Subscribe
- Printer Friendly Page
- Report Inappropriate Content
05-12-2016
10:33 AM
This post explains how to customize survey (example taken for service request object) using the SAP standard functionality through CRM SURVEY SUITE.
More precisely, it indicates the customizing steps to send a mail form that includes a link to the survey.
Once completed the result of the survey will get back to the crm object.
Technical pre-requisite
1. Business fonction
Business function (SFW5) CRM_SHSVC must be activated
2. SICF
The following standard SICF must be active :
- crm_svy_public BSP http Survey Server Public
- crm_svy_server BSP http Survey Server
- iccmp_survey ICWC Survey Component
- svy_h
- svy_m
- svy_popups
- svy_s
3. Connector ID
The survey functionality using http connection requires a connector ID that needs to be maintained for each environment desired. This is explained in OSS note 1734718 - Setup of Connector ID parameter in CRM survey suite .
- Go Transaction Code SM59.
- Choose Create and press F8.
- Enter the following data
- RFC Destination = CONNECTOR_<CRM system name>_<Client>,e.g., CAT_CAD_240
- Connection Type = T (TCP/IP Connection)
- Description = CAT Server
- Choose Enter.
Technical settings
- Activation Type = Registered Server Program
- Program ID = CONNECTOR_<CRM system name>_<Client>
- Gateway host = Host name of the CRM system
- Gateway service = sapgw<CRM system number>.
Note the RFC destination that will be used later in the customizing.
CUSTOMIZING
1. Creating the survey in Crm_survey_suite
Go to transaction CRM_SURVEY_SUITE. (If a dump occurs, follow the instructions of note OSS 857535)
Create the survey needed in the folder desired (SERVICE for example):
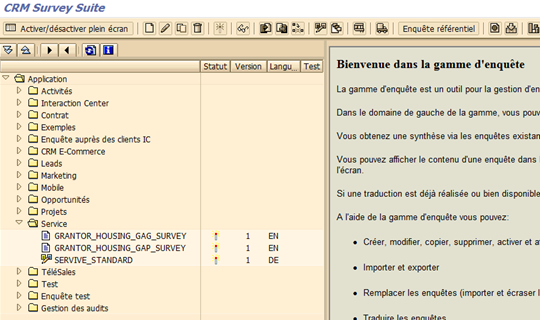


Once the survey page is displayed, click SAVE. The following page appears :
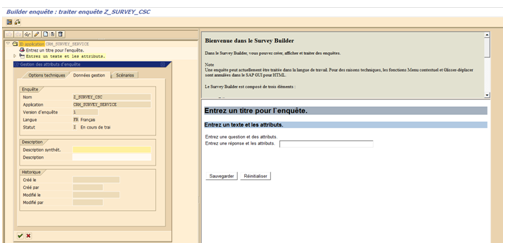
Give a description of the survey:

Click on save: The survey is saved and can be customized as needed.
The survey can also be customized in the web_ui under the marketing business role.
2. Link the survey with the transaction type needed
Once the survey is created, you need to indicate to which transaction type it has to be linked. Follow the path:
Transaction SPRO >>Customer Relationship Management> Transactions > Settings for Service Requests > Questionnaires > Define Determination for Surveys in Service Requests

Click on ‘New entries’ and enter the following :
Déterm : 0
Description : Name of the survey given
Valide du : as required
Fin valid : as required
Type opér : Transaction type you want the survey to be linked to
Type pos : empty
ID : Id of the survey customized
3. Action profile
If you want to send the survey depending on conditions, you can create an action profile.
The method of the action needs to be set up to ESSC_SRV_SVY:

Click on edit and then on the 'glass' icon.
3 element need to be customized in the container:
- MAIL_FORM_TEMPLATE: ID of the mail form used to send the link that will display the survey with Type Name ‘CRMT_PML_ID’.

In the Initial value tab, enter the ID of the mail form template used.
Save and enter the next element:
- SVY_TEMPLATE: ID of the survey customized previously with type Name CRM_SVY_DB_SID.

In the Initial value tab, enter the ID of the survey form created.
Save and enter the next element:
- DEFAULT_SENDER_EMAIL: Sender email address used to send the mail form with type name ‘AD_SMTPADR’.
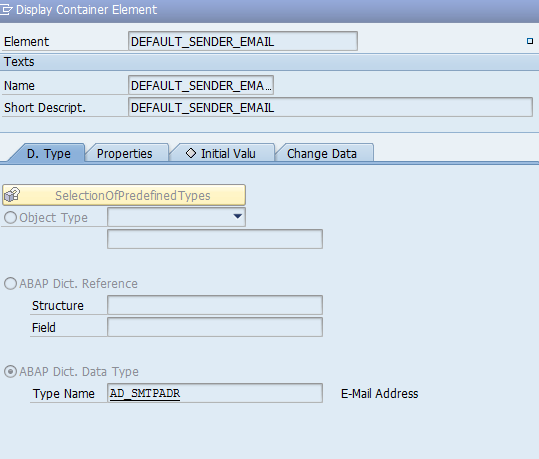
In the Initial value tab, enter the mail address that will be used to send the mailform.
Once all 3 elements are completed, the container looks like this:

Then, set up the conditions to execute the actions in dedicated customizing.
4. Create Mail Form
In order to send the URL link that will display the satisfaction survey, create a mail form in the marketing business role.
This mail form should have the ID that has been mentioned in the container previously.
Be aware that this mail form must contain the following words: Customer Satisfaction Survey
Indeed, it is those words that will be recognized by the method call mentioned in the action profile and will create the survey link composed by: the link of the survey + the GUID of the CRM object.
Thanks to the GUID of the CRM object, the result will automatically gets back to the object mentioned and will be visible in the object!!
5. Customizing of the inbound and outbound survey link
Go to transaction CRM_SURVEY_SUITE and click on the customized survey.
Click on Other functions/Options:

The following window appears and check the following boxes in the part ‘Data storage and Evaluation’:
- Save completed Questionnaire
- Completed questionnaire changeable later
- Evaluation withtout business Information Warehouse
In the part ‘Interface to Application’, complete the following:
- Callback to PBO: CRM_SVY_ESSC_PBO
- Callback to PAI : CRM_SVY_SERVICE_PAI
In the part ‘Authorization’, tick the box: Publicly Available

In the Scenarios tab, tick the following:

6. HTTP customizing
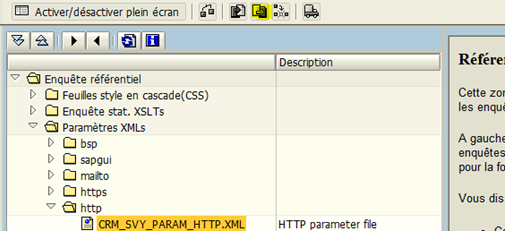
Go to transaction CRM_SURVEY_SUITE and go to Survey Repository

Following page appears and in the Paramters XMLs folder, click on http.
This file will be used to create the survey link and publish it to the CRM server. Thus, it needs to be adapted to the server URL
Select this file and click on export in the navigation bar. Save it on a personal folder and then open it with an XML editor.
The following attributs need to be modify:
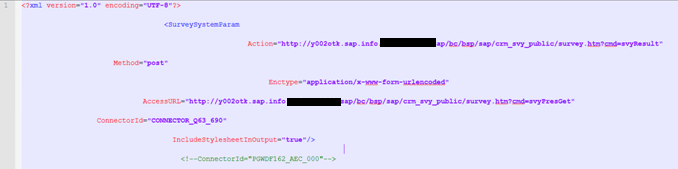
- Action : Modify the URL of the server/port used in the environment
The following part needs to be complete: */sap/bc/bsp/sap/crm_svy_public/survey.htm ?cmd=svyResult »
- Access URL : Modify the URL of the server/port used in the environment
The following part needs to be complete: */sap/bc/bsp/sap/crm_svy_public/survey.htm ?cmd=svyPresGet »
- Connector ID : Fill in the connector ID as desribed in the technical part
Save this document with a new name, like CRM_SVY_PARAM_HTTP_OK
Import the new file :
On the http folder, click on F7, the following page appears:

Fill in with the name of the new file created :

Click on the green tick and look up for the file in your personal folder.
When finished, the system will indicates that the file has been imported correctly:

7. HTTP customizing needs to be indicated in SPRO
Go to SPRO >Customer Relationship Management> Transactions > Settings for Service Requests > Questionnaires > Define URL for surveys
To set up the link that will be published in the server, enter the following:
- Cat: I Inter
- Option Get : http
- Nom de fichier: CRM_SVY_PARAM_HTTP_OK.XML (or the name of the file imported)
- Option Set : http
- Nom de fichier : CRM_SVY_PARAM_HTTP_OK.XML (or the name of the file imported)
Et :
- Cat: I Extern
- Option Get: http
- Nom de fichier: CRM_SVY_PARAM_HTTP_OK.XML (or the name of the file imported)
- Option Set : http
- Nom de fichier : CRM_SVY_PARAM_HTTP_OK.XML (or the name of the file imported)
==> Survey is now customized and is ready to be used!
In the transaction type, Questionnaires assignment block will display the survey.
When the mail form is sent, it will have the URL survey link. When the user clicks on 'Send' , the result will get back to this survey.
This will be indicated by a star (*) next to the survey ID => It means that the survey has been completed by a user.
More information
You can find more information about survey thanks to those nice and well documented wiki page:
- Survey Rendering in CRM WEB UI
- Survey processing without opening a connection to the CRM Backend from the Internet - CRM - SCN Wiki
- SAP Managed Tags:
- SAP Customer Relationship Management
3 Comments
You must be a registered user to add a comment. If you've already registered, sign in. Otherwise, register and sign in.
Labels in this area
-
ABAP
1 -
API Rules
1 -
CRM
1 -
Custom Key Metrics
1 -
Customer Data
1 -
Determination
1 -
Determinations
1 -
Introduction
1 -
KYMA
1 -
Kyma Functions
1 -
open SAP
1 -
Sales and Service Cloud Version 2
1 -
Sales Cloud v2
1 -
SAP
1 -
SAP Community
1 -
SAP CPQ
1 -
SAP CRM Web UI
1 -
SAP Customer Data Cloud
1 -
SAP Customer Experience
1 -
SAP Integration Suite
1 -
SAP Sales Cloud v2
1 -
SAP Service Cloud v2
1 -
SAP Service Cloud Version 2
1 -
Service Cloud v2
1 -
Validation
1 -
Validations
1
Related Content
- Introduction to Permission Marketing in CRM and CX Blogs by SAP
- Navigating the road ahead: How Southeast Asian auto dealers can thrive in a changing landscape in CRM and CX Blogs by SAP
- What is planned for the 2311 release of SAP Variant Configuration and Pricing? in CRM and CX Blogs by SAP
- Project Delivery Framework for SAP Marketing Cloud in CRM and CX Blogs by SAP
- Integrating Sales and Service Cloud Version 2 with SuccessFactors Employee Central in CRM and CX Blogs by Members