
- SAP Community
- Products and Technology
- Technology
- Technology Blogs by SAP
- Building my first site template on the updated ver...
Technology Blogs by SAP
Learn how to extend and personalize SAP applications. Follow the SAP technology blog for insights into SAP BTP, ABAP, SAP Analytics Cloud, SAP HANA, and more.
Turn on suggestions
Auto-suggest helps you quickly narrow down your search results by suggesting possible matches as you type.
Showing results for
Advisor
Options
- Subscribe to RSS Feed
- Mark as New
- Mark as Read
- Bookmark
- Subscribe
- Printer Friendly Page
- Report Inappropriate Content
05-02-2016
1:56 PM
Note:
Note that the two terms "SAP HANA Cloud Portal" and "SAP HANA Cloud Platform, Portal Service" are rebranded to SAP Cloud Platform Portal starting in March 2017.
Did you already get your hands on the new version of SAP HANA Cloud Portal? Compared to the previous one, it has some quite remarkable changes and although you can still go back to the old version of the Site Directory, I think that it is worthwhile checking out the new one.
Basically, you will notice that the new version is much less free-style than the old one and much more template-based. Thus, it relies heavily on the template developer to prepare the right templates that admin users can then use to quickly build nice sites for sharing information and launching applications running on SAP HANA Cloud Platform.
I decided to step into the shoes of the template developer for a minute (or rather an hour) and build my first site template on my HCP trial account. This is done in SAP Web IDE which, as you probably know, can be accessed via the Services section of the HCP Cockpit. Once you launch SAP Web IDE, you need to make sure that the SAP HANA Cloud Portal template development plugin is enabled. You can check that at Tools > Preferences > Plugins > Plugin Repository: Cloud Portal.

This done, I opened the development view again and created a new Project from a Template. In the Cloud Portal category, I found the template for building Cloud Portal Site Templates. In the Provider Account trial (flpportal), there were two site templates available which I could use a basis for my new template. Once my new site template is ready and deployed to HCP, it will also be available here to be used as a basis for future site templates. To keep it really simple, I chose the Starter Site.
After running through the complete wizard, I could see the structure of my new project in Web IDE. The folder pages contains the pages that are initially part of every site I will create based on MyFirstSiteTemplate.

There was just one such page and when I opened its page1.json file, I noticed for example that the page was based on the BlankPage page template, but had no content yet. The folder pageTemplates contains the page templates that are available as part of the site templates, so that the admin can use them to add pages to the sites, here just the BlankPage page template.
So, I decided to add a second page template. To do this, I right-clicked the name of my site template and chose New > Cloud Portal Page Template. In the next window, I got a list of the page templates that were already part of my site (just the Starter Page), but I could also select my complete trial as provider account to get more choices of all page templates running in my trial account.
I decided to create a page that just contains 3 content columns between a header and a footer. As basis, I chose the Header and Footer page template, so I just needed to change the part in the middle. I gave my new page template the name Columns. Immediately, I found a new folder Columns in the pageTemplates folder of my site template and the manifest.json file of the new page template opened for editing. So, I adapted the description of the new page template, but kept the rest for now.
To change the look of my new page template, I opened the template.view.xml for editing. In this file, you see the structure of your page. In a first step, I had to add a new container. Check out https://sapui5.hana.ondemand.com/sdk/explored.html to get an overview of existing SAP UI5 controls and how to use them in your view.xml file. I decided to use the Flex Box control. There are 7 different samples and opening the Flex Box - Size Adjustments sample, I got additional options.

Since I liked the first one best (equal flexibility and content), I clicked the source code icon in the upper left corner to learn more about it. I copied the Flexbox section after the Equal flexibility and content header and and replaced the <l:VerticalLayout> section in my Template.view.xml with it.

In a next step, I defined the places in which admins could later add widgets. So I replaced the 3 button controls from the sample with 3 CP widget controls and assigned unique aliases to all of them. I also changed the alias of the header and footer to have them consistent. Then I saved my changes and deployed my new site template to SAP HANA Cloud Platform to do a first test run.
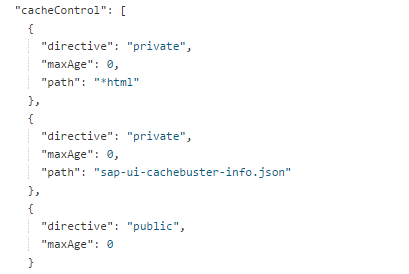
A short tipp: You might need several deployment / creating a site cycles to test your new site template. To avoid deleting the browser cache everytime, it makes sense to disable caching for the development process, but do not forget to turn it back on afterwards! You can do this by editing the neo-app.json file in your project. Simply set the public cache to 0 in the cacheControl section.
There is also a tool for previewing site templates in Web IDE. You can access it by right-clicking your site template and selecting Run > Run Configurations... and then create a new site preview configuration.
After successful deployment, I opened the SAP HANA Cloud Portal Site Directory and created a new site using my new template. At first, it looked quite the same as the Sample Template, but when I clicked the plus icon to create a new page, I noticed that now, there was the Columns page template available as additional option and when I selected it, I got a new page with 3 sections and could also add widgets to them. Initially, the 3 columns did not cover the complete width of the screen, but after adding some images, they did - taking different width depending on their content. To predefine this exactly would probably take some additional effort.

The next thing I wanted to check out was how to add a widget already to the page template, e.g. an image widget to the header, so it would be already be available, when a page is created. For this, you need the manifest.json file of the widget that you want to add. How do you get it? I just added an image widget template to my project by right clicking the project and selecting New > Cloud Portal Widget Template and choosing the Image Widget as basis. I opened the manifest.json file of this new image widget and copied everything in there. Then I went back to the manifest.json of my new page template and created a new nodes section within the "sap.cloud.portal" section.
"nodes": {
"section2": {
"sectionAlias": "page2.header",
Below this sectionAlias, I pasted everything from the widget manifest.json file and then adapted it slightly, e.g. I changed the image name to one of the other images in the images folder, changed the scaling to SCALE and set height to 200.

Then I redeployed the project, created a new site from my new template and a new columns page and voilà, the page was created with my predefined image as header.

This was just a very first glimpse into the options and flexibility that SAP Web IDE gives you to build new site templates, so there is still a lot to investigate. Nevertheless, I hope that you found this blog useful - and stay tuned for more.
Sibylle
- SAP Managed Tags:
- SAP Cloud Portal service
3 Comments
You must be a registered user to add a comment. If you've already registered, sign in. Otherwise, register and sign in.
Labels in this area
-
ABAP CDS Views - CDC (Change Data Capture)
2 -
AI
1 -
Analyze Workload Data
1 -
BTP
1 -
Business and IT Integration
2 -
Business application stu
1 -
Business Technology Platform
1 -
Business Trends
1,661 -
Business Trends
88 -
CAP
1 -
cf
1 -
Cloud Foundry
1 -
Confluent
1 -
Customer COE Basics and Fundamentals
1 -
Customer COE Latest and Greatest
3 -
Customer Data Browser app
1 -
Data Analysis Tool
1 -
data migration
1 -
data transfer
1 -
Datasphere
2 -
Event Information
1,400 -
Event Information
65 -
Expert
1 -
Expert Insights
178 -
Expert Insights
280 -
General
1 -
Google cloud
1 -
Google Next'24
1 -
Kafka
1 -
Life at SAP
784 -
Life at SAP
11 -
Migrate your Data App
1 -
MTA
1 -
Network Performance Analysis
1 -
NodeJS
1 -
PDF
1 -
POC
1 -
Product Updates
4,577 -
Product Updates
330 -
Replication Flow
1 -
RisewithSAP
1 -
SAP BTP
1 -
SAP BTP Cloud Foundry
1 -
SAP Cloud ALM
1 -
SAP Cloud Application Programming Model
1 -
SAP Datasphere
2 -
SAP S4HANA Cloud
1 -
SAP S4HANA Migration Cockpit
1 -
Technology Updates
6,886 -
Technology Updates
408 -
Workload Fluctuations
1
Related Content
- SAP HANA Cloud Vector Engine: Quick FAQ Reference in Technology Blogs by SAP
- CSS sap-custom-chart-subtitle is having no effect in Technology Q&A
- 10+ ways to reshape your SAP landscape with SAP BTP - Blog 4 Interview in Technology Blogs by SAP
- 10+ ways to reshape your SAP landscape with SAP Business Technology Platform – Blog 4 in Technology Blogs by SAP
- Consuming CAPM Application's OData service into SAP Fiori Application in Business Application Studio in Technology Blogs by Members
Top kudoed authors
| User | Count |
|---|---|
| 13 | |
| 10 | |
| 10 | |
| 9 | |
| 7 | |
| 6 | |
| 5 | |
| 5 | |
| 5 | |
| 4 |