Skip to Content
Author's profile photo Sabina Paskuraj

SAP Successfactors: Adding custom fields, field types & picklist values

Hello All,


In this blog I have explained easy steps to add custom employee fields, change field types and to edit/add custom picklist values in the portlets.


For example: I have selected ‘Special Assignments/Projects’ under Talent Profile where a custom field ‘Completion status’ is required as per client along with other default fields: From Date, End Date, Assignment/Project & Description.

/wp-content/uploads/2016/04/11_938477.png


Step 1: After Login to Successfactors instance, goto Admin Center, click ‘Define Employee Fields’ under ‘Employee Files’ as below.

/wp-content/uploads/2016/04/12_938483.png


Step 2: In this screen you see list of background fields with lines of information in rows. Scroll down to required field, Click on the drop down arrow and ‘’Add Field’’ to add new field as below.

/wp-content/uploads/2016/04/13_938484.png


Step 3: You can now see the new field add ‘’ Custom Field 1’’. To rename the field as ‘’Completion status’’, click on the translation button/wp-content/uploads/2016/04/14_938485.png  next to custom field.

/wp-content/uploads/2016/04/15_938492.png


Step4: Change the text from Custom field 1 to ‘’Completion status ‘’ as below and click OK.

/wp-content/uploads/2016/04/16_938493.png


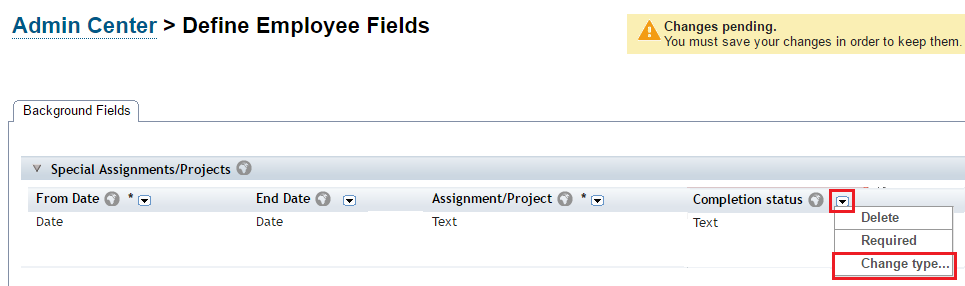
Step 5: As you have now created a custom field, the field type is ‘Text’ by default. To change the field type to any other field type, click on the arrow then click ‘Change type’ as below.

/wp-content/uploads/2016/04/17_938494.png

Step 6: A window opens where you can change the field type to any other data type. Select any data type and click ‘Change Type’ button.

/wp-content/uploads/2016/04/18_938495.png


Step 7: Since I have selected ‘Picklist’, I can add the custom picklist values in the window by clicking on ‘Add’ then ‘Save’ as below.


/wp-content/uploads/2016/04/19_938496.png


You have now successfully added a custom field with custom picklist values. Click ‘Save’

/wp-content/uploads/2016/04/20_938497.png


You can now check the background fields with the updated custom fields and picklist values.


/wp-content/uploads/2016/04/21_938498.png


Guys you can also check my blog on how to add custom UI screens in successfactors in below link.

https://blogs.sap.com/2017/12/06/sap-successfactors-adding-custom-ui-screen/

Adding custom link to Fiori Launchpad / External Application (or) any Website in below link.

https://blogs.sap.com/2018/02/28/sap-successfactors-adding-custom-link-to-fiori-launchpad-external-application-or-any-website/

Thanks & Regards

Sabina P

Assigned Tags

      35 Comments
      You must be Logged on to comment or reply to a post.
      Author's profile photo Ramya A.R
      Ramya A.R

      Great blog..!

      Author's profile photo Vinothkumar T
      Vinothkumar T

      Useful one.. 🙂

      Author's profile photo Madhava Rao Basava
      Madhava Rao Basava

      Hi Sabina,

      Thanks for the document. Could you please explain the path on how to view the background fields for the 'Special Assignments / Projects'.

      Does special Assignments / projects to be enables using the 'Employee files layout'?

      Thanks

      Madhav

      Author's profile photo Sabina Paskuraj
      Sabina Paskuraj
      Blog Post Author

      Hi Madhav,

      1. To view Talent Profile

      Employee files -> Configure Employee Files -> Talent Profile. Click the checkbox under Show/Hide. By this step you will be able to view Talent Profile under the Public Profile.

          2. To customize background element

      Admin Center ->Employee files -> Configure Employee Files -> Talent Profile. Click the Edit button under Action. Scroll to get Special Assignments/Projects under Background elements. Click ‘Insert Portlet’ if Special Assignments/Projects is not enabled. In the next screen list of portlets will appear, scroll for required portlet and click ADD and Save.

      blog pic.jpg

      blog pic1.jpg

      You can also add custom portlets.

      Thanks & Regards

      Sabina P

      Author's profile photo Former Member
      Former Member

      Hi Sabina,

      It is a great one!

      I'm in sales demo, trying to configure your above article but I could not able to find "Talent profile". I have created custom filed of Comment with Picklist and attachment. Kindly suggest how to view it.

      Image.PNG

      Author's profile photo Sabina Paskuraj
      Sabina Paskuraj
      Blog Post Author

      Hi Naresh,

      You are not able to view Talent profile because I think you dont have Role Based Permissions to your user. Pls follow below steps for RBP.

      Step 1:

      /wp-content/uploads/2016/04/answer2_940374.jpg

      Step 2: Select your role group and follow as below.

      /wp-content/uploads/2016/04/answer3_940375.jpg

      Step 3:

      /wp-content/uploads/2016/04/answer1_940472.jpg

      Step 4: Employee Views -> Talent Profile . click Done and Save.

      /wp-content/uploads/2016/04/answer_940473.jpg

      You should be able to view and edit Talent Profile now.

      Thanks & Regards

      Sabina P

      Author's profile photo Former Member
      Former Member

      Hi Sabina,

      In our instance People Profile and other features has been upgraded. That's right I have configred background element and Talent Profile and gave above permissions for it. Now it is getting displayed.

      Regards,

      Naresh B.

      Assignment.PNG

      Author's profile photo Sabina Paskuraj
      Sabina Paskuraj
      Blog Post Author

      Great. Keep rocking...Naresh.

      Author's profile photo Former Member
      Former Member

      Very nice and useful blog..!

      Author's profile photo Former Member
      Former Member

      Hi Sabina,

      It is a great one!

      Author's profile photo Rubavanan Selvamuthu
      Rubavanan Selvamuthu

      Very detailed... Thanks

      Author's profile photo Faisal Iqbal
      Faisal Iqbal

      Hi Sabina, Good manual : )

      Author's profile photo Former Member
      Former Member

      Hi Sabina,

      Do you know where to configure if the custom field could be selectable, filterable, updateable from APIs (SFAPI or OData API)?

      Thanks!

      Author's profile photo Former Member
      Former Member

      Hi Sabina,
      Thanks for a very informative article. I want to add 'Region' as a custom field under Addresses,how do i do that? do i have to amend CSF datamodel at the backend  ? Region will be appearing as picklist . as required by the client
      Your valuable inputs will be highly appreciated.
      Thanks and regards,
      Tejas Shah

      Author's profile photo Former Member
      Former Member

      Sabina,
      Can you confirm how you report on these custom fields? Is it even possible to do so?

      I have a situation where a client has custom picklist fields in their forms and they are unable to report on them. I have a feeling that it’s not possible with client side tools but was wondering if you know of a way to do it?

      Thank you and great post.
      Dan

      Author's profile photo Manish Jaiswal
      Manish Jaiswal

      Great Useful post

      Author's profile photo Former Member
      Former Member

      Attachment properties have attributes sf:Insertable / sap:creatable, sf:Updatable / sap:updatable, sf:Upsertable / sap:upsertable set to "false". How we can change them to insert or upsert attachment via OData API?

      Author's profile photo Sabina Paskuraj
      Sabina Paskuraj
      Blog Post Author

      Hi Mikhail

      This can be done from Provisioning.

      Export the data model.

      You will find below xml downloaded. Search and identify  the particular data field which you want to change. Add as shown below: Upsertable ="true" Updatable ="true".

      If Upsertable & Updatable already exists, then change it from "false" to "true".

      Save and import back the file to provisioning.


      Note: The update sometimes takes 24 - 48 hrs for me, after which you can check in Odata API dictionary in instance.

      Also take a copy of Data model before changing.

      Thanks

      Sabina Paskuraj

      Author's profile photo Former Member
      Former Member

      Hi Sabina,


      Helpful blog, can you pls let me know if we can make Custom field as a Mandatory field?


      regards

      Pallavi

      Author's profile photo Sabina Paskuraj
      Sabina Paskuraj
      Blog Post Author

      Hi Pallavi,

      Definitely we can make custom field as mandatory or not. In the xml as below, make required="true" to make the field mandatory. And required="false" if the field id not mandatory. Save changes and upload.


      For example:

      <data-field id="Country" field-name="vfld14" required="true" max-length="4000" max-file-size-KB="1000">
      <label>Country</label>
      <label xml:lang="en-GB">Country</label>
      </data-field>

      <data-field id="description" field-name="vfld14" required="false" max-length="4000" max-file-size-KB="1000">
      <label>Description</label>
      <label xml:lang="en-GB">Description</label>
      </data-field>

      Best Regards

      Sabina Paskuraj

      Author's profile photo Former Member
      Former Member

      Hi Sabina,


      Thanks for the above response & information, I am working on LMS and created User Custom Column  now same I have create in Platform so using the below steps

      Admin Center -> Employee Files -> Define Employee Fields and also confirm which should be thevalue from drop down  of Add backgroud field.

      Other request I am appearing for LMS exam so if you have any questionaire please do share.

      Thanks in advance,

      Pallavi


      Author's profile photo Deepraj Mukhia
      Deepraj Mukhia

      Hello Sabina.

      Thank you for the informative blog. I wanted to know if it is possible to make the custom field that we have created as read only field. My requirement is to display some text information in the custom field.

      I have made it readonly="true"> in the XML and uploaded it, but it is still editable.


      Author's profile photo Sabina Paskuraj
      Sabina Paskuraj
      Blog Post Author

      Hi Deepraj,

      It is possible to make the field as read only. In the XML code change as  Updatable="false" , so that it will not allow edit option and remains read only. Please check and let know.


      Thanks

      Sabina Paskuraj

      Author's profile photo Former Member
      Former Member

      Hello,

      Can you add a drop down that will only apply to employees of a certain division and not populate for other employees?

      Author's profile photo Former Member
      Former Member

      Hello Sabina,

      May I knew whether any standard field is available to capture the "Termination Date" of an employee. If so where can we enable.


      Thanks

      Avinash


      Author's profile photo Sabina Paskuraj
      Sabina Paskuraj
      Blog Post Author

      Hi Avinash,


      Yes, Standard field is available to capture " Termination Date". Follow below steps:

      Step 1: Click to open the Public Profile of the employee and go to "Employment information".

      Step 2: Click "Take Action" and click on "Terminate".

      Step 3 : You can find all the fields related to Termination including "Termination Date".


      Regards,

      Sabina Paskuraj

      Author's profile photo Former Member
      Former Member

      Hello Sabina,


      Thanks for the response.


      One quick question: How can we rename the Menus such as "My Employee File".


      Thanks

      Avinash


      Author's profile photo Sabina Paskuraj
      Sabina Paskuraj
      Blog Post Author

      Hi Avinash,


      Follow below steps:

      Admin Tools > System Properties > Text Replacement > “Employee”.


      Log out and Login again to view the changes

      Author's profile photo Joana Pinto
      Joana Pinto

      Dear all,


      Does anyone knows if it is possible to add dates in the Portlet for National ID?

      As we have a situation where it would be resourceful to limit the SSN for the EE by dates.


      Thank you

      Author's profile photo Sabina Paskuraj
      Sabina Paskuraj
      Blog Post Author

      Hi Joana,

      It is possible to add any custom field with any data type in the Portlet. Try following the steps in this blog.


      Thanks

      Sabina Paskuraj


      Author's profile photo Former Member
      Former Member

      Hi Sabina,

      Thats a useful blog. I have a couple of questions for my own implementation.
      1. How to change field type for Standard field like Fax number under Personal Information? It is taking alpha numeric values.
      2. When i try to export file from Manage Users -> Live Profile, not all fields are getting exported with values. how can I add more fields to the export template? Example: Fax Number, Employee ID

      Author's profile photo Sabina Paskuraj
      Sabina Paskuraj
      Blog Post Author

      Hi Shweta,

      1. To change a field type, click on the drop-down arrow next to the field and click "change type" and select the desired field type from next popup window and click "Change Type".

      2. You first need to add the required fields in the instance as per the blog and then Export the template. You will find the template with custom fields.

      To export all fields with data, click on "Export Extended Data with User Attributes"


      Thanks & Regards

      Sabina Paskuraj

      Author's profile photo vaibhav srivastava
      vaibhav srivastava

      Hi sabina

      I have created a custom field in a Job ( i.e Target bonus) which gets auto populated on a Position based on a Job classification selection ( have written a business Rule)

      Now i would like to populate the Target bonus value on a People profile of an employee.

      How to cater this request.

      regards

      VS


      Author's profile photo Jorge Ruiz
      Jorge Ruiz

      Hi Sabina,
      How could I add an additional field in the massive termination template? I need to add the deactivate positions field. Can you help me?