
- SAP Community
- Products and Technology
- Technology
- Technology Blogs by SAP
- How to use Smart Templates with SAP Web IDE - Exte...
Technology Blogs by SAP
Learn how to extend and personalize SAP applications. Follow the SAP technology blog for insights into SAP BTP, ABAP, SAP Analytics Cloud, SAP HANA, and more.
Turn on suggestions
Auto-suggest helps you quickly narrow down your search results by suggesting possible matches as you type.
Showing results for
Advisor
Options
- Subscribe to RSS Feed
- Mark as New
- Mark as Read
- Bookmark
- Subscribe
- Printer Friendly Page
- Report Inappropriate Content
04-22-2016
4:14 PM
Introduction
For space requirements this blog has been split in 5 parts:
| Link | Content |
|---|---|
| How to use Smart Templates with SAP Web IDE - Introduction | How to use Smart Templates with SAP Web IDE - Introduction |
| How to use Smart Templates with SAP Web IDE - Creation | How to use Smart Templates with SAP Web IDE - Creation |
| How to use Smart Templates with SAP Web IDE - ListReport | How to use Smart Templates with SAP Web IDE - ListReport |
| How to use Smart Templates with SAP Web IDE - Object Page | How to use Smart Templates with SAP Web IDE - Object Page |
| This part | How to use Smart Templates with SAP Web IDE - Extensibility |
This is the final part of this blog where I'm going to show you some extensibility concepts related to Smart Templates. So far we have not injected yet any big custom code in the Smart Template application, but we just used the wizard in order to build it: now, in this part, we are going to extend our app with new features, simply by adding some XML and Javascript code to it.
I would like to point out here that what I'm going to show here is something which is still undocumented and things will change for sure in the future. With upcoming versions of SAP Web IDE, probably you won't need to create the extensions manually, but rather you will be guided to add extensions just through easy-to-follow wizards.
I would split this blog in 6 sections/steps:
- Adding a custom filter controller
- Adding a custom button to the list report
- Adding a custom static column
- Adding a custom calculated column
- Adding a button to the object page header
- Add a DataFieldForAnnotation showing the Communication.Contact info

Let's go step by step and let me show you how to extend the STDemo application I have created in the 4 previous parts of this blog.
If you want to grab the extended app you can do it by cloning the repository located here.
STEP 1 - Adding a custom filter controller
As a first step into our Smart Templates extensibility journey, I would like to show you how you can add a custom filter to the SelectionFields annotation term you placed in the annotation file. This, as you can imagine, must be achieved by using some custom code. I would like to collect in a special folder named ext, all the extensions we are going to implement in our application.
1 - So let's create a new subfolder named ext under webapp and under ext other two subfolders named controllers and fragments.
Fragments will host all the pieces of XML code we will use for our components in the views, Controllers all logics behind this extension implementation.
You should come to a structure like this:

2 - Create a new file named ListReportExtension.controller.js under the controllers folder
3 - In this new file let's copy the following code:
sap.ui.controller("com.st.demo.ext.controllers.ListReportExtension", {

onBeforeRebindTableExtension : function(oEvent) {

  alert("On Before Rebind Table Extension");

}

});
4 - Save the file.
5 - Create a new file named CustomFilterExtension.fragment.xml, this time under the fragments folder
6 - Paste in this file the following code:
<core:FragmentDefinition xmlns:core="sap.ui.core" xmlns:smartfilterbar="sap.ui.comp.smartfilterbar" xmlns="sap.m">

  <smartfilterbar:ControlConfiguration groupId="_BASIC" index="1" key="PriceRangeFilter" label="Price ranges" visibleInAdvancedArea="true">

  <smartfilterbar:customControl>

            <ComboBox id="PriceRangeFilter-combobox" selectedKey="0">

                <core:Item key="0" text="All"/>

                <core:Item key="1" text="Price between 0-100"/>

                <core:Item key="2" text="Price between 100-500"/>

                <core:Item key="3" text="Price between 500-1000"/>

                <core:Item key="4" text="Price over 1000"/>

            </ComboBox>

  </smartfilterbar:customControl>

  </smartfilterbar:ControlConfiguration>

</core:FragmentDefinition>
7 - Save the file
8 - Open the manifest.json file
9 - Go to the XML editor
10 - Locate the part of code showing:
"extends": {

     "extensions": {

     }

},
11 - Replace this part with the following:
"extends": {

     "extensions": {

          "sap.ui.viewExtensions": {

               "sap.suite.ui.generic.template.ListReport.view.ListReport": {

                    "SmartFilterBarControlConfigurationExtension|ProductSet": {

                         "className": "sap.ui.core.Fragment",

                         "fragmentName": "com.st.demo.ext.fragments.CustomFilterExtension",

                         "type": "XML"

                    }

               }

          },

          "sap.ui.controllerExtensions": {

               "sap.suite.ui.generic.template.ListReport.view.ListReport": {

                    "controllerName": "com.st.demo.ext.controllers.ListReportExtension"

               }

          }

     }

},
12 - If you start the application now you can see the new drop down control, but even if you choose something from it and press the Go button, you won't get anything filtered. The only thing you get is this nice message

This message comes from the ListReportExtension.controller.js file where we have defined a function for the event onBeforeRebindTableExtension. This event is fired when you click on the Go button and it's just there that we are going to put our code for filtering table records.
13 - So reopen the ListReportExtension.controller.js and replace the onBeforeRebindTableExtension function with the following:
NOTE: on the line 9 we have the key PriceRangeFilter which must match the same key defined in the CustomFilterExtension.fragment.xml file on the second line.
sap.ui.controller("com.st.demo.ext.controllers.ListReportExtension", {

     onBeforeRebindTableExtension: function(oEvent) {

          var oBindingParams = oEvent.getParameter("bindingParams");

          oBindingParams.parameters = oBindingParams.parameters || {};


          var oSmartTable = oEvent.getSource();

          var oSmartFilterBar = this.byId(oSmartTable.getSmartFilterId());

          if (oSmartFilterBar instanceof sap.ui.comp.smartfilterbar.SmartFilterBar) {

               var oCustomControl = oSmartFilterBar.getControlByKey("PriceRangeFilter");

               if (oCustomControl instanceof sap.m.ComboBox) {

                    var vPriceRange = oCustomControl.getSelectedKey();

                    switch (vPriceRange) {

                         case "0":

                              oBindingParams.filters.push(new sap.ui.model.Filter('Price', null));

                              break;

                         case "1":

                              oBindingParams.filters.push(new sap.ui.model.Filter('Price', 'LE', "100"));

                              break;

                         case "2":

                              oBindingParams.filters.push(new sap.ui.model.Filter('Price', 'BT', "100", "500"));

                              break;

                         case "3":

                              oBindingParams.filters.push(new sap.ui.model.Filter('Price', 'BT', "500", "1000"));

                              break;

                         case "4":

                              oBindingParams.filters.push(new sap.ui.model.Filter('Price', 'GT', "1000"));

                              break;

                         default:

                              break;

                    }

               }

          }

     }

});
14 - Save the file
NOTE: Of course if your namespace is different, you need to change it in all the .js files listed here.
15 - Run again the application or refresh it.
16 - Now if you filter Prices for example from 100 to 500, you will get the expected records:

STEP 2 - Adding a custom button to the list report
As a second step, let's add a custom button to the LineItem Annotation Term to execute some special custom functions on our records, like for example in this case, to change the price of a selected product.
Since this feature is not natively present in our application, we need to extend it. The first thing to do is to create a new button and then to add some logic to this button. The extension for creating the new button is placed directly into the manifest.json file.
1 - Open the manifest.json file with the XML editor
2 - Locate the extends section and just after the line
"controllerName": "com.st.demo.ext.controllers.ListReportExtension"add a comma and then the the following code:
"sap.ui.generic.app": {

     "ProductSet": {

          "EntitySet": "ProductSet",

          "Actions": {

               "ChangePrice": {

                    "id": "ChangePrice",

                    "text": "Change price (Ext)",

                    "press": "onChangePrice"

               }

          }

     }

}
like in this picture

3 - If you run the application now, the button is in place, but clicking on it nothing happens, because we need to add some logic behind. Let's reuse the ListReportExtension.controller.js controller we created previously and let's add the following code just before the last "});" statement. Of course you need to put a comma after the onBeforeRebindTableExtension function, because you are adding two further functions to the module. The code to add is the following:
     onChangePrice: function(oEvent) {

          var oSmartTable = oEvent.getSource().getParent().getParent().getTable();

          var item = oSmartTable.getSelectedItem();

          if (item) {

               var oContext = item._getBindingContext();

               this._showChangePricePopup(oContext);

          } else {

               sap.m.MessageBox.error("You must first select a row!", {});

          }

     },


     _showChangePricePopup: function(oContext) {

          var that = this;

          var oModel = this.getView().getModel();


          var oField = new sap.ui.comp.smartfield.SmartField({

               value: "{Price}"

          });


          var oParameterDialog = new sap.m.Dialog({

               title: "Change Price",

               content: [new sap.m.Text({

                    text: 'New Price '

               }), oField],

               beginButton: new sap.m.Button({

                    text: "OK",

                    press: function() {

                         that.getView().getModel().submitChanges();

                         oParameterDialog.close();

                    }

               }),

               endButton: new sap.m.Button({

                    text: "Cancel",

                    press: function() {

                         that.getView().getModel().resetChanges();

                         oParameterDialog.close();

                    }

               }),

               afterClose: function() {

                    oParameterDialog.destroy();

               }

          });


          oParameterDialog.setModel(oModel);

          oParameterDialog.setBindingContext(oContext);

          oParameterDialog.open();

     }
Here we are checking if there is a line selected: if yes the application invokes the _showChangePricePopup function which shows up the text box where you can enter the new price. If there isn't a selected line a message pops up informing the user that he needs to select a product

4 - Run the application and check that the button is perfectly working

STEP 3 - Adding a custom static column
For this new kind of extension we need to create 2 further files, both in the fragments folder. The two files will act as a sort of template for a new custom column in the Smart Table and for any cell of this new column.
In this step, we just want to add a static column to the table: it means that the content of its cells will be fixed and won't change with other columns.
In particular we want to create a new column, to be the last in the table, showing the text "Additional info", so that the user knows that by clicking on a row, he can get the product details.
1 - Create a new file named ListReportResponsiveTableColumns.fragment.xml under the folder ext/fragments
2 - Put in this file the following XML code:
<core:FragmentDefinition xmlns:core="sap.ui.core" xmlns="sap.m">

  <Column>

  <Text text="..." />

  <customData>

  <core:CustomData key="p13nData" value='\{"columnKey": "AdditionalInfo"}' />

  </customData>

  </Column>

</core:FragmentDefinition>
3 - Create another file named ListReportResponsiveTableCells.fragment.xml always under ext/fragments
4 - Paste inside this file the XML code
<core:FragmentDefinition xmlns:core="sap.ui.core" xmlns="sap.m">

  <Text text="Additional info"></Text>

</core:FragmentDefinition>

5 - Now reopen the manifest.json with the code editor
6 - Just after the SmartFilterBarControlConfigurationExtension extension add a comma and then the code
"ResponsiveTableColumnsExtension|ProductSet": {

     "className": "sap.ui.core.Fragment",

     "fragmentName": "com.st.demo.ext.fragments.ListReportResponsiveTableColumns",

     "type": "XML"

},

"ResponsiveTableCellsExtension|ProductSet": {

     "className": "sap.ui.core.Fragment",

     "fragmentName": "com.st.demo.ext.fragments.ListReportResponsiveTableCells",

     "type": "XML"

}
7 - Run the application and you will get the new column

STEP 4 - Adding a custom calculated column
What about if we want to add a new column having the cells content based on the content of the cells of another column?
For example we want to show a sort of rating indicator which shows 1 star if the product's price is greater than 500 and 5 stars on all other cases. This of course cannot be a likely case, but you can change the logic to display anything more meaningful.
1 - Open the ListReportResponsiveTableColumns.fragment.xml file and add to it the XML code for the new column:
  <Column>

  <Text text="Rating"/>

  <customData>

  <core:CustomData key="p13nData" value='\{"columnKey": "Rating", "leadingProperty":"Price"}'/>

  </customData>

  </Column>
2) Open the ListReportResponsiveTableCells.fragment.xml file and add the code for the new cell
<RatingIndicator value="{= ${Price} > 500 ? 1:5}" enabled="false"></RatingIndicator>
3)Run again or refresh the app and you get the new calculated column

STEP 5 - Adding a button to the object page header
Let's move now to the Object Page and let's try to add a button in the header bar just aside the buttons for editing and deleting the product.
We won't add any big logic to this button, I just want to show you how you can do it: by clicking on this new button only a nice message will pop up. Feel free to put whatever logic you need under it.
1 - Create a new controller named ObjectPageExtension.controller.js under the ext/controllers folder
2 - Add the following JS code to it
sap.ui.controller("com.st.demo.ext.controllers.ObjectPageExtension", {

     onObjectPageCustomAction: function() {

          sap.m.MessageBox.success("Hello from ObjectPage custom action!", {});

     }

});
NOTE: Again here please pay attention that if you are using a different namespace you need to replace the string "com.st.demo" with yours.
3 - Open the manifest.json file and go in the extends section
4 - Add to the sap.ui.controllerExtensions this new extension
"sap.suite.ui.generic.template.ObjectPage.view.Details": {

     "controllerName": "com.team.meeting.ext.controllers.ObjectPageExtension",

     "sap.ui.generic.app": {

          "ProductSet": {

               "EntitySet": "ProductSet",

               "Header" : {

                    "Actions": {

                         "ObjectPageCustomAction" : {

                              "id" : "ObjectPageCustomAction",

                              "text" : "My Custom Action",

                              "press" : "onObjectPageCustomAction"

                         }

                    }

               }

          }

     }

}
5 - Save the file
6 - Re-run the application and go to the object page. The new button has been added.

STEP 6 - Add a DataFieldForAnnotation showing the Communication.Contact info
In this last step I'm going to show you how to add to the Object Page some fields which are, let's say, "clickable". When clicking on them, indeed, you get some details about the clicked item. Let's take as an example the product's supplier. You want to add this information to your Object Page (i.e. Supplier Id and Supplier Name), but when clicking on the supplier name you want to get the supplier's contact information.
This extension is made directly in the annotation file.
NOTE: At moment we can consider this as an extension because there is no way to do it within the AM.
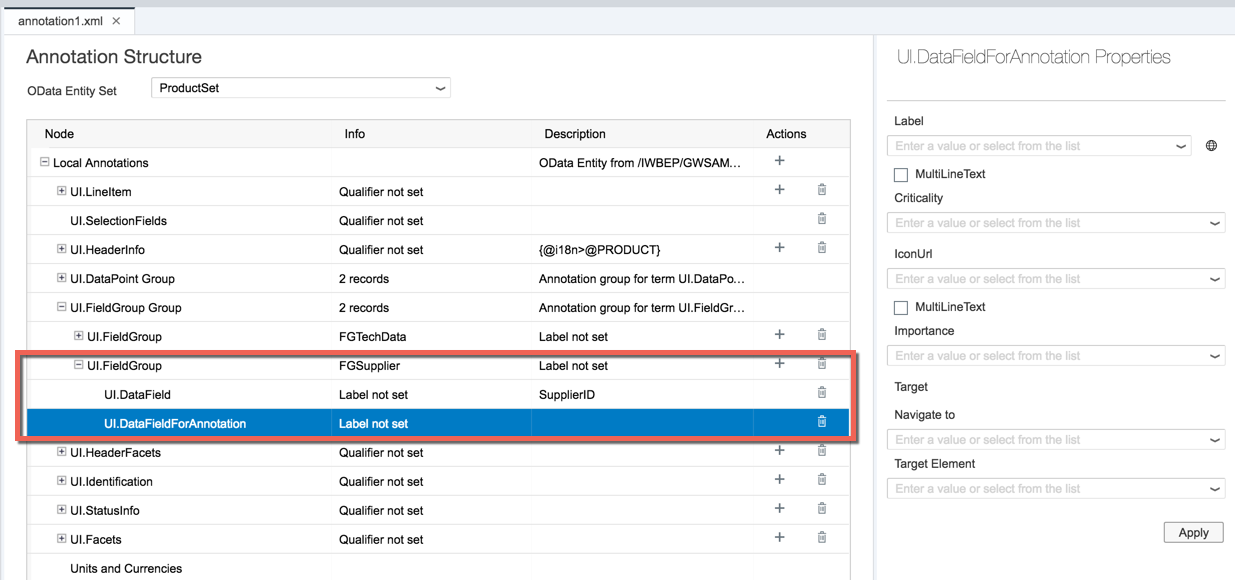
1 - Open the annotation1.xml file with the AM
2 - Create a new UI.FieldGroup term with the qualifier FGSupplier and add a UI.DataField and a UI.DataFieldForAnnotation terms to it. The UI.DataField can be bound to the SupplierID and the UI.DataFieldForAnnotation can be temporarily left blank as it is, without any assignment because we are going to change this by editing directly the XML code.
3 - Click on Apply and save the annotation file.
4 - Switch to the BusinessPartner entity set and click on the Annotate button and save the file. We are not going to put any annotation term for the time being here because we will add it through the XML editor later. We have just created the annotation placeholder

5 - Now reopen the annotation1.xml file with the XML editor
6 - Beautify the file by clicking onf Edit -> Beautify
7 - Locate the annotation for the BusinessPartner entity set: it should be at the end of the file
8 - Replace the entire annotation with this one:
  <Annotations Target="/IWBEP/GWSAMPLE_BASIC.BusinessPartner">

  <Annotation Term="Communication.Contact">

  <Record>

  <PropertyValue Path="CompanyName" Property="fn"/>

  <PropertyValue Property="tel">

  <Collection>

  <Record>

  <PropertyValue EnumMember="Communication.PhoneType/fax" Property="type"/>

  <PropertyValue Path="FaxNumber" Property="uri"/>

  </Record>

  <Record>

  <PropertyValue EnumMember="Communication.PhoneType/work Communication.PhoneType/pref" Property="type"/>

  <PropertyValue Path="PhoneNumber" Property="uri"/>

  </Record>

  </Collection>

  </PropertyValue>

  <PropertyValue Property="email">

  <Collection>

  <Record>

  <PropertyValue Path="EmailAddress" Property="address"/>

  </Record>

  </Collection>

  </PropertyValue>

  </Record>

  </Annotation>

  </Annotations>

9 - Locate the point in the file where you placed the UI.DataFieldForAnnotation term
10 - Replace the entire term with the following:
  <Record Type="UI.DataFieldForAnnotation">

  <PropertyValue Property="Label" String="Supplier"/>

  <PropertyValue AnnotationPath="ToSupplier/@Communication.Contact" Property="Target"/>

  <Annotation EnumMember="UI.ImportanceType/High" Term="UI.Importance"/>

  </Record>

11 - Save the file.
12 - Now we just need to display our new UI.FieldGroup. Open the annotation1.xml file with the AM
13 - Add a new UI.ReferenceFacet to the already existing UI.HeaderFacet
14 - Assign to this new UI.ReferenceFacet the UI.FieldGroup (FGSupplier) we have created previously.
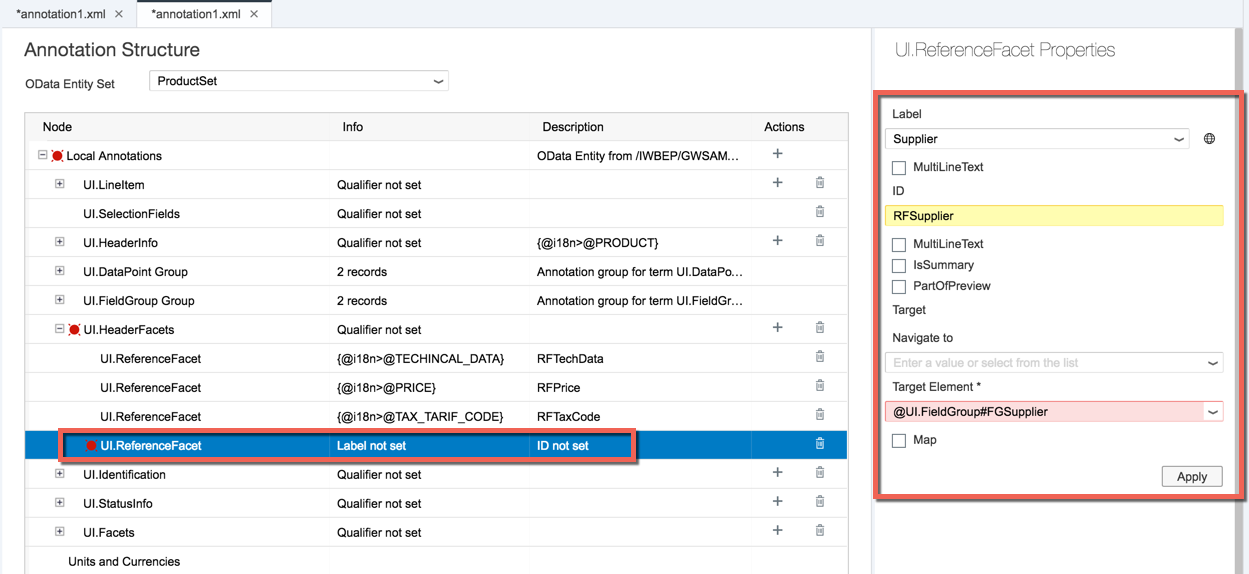
15 - Save the file
16 - Re-run or refresh the application and you will see new extension.

Congratulations! You have successfully extended your Smart Template application! As I said at the beginning of this part, if you want to get the complete source code for this example, feel free to download it from Github here.
- SAP Managed Tags:
- SAPUI5,
- SAP Enterprise Portal
16 Comments
You must be a registered user to add a comment. If you've already registered, sign in. Otherwise, register and sign in.
Labels in this area
-
ABAP CDS Views - CDC (Change Data Capture)
2 -
AI
1 -
Analyze Workload Data
1 -
BTP
1 -
Business and IT Integration
2 -
Business application stu
1 -
Business Technology Platform
1 -
Business Trends
1,658 -
Business Trends
93 -
CAP
1 -
cf
1 -
Cloud Foundry
1 -
Confluent
1 -
Customer COE Basics and Fundamentals
1 -
Customer COE Latest and Greatest
3 -
Customer Data Browser app
1 -
Data Analysis Tool
1 -
data migration
1 -
data transfer
1 -
Datasphere
2 -
Event Information
1,400 -
Event Information
66 -
Expert
1 -
Expert Insights
177 -
Expert Insights
299 -
General
1 -
Google cloud
1 -
Google Next'24
1 -
Kafka
1 -
Life at SAP
780 -
Life at SAP
13 -
Migrate your Data App
1 -
MTA
1 -
Network Performance Analysis
1 -
NodeJS
1 -
PDF
1 -
POC
1 -
Product Updates
4,577 -
Product Updates
344 -
Replication Flow
1 -
RisewithSAP
1 -
SAP BTP
1 -
SAP BTP Cloud Foundry
1 -
SAP Cloud ALM
1 -
SAP Cloud Application Programming Model
1 -
SAP Datasphere
2 -
SAP S4HANA Cloud
1 -
SAP S4HANA Migration Cockpit
1 -
Technology Updates
6,873 -
Technology Updates
422 -
Workload Fluctuations
1
Related Content
- When to Use Multi-Off in 3SL in Technology Blogs by SAP
- Exploring SAP Extensibility - Types of Extensibilities in Technology Blogs by SAP
- Deliver Real-World Results with SAP Business AI: Q4 2023 & Q1 2024 Release Highlights in Technology Blogs by SAP
- 10+ ways to reshape your SAP landscape with SAP Business Technology Platform – Blog Series in Technology Blogs by SAP
- 10+ ways to reshape your SAP landscape with SAP Business Technology Platform – Blog 1 in Technology Blogs by SAP
Top kudoed authors
| User | Count |
|---|---|
| 40 | |
| 25 | |
| 17 | |
| 13 | |
| 7 | |
| 7 | |
| 7 | |
| 6 | |
| 6 | |
| 6 |