

- SAP Community
- Products and Technology
- Technology
- Technology Blogs by SAP
- New complete tutorial for setting up Introscope 9....
Technology Blogs by SAP
Learn how to extend and personalize SAP applications. Follow the SAP technology blog for insights into SAP BTP, ABAP, SAP Analytics Cloud, SAP HANA, and more.
Turn on suggestions
Auto-suggest helps you quickly narrow down your search results by suggesting possible matches as you type.
Showing results for
Advisor
Options
- Subscribe to RSS Feed
- Mark as New
- Mark as Read
- Bookmark
- Subscribe
- Printer Friendly Page
- Report Inappropriate Content
04-05-2016
6:37 PM
This content is outdated. The updated content has been moved to the SCN Wiki
CA APM Introscope Monitoring Setup Guide for BI Platform 4.x (Windows)
-----------------------------------------------------------------------------------------
Previously, I posted on the SCN an article on how to setup Introscope Monitoring for the BI Platform. This article is a replacement to the previous article posted here: A complete guide to setup CA APM Introscope 9 for monitoring SAP BI Platform 4.1 on Windows [PART 1/...
Due to changes in the new SAP Solution Manager Diagnostic Agent 7.4, there has been a period of time where it was not possible to setup Introscope monitoring for the BI Platform unless you had the full SAP Solution Manager stack in your environment. After some research, testing, and working with various teams here at SAP, I'm happy to announce that you can once again setup Introscope monitoring for your BI landscape.
This article is applicable to those SAP BusinessObjects customers who:
- Do not have an SAP Solution Manager system
- Do not have an SAP Basis team or ABAP / Netweaver experience
- Would prefer to only implement Introscope Monitoring tools without the full SAP Solution Manager stack
| BEFORE YOU START: Please be aware, this article is for setting up CA APM Introscope in stand-alone mode aka BOLight (without Solution Manager). If your goal is to setup Solution Manager for BI, please check the following SAP Notes for instructions: |
Here is the workflow we will follow:
- Step 1: Download the installation media from the Software Download Centre
- Step 2: Install the Introscope Enterprise Manager
- Step 3: Install the Diagnostic Agent on each BI node and application server node
- Step 4: Configure each BI node and application server node using AC Tool
- Step 5: Validate the installation/configuration is working
Step 1: Download the installation media from the Software Download Centre
First, we need to download each piece of software from the Service Marketplace. The files required for this configuration are part of the SAP Solution Manager files on the Software Download Center. If your company has a Standard or Enterprise Support contract, you should have usage rights and access to download SAP Solution Manager software. If you find that your S-USER does not have access to download one of these files, open a message under component XX-SER-SWFL and request access to download the file. If you are installing to an operating system other than Windows x64 or if you are having trouble finding the files by browsing, then use the search option to search for the file names under Support Packages and Patches and locate the version appropriate for your platform. In the table below, you can copy the file name (from the File Name column) and paste it into the search box as it is the exact search term that should be used. Furthermore, if you find that the downloads do not complete successfully using the links below, then instead search for the files in the Software Download Center and add them to your download basket. Once they have been added to your download basket, you can then download them via the software SAP Download Manager.
| File Name | Link | Details |
|---|---|---|
| SAPCAR 7.20 | DOWNLOAD | SAPCAR is used to extract files from SAR archives (similar to winRAR). Note, this file is platform specific. The link provided is for Windows x64 platforms. If you are installing to another platform, please search for and download the SAPCAR version for your specific platform |
| WILY INTROSCOPE ENTERPRISE MGR 9.5 | DOWNLOAD | Install media for the CA APM Introscope Enterprise Manager. Note, this file is platform specific. The link provided is for Windows x64 platforms. If you are installing to another platform, please search for and download the WIEM version for your specific platform |
| WILY INTRO EM MGMT MODULES 9.5 SP6 | DOWNLOAD | Management modules and customizations files which contain SAP instrumentation and BOE dashboards |
| SWPM 1.0 SP18 for NW higher than 7.0x | DOWNLOAD | This is the Software Provisioning Manager (replaces the older sapinst). Note, this file is platform specific. The link provided is for Windows x64 platforms. If you are installing to another platform, please search for and download the SWPM version for your specific platform |
| 721 UC Kernel for SWPM SP18 | DOWNLOAD | This is the Kernel file and includes the Diagnostic Agent 7.4. Note, this file is platform specific. The link provided is for Windows x64 platforms. If you are installing to another platform, please search for and download the Kernel version for your specific platform |
| eula.txt (Right click and save target as) | DOWNLOAD | License agreement for CA APM Introscope |
| osgiPackages.v9.5.6.0.windows.zip (Right click and save target as) | DOWNLOAD | OSGI Packages required for Introscope Enterprise Manager installation |
Step 2: Install the Introscope Enterprise Manager
SAP provides a read-only version of CA APM Introscope (RTV version) for free as part of your support contract. This means that you can leverage the monitoring and root cause functionality provided by Introscope, without spending additional money on a full license. Should you decide that you want to create alerts, customize dashboards, or utilize the Websphere/Weblogic power packs, then I encourage you to contact your account executive about upgrading to the SAP Extended Diagnostics package (SED).
The Introscope Enterprise Manager should be installed on a dedicated server which has 24/7 uptime. All of the performance metrics are stored in the SmartStor database which is maintained by the Introscope Enterprise Manager. For best performance, you should install to a dedicated hard disk with plenty of available disk space (300gb or more). The Introscope Enterprise Manager makes frequent read/writes to this disk and works best if nothing else is reading/writing to this disk in parallel.
- Copy the Introscope Enterprise Manager 9.5 SP6 media (WILYISEM06_0-70000324.zip), Introscope 9.5 SP6 customizations (WILYISMM06_0-70000299.zip), eula.txt, and osgiPackages.v9.5.6.0.windows to a temporary folder on the host where you will be installing the Introscope Enterprise Manager
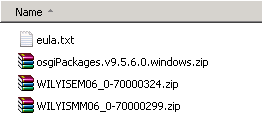
- Extract WILYISEM06_0-70000324.zip to a folder WILYISEM06_0-70000324 then move eula.txt and osgiPackages.v9.5.6.0.windows.zip to this folder

- Edit the file eula.txt and change "reject" to "accept" to accept the end user license agreement

- Edit the file ca-eula.txt and change "reject" to "accept" to accept the end user license agreemen
t
- Edit the file installer.properties. If you want to change the default install location, update the property USER_INSTALL_DIR. Next, set silentInstallChosenFeatures to All

- Double-click on the file introscope9.5.6.0windowsAMD64SAP.exe to launch the silent installer. Wait about 2 minutes and check the install directory for failed log files. If no failed log is generated then the install worked. Confirm the install worked by checking your start menu

- Next, we need to turn up the Max Java heap setting for Introscope Enterprise Manager. Browse to your Introscope install bin directory and edit the file C:\usr\sap\ccms\apmintroscope\bin\EMService.conf. Change the Maximum Java Heap Size to 2048

- Next, extract the file WILYISMM06_0-70000299.zip to folder WILYISMM06_0-70000299. Browse to folder WILYISMM06_0-70000299 then select all files and copy them to your clipboard
- Browse to the location where you installed CA APM Introscope Enterprise Manager (by default: C:\usr\sap\ccms\apmintroscope) then paste the contents of your clipboard to this folder. When prompted, check the option Do this for all current items and select Yes to merge the contents.

- Next, go to Administrative Tools and restart the Introscope Enterprise Manager service

- Copy the files SAP_BOBJ.jar and SAP_Apache_Tomcat_Basis.jar from <DRIVE>:\usr\sap\ccms\apmintroscope\sap\extra_modules to <DRIVE>:\usr\sap\ccms\apmintroscope\deploy
- Open a web browser, then browse to the Introscope WebView. For example (where wiemhostname is your Introscope Enterprise Manager hostname): http://wiemhostname:8081/webview
- Logon to Introscope using the default credentials. User: Admin and Password: Admin89

- On the Console tab, click the drop-down menu for Dashboard to choose a dashboard
- Confirm that the BOE 4.0 dashboards are installed. Confirm the Apache Tomcat dashboards are installed

Step 3: Install the Diagnostic Agent on each BI node and application server node
In this step, we will install the Diagnostic Agent 7.4 on each BI node and Web Application Server node. If the BI node and Web Application Server node are on the same host (as shown in this example), then you only need to install the Diagnostic Agent once.
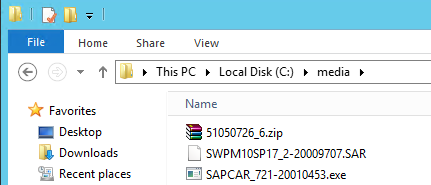
- Copy SAPCAR*.exe, the SWPM (SWPM10SP18_2-20009707.SAR) and Kernel file (51050726_6.zip) to a temporary directory on your BI server (in this example C:\media)
- Extract the contents of 51051173_6.zip to this temporary directory. The extracted Kernel folder will be named Krnl_7.21_WIN__IA32__IA64__x64__SP11_

- Open a command prompt and browse to your temporary directory and run the command:SAPCAR_721-20010453.exe -xvf SWPM10SP18_2-20009707.SAR

- After the files are extracted, execute the commandsapinst.exe SMD_INSTALLATION_SCENARIO=ishub

- After the Software Provisioning Manager starts, scroll down to the bottom of available options, expand Generic Options, Diagnostics in SAP Solution Manager, then choose Install - Diagnostics Agent and click Next

- Next, under DVDs or Blu-Ray Media click Add then click Browse on the newly added Media Location entry. Browse to the location where you extracted the Kernel folder Krnl_7.21_WIN__IA32__IA64__x64__SP11_. Once you have selected the Kernel folder, click Next.

- On the next page, confirm that the hostname is correct and click Next.

- By default, the agent installs to the C:\ drive. Change the Destination Drive if you prefer the files to land on a different drive. Click Next.

- The installer will create 2 user accounts on the localhost for the agent service accounts. Click Next.

- Enter in strong passwords (uppercase and lowercase letters, numbers, special chars etc) for each user account being created by the agent installer

- You may receive some warnings about the Operating System Version, it is ok to continue on. Click Next then click No.

- Next, enter a strong password to use for the new account sapadm and click Next.

- When prompted if we want to add SAPServiceDAA to the trusted users list, choose Yes.

- You will be prompted to choose an Instance Number, leave this as the default of instance 98 and click Next.

- When prompted to Choose the SLD destination, select No SLD Destination and click Next.

- When prompted for the Connection of the Diagnostics Agent to SAP Solution Manager, choose Do not configure connection then click Next.
- On the Unpack Archives screen, click Next.
- On the Parameter Summary page, click Next and the install will begin.
- Once the installation finishes, you are done installing the Solution Manager Diagnostic Agent.
Continue to part 2: New complete tutorial for setting up Introscope 9.5 Stand-alone Monitoring for SAP BI Platform 4.x (...
- SAP Managed Tags:
- SAP BusinessObjects Business Intelligence platform
8 Comments
You must be a registered user to add a comment. If you've already registered, sign in. Otherwise, register and sign in.
Labels in this area
-
ABAP CDS Views - CDC (Change Data Capture)
2 -
AI
1 -
Analyze Workload Data
1 -
BTP
1 -
Business and IT Integration
2 -
Business application stu
1 -
Business Technology Platform
1 -
Business Trends
1,661 -
Business Trends
88 -
CAP
1 -
cf
1 -
Cloud Foundry
1 -
Confluent
1 -
Customer COE Basics and Fundamentals
1 -
Customer COE Latest and Greatest
3 -
Customer Data Browser app
1 -
Data Analysis Tool
1 -
data migration
1 -
data transfer
1 -
Datasphere
2 -
Event Information
1,400 -
Event Information
65 -
Expert
1 -
Expert Insights
178 -
Expert Insights
282 -
General
1 -
Google cloud
1 -
Google Next'24
1 -
Kafka
1 -
Life at SAP
784 -
Life at SAP
11 -
Migrate your Data App
1 -
MTA
1 -
Network Performance Analysis
1 -
NodeJS
1 -
PDF
1 -
POC
1 -
Product Updates
4,577 -
Product Updates
330 -
Replication Flow
1 -
RisewithSAP
1 -
SAP BTP
1 -
SAP BTP Cloud Foundry
1 -
SAP Cloud ALM
1 -
SAP Cloud Application Programming Model
1 -
SAP Datasphere
2 -
SAP S4HANA Cloud
1 -
SAP S4HANA Migration Cockpit
1 -
Technology Updates
6,886 -
Technology Updates
408 -
Workload Fluctuations
1
Related Content
- SAP Business Objects - FRUN System Monitoring - No Matching Introscope for pattern for CMS metrics in Technology Q&A
- Getting ready to start using SAP Focused Run in Technology Blogs by SAP
- SAP BTP ABAP Environment – Release 2402 in Technology Blogs by SAP
- Cloud ALM - How to provision Selenium Runner for private landscape in Technology Blogs by SAP
- How SAP's Generative AI Architecture Redefines Business Applications in Technology Blogs by SAP
Top kudoed authors
| User | Count |
|---|---|
| 11 | |
| 11 | |
| 11 | |
| 10 | |
| 9 | |
| 7 | |
| 6 | |
| 5 | |
| 5 | |
| 5 |