
- SAP Community
- Products and Technology
- Technology
- Technology Blogs by SAP
- Principal Propagation between HTML5- or Java-based...
Technology Blogs by SAP
Learn how to extend and personalize SAP applications. Follow the SAP technology blog for insights into SAP BTP, ABAP, SAP Analytics Cloud, SAP HANA, and more.
Turn on suggestions
Auto-suggest helps you quickly narrow down your search results by suggesting possible matches as you type.
Showing results for
MartinRaepple
Active Participant
Options
- Subscribe to RSS Feed
- Mark as New
- Mark as Read
- Bookmark
- Subscribe
- Printer Friendly Page
- Report Inappropriate Content
03-21-2016
2:00 PM
Introduction
Although there is no standardized definition of the term "Principal Propagation", it is commonly understood as the ability of a system to securely forward or propagate the authenticated user (principal) from a sender to a receiver in a way that the forwarded user information is kept confidential and - even more important - cannot be changed during transit. Based on a pre-established trust relationship to the sender, the receiver uses this information to logon the user without asking her again for the credentials.
Principal propagation plays an important role in many scenarios on SAP HANA Cloud Platform (HCP), e.g. when an application has to pass the logged-on user in the Cloud to an on-premise system via the SAP HANA Cloud Connector. More information on this scenario can be found here. The following picture illustrates another very common scenario for principal propagation, where an application on HCP consists of two components: The user interface (UI) is developed and deployed as an HTML5- or Java-application on HCP which consumes an API implemented as a RESTful service from an SAP HANA instance running on HCP. The API requires an authenticated user and exposes the user's data via SAP HANA Extended Application Services (XS).

On HCP, the user usually authenticates against an identity provider (IdP) which is configured for the account where the application is deployed to. In HCP trial accounts for example, this is the SAP ID Service by default, which is a free-of-charge public identity provider from SAP, managing the SAP Community Network users, SAP Service Marketplace users and the users of several other SAP sites. To delegate user authentication to the IdP, HCP uses the SAML 2.0 protocol. Upon successful authentication at the IdP, the HTML5 application on HCP receives a SAML Response from the IdP, which is a message digitally signed by the IdP. It must contain at least the unique logon name of the user, and may also include additional information about the user, such as the user's first and last name, e-mail address etc.
HTML5 applications usually rely on on-premise or on-demand RESTful services. When a RESTful service is called from an HTML5 application, a new connection is initiated by the central HTML5 dispatcher on HCP to the service that is defined in a corresponding HTTP destination. If this call requires the user to authenticate at the service, the HTML5 dispatcher should rather propagate the authenticated user or login context than prompting the user again for credentials to access the service.
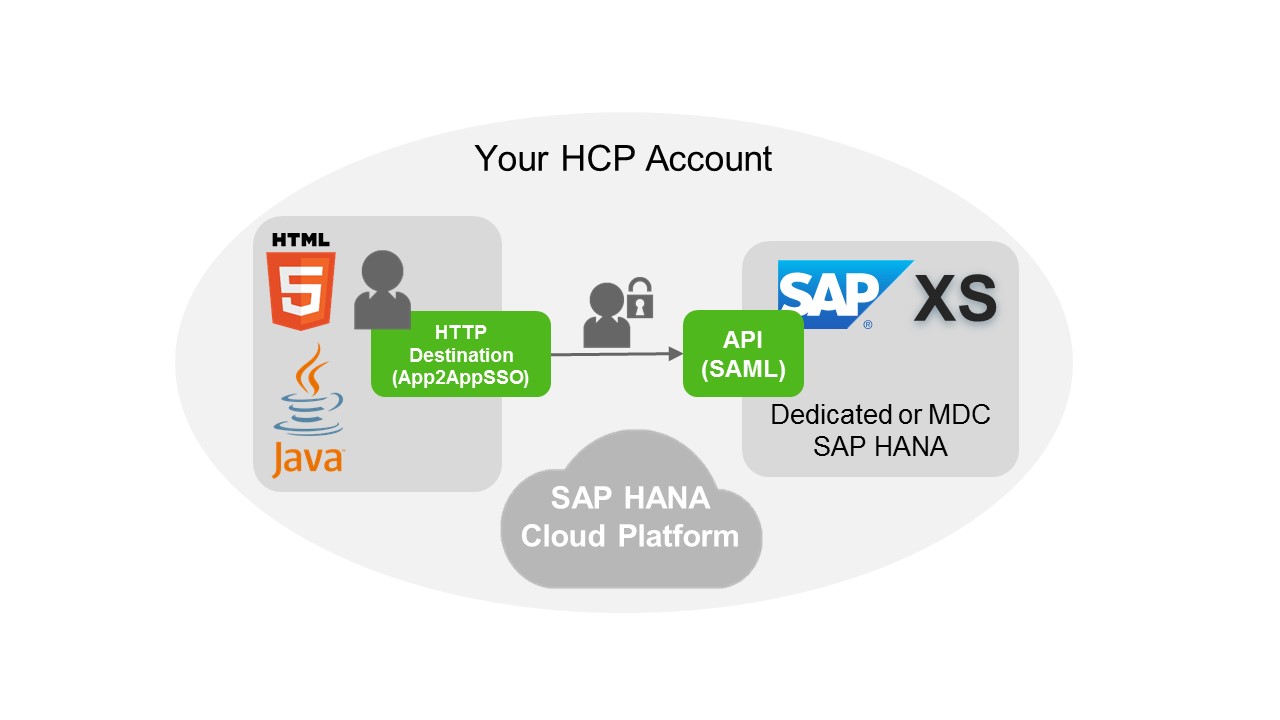
There are two authentication mechanism available for an HTTP destination to propagate the logged-in user to a RESTful service running on SAP HANA XS: SAP Assertion SSO or Application-to-Application SSO (AppToAppSSO). The first one uses SAP Assertion Tickets to transfer the logged-on user information, the latter uses a SAML Assertion. Compared to SAP Assertion SSO, AppToAppSSO has the following advantages:
- The propagated user information can contain more information than just the user's login name. Additional user attributes are also forwarded with the SAML Assertion. SAP Assertion Tickets only forward the user's login name.
- SAP HANA XS can dynamically create a new DB user based on the forwarded information. This user is required to successfully log on the user on the SAP HANA instance. With SAP Assertion Tickets, this mechanism, sometimes referred to as "Just-in-time (user) provisioning", is not supported, and the users have to be created in advance. However, this is sometimes not possible, e.g. if there is a large number of users accessing the service.
In this blog you will go step-by-step through a scenario using AppToAppSSO. Common for both mechanism is that the recipient (XS) must trust the sender (HTML5 dispatcher) to accept the propagated principal. For AppToAppSSO, this trust relationship is setup in XS similar to other SAML-based IdPs. Therefore, the SAP HANA instance must be properly setup for SAML-based authentication as one of the following prerequisites.
Note: Although an HTML5 application is used to implement the UI, a Java-based application could have been used as well for the scenario. AppToAppSSO works for both application runtimes to propagate the authenticated user to SAP HANA XS.
Prerequisites
The scenario in this blog is using an SAP HANA Multitenant Database Container (MDC) on the HCP trial landscape. Before getting started, please check that you meet the following prerequisites:
- You have an HCP trial account, which can be created at no charge from here.
- You have created a MDC in your trial account. Please follow ekaterina.anachkova's instructions in this blog to create one.
- You have setup the SAML Service Provider in the MDC. Please follow the sections Creating Your Service Provider Certificate and Complete the Service Provider Settings in the blog “Play It Again, SAML” from oliver.goetz
- You have installed Eclipse with the SAP HANA Cloud Platform Tools and SAP HANA Tools following the instructions on the SAP HANA Tools site
- You have installed OpenSSL which will be used in first step to generate the signing key pair and certificate for your HTML5 SAML Service Provider
Step 1: Configuring the Local Service Provider for HTML5 apps
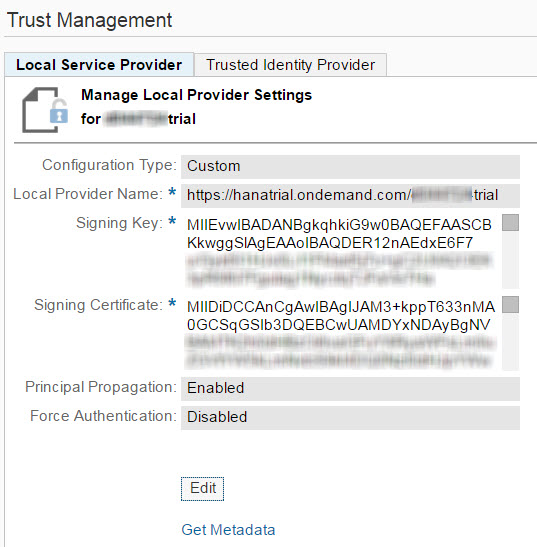
AppToAppSSO uses a SAML Assertion as the security token format to propagate the logged-on user. Therefore, your HCP (trial) account must be setup with a custom SAML Service Provider key pair which is used to digitally sign the SAML Assertion. Based on this signature, XS will verify that the user information has been propagated from a trustworthy system, i.e. your HTML5 application, or even more precisely, your account's subscription to the central HTML5 dispatcher. Login to the Cloud Cockpit on the HCP trial landscape and open the Trust settings of your account. Click on the Edit button and switch the Configuration Type from "Default" to "Custom".

If you have never done this before, you will see empty text fields for the Signing Key and Signing Certificate. Those need to be filled in this step as they identify your HTML5 application to the service running on XS. For development purposes, you can use the "Generate Key Pair" button in this scenario to generate a key pair with a self-signed certificate. For a productive scenario, it is recommended to use a certificate issued by a well-known and trusted Certificate Authority (CA). After clicking on Save you should get a message that you can proceed with the configuring of your trusted identity provider settings, and see a Local Service Provider configuration like shown in the following screenshot:
Click on the Get Metadata link to export the Local Service Provider configuration in a standardized metadata format, which will be use in the next step to import the trust settings in XS.
With the Configuration Type "Custom" you are now able to configure your own trusted identity providers, e.g. a corporate IdP. For the scenario in this blog you will continue to use SAP ID Service as our IdP to authenticate the users. Therefore you have to switch back to Configuration Type "Default" by clicking on the Edit button and reverting Configuration Type "Custom" back to "Default". Click on Save.
Note: By switching back to "Default", your "Custom" settings are not lost, and will be used for signing the SAML Assertion sent by the HTTP destination using AppToAppSSO principal propagation.
Step 2: Setup Trust in XS to the HTML5 Local Service Provider
Open the SAML Identity Provider list of your trial MDC with the XS Admin tool using your account-specific URL https://<mdcname><account name>.hanatrial.ondemand.com/sap/hana/xs/admin, and login with the SYSTEM user. If the SYSTEM has not yet the required roles to access the XS Admin tool, add all roles in SAP HANA Studio containing "xs.admin" in the name as shown in the following screenshot:

On the SAML Identity Provider list, click on Add ("+") to create a new trust relationship to your HCP account's Local Service Provider which has been configured in the previous step. In the Metadata field, copy and paste the content of the SAML Metadata file you exported from the Cloud Cockpit using the Get Metadata link.
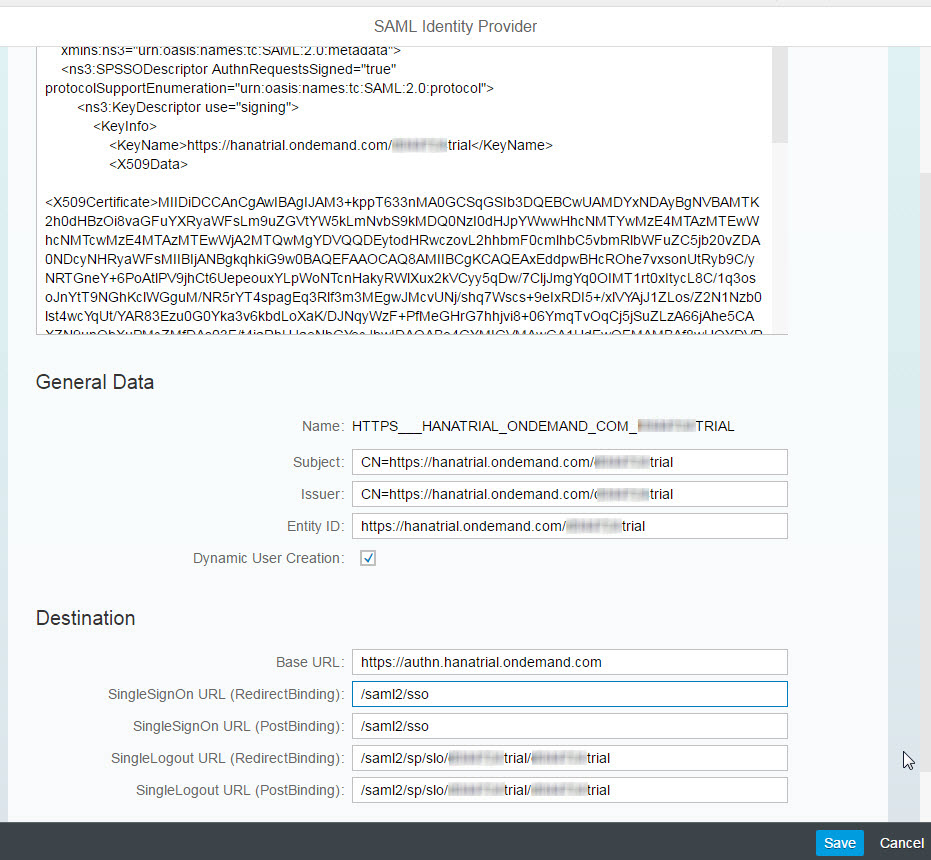 When you click on Save, the fields in the form will be updated based on the values from the metadata file. The only fields left blank are "SingleSignOn URL (RedirectBinding)" and "SingleSignOn URL (PostBinding)", because you've actually imported a metadata file of a service provider, and not of an identity provider. Therefore add some dummy values, e.g. "/saml2/sso". Also make sure that the checkbox "Dynamic User Creation" is activated. This ensures that for new users a corresponding HANA user is created. Click on Save again to store your settings.
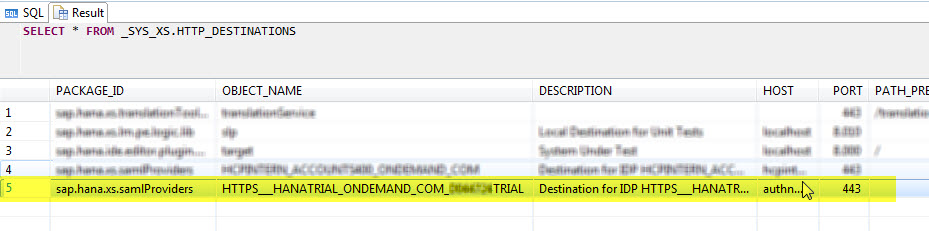
Next, verify that the destination for the new IdP was stored in HANA by checking in SAP HANA Studio the _SYS_XS.HTTP_DESTINATIONS table using the command
SELECT * FROM _SYS_XS.HTTP_DESTINATIONS
You should see the destination in the result list:
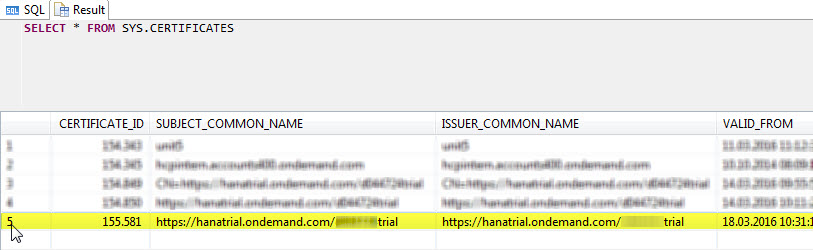
 Also verify that the certificate of your trial account metadata has been successfully stored using the following SQL command:
SELECT * FROM SYS.CERTIFICATES
The certificate is shown at the end of the list:
This concludes the trust setup in HANA XS to your HTML5 application as a trustworthy system to propagate the authenticated user. Next you will configure the destination of your HTML5 application.
Step 3: Configure HTTP Destination for AppToAppSSO
The sample HTML5 application used in this blog is a project management application, which retrieves a user's project data from an REST service running on XS. The complete code of the HTML5 application can be downloaded from here and can imported in SAP WebIDE on HCP following these steps:
- In Cloud Cockpit, go to Applications > HTML5 Applications. Click on Import from File.
- Select the downloaded ZIP archive. For the version name, enter "initial"
- Select the new application "xproject" by clicking on its link
- Select Versioning from the left-hand navigation menu, then click on Versions > Initial > Activate.
Open the HANA Cloud Platform WebIDE from the Services Cockpit or open it directly with the link https://webide-<account_name>.dispatcher.hanatrial.ondemand.com/. In your WebIDE workspace, follow these steps:
- Right-click on the Workspace and select Import > Application from SAP HANA Cloud Platform
- Right-click on the xproject folder and select Deploy > Deploy to SAP HANA Cloud Platform. Enter something like 1.0 in the version field and click Deploy.
You should now be able to reach the application under its Application URL as shown in the Cloud Cockpit, e.g. https://xproject-<account_name>.dispatcher.hanatrial.ondemand.com/?hc_reset.
Let's have a close look at the HTML5 application. As a user, you login to the application via the IdP, and then see a list of projects where you are assigned to. Therefore the logged-on user must be propagated securely to XS which will use the propagated user id to query the database for the projects where the user is assigned to as the project lead. In addition, the user's attributes such as first- and last name are used to set the user's name in the list of projects returned from XS to HTML5.
The actual invocation of the service in XS is done in Project.controller.js of the HTML5 application:
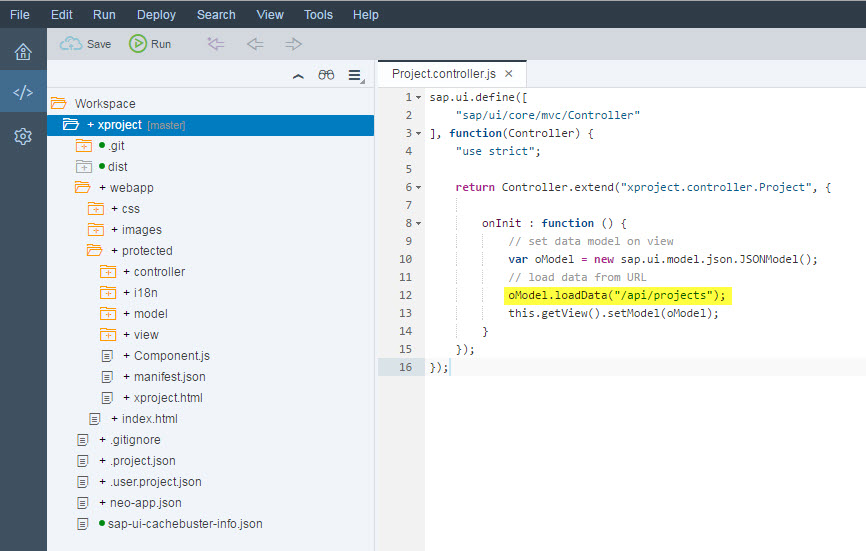
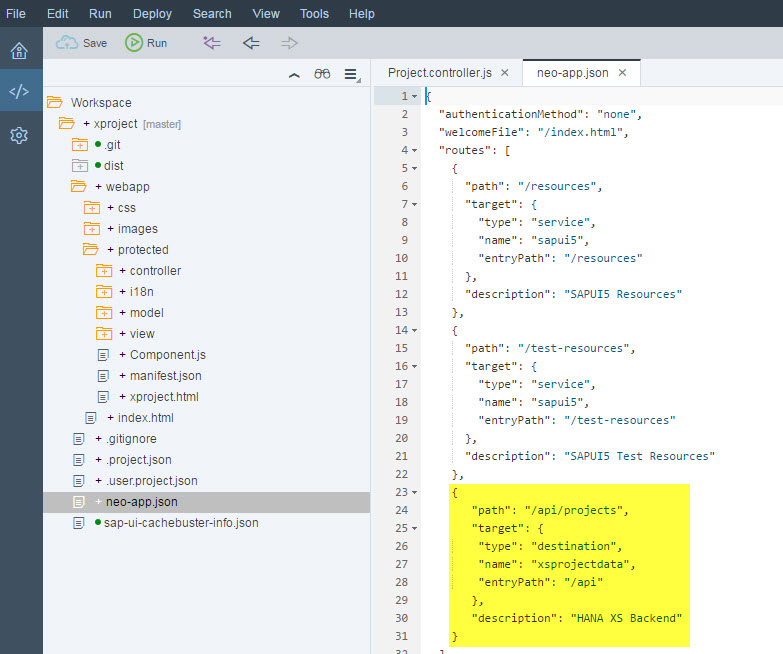
In the JSON model, the data is loaded from the URL /api/projects, which is mapped in the HTML5 application's neo-app.json descriptor file to the HTTP destination with name "xsprojectdata" :
Let's have a look at the destination configuration in the Cloud Cockpit. The two most important settings are highlighted in the following screenshot:

- The Authentication method is set to AppToAppSSO
- An additional property with the name "saml2_audience" and the value "I1700" is set for the destination
The property sets an important value in the SAML Assertion which is used to propagate the user. This value, the SAML audience,
"contain[s] the unique identifier URI from a SAML name identifier that describes a system entity" and "evaluates to Valid if and only if the SAML relying party is a member of one or more of the audiences specified." (Assertions and Protocols for the OASIS Security Assertion Markup Language (SAML) V2.0, page 23)
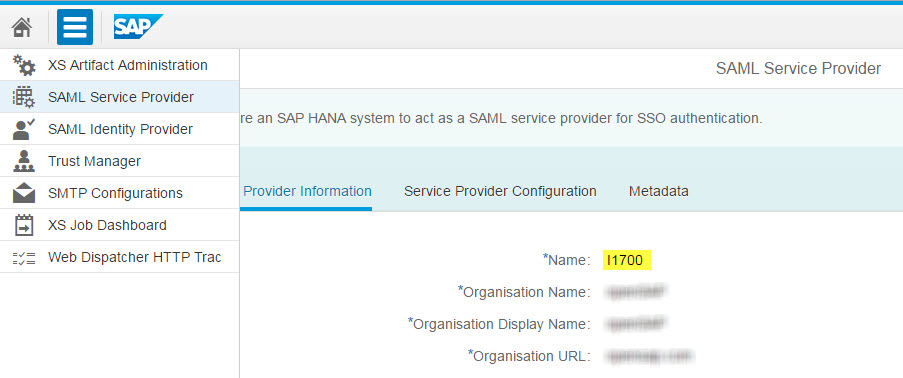
In other words: XS would reject the SAML Assertion with the propagated user if the audience is not set correctly to its own SAML name identifier. By default, an HTTP destination configured for AppToAppSSO sets the audience to the name of the SAML local service provider (aka "relying party") configured in the Cloud Cockpit. For a trial account, this would be "https://hanatrial.ondemand.com/<your account name>" if you haven't changed it. However, your MDC container is configured to a different SAML service provider name. Mine got the name identifier "I1700" which can be looked up in the XS Admin Tool under "SAML Service Provider":
Last but not least, configure the URL of the destination according to your service location. To do so, follow these steps:
- Create a new package "sample", e.g. with SAP HANA Studio in the SAP HANA Systems view
- Create a new schema "xproject", e.g. with SAP HANA Studio SQL Console, using the command CREATE SCHEMA "xproject"
- Download the XS service code from here, and import it in the new "sample" package, e.g. with the SAP HANA Web-based Development Workbench (https://<MDC_name><account_name>.hanatrial.ondemand.com/sap/hana/ide/editor/) using the context menu (Import - Archive)

- Refresh the package after successful import of the archive and open the newly created "xproject" sub-package. Right-click on the following imported files and select Activate: PROJECT.hdbdd, project.hdbsequence, projectmember.hdbrole,
- Open the data/projects.csv file, and replace the two placeholders <your user id> in the file with your SAP ID Service user ID (e.g. P123456 or D987654). Save the changes. This file will import some sample data into the PROJECT table which is used later for testing the scenario. Now right-click on the file project.hdbti and select Activate from the context menu.
- Finally, right-click on the package "xproject" and select Activate All from the context menu.
As a result, the XS-based service is now accessible at the URL https://<MDC_name><account_name>.hanatrial.ondemand.com/sample/xproject/xproject.xsjs. Enter this URL in the destination's URL field and save it.
Step 5: Configure the default role of dynamically created users in XS Service
The xproject.xsjs file implements the XS service to retrieve the propagated user's projects from the database. The function getProject() retrieves the user's unique logon name and queries the database for projects where the user set as the project lead. The result is returned in JSON format. The PROJECT table can only be accessed by users with the role "projectmember" which is defined by the file projectmember.hdbrole. Therefore, new HANA DB users created dynamically according to the new IdP's setting should automatically be assigned to this role. To set this default role, you first need to create a run-time role by opening the Security folder of your system in the "Systems" view in SAP HANA Studio. There do a right-click on the Roles element and select New Role from the context menu. For the Role Name, enter a value such as "DEFAULT_ROLE_FOR_PROJECT_MEMBERS", and click on the "+" in tab Granted Roles to add your design-time role "sample.xproject::projectmember" to it. Press Ctrl+S to save you new run-time role.
 Next, double-click on your system in SAP HANA Studio to open the Administration. Select the Configuration tab and filter for "saml". Right-click on the saml section in the search results and select Add Parameter from the context menu. The Add Parameter Wizard opens. Leave the default selection ("Database") for the scope and click Next. For the key name, enter "defaultrole", and for the value the name of the newly created run-time role ("DEFAULT_ROLE_FOR_PROJECT_MEMBERS"). Click Finish to save the new parameter.
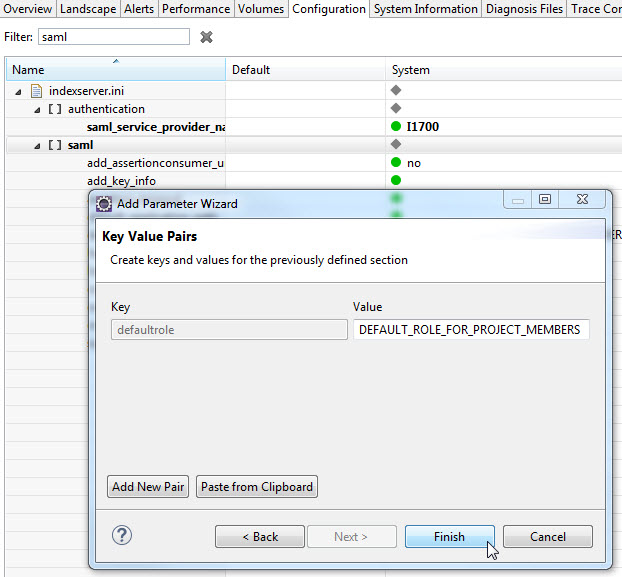
Step 6: Configure SAML for the XS Service
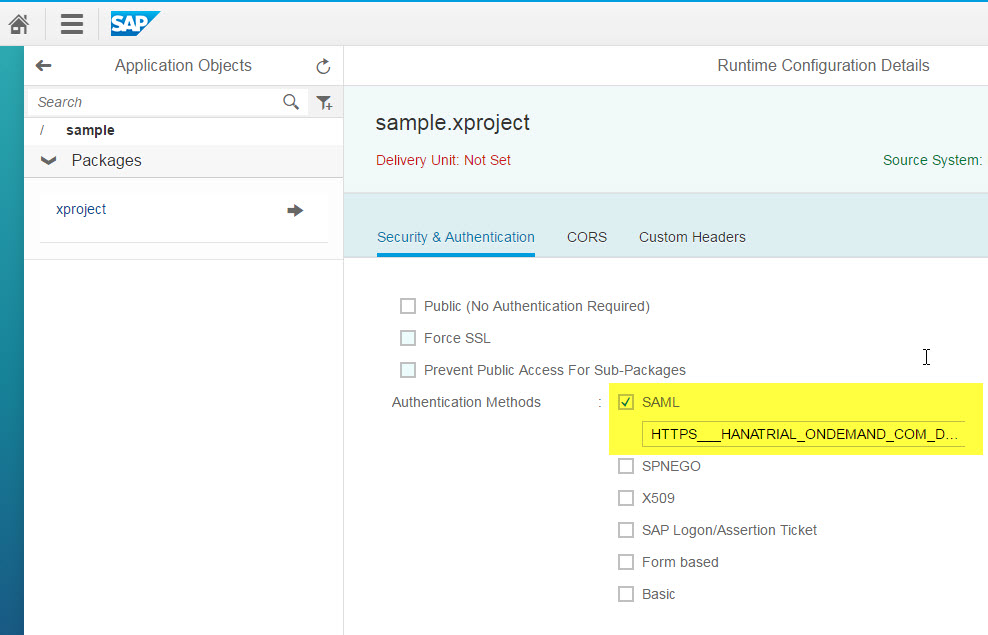
Before you can test the scenario, the XS Service must also be protected with SAML. In the XS Admin Tool, select "XS Artifact Administration" from the menu. Go to package "sample.xproject" and click on Edit. In the Security & Authentication tab, activate SAML and select newly created IdP in the dropdown box, starting with "HTTPS__HANATRIAL_...". Deactivate any other authentication methods and click on Save.
Step 7: Testing the Scenario
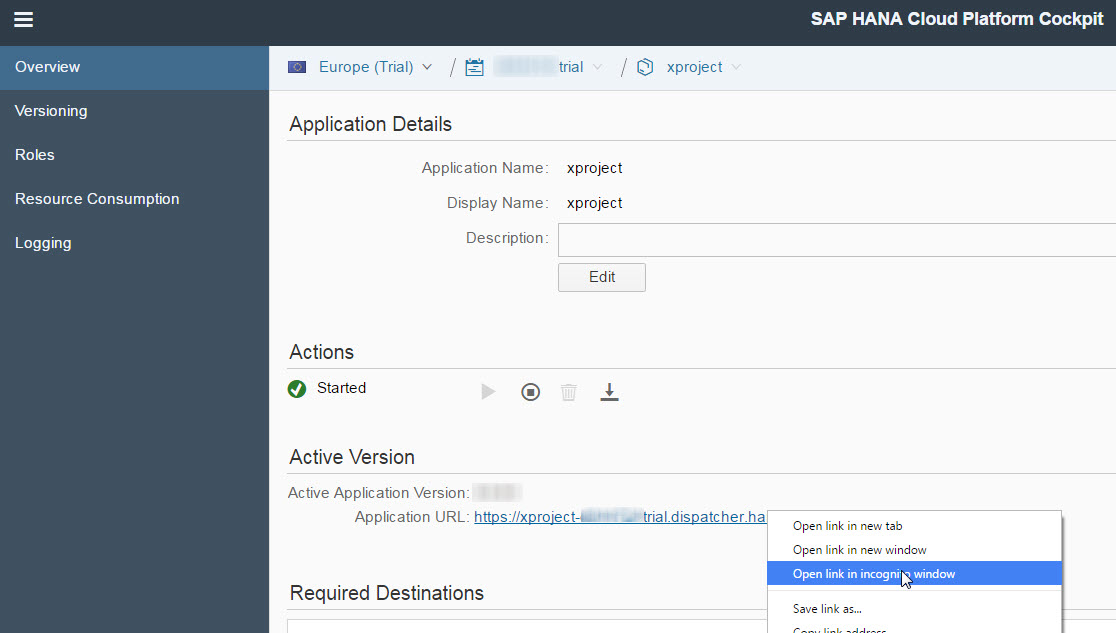
Now it is time to test the scenario: Go back to Cloud Cockpit and open the Overview page of your xproject HTML5 application. Right-click on the Application URL and open the application in a new private/incognito browser window to obtain a new session.
 You will see the landing page of the xproject application. Click on Login.
Based on your trial account's trust settings, you will be redirected to SAP ID Service as the default IdP. Upon successful logon with your SAP ID Service credentials, your browser is redirected back to the application. The project overview page retrieves its data from the XS service, which uses the AppToAppSSO destination to propagate your user. Based on the configuration settings from the previous steps, only the projects for the currently logged-in user are retrieved by getting the username from the XS session object with
var username = $.session.getUsername();
in line 20 of the xproject.xsjs file, and appending it to the SQL statement which queries the application's PROJECT table. In addition, the federated user attributes for first- and last name of the logged-in user are used to return the display name of the user. Those are accessed in XS under the same name as in HTML5 or Java. For SAP ID Service, they are accessed using firstname and lastname using the following API:
var displayName = $.session.samlUserInfo.firstname + " " + $.session.samlUserInfo.lastname;
Depending on your table data and user name, the list may look like this in the web browser, only showing two out of three projects in total:
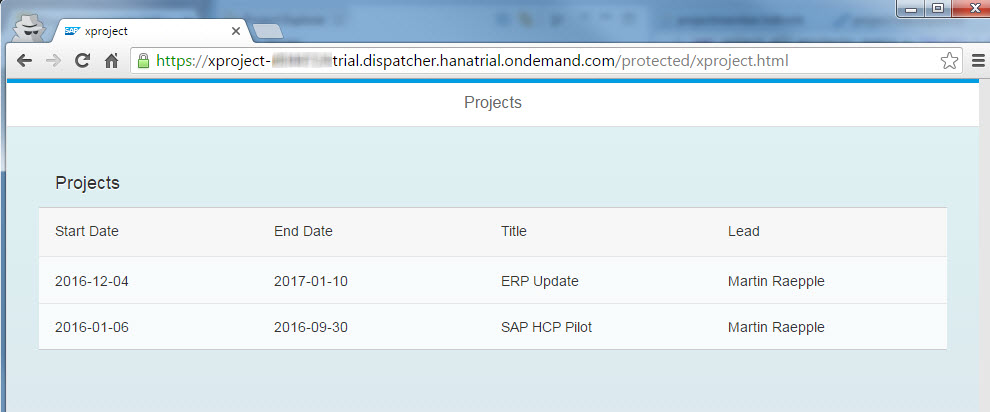 This step concludes the scenario and I hope this is of help if you are implementing a similar scenario on SAP HANA Cloud Platform.
- SAP Managed Tags:
- SAP HANA,
- Security,
- SAP Business Technology Platform
68 Comments
- « Previous
-
- 1
- 2
- Next »
You must be a registered user to add a comment. If you've already registered, sign in. Otherwise, register and sign in.
Labels in this area
-
ABAP CDS Views - CDC (Change Data Capture)
2 -
AI
1 -
Analyze Workload Data
1 -
BTP
1 -
Business and IT Integration
2 -
Business application stu
1 -
Business Technology Platform
1 -
Business Trends
1,661 -
Business Trends
87 -
CAP
1 -
cf
1 -
Cloud Foundry
1 -
Confluent
1 -
Customer COE Basics and Fundamentals
1 -
Customer COE Latest and Greatest
3 -
Customer Data Browser app
1 -
Data Analysis Tool
1 -
data migration
1 -
data transfer
1 -
Datasphere
2 -
Event Information
1,400 -
Event Information
64 -
Expert
1 -
Expert Insights
178 -
Expert Insights
273 -
General
1 -
Google cloud
1 -
Google Next'24
1 -
Kafka
1 -
Life at SAP
784 -
Life at SAP
11 -
Migrate your Data App
1 -
MTA
1 -
Network Performance Analysis
1 -
NodeJS
1 -
PDF
1 -
POC
1 -
Product Updates
4,577 -
Product Updates
323 -
Replication Flow
1 -
RisewithSAP
1 -
SAP BTP
1 -
SAP BTP Cloud Foundry
1 -
SAP Cloud ALM
1 -
SAP Cloud Application Programming Model
1 -
SAP Datasphere
2 -
SAP S4HANA Cloud
1 -
SAP S4HANA Migration Cockpit
1 -
Technology Updates
6,886 -
Technology Updates
399 -
Workload Fluctuations
1
Related Content
- Single Sign On to SAP Cloud Integration (CPI runtime) from an external Identity Provider in Technology Blogs by SAP
- Integrating with SAP Datasphere Consumption APIs using SAML Bearer Assertion in Technology Blogs by SAP
- 2024 SAP Cloud Identity Services & IAM Portfolio: What’s New? in Technology Blogs by Members
- Empowering Process Transformation: Variant Management for Managing Complex Process Landscapes in Technology Blogs by SAP
- OUT NOW: SAP Signavio February 2024 release in Technology Blogs by SAP
Top kudoed authors
| User | Count |
|---|---|
| 11 | |
| 10 | |
| 9 | |
| 9 | |
| 7 | |
| 7 | |
| 7 | |
| 6 | |
| 6 | |
| 5 |