How to configure the information shown in the Account Identification view of the IC Header
Per SAP standard the left block of the context area of the IC header shows the account name (and the contact name if different) as text information. However it is possible to configure this area to show different account and contact information such as the account address. The only limitation is that the information shown will be in two lines.

In order to do this, create a new custom class (e.g. called Z_CRM_CONTEXTAREA) and assign it to the account identification profile of your business role.
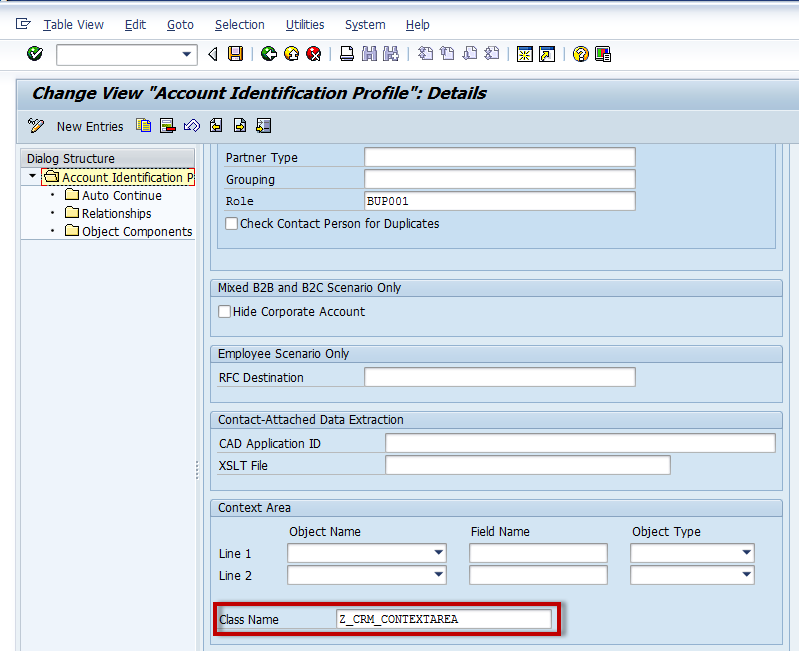
The assignment to the business role is done through the functional profile customizing.

In the method DISPLAY_DATA of the new class the BOL entities for account and contact are available and using ABAP the line one and two of the account identification view can be freely composed by ABAP.
The below code belongs to the result shown in the above screen shot.
METHOD display_data.
IF iv_customer IS BOUND.
iv_customer->get_property_as_value( EXPORTING iv_attr_name = 'ACCOUNT_NAME' IMPORTING ev_result = rv_text1 ).
iv_customer->get_property_as_value( EXPORTING iv_attr_name = 'ACCOUNT_DESCRIPTION' IMPORTING ev_result = rv_text2 ).
SHIFT rv_text2 up to ','.
SHIFT rv_text2 by 1 PLACES.
SHIFT rv_text2 left deleting leading '0'.
ENDIF.
ENDMETHOD.
How to fully control the content of the account identification area
The example shows the level of configuration, which is possible by straightforward configuration.
Now the question is how to go beyond this and fully control for instance the content of the account identification area view.
The example shows how we can show the name of the confirmed account, its id and its description in a completely custom layout. Also dependent on the customer id we show a different icon next the customer name. For instance imagine that you want to display a special icon for your premium customers.
Based on the code for this example it should be clear how to generalize it to show any kind of backend information of the confirmed account and contact in any kind of layout. For instance if the backend could determine the URL of a photo based on the customer id, this URL of this photo could be passed by the backend event and the photo could be rendered by the frontend.


In order to update the header, class Z_CRM_CONTEXTAREA will raise a custom SAM event. The reason for using this class is that it should be called at the right time when the customer is confirmed.
So the new version of the DISPLAY_DATA method will look like this:
METHOD display_data.
data: lv_account_name type string,
lv_account_desc type string,
lv_account_number type string,
lv_account_birthdate type string.
IF iv_customer IS BOUND.
iv_customer->get_property_as_value( EXPORTING iv_attr_name = 'ACCOUNT_NAME' IMPORTING ev_result = lv_account_name ).
iv_customer->get_property_as_value( EXPORTING iv_attr_name = 'ACCOUNT_DESCRIPTION' IMPORTING ev_result = lv_account_desc ).
iv_customer->get_property_as_value( EXPORTING iv_attr_name = 'BP_NUMBER' IMPORTING ev_result = lv_account_number ).
ENDIF.
call method me->send_sam_message( EXPORTING
IV_ACCOUNT_NAME = lv_account_name
IV_ACCOUNT_ID = lv_account_number
IV_ACCOUNT_DESC = lv_account_desc ).
ENDMETHOD.
The example code of the method SEND_SAM_MESSAGE looks like this. It raises the custom SAM event 'com.sap.ic.mimc.sessions.zevent' with some example customer data.
DATA: message TYPE REF TO cl_sam_text_message.
DATA: lv_value TYPE string.
DATA: ex TYPE REF TO cx_sam_messaging_exception,
ex_text TYPE string. "#EC NEEDED
TRY.
CREATE OBJECT message.
* Message client listener
message->if_sam_message~set_string_property(
name = 'icwc_sam_message_listener'
value = 'icwc_client_listener' ).
* Message topic
message->if_sam_message~set_string_property(
name = 'icwc_eventname'
value = 'com.sap.ic.mimc.sessions.zevent' ).
DATA msg_tmp_value TYPE string.
msg_tmp_value = cl_icwc_session_registry=>get_session_id( ).
IF msg_tmp_value IS NOT INITIAL.
message->if_sam_message~set_string_property(
name = 'session_id'
value = msg_tmp_value ).
ENDIF.
* Add application data here
message->if_sam_message~set_string_property(
name = 'ACCOUNT_ID'
value = iv_account_id ).
message->if_sam_message~set_string_property(
name = 'ACCOUNT_NAME'
value = iv_account_name ).
message->if_sam_message~set_string_property(
name = 'ACCOUNT_DESC'
value = iv_account_desc ).
IF iv_account_id = '0000003041'.
lv_value = 'X'.
message->if_sam_message~set_string_property(
name = 'premium_customer'
value = lv_value ).
ENDIF.
* Message send
me->send_to_client( message ).
CATCH cx_sam_messaging_exception INTO ex.
ex_text = ex->get_text( ).
ENDTRY.
By adding or removing properties, any kind of information can be transferred to the header view.
To show the possibility of dynamic content, the customer with id 0000003041 is identified as a premium customer. In a real implementation this kind of information could come from a custom field in the customer master data.
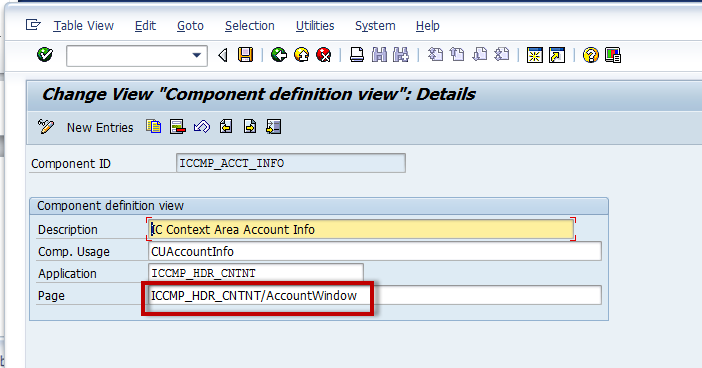
In order to adjust the layout, view ICCMP_HDR_CNTNT/AccountInformationVS needs to be modified in the Web UI component workbench. In EhP3 the normal Web UI enhancement concept can be used for this. This view is the one, which is shown in the upper left part as the account identification view (see screenshot).
<%@page language="abap" %>
<%@extension name="chtmlb" prefix="chtmlb" %>
<%@extension name="thtmlb" prefix="thtmlb" %>
<style>
#ICCMP_ACCT_INFO{
background-color: transparent;
border: 0px;
}
</style>
<script>
var eventManager = null;
window.onload = function(){
eventManager = ICClientEventManager.getInstance( );
eventManager.subscribe( 'com.sap.ic.mimc.sessions.zevent', function(message){
document.getElementById("acc_data").style.display = "block";
var ff_flag = message.getProperty("premium_customer");
if(ff_flag=="X"){
document.getElementById("ff_img").src = "/sap/bc/bsp/sap/ICCMP_HDR_CNTNT/smiley.png ";
}
document.getElementById("acc_id").innerHTML=message.getProperty("ACCOUNT_ID");
document.getElementById("acc_name").innerHTML=message.getProperty("ACCOUNT_NAME");
document.getElementById("acc_desc").innerHTML=message.getProperty("ACCOUNT_DESC");
} );
}
</script>
<div style="white-space:nowrap;overflow:hidden;width:100%; height:100%; position: relative;">
<div><h1> <span ID="acc_name"></span> <img id="ff_img"></h1></img></div>
<div id="acc_data" style="display:none; width:100%;"><b>id:</b><span id="acc_id"></span> <b>description:</b><span id="acc_desc"></span></div>
</div>
As it is common in Web programming, the BSP view contains of some <div> tags with unique ids.
The JavaScript code on this view registers a callback JavaScript function on the SAM event, which is raised by the ABAP code in the backend.
Depending on whether the premium customer flag is sent by the backend for the customer, a different icon will be shown on the fronted. Also the account name, id and description are extracted from the backend message and shown on the screen.
Store the Javascript code into a Javascript file and load it during application start
For bigger projects it may be advisable to put the Javascript code not directly on the page, but to put it into a dedicated Javascript source file.
Sometimes this may also help to solve problems with the Javascript not being loaded.
You can use the following customizing:

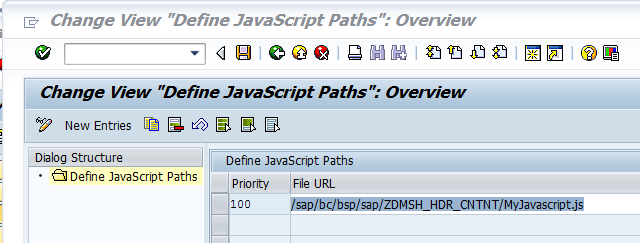
The Javascript should then be uploaded into your BSP application:

The BSP code on our page can then be very simple:
<script type="text/Javascript">
window.onload = modify_header;
</script>
Header Layout Customizing
The above example just focuses on the account identification area of the IC header. In order to understand how this approach can be extended to other areas of the header, it is important to understand the general IC Header Layout customizing. This is explained in detail in note 2161942.
Applied to our example it means we identify view ICCMP_HDR_CNTNT/AccountInformationVS as the right one to be enhanced, because it is assigned to the DEFAULT context area profile used by the IC_AGENT role through layout component ICCMP_ACCT_INFO.