


- SAP Community
- Products and Technology
- Technology
- Technology Blogs by SAP
- Hana Modeler: Impact Analysis and Refactoring of C...
Technology Blogs by SAP
Learn how to extend and personalize SAP applications. Follow the SAP technology blog for insights into SAP BTP, ABAP, SAP Analytics Cloud, SAP HANA, and more.
Turn on suggestions
Auto-suggest helps you quickly narrow down your search results by suggesting possible matches as you type.
Showing results for
matthias_jensen
Explorer
Options
- Subscribe to RSS Feed
- Mark as New
- Mark as Read
- Bookmark
- Subscribe
- Printer Friendly Page
- Report Inappropriate Content
10-23-2015
4:42 PM
Modeling SAP HANA Calculation Views is the key approach to successfully exploit the power of the SAP HANA Platform and leverage key SAP HANA capabilities. In the meantime there exist many features that help to change and refactor calculation views. We will summarize and outline these features in the following:
All the features are available with SP10. Many of them are already available in earlier support packages.
Note: The blog contains a lot of quite large screen shots. If these appear blurred click on them to see a version with a higher resolution!
Impact Analysis and Lineage
First you probably want to get an overview what impact you change might have.
Where used list
To invoke the where used list in the SAP Hana Systems view below the content node choose "Context Menu -> Where-Used" on any calculation view (attribute and analytic views work as well). You will see the impacted views in the Where-Used List view:

- Double clicking in the where used list opens the editor.
- The where used list adjusts if one switches to another calculation view in the editor.
Also in the Projects / Repository view you can invoke the Where Used list in a similar way by choosing" Context Menu -> Get Where-Used List":

- Double clicking in the Search view opens the editor
- Where used list also available in the search result so you can get a second and third level where used list.
- You can navigate to old search results
Column Lineage inside a calculation view
This is available with SP10. From the columns tab in the semantic node you can invoke "Show Lineage" on a column to see how the column travels through the nodes of the model and in which nodes it is renamed:

The same functionality can also be invoked from the output pane of every node:

Refactoring in the calculation view editor
This chapter explains several ways to do critical / incompatible changes with the least effort.
Adding a table or a view
This is normally not critical if you add the table to a union node or to a new (empty) projection/aggregation/rank node. But how to you add this table to a new join node without losing other mappings? You can do this by dragging a new join node from the palette to the data source (TD1 in the example). After confirming the pop up a new join node is added while all the existing mappings are kept. Now you can add the table/view to the new join node:

You can as well add a table and replacing an existing table in the model. To do so choose "Context menu -> Replace with Data Source..." on the table/data source to be replaced. The editor will preserve all column mappings that still fit. Additional mappings can be maintained in the Map Columns step of the replace wizard:

Add a column to a table / view
This is uncritical as is doesn't break existing calculation views. But how do a add the new column efficiently to views built on top ? The can be done by the "Propagate to Semantics" feature:

This add the column to all nodes of the current view. This feature can be done for several new columns at once when it is invoked from the output pane.
In case a new column is added to a shared dimension this might break calculation views using the dimension in a star join. This happens if the column names in the star join view are not unique anymore. In such a case you will see the following messages in the regeneration phase of the activation and the object is marked as broken:

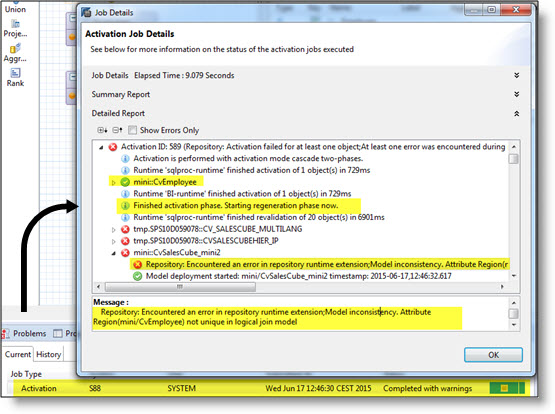
To correct this open the affected star join calculation view. The editor automatically proposes aliases to make the column names unique:

Remove a table / view
The deletion is rejected (can't be activated) as long as the view / table is used in other objects:

You can use the where used list (see the first chapter of this blog) to find out where it is used.
Then open these views and by removing the corresponding data source in the editor you will get an overview about the impact:
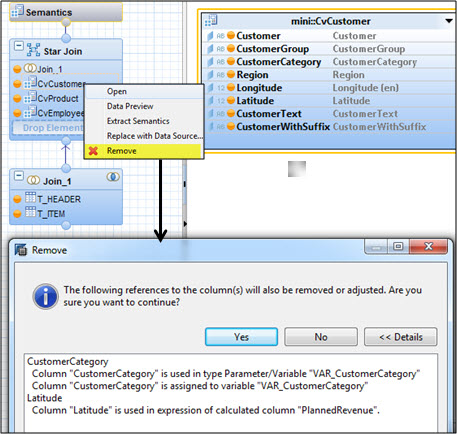
If you still want to do the change cancel the pop up with No, remove the references manually and only then remove the data source again. After you have done this for all affected views the original table / view can finally be deleted.
Remove a table / view from a join node
This can be done by keeping the existing mappings with the following trick:

You choose "Context Menu -> Replace With -> Data Source..." where the join node (Join_1) containing the table to be removed (TD1) is used as input (in Join_3). Then you replace Join_1 by the other table (TF1). After this refactoring Join_1 and with it the table TD1 can simply be deleted.
Remove a column from a table / view
In case the column is still used in views built on top you get an error / warning (depending on the activation mode) in the protocol.

If the activation goes through the affected objects are marked as broken. When you open these models to adjust them the missing columns are marked with red icons. Removing the column gives you additional information where it in the model is was used. These occurrences need to be adjusted manually.

Rename / move a view
For this choose "Context menu -> Refactor -> Move / Rename":

References in other views are adjusted automatically.
Attention: References in other DB artifacts e.g. SQL script procedures are not adjusted! In such a case a warning is shown in the Rename Wizard.
Rename Column
This feature is available in the Columns Tab of the Semantic Node:

References in other views are adjusted automatically. In the pop up shown above you see what exactly is adjusted in the affected views.
Attention: References in other DB artifacts e.g. SQL script procedures are not adjusted! In such a case a warning is shown in the Rename Wizard.
Rearrangement of nodes
In this chapter we show additional functions for node refactoring within one calculation view
Insert a node between two existing nodes
For this drag the new node from the palette and drop it on the connection line between the existing nodes:

Insert a node between a node and a data source
For this drag the new node from the palette and drop it on the data source:

Remove and replace a node
For this choose "Context menu -> Remove and Replace With -> Node..." on the node to be removed:
You are able to adjust the mappings to the new node in the wizard (fitting mappings are kept).
Replace the input of a node
For this choose "Context menu -> Replace With -> Node/ Data Source ..." on the node input to be replaced:
You are able to adjust the mappings to the new node / data source in the wizard (fitting mappings are kept).
Copy and paste for nodes
Nodes can be copied and pasted via the context menu. If desired you can copy complete node structures:

Miscellaneous
Swap join inputs
You can swap the left and the right input of a join node. Either via the context menu on the join inside the details drawing canvas:
Or after double clicking on the join in the join details dialog:

- SAP Managed Tags:
- SAP HANA
4 Comments
You must be a registered user to add a comment. If you've already registered, sign in. Otherwise, register and sign in.
Labels in this area
-
ABAP CDS Views - CDC (Change Data Capture)
2 -
AI
1 -
Analyze Workload Data
1 -
BTP
1 -
Business and IT Integration
2 -
Business application stu
1 -
Business Technology Platform
1 -
Business Trends
1,661 -
Business Trends
88 -
CAP
1 -
cf
1 -
Cloud Foundry
1 -
Confluent
1 -
Customer COE Basics and Fundamentals
1 -
Customer COE Latest and Greatest
3 -
Customer Data Browser app
1 -
Data Analysis Tool
1 -
data migration
1 -
data transfer
1 -
Datasphere
2 -
Event Information
1,400 -
Event Information
65 -
Expert
1 -
Expert Insights
178 -
Expert Insights
280 -
General
1 -
Google cloud
1 -
Google Next'24
1 -
Kafka
1 -
Life at SAP
784 -
Life at SAP
11 -
Migrate your Data App
1 -
MTA
1 -
Network Performance Analysis
1 -
NodeJS
1 -
PDF
1 -
POC
1 -
Product Updates
4,577 -
Product Updates
330 -
Replication Flow
1 -
RisewithSAP
1 -
SAP BTP
1 -
SAP BTP Cloud Foundry
1 -
SAP Cloud ALM
1 -
SAP Cloud Application Programming Model
1 -
SAP Datasphere
2 -
SAP S4HANA Cloud
1 -
SAP S4HANA Migration Cockpit
1 -
Technology Updates
6,886 -
Technology Updates
408 -
Workload Fluctuations
1
Related Content
- SAP Sustainability Footprint Management: Q1-24 Updates & Highlights in Technology Blogs by SAP
- GRC Risk Management Series: Risk Analysis profile in Technology Blogs by Members
- What’s New in SAP Analytics Cloud Release 2024.07 in Technology Blogs by SAP
- SAP Datasphere - Space, Data Integration, and Data Modeling Best Practices in Technology Blogs by SAP
- Analytical Query CDS View creation and consumption in RSRT along with publishing OData Services in Technology Blogs by Members
Top kudoed authors
| User | Count |
|---|---|
| 13 | |
| 10 | |
| 10 | |
| 9 | |
| 8 | |
| 7 | |
| 6 | |
| 5 | |
| 5 | |
| 5 |