Since NW7.5 SP00, data elements are native integrated in a form-based editor in ABAP Development Tools (ADT). This means, you can now create and edit data elements directly in ADT without opening transaction SE11 in the classic SAP GUI.
How Does the New Editor Look Like?
The data element editor displays all relevant information at a glance and is divided into the following three sections:
- Data Type Information for defining the type of the data element based on a predefined type, domain, and so on
- Field Labels for defining the relevant UI text and its maximum lengths
- Additional Properties for adding search helps or defining the reading direction of UI text and so on

Fig. 1: Example of a data element that is opened in the form-based editor
Which Functionalities Does It Provide?
Within the three sections you can arrange your data element by combining the provided fields and elements. Play with the values from the dropdown listboxes and see what happens. Then, other fields might be no more selectable others become available. So, the editor automatically adopts the dependencies among the currently selected values.
From the toolbar, you can perform the following actions on a data element:
- Duplicating it to create the exact same object in a selected ABAP package
- Opening it in the integrated SAP GUI or in another ABAP project
- Sharing an ADT link with your colleagues to open it directly in another ABAP in Eclipse client
- Navigating to the context-relevant help documentation
What Are The Advantages of The New Editor?
The form-based editor makes your daily work as follows easier:
- Usability: You don´t need to switch between several tabs anymore. ADT serves you all information smoothly in one view.
- Content Assist: You forgot, for example, the name of the search help that you want to add? No problem. In the corresponding input fields, choose Ctrl + Space and the content assist functionality enables you to search for it. Just start typing. You can also use wildcards here.
- Element Info Popup: As it were not enough, you can get further information from the element info popup. The corresponding one is automatically opened when you select a proposed value from the content assist.
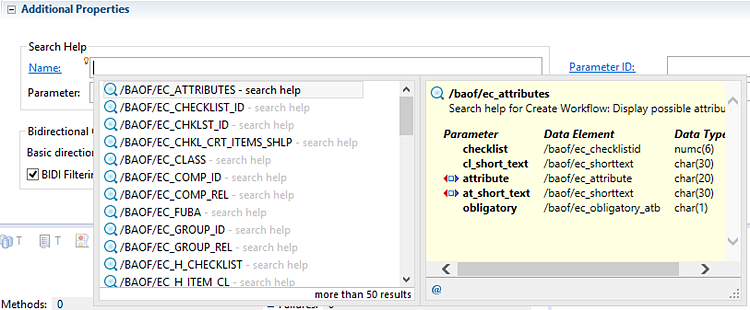
Fig 2: Example of an element info popup providing information about a parameter
How to Create and Edit Data Elements?
The creation is also based on a creation wizard as you are used to from ABAP classes, interfaces, programs, and so on.

Fig 3: Example of a creation wizard
To create a new data element, proceed as follows:
- Choose File > New > Other from the menu bar.
- In the New ABAP Repository Object dialog, enter Data Element and double-click the finding.
- Enter the Name of your object and its Description.
- Choose Next to handle the transport management and/or Finish to start the creation.
Result: The new data element is created in the back-end, displayed in the Project Browser tree, as well as opened in the form-based editor. The Domain category is set by default.
The displayed content in the sections of the form-based editor depends on your selection. So, if you choose a specific property, the editor will look different and automatically adopts to the new conditions.
To edit a data element, proceed as follows:
- In the Data Type information section, choose the Category from the dropdown listbox.
According to your selection, the subsequent values are displayed.
NOTE: In all input fields, the content assist functionality is supported. Choose Ctrl + space to display and select the existing values. - In the Field label section, enter the respective texts you want to display on your UI.
- [Optional:] Choose the spin button to redefine the field length.
- In the Additional Properties section, you can, for example, optionally:
- Enter an existing or create a new search help to reference or create a new search help object.
- Enter an existing or create a new Parameter ID to associate a data element with an SPA/GPA parameter..
- Enter a Component Name to structure the reference of components or table fields to the entered data element.
- Select the Change Document Logging checkbox to log changes to fields in database tables defined with reference to this data element.
- Select the Input History checkbox to activate or deactivate the SAP GUI history for dynpro fields defined with direct or indirect reference to the data element.
- Define the direction of UI text.
For detailed information, enjoy taking a look on the help documentation:
