Skip to Content
Author's profile photo Gaurav Dey

Developing a sample C4C extension application using HANA Cloud Platform (Part 2).

In this section, we will create a Service Tickets Fiori Launchpad site with a tile for launching the Open Tickets application that we created in Part1. Along with it we will also create a dynamic tile to display live data.


Launch HANA Cloud Portal service


Input Output
  • In your HANA Cloud Platform cockpit, click Services from the left-side content panel
  • SAP HANA Cloud Portal appears first in the list of services available in your account. Click it.
  • Click the Enable button, if the service is not enabled. (this may take a few seconds)
/wp-content/uploads/2015/10/1_806958.jpg
  • Click on the tile to launch your SAP HANA Cloud Portal
  • The Cloud Portal’s Go to Service link is now enabled
  • Click on the link to launch your SAP HANA Cloud Portal in a new browser tab.
  • The Cloud Portal Site Directory is opened
/wp-content/uploads/2015/10/1_806958.jpg


Create a Fiori Launchpad Site


Input Output
  • From the Cloud Portal site directory click on the first tile with + symbol.
  • Select Fiori Launchpad in the first drop down list. Enter the Site Name – Service Center.
/wp-content/uploads/2015/10/1_806958.jpg
  • Click Save. Your Fiori Launchpad site is created.
  • With your mouse cursor hover over the newly created site icon.
  •   Click on the ‘Site Actions’ menu and click ‘Publish.
/wp-content/uploads/2015/10/1_806958.jpg
The Publish Site confirmation dialog appears

  • Click Publish to publish the Launchpad site. This will publish your Launchpad and make it accessible
  • Click Close on the Publish Site dialog box.


Once the site is published, you will notice

  • The site icon changes its color to green and Status to ‘Public’.
  • A URL to access the Launchpad runtime from your Site Directory.
  • A Manage button to enter the Fiori Configuration Cockpit.
/wp-content/uploads/2015/10/2_806968.jpg
  • Click on the Launchpad URL

        The new Fiori Launchpad site is launched in a new browser tab.

  • From the Cloud Portal site directory hover over the newly created site icon.
  • Click on the ‘Manage’ button
    The Fiori Launchpad’s Configuration Cockpit is opened in a new browser tab.

1.PNG


Create new App Tile


Input Output
  • Click on the Create App Tile.
app tile.PNG
  • The App tile wizard is opened which enables you to create the app tile with desired functionality. This screen helps you to define the properties of the application.
  • Click on the window tile of the App Name it picks the HTML5 applications that you have created and deployed in SAP HANA Cloud Platform.
  • A pop will come for authentication, enter the password of your SAP HANA Cloud Platform cockpit account.


app tile wizard.PNG

auth.PNG

  • Select the opentickets application from the list. Click OK .
  • Enter the Description as per required. Here we are entering Outstanding Tickets.
  • Click on the window tab of Assigned Catalogs this will show the list of Catalogs under which the application will be listed.
  • Select Sample Catalog and click OK.
  • Click Next.

sele.PNG

cata.PNG

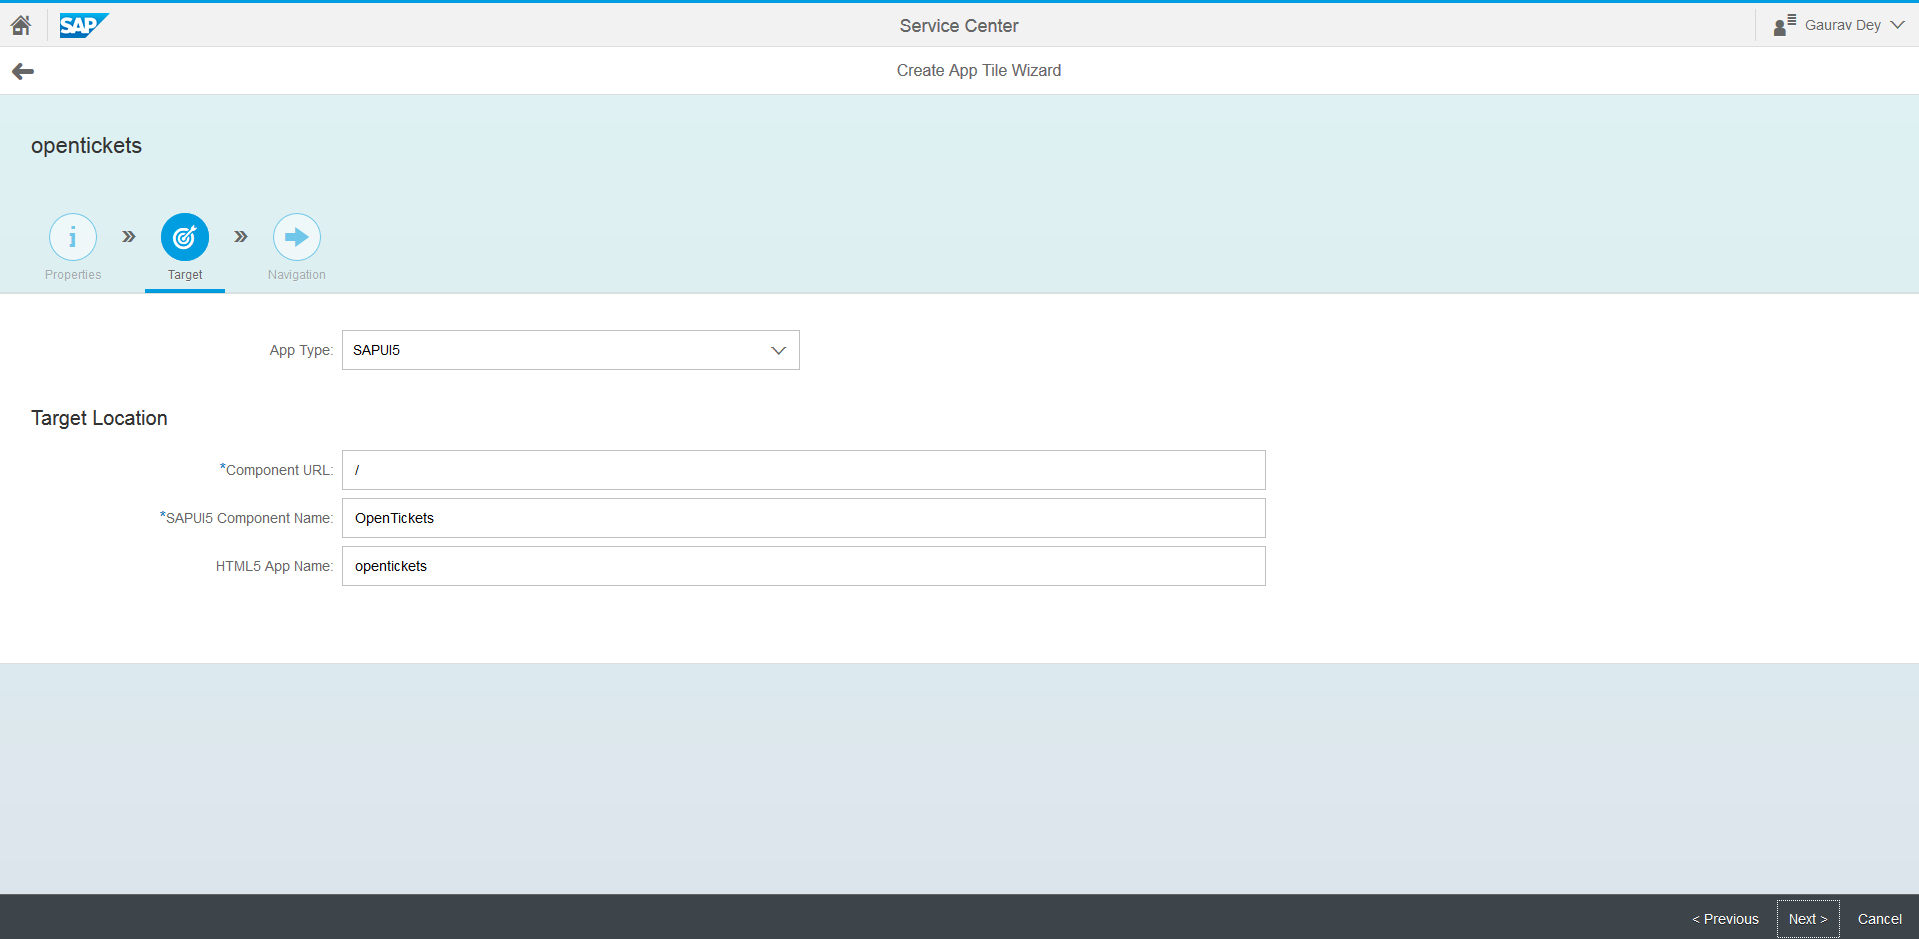
  • The screen that you will see is the Target screen. This enables you to mention the location of the required files for the application that will be picked when the applications runs.
  • Enter the details as shown in the figure.
  • Click Next
target.PNG
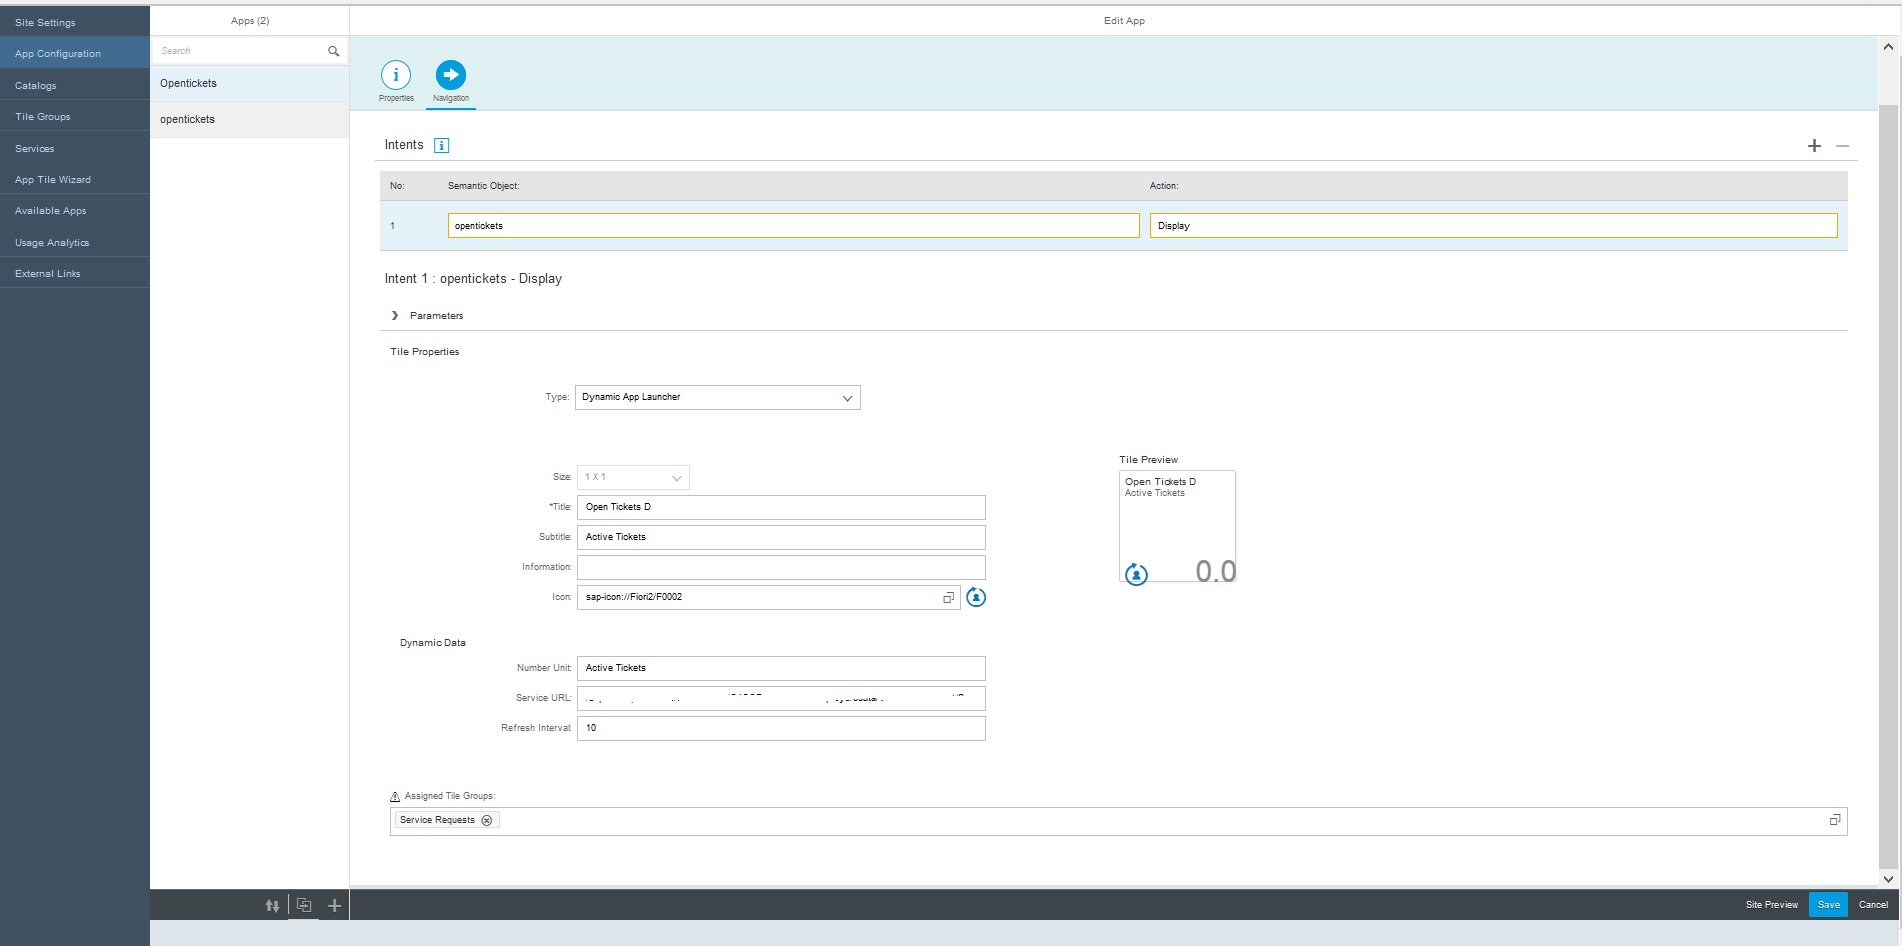
  • We are on the Navigation screen. Here multiple things can be done like pass parameters, classify tile properties, assign tile groups etc. We will mention the tile properties.
  • Enter the details as shown in adjacent figure.
  • Click Finish.
fin.PNG
  • Your application is ready. Click on Preview Site.
  • You can now see the Home page of your ticketing application. Click on the tile to see the application running.

/wp-content/uploads/2015/10/fina_846830.png

/wp-content/uploads/2015/10/qwq_846831.png


Create a New Catalog.


Input Output
  • From the Site Content group of tiles in the Fiori Launchpad’s Configuration Cockpit
  • Click on the Manage Catalog tile tab. The Category Manager is opened with the list of available categories.
opp.PNG

  • Click on the + icon to create a new Category
  • Enter the Name of the category – Service Requests
  • Enter a Description.
  • Click Save
  • Click on the Roles icon to allow public access. Click Edit. Click + to add Everyone to the list. Press OK and Save.
  • Click on the Home icon to return back.

/wp-content/uploads/2015/10/1_806958.jpg


Register to SAP Fiori Launchpad


Input Output
  • If you already closed the “Successfully Deployed” dialog in the SAP Web IDE, right click on the OpenTickets project folder and select Deploy > Register to SAP Fiori Launchpad.The Register to SAP Fiori Launchpad wizard is opened.


  • Go to SAP Web IDE and Click the Register to SAP Fiori Launchpad to make your application available in Fiori Launchpad Sites.
  • Enter the application description in the General Information screen as follows:

Application Name:    OpenTickets

Description:    List of available service requests.


  • Click Next.

      The Tile Configuration screen is opened.Configure the appearance properties of the tile that will launch your application in the Fiori Launchpad site.

/wp-content/uploads/2015/10/1_806958.jpg
  • Enter the details

Type : Static

Title :  Open Tickets

Subtitle: Outstanding open tickets

Icon : Click on the Browse button to select an icon               

5.JPG


  • Click Next. The Assignment screen is opened.
  • Assign the application to the Catalog and Group we defined in the previous section.


Catalog: Service Requests


ass.PNG

  • Click Next.
  • Click Finish in the Confirmation screen. The Successful Registration dialog box opens.
  • Click OK.
5.JPG

Manage Content in a Fiori Launchpad Site

In this section you will add the OpenTickets business applications as content to your Service Center Fiori Launchpad Site and customize application tiles.


Create a New Group of Tiles (applications)

Configure tile groups to organize the related applications in the current Fiori Launchpad site.


Input Output
  • Open the Fiori Launchpad’s Configuration Cockpit
  • Click on the Configure Apps tile from the Site Content group of tiles.

          The Tile Groups Manager is opened with the list of available tile groups

  • Click on the + icon to create a new Group
  • Enter the Name of the Group – Service Requests
  • Select the Catalog as Service Request that was created in previous steps.

ser.PNG

  • Click on the Tiles tab to add applications to this group.
  • Click on the Edit icon below, then the + icon on top right corner to open the list of available applications
  • From the list of application, select the OpenTickets applications
  • Click OK. The application are assigned to the group
  • Click Save

  From the top navigation bar click on the Home icon to return to the Configuration Cockpit.

ser2.PNG

Preview the Fiori Launchpad Site


From the Site Content group of tiles in the Fiori Launchpad’s Configuration Cockpit.


Input Output
  • Click on the Preview Site tile

  The Fiori Launchpad Site is opened in a new browser tab with the application we deployed under the Service Request group of tiles.

  • Click on the tile to launch the ticket application.
  • Click on the Back  or Home  buttons to navigate back to the Launchpad Home page.

new.PNG

/wp-content/uploads/2015/10/1_806958.jpg


Creating a Dynamic Tile.


Input Output
  • Launch your Cloud portal site from SAP HANA Cloud Platform Cockpit.

Goto Services, click on SAP HANA Cloud Portal and then click on Go to Service


Your cloud portal launch pad will be opened.

  • Click on Manage of the Service Center site. Yow will be taken to the Home Page of the Service Center site.

13.PNG

  • Click on App Configuration. This is the place where your all apps are listed.
14.PNG
  • Click on + to create a new dynamic tile.
  • Now you are on the Properties section where you can define the name

           and other important properties of the dynamic tile. Enter the details as shown in the figure.

Component URL: /
Is the relative path from you application root to your Component.js file

SAPUI5 Component Name: OpenTickets
Is the registered name of the SAPUI5 component, defined in the Component.js file, without .Component

HTML5 App Name: employees
Is the name of the deployed HTML5 application

  • Click Save.
15.PNG
  • Click on Navigation icon. You are now on the navigation screen where you give the location of service URL from where the data has to be picked.
  • Enter the details as shown in the figure.


      Service URL       
      Is the URL of an OData query from which data should be read.The format of the URL is as follows:

  /<fiori proxy>/<application id>/destinations/<destination name>/<path to OData service>/<ODatacollection>/<query string>


/sap/fiori/opentickets/destinations/C4CODataServices/sap/byd/odata/v1/

servicerequest/ServiceRequestCollection/$count


This is the query that we have used in this example which shows the KPI of Open Tickets.

  • Click Save.
16.PNG
  • Your dynamic tile is ready. Click on Site Preview.
  • The tile shown here is representing the count of open tickets in the C4C tenant.
17.PNG


Congratulations! You’ve succeeded in developing a support site application and added it to a Fiori Launchpad Site.


Assigned Tags

      10 Comments
      You must be Logged on to comment or reply to a post.
      Author's profile photo Former Member
      Former Member

      Thanks for the important information. Can we somehow make it work offline?

      Author's profile photo Gaurav Dey
      Gaurav Dey
      Blog Post Author

      Yes.. with SMP native application you can leverage the offline capability.. These might help.


      SAP Fiori & SMP


      Getting Started with Kapsel - Part 15 -- Offline OData (New in SP05)


      Author's profile photo Navin Kandasamy
      Navin Kandasamy

      Hi Gauvrav,

      Thanks for sharing this wonderful content.

      I am having a requirement to  Integrate HCP and C4C to carry out the Sales processes in HCP.

      Requirement: Creating a Site for Sales Person to handle the sales processes like  creating and  updating of Accounts,Contacts,Opportunities and Leads  from HCP .

      Kindly provide me details regarding the OData Services which I need to consume for displaying these Sales data  in HCP and also for Creating new set of data and updating the existing data from HCP.

      I am very new to HCP module please share the steps to achieve this requirement.

      Thanks in advance.

      Regards,

      Navin

      Author's profile photo Gaurav Dey
      Gaurav Dey
      Blog Post Author

      Hi Navin,

      Have a look at your metadata for which fields to consume and regarding the creation and updation you have to perform CRUD operations.

      Author's profile photo Former Member
      Former Member

      Hi Gaurav, great content
      My scenario is to create a service ticket in c4c using hcp...i'm able to consume the data using odata services  https://myxxxxxx.crm.ondemand.com/sap/c4c/odata/cust/v1/iot/$metadata but i'm unable to create a ticket.I am using CRUD master application to achieve this..Please help me with your valuable inputs.
      Thanks in advance.
      Regards,
      Giridhar

      Author's profile photo Gaurav Dey
      Gaurav Dey
      Blog Post Author

      Hi Giridhari,

      Thanks for trying this blog. What error are you receiving ?

      Regards,
      Gaurav Dey

      Author's profile photo Sohil Vidja
      Sohil Vidja

      Hi Gaurav,

      Thanks for the writing this blog. Nowadays it seems very applicable for various cloud solutions.

      In above example, how does user to customer mapping work? meaning how do portal user gets his/her service tickets and customers from C4C?


      Thanks,

      Sohil.

      Author's profile photo Gaurav Dey
      Gaurav Dey
      Blog Post Author

      Hi Sohil,

      If I understood your question correctly then you want external users to access your portal site where the C4C app is displayed, then you need to configure those users or their IdP on SAP CP and set the trust between them. Once it's done then the user will get authenticated once they access the portal site.

      If this is not what you were asking kindly elaborate the question.

      Regards,

      Gaurav Dey

      Author's profile photo Sohil Vidja
      Sohil Vidja

      Hi Gaurav,

      Thanks for your response.

      My question is in terms of user to C4C mapping. So if user X is a contact person working for customer A, and using UI5 app. In that case, user data like service tickets, customers needs to be retrieved from C4C. and for that query might be something like

      a. get contact person of user using email address

      b. get customers using contact person

      c. get list of service ticket associated for those customers.

      In order to read all of these user specific details. Is there a standard integration available or it has be developed using oData service? And are these details needs to be persisted in SCP  or retrieved every time user logs in?

      Thanks

      Sohil.

      Author's profile photo Julius Pereira
      Julius Pereira

      Hi Gaurav,

      We want to roll the customer portal for multiple customers. My question is how can we allow each customer to see only their tickets and prevent them from seeing other customers tickets?

      Is this possible out of the box through setup or do we need to custom develop the app for this functionality?


      Thank you

      Julius