
- SAP Community
- Products and Technology
- CRM and Customer Experience
- CRM and CX Blogs by SAP
- How to- SDK/PDI for Key Users and Admins, Part 3- ...
CRM and CX Blogs by SAP
Stay up-to-date on the latest developments and product news about intelligent customer experience and CRM technologies through blog posts from SAP experts.
Turn on suggestions
Auto-suggest helps you quickly narrow down your search results by suggesting possible matches as you type.
Showing results for
Former Member
Options
- Subscribe to RSS Feed
- Mark as New
- Mark as Read
- Bookmark
- Subscribe
- Printer Friendly Page
- Report Inappropriate Content
09-30-2015
8:21 PM
Part 3- How to manage the lifecycle of SDK solutions (create/delete, import/export, patch, activate/deactivate)
The main difference between doing changes between SDK and KUT is that in SDK all changes are packaged together by a concept called a SDK solution. When you activate, deactivate, or delete the solution, it adds, removes, deletes all the changes together. There is an excellent detailed blog by Stefan Krauth that describes how you organize your SDK solutions and how you deploy them, patch them, in both simple and complex tenant landscapes. The online help is also an excellent resource (access to online help explained in previous blog here ) and explains how to manage the SDK solutions if there are topics not covered in this how to.
SAP Cloud Applications Studio Deployment & Landscape Basics
The most common “admin” scenarios are:
- Importing Solution Templates
- Viewing the status of the uploaded solutions
- Activating, deactivating, and cleaning solutions
- Deleting solutions
- Importing/Exporting solutions and patches
Once you have setup SDK key users, installed SDK, and successfully logged into SDK, you are ready to upload your first SDK solution. This blog will show how-to upload an SDK solution template and manage that solution in your development/sandbox tenant. Best practice is that a development/sandbox tenant always be used as your starting tenant to try/create new SDK solutions and make changes to existing ones.
SDK solution templates are re-usable solutions that can be imported into any C4C tenant independent of where the SDK solution template was created. Creating SDK solution templates is a unique usecase. Use the online help to get more details.
Importing Solution Templates
Step 1- Before you can import a solution template, you will need to create a customer specific solution to import the template into with the Solution Explorer. A customer specific solution allows you to "customize" the template specific to customer requirements, whereas a solution template is generic and can be reused for any customer. It is expected you use the solution template as a starting point and customize it per customer requirements.
Lets begin with viewing which SDK solutions have been uploaded into the tenant with the Solution Explorer.
To open the Solution Explorer… Go to View -> Solution Explorer.


To create a new customer specific SDK solution… Right click on My Solutions in the solution explorer and choose "Create Solution”. Choose customer specific solution and CRM deployment unit

Choose Customer Specific Solution and Customer Relationship Management deployment unit.

Step 2- After the customer specific solution is created, you are ready to import the Solution Template into it.
To import a Solution Template into the Customer Specific Solution… Open the Implementation Manager of the Customer Specific Solution you created. To open the Implementation Manager, double click on the solution in the Solution Explorer and it will load the Implementation Manager. Choose the Import Solution Template option and choose a SDK solution template zip file. If you need an example SDK solution template download one here.

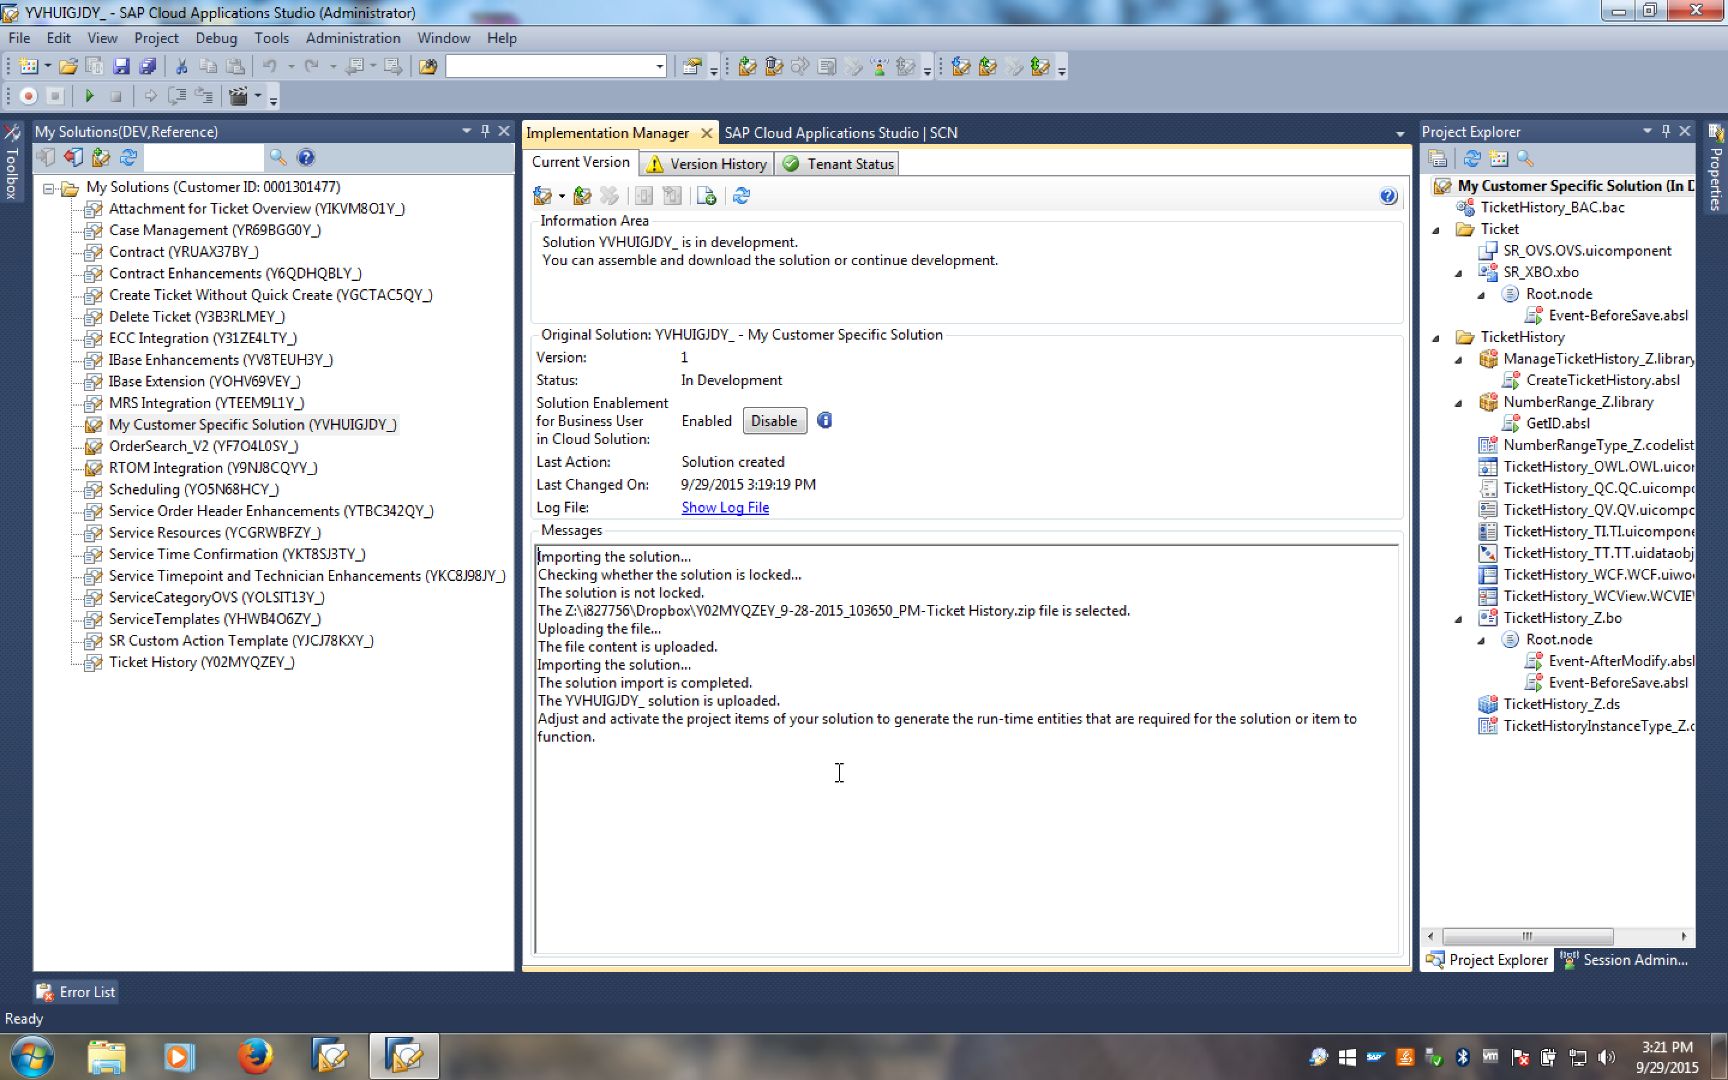
Viewing the status of uploaded solutions
Depending on the size of the Solution Template, it may take a few minutes for the import process to complete. To check the status of the import, use the Implementation Manager Messages, Log Files, and Version History features to check if the import completed.

Activating, deactivating, and cleaning solutions
When you import SDK content or make SDK content changes, those changes are uploaded to the tenant, but are not active until you activate the content. You can either activate the entire solution in one shot or each individual file. When the solution or parts of the solution is not activated, you will see a red dot next to the solution file in the project explorer.
Step 1- To open the project explorer (if the widget is not available already) to activate SDK content… Go to View -> View -> Project Explorer. In this example below you will see the the TicketHistory_Z.bo has been changed and has not been activated.
To activate a specific element in the Project Explorer… Right click on it and choose the “Activate” option.

To activate the entire project… Right click on the project name at the top of the Project Explorer and choose Activate -> All Items.

Step 2- To see the changes in your tenant, login into your tenant with the same SDK key user. If the SDK solution contains a new work center (as indicated by the TicketHistory_WCF file), you will need to add this work center to the business roles that need access to this UI and refresh the session to get access to it.

In this example, there is a new Ticket History Work Center. If you activated the solution fully and added the Work Center to the Business Role/User correctly, then you will have an active solution in your tenant and be able to see the Work Center as shown below.

Step 3- As you do testing, you will probably create test data. If you want to delete the test data, use the Clean feature. This will only be allowed for SDK solution that is “In Development” status. You are not allowed to Clean data for solutions in “Deployed” status.
To delete test data… Go to Project Explorer, find the business object you want to delete its data, right click on it and choose the Clean option.


Deactivating Solutions
To deactivate the solution from further usage by end users, then you can “Disable” it in the Implementation Manager. You can always “Enable” and then re-activate it later anytime.
To Disable the solution… Go to the Implementation Manager and click on the Disable button. Once the solution is disabled it will tell you that status in the Messages component of the Implementation Manager.


Deleting Solutions
To Delete an unused or old SDK solution that is not relevant and to maintain a clean development/sandbox environment, you can Delete the solution. This is a permanent configuration change and you will loose all test data captured, as well as any configuration changes. Once you delete, there is no way to recover/reapply your changes unless you upload or import the solution again.
To Delete the solution, Go to the Solution Manager, right click on the solution and choose Delete.


Downloading, Copying, Uploading solutions and creating Patches
Until now we went through the entire lifecycle of importing a Solution Template into a Customer Specific Solution, activating it, deactivating it, and ultimately deleting it.
The process of then moving the Customer Specific Solution from your development/sandbox tenant into your test, QA, and production landscape is done through Downloading, Copying, and/or patching the solution from your development tenant/sandbox. Details of which option to use is described well in Stefan’s blog mentioned earlier.
Lets use a basic example where you want to move your newly created Customer specific Solution from your development/sandbox tenant into a test environment. This is done through using the Download and Assemble feature. Once you “Assemble” the solution this locks the solution from further changes so you can upload an exact replica of the assembled solution in all of your other tenants. You then version this assembled solution by creating patches and deploying the patch on the other tenants just like how you would upload the assembled solution.
Step 1- To Download and Assemble the solution… Go to the Implementation Manager. Click on the "Assemble and Deploy" option in the "Current Version” tab. FYI… The "Download a Copy” will make a copy of the SDK solution as a new name space/solution name, which is similar to doing a "code split" so you have another similar (but different) solution with a different lifecycle.


Step 2- The Implementation Manager will ask you to save the SDK solution file as a ZIP. Rename the file to remove the special characters such as “/“ and “(“ and “)” in the file name. I usually replace it with “-“.

You will need to make sure the entire SDK solution is checked in and active. If it is not, an error is thrown and it will tell you to correct this. In this example, a particular SDK file was changed but not checked into the repository.

Notice the red check mark next to the “SR _XBO”. Right click on it and check in any checked out content. Repeat the Assemble and Download process again.
To check in SDK content… Right click on the SDK solution explorer element that has a red check mark, and choose “Check-In"

Uploading Solutions
When you want to upload a Customer Specific Solution into another one of your tenants, open the Implementation Manager and choose the Upload option. You will be given a file explorer to choose the downloaded solution you did above. If the same Customer Specific Solution exists in the tenant already, (with the same name/name space ID-> you can find the name space ID by the Yxxxyyyzzz ID suffix) the upload option will overwrite the solution with the uploaded version. As a note, you will not be allowed to upload a Customer Specific Solution if the customer ID from where the solution is downloaded/copied is not the same as the customer ID to where the solution is uploaded to prevent the transport of customer specific IP to another customer easily.
If you need to export/import solutions independent of the customer ID then you would need to use Solution Templates explained earlier.
To upload a Customer specific Solution… Go to Implementation Manager and click on the Upload option and choose a SDK solution zip file you either Downloaded or Copied from another tenant.

Summary
In summary, this blog highlights the major activities a SDK key user could do to maintain the SDK solutions on a tenant. The online help and the SCN community for SDK are excellent resources to get more details and other tips and tricks to manage your solutions in the most effective way.
Thank you and have fun!
Rei Kasai
VP, Product Management
Cloud for Customer
- Go back to How to- SDK/PDI for Key Users and Admins
- Go to previous Blog in Series How to- SDK/PDI for Key Users and Admins, Part 2- Use the Repository Explorer to view the Public Sol...
- Go to next Blog in Series How to- SDK/PDI for Key Users and Admins, Part 4- Use the Debugger to do Root Cause Analysis of prob...
- SAP Managed Tags:
- SAP Cloud for Customer add-ins
3 Comments
You must be a registered user to add a comment. If you've already registered, sign in. Otherwise, register and sign in.
Labels in this area
-
Business Trends
270 -
Business Trends
11 -
chitchat
1 -
customerexperience
1 -
Event Information
256 -
Event Information
18 -
Expert Insights
30 -
Expert Insights
51 -
Life at SAP
133 -
Life at SAP
1 -
Product Updates
666 -
Product Updates
24 -
SAP HANA Service
1 -
SAPHANACloud
1 -
SAPHANAService
1 -
Technology Updates
453 -
Technology Updates
15
Top kudoed authors
| User | Count |
|---|---|
| 5 | |
| 2 | |
| 2 | |
| 2 | |
| 2 | |
| 1 | |
| 1 | |
| 1 | |
| 1 | |
| 1 |