Hello Everyone,
This blog shows you, how to secure the communication between HANA Server and HANA Studio through SSL. It is highly recommended when there are lot of sensitive data handled in the system, which you want to secure from the middle-man attacks. There could be multiple documents available in SCN on this topic, but here I wants to show my experience on setting this up, in short time.
Pre-requisites:
- HANA Server is installed and running
- HANA studio is installed in the local system
- Access to the HANA server
- Putty / WinSCP tools
HANA Server and client without SSL configured:

 Steps need to be performed in HANA Server:
Login to HANA server system using Putty, as a root user and check if the libssl.so file exists. If not, create a symbolic link to libssl.so.0.9.8.

Now login to HANA server system, as a “<sid>adm” user.
 Create the Root Certificate:
- Go to Home directory “/usr/sap/<sid>/home”
- Create directory with a same “.ssl”
- Get into “.ssl” directory

4. Execute the following command
openssl req -new -x509 -newkey rsa:2048 -days 3650 -sha1 -keyout CA_Key.pem -out CA_Cert.pem -extensions v3_ca
5. Enter the relevant details

6. This will create couple of files (CA_Cert.pem and CA_Key.pem) in “.ssl” directory
 Create the Server Certificate:
- Get into “.ssl” directory
- Execute the following command and Enter the relevant details
openssl req -newkey rsa:2048 -days 365 -sha1 -keyout Server_Key.pem -out Server_Req.pem -nodes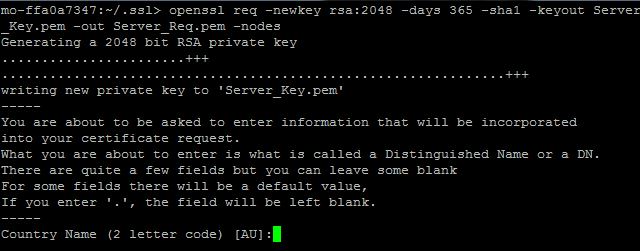

3. This will create a couple of additional files (Server_Key.pem and Server_Req.pem) in “.ssl” directory
4. At this time, you will have 4 .pem files under “.ssl” directory
 Sign the Server Certificate:
- Get into “.ssl” directory
- Execute the following command and Enter the relevant details
openssl x509 -req -days 365 -in Server_Req.pem -sha1 -extfile /etc/ssl/openssl.cnf -extensions usr_cert -CA CA_Cert.pem -CAkey CA_Key.pem -CAcreateserial -out Server_Cert.pem

3. At this time, you will additionally have one new .pem file(Server_Cert.pem) and one new .srl file(CA_Cert.srl) created under “.ssl” directory as shown above
Chain the Certificate:
- Get into “.ssl” directory
- Execute the following command
cat Server_Cert.pem Server_Key.pem CA_Cert.pem > key.pem
3. At this time, you will additionally have one new .pem file(key.pem) created under “.ssl” directory. Totally there will be 7 files under this directory
 Copy the Certificate:
- Get into “.ssl” directory
- Execute the following command
cp CA_Cert.pem trust.pem
3. This will create one new trust.pem file, as you just did a copy
 Restart HANA Server:
- Go to /usr/sap/<sid>/HDB<InstNo>
- Stop the HANA Server using ./HDB stop and then start the HANA server using ./HDB start
 Steps need to be performed in HANA Studio:
Copy “trust.pem” to local client:
Steps need to be performed in HANA Studio:
Copy “trust.pem” to local client:
Using WinSCP Tool copy the trust.pem from “.ssl” directory to c:\temp\
 Import “trust.pem”:
- As user ‘Administrator’, or with administrative access, import trust.pem into Java’s keystore. This can be done as below
- Copy the Java bin directory location from HANA Studio

3. Run the Command prompt (with Run As Administrator), and go to Java bin directory location copied above

4.
Execute the command keytool.exe -importcert -keystore "C:\Program Files\SAP\hdbstudio_Rev93\plugins\com.sap.ide.sapjvm.jre.win32.x86_64_81.0.0\jre\lib\security\cacerts" -alias HANServer -file c:\temp\trust.pem

5. Enter the keystore password and the default password for the Java keystore is “changeit”. Once the password is entered, and the certificate details will be shown. Enter “yes” to trust the certificate

6. Now the Certificate would be added to the keystore
 Enable SSL Communication:
- Close HANA Studio(if it’s opened already)
- Open the HANA Studio and go to Administrator’s perspective, right click and add the HANA system (MK2 in our case)
- Enable “Connect using SSL”, in the Connection Properties dialog and click Finish

4. Now hover the added HANA(MK2) system, you will observe a small lock on the system along with SSL indication in the tooltip as shown below
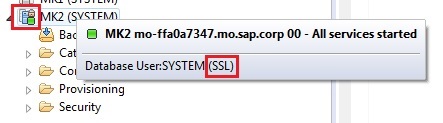
Now the SSL has been configured between HANA Server and HANA Studio and the communication is secured.
Hope this helps.
Rgds,
Murali
