
- SAP Community
- Products and Technology
- Additional Blogs by Members
- Step-By-Step, End-To-End Guide to Building a SAP F...
Additional Blogs by Members
Turn on suggestions
Auto-suggest helps you quickly narrow down your search results by suggesting possible matches as you type.
Showing results for
laszlo_kajan2
Active Participant
Options
- Subscribe to RSS Feed
- Mark as New
- Mark as Read
- Bookmark
- Subscribe
- Printer Friendly Page
- Report Inappropriate Content
09-21-2015
7:38 AM
Foreword
Part 1 of this blog post introduced a quality management Fiori-like SAPUI5 app, and covered the details of creating an OData service for it. This part covers the steps taken to create the Fiori-like SAPUI5 quality management app from scratch.
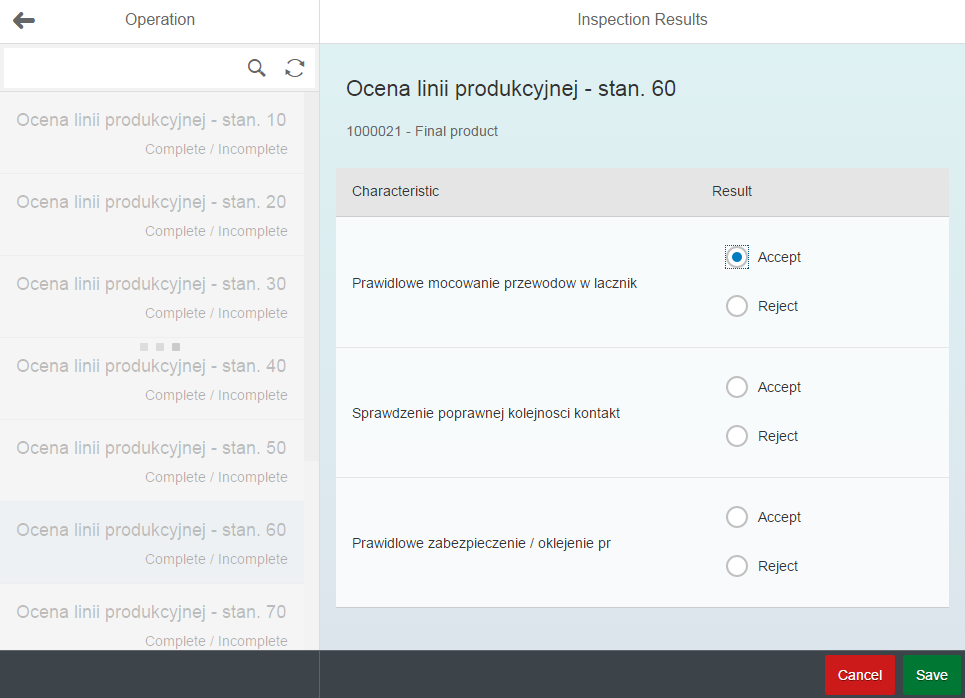
The example app is for recording results for quality management. It could be used by the quality inspector to record results using a tablet, walking down the line.
The presented app is not a reference. Its purpose is to demonstrate key solutions involved in providing the required functionality.
This blog was made possible by itelligence Sp. z o.o. Thanks to Artur Wojciechowski and Piotr Pudelski for supporting the creation of this blog.
Overview
App development
- Design considerations (blog post part 1)
- OData service
- Fiori-like SAPUI5 app (blog post part 2)
- Development environment for Fiori-like SAPUI5 app
- Web IDE
- SAP HANA Cloud Connector
- Set up own git server
- Web IDE
- Displaying inspection results
- Recording inspection results
- Development environment for Fiori-like SAPUI5 app
Table of contents
Creating the Fiori-like SAPUI5 app
Development environment
SAP Web IDE
This tutorial shows how to use the SAP Web IDE with an on-premise SAP system. The system is connected to the SAP Web IDE using the SAP HANA Cloud Connector.
SAP HANA Cloud Connector
Follow the 'How-to setup the SAP HANA Cloud Connector for secure on-premise connectivity' tutorial to download and install the SAP HANA Cloud Connector (productive version recommended) on a host on the network of the application server.
Set on-premise resources and additional properties as prescribed in SAP Web IDE Developer Guide - Connecting Remote Systems:
- Configure the following on-premise resources in the Cloud Connector Administration / Access Control / Virtual_host_for_your_application_server:
/sap/opu/odata - Path and all sub-pathsURL Path Access Policy /sap/opu/odata Path and all sub-paths /sap/bc/ui5_ui5 Path and all sub-paths /sap/bc/adt Path and all sub-paths /sap/bc/bsp Path and all sub-paths /sap/hba Path and all sub-paths /plugins/pluginrepository Path and all sub-paths - Additional Properties in the Cloud Platform Cockpit / Destinations:
- sap-client = <your_sap_client>
- WebIDEEnabled = true
- WebIDESystem = <your_SID>
- WebIDEUsage = odata_abap,odata_gen,ui5_execute_abap,dev_abap,bsp_execute_abap,plugin_repository,odata_xs,api_mgmt_catalog,api_mgmt_proxy
git server
Git is used by the SAP Web IDE for version control. While not mandatory, connecting the SAP Web IDE project to git has the benefit of allowing experiments with the code. After testing an idea on a 'branch', it is very easy to switch to another state of the project on another 'branch'.
- A Linux server with Apache is configured to act as git server, and host the repository for the source code of the app. The configuration is based on the example at Git on the Server - Smart HTTP. Example '/etc/apache2/sites-enabled/default-ssl':
# git access (HTTPS)

SetEnv GIT_PROJECT_ROOT /home/git/opt/git

SetEnv GIT_HTTP_EXPORT_ALL

SetEnv REMOTE_USER=$REDIRECT_REMOTE_USER

ScriptAlias /git/ /usr/lib/git-core/git-http-backend/

<Directory "/usr/lib/git-core*">

    Options ExecCGI Indexes

    Order allow,deny

    <IfVersion < 2.4>

        Allow from all

    </IfVersion>

    <IfVersion >= 2.4>

        Require all granted

    </IfVersion>

</Directory>

#<LocationMatch "^/git/.*/git-receive-pack$">

<LocationMatch "^/git">

    AuthType Basic

    AuthName "Git Access"

    # htpasswd [-c] /home/git/.htpasswd S1234564825

    AuthUserFile /home/git/.htpasswd

    Require valid-user

</LocationMatch>
- Prepare the project repository in git. On the git server:
cd /home/git/opt/git

mkdir ZTUT_QM_00.git

cd ZTUT_QM_00.git

git --bare init --shared

cd /tmp

mkdir ZTUT_QM_00.git

cd ZTUT_QM_00.git

touch .gitignore

git init

git add .

git commit -m "Initial commit"

git remote add origin https://S1234564825@yourserver.com/git/ZTUT_QM_00
git push --set-upstream origin master
Further reading
Displaying inspection results

The quality management result recording app is created using the 'SAP Fiori Master Master Detail Application' template in the SAP Web IDE.
- Start the SAP Web IDE
- On your SAP HANA Cloud Platform Cockpit, click 'Subscriptions' / 'webide' / 'Application URL'
- Create a new project
- File / New / Project from Template
- Choose 'SAP Fiori Master Master Detail Application', 'Next'
- Project name: 'ZTUT_QM_00'
- Service Catalog
- Choose destination for application server connected via the Cloud Connector
- Look up and select service 'ZTUT_QM_00_SRV', 'Next'
- Project namespace: 'tut.qm'
- Master 1 Section
- Title: 'Order'
- OData Collection: 'InspLotSet'
- Search Field: 'OrderNo'
- Master 1 Data Fields:
- Item Title: 'OrderNo'
- Attribute 1: 'TxtMat'
- Master 2 Section
- Title: 'Operation'
- OData Collection Navigation: 'InspLotOpSet' (automatically selected)
- Search Field: 'TxtOper'
- Master 2 Data Fields
- Item Title: 'TxtOper'
- Detail Section
- Title: 'Inspection Results'
- Attribute 1: 'TxtOper'
- 'Next'
- 'Finish'
- Test new project
- Run (Alt+F5)
- Note how searching in both the master and master2 lists is already functional
- Note how inspection lots in the master list are not ordered by their order number
- Note how inspection operations are not limited to the range <= 100 and <= 499
- Note how the detail section header displays only the inspection operation description, the inspection lot number and description is missing
- Note how the detail section does not list inspection characteristics
- Run (Alt+F5)
- Push the project into git
- Choose 'File' / 'Export' and save the project 'zip'
- Delete the project from the Web IDE :!:
- Choose 'File' / 'Git' / 'Clone Repository'
- Right click 'ZTUT_QM_00' project, choose 'Import' / 'From File System', choose 'zip' file saved above, 'OK'
- Open the git pane 'Ctrl+Shift+V'
- Click 'Stage All'
- Commit Description: 'Initial project from template'
- Click 'Commit and Push' / 'origin/master'
- Fill in your email address and name, 'OK'
- On the right, under the 'SAP' logo, 'Push has been completed' should appear for a while
- Tidy up the repository
- Create a new folder 'controller' in the project
- Move (cut and paste) all the controllers from 'view' to 'controller'
- Replace 'view' with 'controller' on 'sap.ui.core.mvc.Controller.extend' line of controller files
- Replace 'view' with 'controller' on 'mvc:View controllerName' lines of view files
- Make sure the app still works, then commit and push the changes with message 'Moved controllers to controller folder'
Ordering items of the master list
Order the master list by order number:
- Edit 'view/Master.view.xml' / <List> element 'master1List'
- Change the 'items' property to "{path: '/InspLotSet', sorter: [{path: 'OrderNo', descending: false}]}"
- 'Save' and 'Test' the project: the master list is now ordered
- Commit and push your changes with a descriptive message
Filtering the inspection operation list
Filter the inspection operation list to range >= 100 and <= 499:
- Edit 'view/Master2.view.xml' / <List> element 'master2List'
- Change the 'items' property to "{path: 'InspLotOpSet', filters: [{path: 'Inspoper', operator: 'BT', value1: '0100', value2: '0499'}]}"
- 'Save' and 'Test' the project: the master2 list is now filtered. Note that searching works as before.
Displaying the inspection lot number and description on the detail view
These properties are available for inspection operations via the navigation property 'InspLot'.
- Edit 'view/Detail.view.xml' / <ObjectHeader> / <attributes> / <ObjectAttribute> element
- Set property 'text' to '{InspLot/OrderNo} - {InspLot/TxtMat}'
- Edit 'controller/Detail.controller.js' / 'bindView' function
- Change 'oView.bindElement' to 'oView.bindElement(sEntityPath, {expand: "InspLot"});'
- Prevent the master2 list from jumping to the first item when the response from the 'expand' query arrives ('updateFinished' event):
- Edit 'controller/Master2.controller.js' / 'onRouteMatched' function
- Change the anonymous function of 'this.byId("master2List").attachUpdateFinished' to:
this.byId("master2List").attachUpdateFinished(function(oEvent) {

  var m2List = oEvent.oSource;

  if (!m2List.getSelectedItem()) {

    that.selectFirstItem();

    oEventBus.publish("Master2", "LoadFinished", {

      oListItem: m2List.getItems()[0]

    });

  }

});
- Change the anonymous function of 'this.byId("master2List").attachUpdateFinished' to:
- Edit 'controller/Master2.controller.js' / 'onRouteMatched' function
- Test the app
Displaying inspection characteristics and corresponding results
Displaying inspection characteristic results, along with the option to edit, is implemented in custom control 'ResultControl'. The control ensures a clean interface and localisation of implementation code.
- Create custom control 'ResultControl':
- Create new file in project: 'control' (new folder) / 'ResultControl.js' (new file)
/*     This file is part of ZTUT_QM_00 - SAPUI5 Tutoral App

     scn.sap.com/people/laszlo.kajan/blog/2015/09/17/step-by-step-end-to-end-guide-to-building-a-sap-fiori-like-sapui5-app--part-2

*/

sap.ui.core.Control.extend("tut.qm.control.ResultControl", {

     metadata: {

          properties: {

               closedch: {

                    type: "string"

               },

               code1ch: {

                    type: "string" /*, defaultValue: "0"*/

               }, // "OK", "NOK"


               okcode: "string",

               nokcode: "string"

          },

          aggregations: {

               "_hl": {

                    type: "sap.ui.layout.HorizontalLayout",

                    multiple: false,

                    visibility: "hidden"

               }

          },

          events: {

               "change": { // attachChange, detachChange, fireChange

                    parameters: {

                         property: "string",

                         bindingContext: "sap.ui.model.Context",

                         bindingPath: "string",

                         newValue: "any"

                    }

               }

          }

     },

     init: function() {

          var hl = new sap.ui.layout.HorizontalLayout(this.getId() + "-hl", {});

          this.setAggregation("_hl", hl, true); /* no re-rendering needed on property change */


          hl.addContent(this._rs = new sap.m.ObjectStatus(this.getId() + "-resStat", {

               text: undefined,

               icon: undefined

          }));

     },

     exit: function() {},

     updateAllParts: function() {

          var that = this;

          var closedch = this.getClosedch();

          var code1ch = this.getCode1ch();

          var hl = this.getAggregation("_hl");

          var initialCode1 = !code1ch;

          var okcode = this.getOkcode();

          var nokcode = this.getNokcode();


          if (!this._rsw) {

               hl.insertContent(this._rsw = new sap.m.RadioButtonGroup(this.getId() + "-resSw", {

                    columns: 1,

                    valueState: "None",

                    buttons: [{

                         text: "{i18n>evalAccept}"

                    }, {

                         text: "{i18n>evalReject}"

                    }],

                    selectedIndex: 2,

                    select: function(oEvent) {

                         var selidx = oEvent.getParameter("selectedIndex");

                         var newValue = selidx === 0 ? okcode : nokcode;

                         that._rsw.setValueState(selidx === 0 ? "Success" : "Error");

                         that._rs.setIcon("sap-icon://decision");


                         that.fireChange({

                              property: "code1ch",

                              bindingContext: that.getBindingContext(),

                              bindingPath: that.getBindingPath("code1ch"), // entity property name

                              newValue: newValue

                         });

                    }

               }), 0);

          }

          if (!initialCode1) {

               var selidx = (code1ch === okcode) ? 0 : 1;

               this._rsw.setSelectedIndex(selidx);

               this._rsw.setValueState(selidx === 0 ? "Success" : "Error");

          } else {

               this._rsw.setSelectedIndex(2);

               this._rsw.setValueState("Success");

          }


          if (closedch === "X") {

               if (this._rsw) {

                    this._rsw.setEnabled(false);

               }

               if (this._ri) {

                    this._ri.setEnabled(false);

               }

               this._rs.setIcon("sap-icon://locked");

          } else {

               if (this._rsw) {

                    this._rsw.setEnabled(true);

               }

               if (this._ri) {

                    this._ri.setEnabled(true);

               }

               this._rs.setIcon("");

          }

     },

     renderer: {

          render: function(oRm, oControl) {

               oControl.updateAllParts();

               oRm.write("<div");

               oRm.writeControlData(oControl);

               oRm.addClass("ResultControl");

               oRm.writeClasses();

               oRm.write(">");

               oRm.renderControl(oControl.getAggregation("_hl"));

               oRm.write("</div>");

          }

     }

});

/*     This file is part of ZTUT_QM_00 - SAPUI5 Tutoral App

     scn.sap.com/people/laszlo.kajan/blog/2015/09/17/step-by-step-end-to-end-guide-to-building-a-sap-fiori-like-sapui5-app--part-2

*/ - Create texts 'evalAccept' and 'evalReject' in 'i18n/messageBundle.poperties' (e.g. 'Accept', 'Reject')
- Create new file in project: 'control' (new folder) / 'ResultControl.js' (new file)
- Edit 'view/Detail.view.xml' / '<Page>' / '<content>'
- Remove the '<IconTabBar>'
- Right click 'Detail.view.xml', choose 'Open With' / 'Layout Editor'
- Add a table with two columns to '<content>' (remove additional headers and cells as needed)
- Use the 'Outline' (Ctrl+Shift+U) to select a table item
- Check 'Set as template'
- Close the layout editor
- Edit 'view/Detail.view.xml' / '<Page>' / '<content>' / '<table>'
- Set 'items' to '{InspLotOpCharSet}'
- Set static texts using internationalization (i18n) text bundle
- Set 'noDataText' to '{i18n>detailListNoDataText}'
- Set the two '<Column>' / '<header>' / '<Label>' / 'text's to '{i18n>detailCol1Header}' and '{i18n>detailCol1Header}' respectively
- Create the referenced texts in 'i18n/messageBundle.poperties' (e.g. 'No characteristics', 'Characteristic', 'Result')
- Edit '<items>' / '<ColumnListItem>' / '<Cells>'
- Set the 'text' of the first cell ('<Text>' element) to '{CharDescr}'
- Replace the second '<Text>' element with the custom control:
<c:ResultControl change="onResultChanged" closedch="{ClosedCh}"

  code1ch="{Code1Ch}" id="idDetailResultCont" nokcode="NOK" okcode="OK"/>
- Add namespace 'c' to the view:
- Edit '<mvc:View>', add new property 'xmlns:c="tut.qm.control"'
- Set the vertical alignment of table cell contents to 'middle'
- Edit 'Detail.view.xml'
- Add 'vAlign="Middle"' property to '<ColumnListItem>' element
- In order to align the status icon inside the custom control, edit 'index.thml'
- Add CSS code after '<link rel="stylesheet"/>':
<style type="text/css">

  .ResultControl .sapUiHLayoutChildWrapper {

    vertical-align: middle;

  }

  .ResultControl .sapMObjStatus {

    padding-left: 1em;

  }

</style>
- Add CSS code after '<link rel="stylesheet"/>':
- Edit 'Detail.view.xml'
- Commit and push your changes with a descriptive message
Further reading
Recording inspection results
When the user enters inspection results by choosing 'Accept' or 'Reject', the following should take place:
- The choice is recorded in data model 'draftModel', and the control is switched to this model
- Input area receives exclusive focus, all other controls are deactivated
- 'Cancel' and 'Save' buttons are activated
Draft data model
- Create new controller 'Application' for the whole application. This controller creates the draft data model 'draftModel', along with the application model 'appProperties'.
- Right click 'controller' folder, choose 'New' / 'File' / 'Application.js':
/*     This file is part of ZTUT_QM_00 - SAPUI5 Tutoral App

     scn.sap.com/people/laszlo.kajan/blog/2015/09/17/step-by-step-end-to-end-guide-to-building-a-sap-fiori-like-sapui5-app--part-2

*/

sap.ui.define([

     "sap/ui/base/Object",

     "sap/ui/model/json/JSONModel"

], function(Object, JSONModel) {

     "use strict";

     return Object.extend("tut.qm.controller.Application", {

          // This class serves as controller for the whole App

          constructor: function(oComponent) {

               this._oComponent = oComponent;

          },

          init: function() {

               this._oAppModel = new JSONModel({

                    applicationController: this,

                    btnSaveEnabled: false,

                    busyForDetailChange: false,

                    errClassCh: "01", // Customization for insp. lot 030000000051

                    master2PageBusyIndicationDelay: undefined, // whatever is the element's default

                    sampleCloseOnSave: "" // [""|"X"] for testing

               });

               this._oComponent.setModel(this._oAppModel, "appProperties");


               this._oDraftModel = new JSONModel({

                    //"key": {CharDescr: "desc1", ...}          // contains changed characteristic entities

               });

               this._oComponent.setModel(this._oDraftModel, "draftModel");

          }

     });

});

/*     This file is part of ZTUT_QM_00 - SAPUI5 Tutoral App

     scn.sap.com/people/laszlo.kajan/blog/2015/09/17/step-by-step-end-to-end-guide-to-building-a-sap-fiori-like-sapui5-app--part-2

*/ - Instantiate and initialize 'Application' in 'Component.js'
- Add 'jQuery.sap.require("tut.qm.controller.Application");' at the top of the file
- Add to the init() function of 'tut.qm.Component':
this._oApplicationController = new tut.qm.controller.Application(this);

this._oApplicationController.init();
- Right click 'controller' folder, choose 'New' / 'File' / 'Application.js':
Cancel and save buttons
Add 'Cancel' and 'Save' buttons to the detail view. Bind the 'active' property of the buttons to 'appProperties>btnSaveEnabled'.
- Insert into 'Detail.view.xml' / '<footer>' / '<Toolbar>':
<Toolbar>

  <ToolbarSpacer/>

  <Button id="idBtnCancel" press="onCancelPressed" text="{i18n>btnCancel}" type="Reject"

    enabled="{appProperties>/btnSaveEnabled}"/>

  <Button id="idBtnSave" press="onSavePressed" text="{i18n>btnSave}" type="Accept"

    enabled="{appProperties>/btnSaveEnabled}"/>

</Toolbar> - Create 'i18n' texts 'btnCancel' and 'btnSave'
- Preview the application. Note how the new buttons are inactive.
- Commit and push your changes with a descriptive message
Handling inspection characteristic user input
- Record user choice in draft data model 'draftModel', and switch changed control to draft data model
- Implement the 'onResultChanged' event handler of custom control '<c:ResultControl>'
- Edit 'Detail.controller.js' function 'tut.qm.controller.Detail.onInit', add lines to top of function:
var oComponent = this.getOwnerComponent();

this._oAppModel = oComponent.getModel("appProperties");

this._oApplicationController = this._oAppModel.getProperty("/applicationController"); - Edit 'Detail.controller.js' and add method to 'tut.qm.controller.Detail':
onResultChanged: function(oEvent) {

  this._oApplicationController.onDetResultChanged(oEvent);

}
- Edit 'Detail.controller.js' function 'tut.qm.controller.Detail.onInit', add lines to top of function:
- Add method to 'tut.qm.controller.Application':
onDetResultChanged: function(oEvent) {

     // Registering the change for later 'Save'

     // bCon.sPath = "/InspLotOpChardetColl(Insplot='030000000005',Inspoper='0020',Inspchar='0010',ResNoSi='0000')"

     var bCon = oEvent.getParameter("bindingContext"); // sap.ui.model.Context

     var bKey = bCon.getModel().getKey(bCon, false);

     //console.log(bKey);

     if (!(this._oDraftModel.oData[bKey] instanceof Object)) {

          var li = oEvent.oSource.getParent(); // list item

          this._oDraftModel.setData(

               function() {

                    var o = {};

                    o[bKey] = bCon.getProperty();

                    o[bKey]._listItem = li;

                    return o;

               }(),

               true);

          li.setModel(this._oDraftModel);

     }

     this._oDraftModel.setProperty(bCon.sPath + "/" + oEvent.getParameter("bindingPath"),

          oEvent.getParameter("newValue"), undefined, false); // no need to re-render bound element

}
- Implement the 'onResultChanged' event handler of custom control '<c:ResultControl>'
- Deactivate master2 input area, deactivate detail area navigation (back) button, activate save and cancel buttons
- Edit 'tut.qm.controller.Application.onDetResultChanged', append to end of function:
this.setDetailChangingState(true); - Edit 'tut.qm.controller.Application.setDetailChangingState' function:
          setDetailChangingState: function(targetState) {

               // No dialogues from here

               if (!targetState) { // targetState = false

                    // reset item bindings to default (the parent model)

                    for (var key in this._oDraftModel.oData) {

                         var entry = this._oDraftModel.oData[key];

                         var li = entry._listItem;

                         if (li) {

                              li.setModel(undefined);

                         }

                    }

                    this._oDraftModel.setData({});

                    //

                    this._setDetailChangingStateHelper(targetState);

               } else { // targetState = true

                    this._setDetailChangingStateHelper(targetState);

               }

          },


          _setDetailChangingStateHelper: function(targetState) {

               if (targetState) {

                    this._oAppModel.setProperty("/master2PageBusyIndicationDelay", 0);

                    this._oAppModel.setProperty("/busyForDetailChange", targetState);

               } else { // oBool = false - save disable, not busy

                    this._oAppModel.setProperty("/busyForDetailChange", targetState);

                    this._oAppModel.setProperty("/master2PageBusyIndicationDelay", undefined);

               }

               this._oAppModel.setProperty("/btnSaveEnabled", targetState);

} - Edit the master2 and detail views and bind the 'busy', 'busyIndicatorDelay' and 'showNavButton' properties to respective properties of the oAppModel
- 'Master2.view.xml', 'busy' and 'busyIndicatorDelay':
<mvc:View busy="{appProperties>/busyForDetailChange}" busyIndicatorDelay="{appProperties>/master2PageBusyIndicationDelay}"
controllerName="tut.qm.controller.Master2" xmlns:core="sap.ui.core" xmlns:mvc="sap.ui.core.mvc" xmlns="sap.m"> - 'Detail.view.xml', 'showNavButton', note the expression binding:
<Page class="sapUiFioriObjectPage" id="detailPage" navButtonPress="onNavBack"
showNavButton="{= ${device>/isPhone} && !${appProperties>/busyForDetailChange}}"
title="{i18n>detailTitle}">
- 'Master2.view.xml', 'busy' and 'busyIndicatorDelay':
- Edit 'tut.qm.controller.Application.onDetResultChanged', append to end of function:
- Commit and push your changes with a descriptive message
Discarding changes to characteristic results
After changes have been made to inspection characteristic results, the 'Cancel' button is active. If the user clicks 'Cancel', the original state of the controls is restored.
- Implement 'Detail.controller.js' 'onCancelPressed' function:
onCancelPressed: function(oEvent) {

  this._oApplicationController.onDetailCancelPressed(oEvent);

} - Implement 'Application.js' 'onDetailCancelPressed' function:
onDetailCancelPressed: function(oEvent) {

  this.discardDetailChanges();

} - Add the 'sap/m/MessageBox' dependency to the application controller 'Application.js':
sap.ui.define([

  "sap/ui/base/Object",

  "sap/ui/model/json/JSONModel",

  "sap/m/MessageBox"

], function(Object, JSONModel, MessageBox) { - Implement 'Application.js' 'discardDetailChanges' function:
discardDetailChanges: function(fnAfterDiscard) {

     var that = this;

     // Show cancel dialogue, handle response, call fnAfterDiscard if set

     if (this._oAppModel.getProperty("/btnSaveEnabled")) {

          // Opens the confirmation dialog

          var i18n = this._oComponent.getModel("i18n").getResourceBundle();

          MessageBox.show(i18n.getText("msgDiscardChangesQuestion"), {

               icon: MessageBox.Icon.WARNING,

               title: i18n.getText("msgDiscardChangesTitle"),

               actions: [MessageBox.Action.OK, MessageBox.Action.CANCEL],

               onClose: function(oAction) {

                    if (oAction === MessageBox.Action.OK) {

                         // Perform clean-up actions

                         that.setDetailChangingState(false);

                         //

                         if (fnAfterDiscard) {

                              fnAfterDiscard();

                         }

                    }

               }

          });

     } else {

          if (fnAfterDiscard) {

               fnAfterDiscard();

          }

     }

}- Create 'i18n' texts 'msgDiscardChangesQuestion' and 'msgDicardChangesTitle'
- Note how the 'setDetailChangingState(false)' function as given above already implements switching the data model back to the default. Deactivating the save and cancel buttons as well as resetting busy states is also already handled by the 'setDetailChangingState(false)' function. User interface controls immediately react to changes to the 'appProperties' data model model because of their bindings.
- Commit and push your changes with a descriptive message
Saving changes to characteristic results
Save changes as one unit of work, one transaction. A batch OData request implements this.
- Implement 'Detail.controller.js' 'onSavePressed' function:
onSavePressed: function(oEvent) {

  this._oApplicationController.onDetailSavePressed(oEvent);

} - Implement 'Application.js' 'onDetailSavePressed' function:
onDetailSavePressed: function(oEvent) {

     this._oAppModel.setProperty("/btnSaveEnabled", false); // keep it busy still

     //

     var oModel = this._oComponent.getModel();

     var batchChanges = [];

     oModel.clearBatch();


     var errClassCh = this._oAppModel.getProperty("/errClassCh");

     for (var key in this._oDraftModel.oData) {

          var entry = {};

          var bCon = this._oDraftModel.createBindingContext("/" + key);

          entry.ClosedCh = this._oAppModel.getProperty("/sampleCloseOnSave");

          entry.EvaluatedCh = "X";

          entry.ValidValsCh = "1";

          entry.CodeGrp1Ch = bCon.getProperty("SelSet1");

          if ((entry.Code1Ch = bCon.getProperty("Code1Ch")) === "OK") { // accept

               entry.EvaluationCh = "A";

               entry.ErrClassCh = "";

               entry.NonconfCh = "";

          } else { // reject

               entry.EvaluationCh = "R";

               entry.ErrClassCh = errClassCh;

               entry.NonconfCh = "1";

          }

          batchChanges.push(oModel.createBatchOperation(bCon.sPath, "MERGE", entry, undefined));

     }

     //

     this.setDetailChangingState(false); // also clears busyForDetailChange

     // async

     if (batchChanges.length) {

          oModel.addBatchChangeOperations(batchChanges);

          oModel.submitBatch(function(oData, oResponse, aErrorResponses) { // request successfully sent

               // Homework: implement error handling

               //   1869434 - Details for working with OData $batch

               // Homework: internationalize the below texts

               MessageBox.show(

                    oData.__batchResponses[0].__changeResponses.length +

                    (oData.__batchResponses[0].__changeResponses.length <= 1 ?

                         " characteristic" : " characteristics") + " updated", {

                         icon: sap.m.MessageBox.Icon.SUCCESS,

                         title: "Batch Update",

                         actions: [sap.m.MessageBox.Action.OK]

                    });

          }, function(oError) { // invalid request

               sap.m.MessageBox.show("Invalid batch update request", {

                    icon: sap.m.MessageBox.Icon.ERROR,

                    title: "Batch Update",

                    actions: [sap.m.MessageBox.Action.OK]

               });

          });

     }

} - Test saving a changed inspection characteristic. As long as only one characteristic is changed at a time, the app should work. When more than one characteristic is changed, the following error appears - among quite a lot of text - in the browser console (Ctrl+Shift+I on Chrome):
The default implementation attempts to commit ('BAPI_TRANSACTION_COMMIT') each characteristic in the 'changeset' of the batch request. This is an error when multiple entries are present in the 'changeset', as the whole batch operation must consist exactly one unit of work, and be committed (or rolled back) as one."Default changeset implementation allows only one operation" - Hold back 'BAPI_TRANSACTION_COMMIT' in the OData service implementation in case a changeset (from a batch request) is present
- Go to the implementation of the OData service: 'SEGW' / 'ZTUT_QM_00' / 'Service Implementation' / 'InspLotOpCharSet', right click 'Update', choose 'Go to ABAP Workbench'
- Add a new protected instance attribute 'Z_CHANGESET' type 'BOOLEAN' (or equivalent)
- Expand 'Methods' / 'Inherited Methods'
- Redefine '/IWBEP/IF_MGW_APPL_SRV_RUNTIME~CHANGESET_BEGIN'
method /IWBEP/IF_MGW_APPL_SRV_RUNTIME~CHANGESET_BEGIN.

  Z_CHANGESET = 'X'.

endmethod. - Redefine '/IWBEP/IF_MGW_APPL_SRV_RUNTIME~CHANGESET_END'
method /IWBEP/IF_MGW_APPL_SRV_RUNTIME~CHANGESET_END.

  clear Z_CHANGESET.

endmethod. - Redefine '/IWBEP/IF_SB_DPC_COMM_SERVICES~COMMIT_WORK'
METHOD /iwbep/if_sb_dpc_comm_services~commit_work.

  IF z_changeset <> 'X'.

    " Must not commit each entity if this request is part of a change set!

    CALL METHOD super->/iwbep/if_sb_dpc_comm_services~commit_work

      EXPORTING

        iv_rfc_dest = iv_rfc_dest.

  ENDIF.

ENDMETHOD. - Activate the class and test the app in the browser. Multiple changes are now committed correctly. This concludes the tutorial.
- Commit and push your changes with a descriptive message
Homework
If you look carefully, you can notice that when changes are saved, the old state flashes back on the controls for a short time. Why is this? Could you prevent this from happening? Clues: check if the model of the changed controls is (re)set in sync with the changing default data model (it is not; try to synchronize these actions).
Further reading
- Detailed description: Reference App - Manage Products
- 1869434 - Details for working with OData $batch
- OData Batch Requests - SAP HANA Developer Guide for SAP HANA Studio - SAP Library
Afterword to part 2 of this blog post
Thank you for reading part 2 of this blog post. I hope you found it useful.
4 Comments
Top kudoed authors
| User | Count |
|---|---|
| 1 | |
| 1 | |
| 1 | |
| 1 |