
- SAP Community
- Products and Technology
- Technology
- Technology Blogs by SAP
- How to use Kapsel Barcode Scanner plugin with SAP ...
Technology Blogs by SAP
Learn how to extend and personalize SAP applications. Follow the SAP technology blog for insights into SAP BTP, ABAP, SAP Analytics Cloud, SAP HANA, and more.
Turn on suggestions
Auto-suggest helps you quickly narrow down your search results by suggesting possible matches as you type.
Showing results for
Advisor
Options
- Subscribe to RSS Feed
- Mark as New
- Mark as Read
- Bookmark
- Subscribe
- Printer Friendly Page
- Report Inappropriate Content
09-18-2015
2:36 PM
Introduction
In this blog I'll show you how to use the Kapsel Barcode Scanner plugin to scan a code of a given product and search for it in the related collection.
Objective
We are going to develop a SAPUI5 hybrid application from one of the standard templates available in SAP Web IDE. We will use the OData service ZGWSAMPLE_SRV available here for getting Products' information from the backend. This data source is part of the SAP Netweaver Gateway Demo system for which you can request an account simply by following the steps reported at SAP Gateway Demo System. We will add some custom code to this app to extend the search bar functionality: a new button will be added aside the search field; by pressing this button you will have the ability to scan the barcode of a product and search for its information in the backend.
When our app will be ready, we will mobilise it using the Hybrid Application Toolkit and the trial HCPms system.
This is our challenge!
Let's get started.
Prerequisites
- SAP Web IDE 1.15 and later (you can register at SAP HANA Cloud Platform to get your development environment)
- Hybrid Application Toolkit 1.8.2+ downloadable from here
- An HCPms account configurable as described here
NOTE: An Android or iOS device is required: emulator is not good for this exercise because it cannot scan the code using the camera.
All the above prerequisites must be properly configured, before moving forward with this guide.
Walkthrough
This is the list of all the steps we'll go through:
- Create a sample barcode
- Create a destination in the SAP HANA Cloud Cockpit
- Create a new app in the HCPms
- Create a new Kapsel app with SAP Web IDE
- Add a button to the Master view
- Add the custom code for the new button
- Deploy the app with HAT
- Run the project on a mobile device
Create a sample barcode
Since we want to scan a product barcode in order to test our final application, let's start by creating a sample barcode. You can generate free barcodes from Free Barcode Generator - Create barcodes here.
Select for example to create a QRCode, got on the Text tab and put the string "HT-1011", which is the product code we want to search in the backend. Then click on Create QR Code. On the left side a QR code for that product will appear. You can even download it as a picture if you want.

Create a destination in the SAP HANA Cloud Cockpit
Our barcode is ready; we can start by creating a destination to reach the OData service located at SAP Gateway Demo System.
1) Access your HANA Trial environment and create a new destination which points to the ES1 system in the following way

Create a new app in the HCPms
Now let's create a new application in the HCPms system. You can follow this blog to learn how to enable your HCPms environment.
1) Go on https://hcpmsadmin-<your_user>trial.dispatcher.hanatrial.ondemand.com where you need to replace the string "<your_user>" with your user account.
2) Click on Applications
3) Create a new Application with the following parameters and click on Save
Parameter | Value |
|---|---|
Application ID | com.test.products |
Version | 1.0.0 |
Name | Products |
Type | Hybrid |
Description | Products application |
Vendor | SAP |
Security Configuration | None |

4) Click on Configure on the right bottom corner
5) Switch to the Backend tab and specify the Backend URL together with the Authentication Type and the Proxy Type; after this click on Save
Parameter | Value |
|---|---|
Backend URL | http://sapes1.sapdevcenter.com:8080/sap/opu/odata/sap/zgwsample_srv/ |
Proxy Type | Internet |
Authentication Type | Basic Authentication |
User name | <leave it blank> |
Password | <leave it blank> |
Maximum Connections | 500 |
Rewrite Mode | Rewrite URL on HCPms |
Relative Paths | <leave it blank> |

6) You should be able to ping the application successfully

Create a new Kapsel app with SAP Web IDE
Now that our connection is in place, let's create the Kapsel application
1) Open SAP Web IDE
2) Create a new SAPUI5 project from the template SAPUI5 Master Detail Kapsel Application
3) Enter a project name (i.e. Products)
4) Define the OData connection information to the ZGWSAMPLE_SRV service
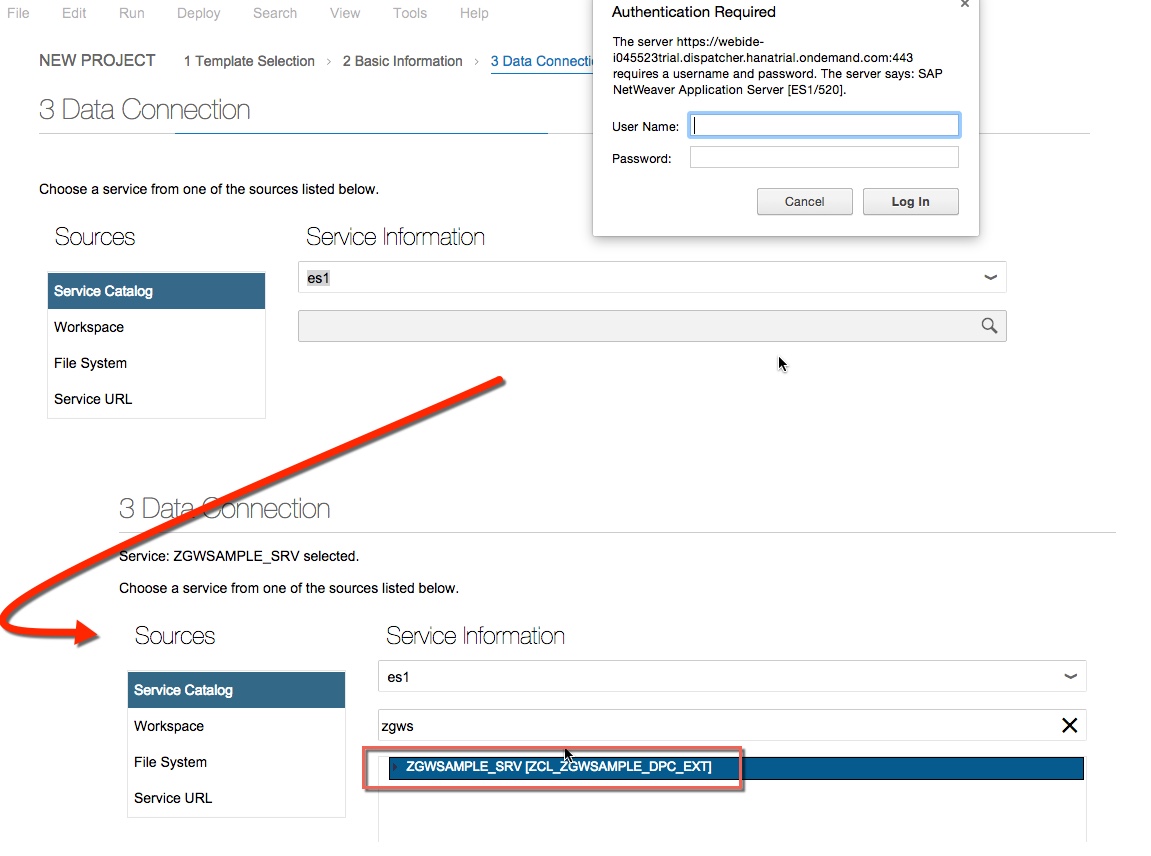
5) Provide the information about the fields you want to see in the application and click on Save

NOTE: It's important, for the goal of this guide, that for the search field you choose ProductId otherwise the final application doesn't work!
6) Click on Finish to complete the wizard
7) You can test the application by running it in the desktop preview mode

😎 Right click on the name of the project in SAP Web IDE and choose Project Settings --> Device Configuration. Specify the App Name, the App ID (it needs to match the Application ID used in the HCPms configuration) and all others parameters listed here and then click on Save
Parameter | Value |
|---|---|
App Name | Products |
App ID | com.test.products |
Description | Products application |
Version | 1.0.0 |
| Build Options | Release Mode |
| Platforms | Choose the one (or both) you want to build your app for. In my case it's just iOS |
| Plugins > Kapsel | Enable Logon Manager and Barcode Scanner |
| HCPms/SMP | HCPms |
| HCPms Host | hcpms-<your_account>.hanatrial.ondemand.com |

Add a button to the Master view
In SAP Web IDE open the Master view (view/Master.view.xml) of the app. Add the following code just after the last "/contentmiddle" tag and save the file
<contentRight>

<Button id="barcodeButton" icon="sap-icon://bar-code" tooltip="Bar Code Scanner" press="onBarCodeScan"></Button>

</contentRight>
It should look like this

Add the custom code for the new button
Now open the Master view controller (view/Master.controller.js) and add the following function at the beginning of the file, just after the init function. Save the file
onBarCodeScan: function() {

    var that = this;

    var code = "";

    cordova.plugins.barcodeScanner.scan(

          function (result) {

              code = result.text;

              console.log("This is the code: " + code);

              that.getView().byId("searchField").setValue(code);

              that.onSearch();

          },

          function (error) {

              alert("Scanning failed: " + error);

          }

    );

},
It should look like this

Deploy the app with HAT
Deploy the project using Hybrid Application Toolkit.
1) Launch HAT

2) Right click on the name of the project in SAP Web IDE and choose Deploy --> Deploy to local Hybrid Toolkit
3) The app is deployed to your local workstation folder
Run the project on a mobile device
Once your project has been successfully deployed to your local PC you can run it on your device.
1) Go back to SAP Web IDE
2) Select the index.html file of the app, right click on it and choose Run --> Run on --> iOS (or Android) device
3) Once the application starts, provide the credentials for ES1 in the Kapsel Logon.

4) Then create a new passcode or disable it by clicking on the Disable Passcode button and click on Submit

5) Now a new button should be available beside the search bar. Click on this Barcode Scanner button

6) Camera is activated: you can scan the barcode with your device

7) The product is automatically found by the application
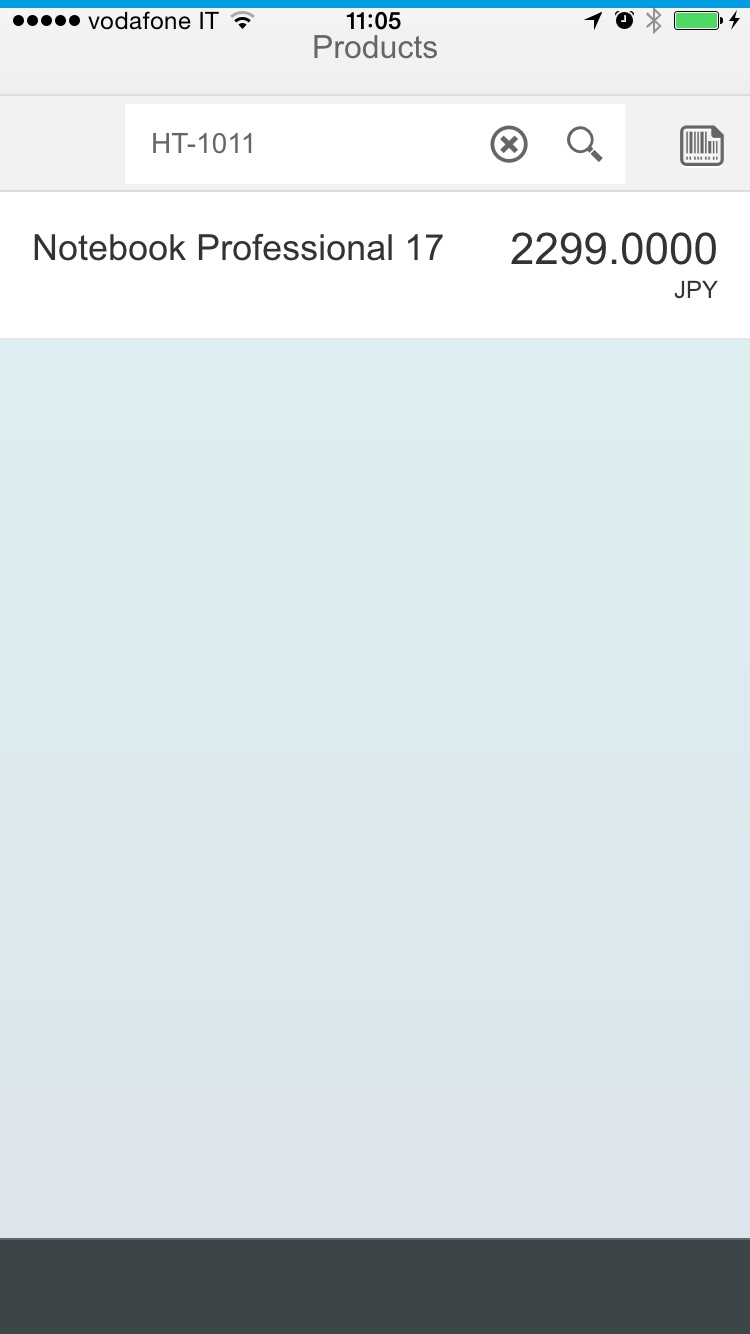
Congratulations! You have successfully used the BarcodeScanner Kapsel plugin within your application!
NOTE: it must be said that you can also test this project directly in the SAP Web IDE preview if you have a webcam on your laptop. You just need to check that by right clicking on the name of the project, under Tools --> Preferences and then Hybrid Application Toolkit the Cordova Facade Preview flag is enabled.
When you run the app in the preview mode you can click on the BarcodeScanner button to scan the code by using your laptop camera.

- SAP Managed Tags:
- SAPUI5,
- SAP Enterprise Portal
5 Comments
You must be a registered user to add a comment. If you've already registered, sign in. Otherwise, register and sign in.
Labels in this area
-
ABAP CDS Views - CDC (Change Data Capture)
2 -
AI
1 -
Analyze Workload Data
1 -
BTP
1 -
Business and IT Integration
2 -
Business application stu
1 -
Business Technology Platform
1 -
Business Trends
1,658 -
Business Trends
93 -
CAP
1 -
cf
1 -
Cloud Foundry
1 -
Confluent
1 -
Customer COE Basics and Fundamentals
1 -
Customer COE Latest and Greatest
3 -
Customer Data Browser app
1 -
Data Analysis Tool
1 -
data migration
1 -
data transfer
1 -
Datasphere
2 -
Event Information
1,400 -
Event Information
66 -
Expert
1 -
Expert Insights
177 -
Expert Insights
301 -
General
1 -
Google cloud
1 -
Google Next'24
1 -
GraphQL
1 -
Kafka
1 -
Life at SAP
780 -
Life at SAP
13 -
Migrate your Data App
1 -
MTA
1 -
Network Performance Analysis
1 -
NodeJS
1 -
PDF
1 -
POC
1 -
Product Updates
4,577 -
Product Updates
346 -
Replication Flow
1 -
REST API
1 -
RisewithSAP
1 -
SAP BTP
1 -
SAP BTP Cloud Foundry
1 -
SAP Cloud ALM
1 -
SAP Cloud Application Programming Model
1 -
SAP Datasphere
2 -
SAP S4HANA Cloud
1 -
SAP S4HANA Migration Cockpit
1 -
Technology Updates
6,873 -
Technology Updates
429 -
Workload Fluctuations
1
Related Content
- SAP UI5 How to get data using external barcode reader in Technology Q&A
- SAP MDK OnValueChange event issue in Technology Q&A
- Reusable SAPUI5 Barcode Scanner Input Value Help in Technology Blogs by Members
- abap2UI5 - (10) Extensions I: Exploring External Libraries & Native Device Capabilities in Technology Blogs by Members
- Make to Order Process IN SAP CLOUD Public edition in Technology Blogs by Members
Top kudoed authors
| User | Count |
|---|---|
| 44 | |
| 23 | |
| 17 | |
| 15 | |
| 11 | |
| 9 | |
| 7 | |
| 7 | |
| 7 | |
| 7 |