
- SAP Community
- Products and Technology
- Technology
- Technology Blogs by SAP
- How to use Hybrid Application Toolkit (HAT) and te...
Technology Blogs by SAP
Learn how to extend and personalize SAP applications. Follow the SAP technology blog for insights into SAP BTP, ABAP, SAP Analytics Cloud, SAP HANA, and more.
Turn on suggestions
Auto-suggest helps you quickly narrow down your search results by suggesting possible matches as you type.
Showing results for
Advisor
Options
- Subscribe to RSS Feed
- Mark as New
- Mark as Read
- Bookmark
- Subscribe
- Printer Friendly Page
- Report Inappropriate Content
08-25-2015
3:10 PM
Introduction
In this blog we are going to see how to use the Hybrid Application Toolkit for SAP Web IDE and how to mobilise and test the app generated with the development environment.
This blog has been split in 3 parts:
| Link | Content |
|---|---|
| Part1 (this page) | Introduction and some preliminary steps |
| Part2 | Preview apps on the emulator and on the device (iOS and Android) |
| Part3 | Run apps on the emulator and on the device (iOS and Android) |
What is Hybrid Application Toolkit (HAT)
SAP Web IDE Hybrid App Toolkit Add-on enables developers to create and deploy Apache Cordova hybrid apps.
The Hybrid App Toolkit includes 3 components:
1) SAP Web IDE plugin which adds hybrid app development features to SAP Web IDE. These features include:
- auto code completion and documentation for Cordova and Kapsel plugin APIs
- hybrid project templates and code snippets
- device configuration
- previews on Companion app, and browsers
- deploy to local, HANA Cloud, and SAP Mobile Platform environments
- deploy and run app on target device
This plugin is currently available as an optional plugin for SAP Web IDE. This means that it's shipped with SAP Web IDE, you just need to enable it from the Optional Plugins section
2) Hybrid App Toolkit Connector which is a local server process that enables SAP Web IDE to connect to the local system's Cordova development environment and allows developers to create and manage a local Cordova project.
3) Companion application which is a native mobile application that runs on a mobile device or device emulator and enables a live preview of a Web application created with SAP Web IDE. It's included in the Hybrid App Toolkit package
How to get HAT
Hybrid Application Toolkit can be downloaded here directly from the SAP Store
How to install HAT
The installation guide for Hybrid Application Toolkit can be found here.
Beside this you can find a complete walkthrough for the installation on the Windows platform in this blog.
How to use HAT
There are many different ways to use HAT and in this blog we are going to see some of them. The steps listed here are pretty the same for Android and iOS platforms so I'm going to put side-by-side the screenshots for both platforms just for sake of comparison.
What is the main goal of this blog
The main goal of this blog is to show you how to
- develop a simple SAPUI5 Master-Detail application from one of the standard templates, in SAP Web IDE. This app takes data from a SAP HANA Cloud destination, which we are going to define, pointing to the service http://sapes1.sapdevcenter.com:8080/sap/opu/odata/IWBEP/GWDEMO for getting the Sales Order Products information
- add some custom code to this app to extend the search bar functionality:
- add a new button next to the search field of Master View to scan the product barcode
- search for its information in the backend. For this the Kapsel Barcode Scanner Plugin will be used
- when the app is ready, mobilise it using the Hybrid Application Toolkit and the trial HCPms system
- test it using various methods like,
- Test as a Web app
- Run with Cordova Façade in the browser
- Preview with Companion App on
- Emulator
- Android Device
- Run on
- Emulator
- Device
- Deploy to HCPms and then on Device
Preliminary steps
- Check the prerequisites
- Setup the required destination
- Enable HAT plugin in SAP Web IDE and check its connectivity
- Create a new app in the HCPms administration console
- Create a QR-Code of a product
- Create an hybrid application with SAP Web IDE
Check the prerequisites
Ensure all the prerequisites are met.
- SAP Web IDE (Register at SAP HANA Cloud Platform to get the development environment)
- Hybrid Application Toolkit downloadable from here
- An HCPms account configurable as described here
- Valid user for ES1. Procedure to get access information is described here
- An Android/iOS device to test the application. To connect an Android device to the PC to test your applications you need to install the appropriate USB driver. Follow this link for the detailed steps.
Note: A mobile device simulator can be used only to add contacts, but for Barcode Scanning a real Mobile device is needed. For using the Device Emulators and for other installation prerequisites regarding SAP Web IDE Hybrid App Toolkit Add-on please refer to the SAP Web IDE Hybrid App Toolkit Add-on | SCN.
Setup the required destination
1) Login to your HANA Trial account
2) Navigate to Destinations --> New Destination
3) Set up a destination named "es1" in the following way:
| Parameter | Value |
|---|---|
| Name | es1 |
| Description | es1 |
| Type | HTTP |
| URL | http://sapes1.sapdevcenter.com:8080 |
| ProxyType | Internet |
| Authentication | NoAuthentication |
and add these additional properties
| Property | Value |
|---|---|
| WebIDEUsage | odata_abap |
| WebIDEEnabled | true |
| WebIDESystem | es1 |
as shown in this screen shot

4) Save the configuration
Start the HAT Connector
To allow SAP Web IDE to interact with HAT add-on components on your local machine over HTTPS protocol, start the HAT Connector
Windows platforms
1) With Windows Explorer on your machine, go to the folder where the HAT tool is installed
2) Double click on the run.cmd program
3) At the prompt enter your keystore password (which you defined already during the HAT setup procedure)
4) The HAT Connector starts listening for requests from SAP Web IDE

Mac platforms
1) Open a terminal window on your Mac
2) Go inside the folder where the HAT tool is installed
3) Type the command: ./run.sh
4) At the prompt enter your keystore password (which you defined already during the HAT setup procedure)
5) The HAT Connector starts listening for requests from SAP Web IDE

Enable HAT plugin in SAP Web IDE and check its connectivity
Login to SAP Web IDE and ensure that HAT plugin is enabled. Verify that the connection is up and running.
1) Open SAP Web IDE
2) Go to Tools --> Preferences
3) Select Plugins --> Optional Plugins
4) Enable the Hybrid App Toolkit plugin

5) Save the configuration
6) Choose the Hybrid Application Toolkit item on the left side
7) Click on Test Connection
😎 Ensure that the connection is up and running

Create a new app in the HCPms administration console
Login to HCPms and create a new application.
1) Login to https://hcpmsadmin-<your_account>.dispatcher.hanatrial.ondemand.com where <your_account> is the account you received when registering to the HANA Trial Landscape
2) Click on the Applications tile

3) Click on the "+" sign

4) Enter the following values and save the settings
| Parameter | Value |
|---|---|
| Application ID | com.test.products |
| Version | 1.0 (default) |
| Name | Products |
| Type | Hybrid |
| Description | Sales Order Products |
| Vendor | SAP |
| Enable same-origin policy | Disabled |
| Ignore case for user name | Disabled |
| Security Configuration | None |

5) Keeping the application selected on the left side click on Configure

6) Select the Backend tab and enter the following values. Leave all the other values as proposed and click on Save
| Parameter | Value |
|---|---|
| Backend URL | http://sapes1.sapdevcenter.com:8080/sap/opu/odata/IWBEP/GWDEMO |
| Proxy Type | Internet |
| Authentication Type | Basic Authentication |
| User Name | <leave it blank> |
| Password | <leave it blank> |
| Maximum Connections | 500 |
| Rewrite Mode | Rewrite URL on HCPms |

7) Test the connection by pinging it, you should get a successful result

Create a QR-Code of a product
Let's generate a QR-Code for at least one product so that we can test our app.
1) Go to http://www.barcode-generator.org/
2) Select the Text tab, provide for example the code "HT-1002" as plain text and click on Create QR Code

3) The code is generated: you can either download or print this code in order to be used later in this blog.
Create an hybrid application with SAP Web IDE
We are going to create now the hybrid application that we'll use during this exercise.
1) Open SAP Web IDE
2) Choose File --> New --> Project from template
3) Choose SAPUI5 Master Detail Kapsel Application and click on Next
4) Enter a project name (i.e. "Products") and click on Next
5) Select Service Catalog on the left side, choose the destination "es1" you have created previously, in the search bar enter "gwd", select the GWDEMO service and click on Next

6) Eventually, enter the credentials for the "es1" service
7) Enter the following information and click on Next
| Parameter | Value |
|---|---|
| Project Namespace | com.test.products |
| Title | Products |
| OData Collection | ProductCollection |
| Search Field | ProductID |
| Item Title | ProductName |
| Numeric Attribute | UnitPrice |
| Unit Attribute | CurrencyCode |
| Title | Product |
| Additional Attribute 1 | ProductDescription |
| Additional Attribute 2 | ProductCategory |
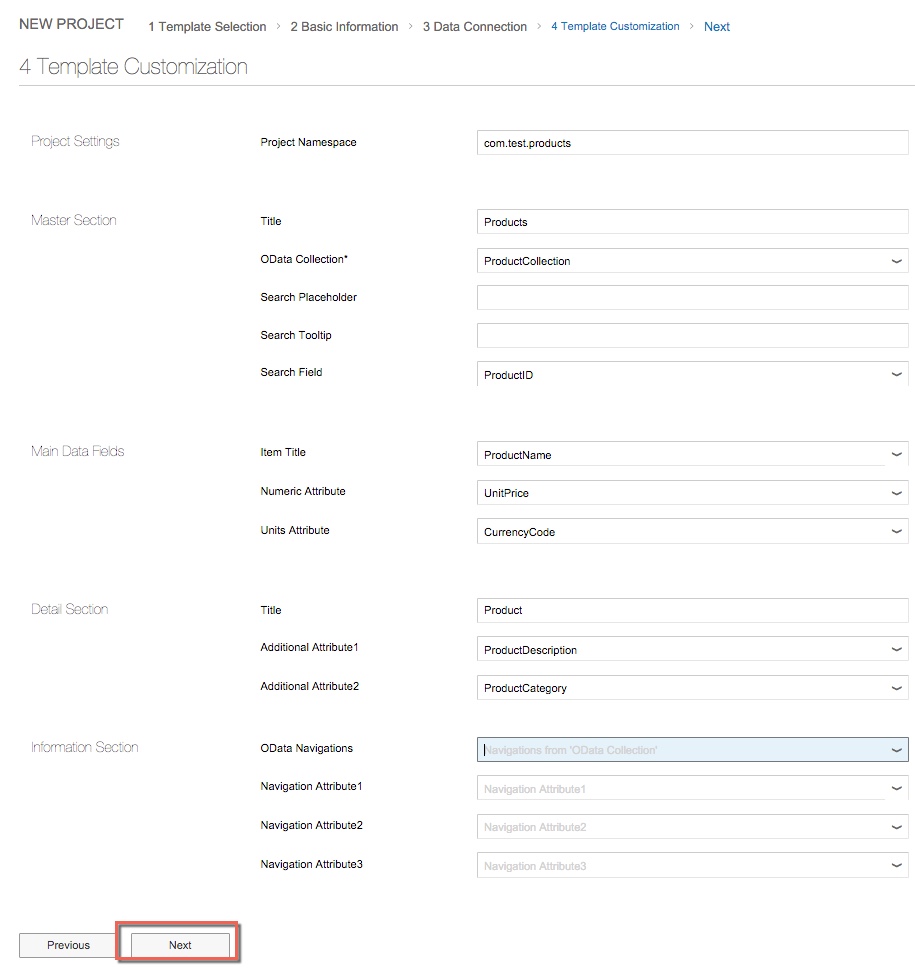
😎 Click on Finish
9) Paste the following code just after the closing of the "contentMiddle" tag and save the file
<contentRight>

  <Button id="barcodebutton" icon="sap-icon://bar-code" press="onBarcodeScan"></Button>

</contentRight>

10) Open the Master.controller.js file, paste the following code just after the "onInit" function and save the file
  onBarcodeScan: function() {

  var that = this;

  var code = "";

  if (!cordova.plugins.barcodeScanner) {

  alert("Barcode scanning not supported");

  return;

  }

  cordova.plugins.barcodeScanner.scan(

  function(result) {

  code = result.text;

  that.getView().byId("searchField").setValue(code);

  that.onSearch();

  },

  function(error) {

  alert("Scan failed: " + error);

  }

  );

  },

11) Right click on the name of the project and choose Project Settings
12) Click on Device Configuration and set the parameters in the following way
| Parameter | Value |
|---|---|
| App Name | Products |
| App ID | com.test.products |
| Description | Sales Order Products |
| Version | 1.0.0 |
| Local Build Options | Release Mode |
| Platform | Android or iOS or both |
| Kapsel Plugins | Logon Manager, App Update, Barcode Scanner |
| HCPms/SMP | HCPms |
| HCPms Host | hcpms-<your_account>.hanatrial.ondemand.com (where <your_account> is the one you got on the Trial Landscape |
NOTE 1: pay attention that the App ID here must match the Application ID you defined at step 4 of the chapter "Create a new app in the HCPms administration console", otherwise the application will be not working
NOTE 2: regarding the Platform parameter, you have to choose the platform you are going to test your app for. If you have a Windows machine you can only use Android as deployment platform. If you have a Mac, instead, you can use both platform for testing and running mobile applications. In my case, since I'm using a Mac and I want to show you the differences between the two platforms I'm going to select both!

13) Congratulations! You have created your hybrid application. This is the app we are going to use for our tests in this exercise.
This blog now will continue with a second part where you will learn about all the different ways to test and run an hybrid application with HAT.
- SAP Managed Tags:
- SAPUI5,
- SAP Enterprise Portal
20 Comments
You must be a registered user to add a comment. If you've already registered, sign in. Otherwise, register and sign in.
Labels in this area
-
ABAP CDS Views - CDC (Change Data Capture)
2 -
AI
1 -
Analyze Workload Data
1 -
BTP
1 -
Business and IT Integration
2 -
Business application stu
1 -
Business Technology Platform
1 -
Business Trends
1,661 -
Business Trends
85 -
CAP
1 -
cf
1 -
Cloud Foundry
1 -
Confluent
1 -
Customer COE Basics and Fundamentals
1 -
Customer COE Latest and Greatest
3 -
Customer Data Browser app
1 -
Data Analysis Tool
1 -
data migration
1 -
data transfer
1 -
Datasphere
2 -
Event Information
1,400 -
Event Information
64 -
Expert
1 -
Expert Insights
178 -
Expert Insights
269 -
General
1 -
Google cloud
1 -
Google Next'24
1 -
Kafka
1 -
Life at SAP
784 -
Life at SAP
10 -
Migrate your Data App
1 -
MTA
1 -
Network Performance Analysis
1 -
NodeJS
1 -
PDF
1 -
POC
1 -
Product Updates
4,578 -
Product Updates
317 -
Replication Flow
1 -
RisewithSAP
1 -
SAP BTP
1 -
SAP BTP Cloud Foundry
1 -
SAP Cloud ALM
1 -
SAP Cloud Application Programming Model
1 -
SAP Datasphere
2 -
SAP S4HANA Cloud
1 -
SAP S4HANA Migration Cockpit
1 -
Technology Updates
6,886 -
Technology Updates
389 -
Workload Fluctuations
1
Related Content
- Consuming CAPM Application's OData service into SAP Fiori Application in Business Application Studio in Technology Blogs by Members
- Value Unlocked! How customers benefit from SAP HANA Cloud in Technology Blogs by SAP
- Gamifying SAP C4C with BTP, the Flutter or Build Apps way. in Technology Blogs by SAP
- Getting ready to start using SAP Focused Run in Technology Blogs by SAP
- SAP CAP with Event Mesh - Error: JWT with audience is not issued for clientIds in Technology Q&A
Top kudoed authors
| User | Count |
|---|---|
| 12 | |
| 12 | |
| 11 | |
| 9 | |
| 9 | |
| 9 | |
| 8 | |
| 8 | |
| 8 | |
| 8 |