
- SAP Community
- Products and Technology
- Additional Blogs by Members
- SAP ERP User Manual of Purchase Order
Additional Blogs by Members
Turn on suggestions
Auto-suggest helps you quickly narrow down your search results by suggesting possible matches as you type.
Showing results for
bestepolat
Participant
Options
- Subscribe to RSS Feed
- Mark as New
- Mark as Read
- Bookmark
- Subscribe
- Printer Friendly Page
- Report Inappropriate Content
08-14-2015
11:48 AM
Dear SAP Experts,
Some companies have not prepared the documentation for the user guide of SAP Purchase Order but this document should always be in your folder.
Every company has a different system with their custom developments but the below fields might be familiar.
Sincerely,
Beste
Summary
The aim of this document is creating and changing Purchase Order (after now PO). POs can be created by two ways. One of them is creating PO manually without a PR. Second one is creating by using an assigned PR.
Table of Contents
1. Creating Purchase Order
1.1. Manually Creating Purchase Order
1.1.1. In case of a SKU (Material with a code)
1.1.2. Purchase Order for Assets
1.1.3. PO for Items to be Purchased for a Project
1.2. Creating PO Via Requisition (PR) Assignment List
2. Changing PO
3. Confirmations
4. Displaying PO
1. Creating Purchase Order
1.1. Manually Creating PO
POs can be created in the system Without taking any reference, PR.
Following SAP Menu | Logistics -> Materials Management -> Purchasing -> Purchasing Order -> Create -> Vendor/Supplying Plant Known |
Transaction Code | ME21N |

By following the above menu path or typing the transaction code ME21N in transaction bar, below screen is opened.
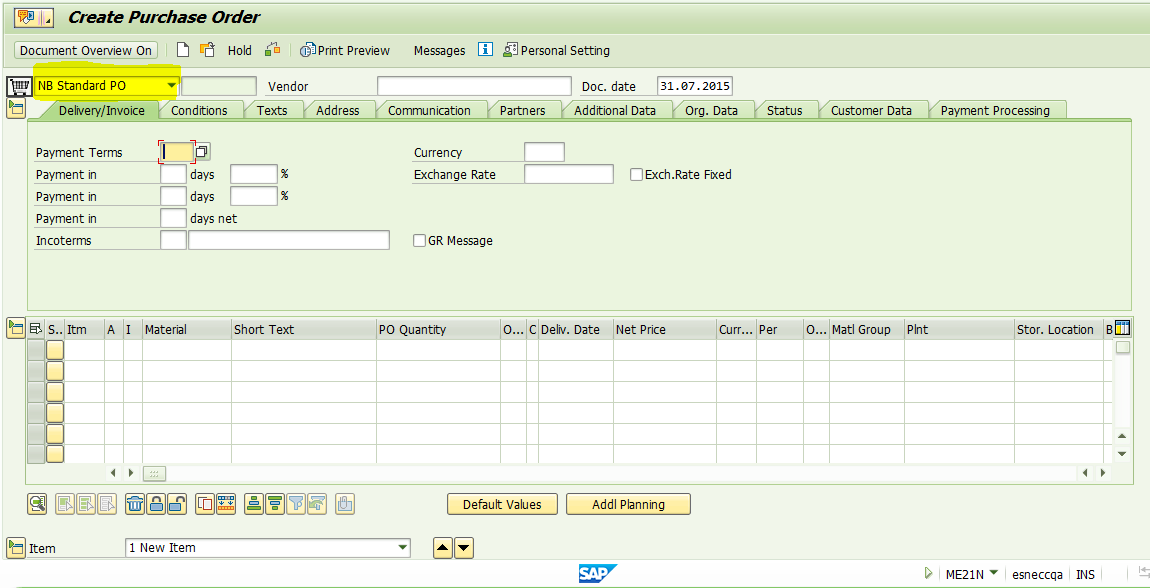
Proper document type is chosen from the upper left side of the screen.
After selecting proper PO document type, vendor code is entered in “Vendor” field. If vendor code is not known, it can be searched by using F4 in the “Vendor” field. After pressing F4, below screen is opened.

Vendors can be filtered by below fields.
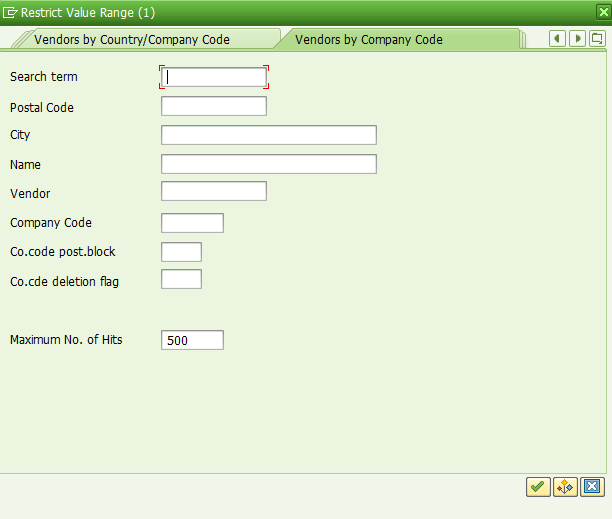
By pressing button vendor list is obtained. Proper vendor is chosen from the list and the “enter” button is used to bring the vendor into PO.
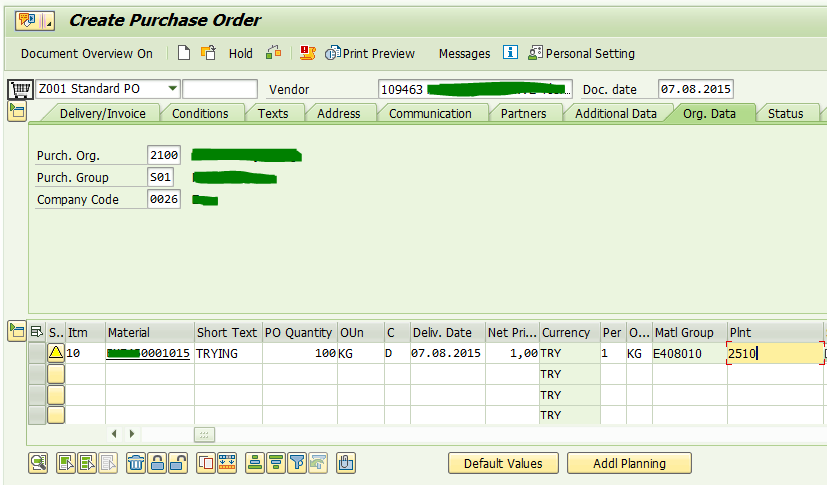
After vendor selection, “Purchasing Organisation”, “Purchasing Group” and “Company Code” fields under “Organizational Data” section are filled. Proper Purchasing Group can be chosen.

After fixing the above mentioned fields, by pressing enter, payment terms, Incoterms and currency data related with the vendor are automatically brought into PO from vendor master data. But, these data are subject to change if required.

If this is a PO for a SKU, material code is typed in “Material” cell. If not, material description is typed in “Short Text” cell. Then, price, quantity and Plant information are typed in the related fields.
1.1.1. In case of a SKU (Material with a code)
From the master data of the material, material group, storage location, delivery date, unit information are automatically adopted. After typing the price information, by pressing button, PO is checked for any problem. If there is not any problem message, by pressing button, PO is saved and a PO number is generated by the system.

1.1.2. PO for Assets
Firstly, vendor and organizational data are filled. Then, after choosing proper material group from the list, Acc. Assignment Cat. is chosen as “A”. Then, PO quantity, delivery date and price information are entered to the related fields.

For Account Assignment, if the item is purchased from domestic market (Standard PO), “Asset” field is set as “DUMMY” or any dummy code which is your company used. If this is an import subject, an asset number is obtained from Accounting Department and then this number is entered in “Asset” field.

After completing all necessary fields, PO is checked for any problem message by clicking ![]() button . Then, PO is saved by clicking
button . Then, PO is saved by clicking button. A PO number is generated by system.

1.1.3. PO for Items to be Purchased for a Project
Firstly, vendor and organizational data are filled. Then, after choosing proper material group from the list (if this is a purchasing for a non-SKU item), Acc. Assignment Cat. is chosen as “P”. Then, PO quantity, delivery date and price information are entered to the related fields.

After choosing Acc. Assignment Category as “P”, on item basis G/L Account and WBS Element selections should be written properly and respectively.

After completing all necessary fields, PO is checked for any problem message by clicking button . Then, PO is saved by clicking
 button. A PO number is generated by system.
1.2. Creating PO Via Requisition (PR) Assignment List
This way of creating PO is the mostly used one. It is the way to create PO with assigned PR documents. Many of the information comes from the assigned PR.
Following SAP Menu | Logistics -> Materials Management -> Purchasing -> Purchase Order -> Create -> Via Requisition Assignment List |
Transaction Code | ME58 |

By following the above path or directly typing the transaction code ME58 in transaction box, below screen will be opened:

In this screen, it is possible to filter assigned PRs with respect to different parameter. After filtering and executing this selection(s) with  button , we will reach below screen view on which requested PRs are displayed.

By double clicking on the expression “W/o Outl. Agmt” below window is opened. Proper PO document type is choosen and purchasing group and purchasing organization fields are entered properly if not filled. Then, by clicking button, our settings are brought into PO creation screen.

By picking the PR request on the left side and moving it into the basket, all information in the PR are brought into PO document:

WARNING: It is strictly recommended that after bringing PR into PO, currency, prices, payment terms, delivery terms and other data coming from vendor master data to be checked specifically for the new PO. This is because those information are master data but one can create a PO for the selected vendor with different terms and conditions.
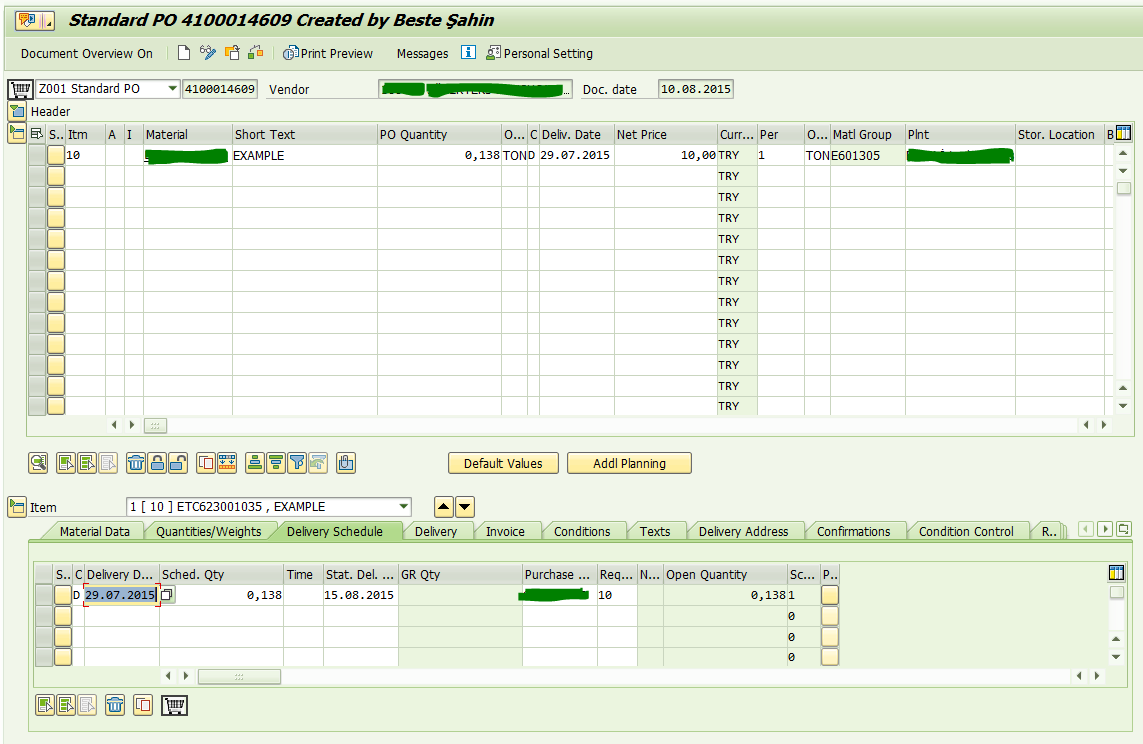
If we want to change the delivery date, it is required to change the in the “Statistical Delivery Date” field under “Delivery Schedule” section. For import POs, this date represents the delivery date of the vendor with respect to delivery terms. For example, if this would be a FCA delivery, then, the date in “Statistical Delivery Date” represents the date that vendor will deliver the goods at the delivery point. However, date in the “Delivery Date” field represents the date that the item will be in your company’s stocks.
Generally, “Delivery Date” should not be changed. Instead, one can manage delivery date of the item to your company’s stocks by changing confirmations. Confirmations will be shown later.
After completing all necessary fields, PO is checked for any problem message by clicking button . Then, PO is saved by clicking
 button. A PO number is generated by system.

2. Changing PO
This transaction is used to make changes in a previously created PO.
Following SAP Menu | Logistics -> Materials Management -> Purchasing -> Purchase Order -> Change |
Transaction Code | ME22N |

By clicking the transaction on the list, below screen is opened:
Always, last created/saved PO will be brought in the screen. To display a different PO, by clicking button, required PO number is written and
 button is clicked.

After completing all changes, PO is checked for any problem message by clicking  button . Then, PO is saved by clicking
 button.
3. Confirmations
After forwarding PO document to the vendor, confirmation data received from the vendor is stored in the system. For this action, again, PO change transaction is used. Confirmations are seen by planning department via “Stock/Requirements List” screen (MD04) and production plans are made according to confirmed delivery date(s) and quantities.
Following SAP Menu | Logistics -> Materials Management -> Purchasing -> Purchase Order -> Change |
Transaction Code | ME22N |
Before saving the confirmation information, planning departments will see PO item stock availability date as 29.07.2015 (29.07.2015 + 0 days for material quality control (this data is defined in material master data)).

By default, Confirmation Control Key is selected; it is defined in vendor master data. To enter confirmation data, first, under “Confirmations” section, “AB-Order Acknowledgment” is chosen in CC (Confirmation Category) field. Then, delivery date confirmed by vendor is typed in “Delivery Date” field and quantity is entered in “Quantity” field. And, by pressing enter (skipping yellow warning messages), confirmation information are set.

After entering confirmation data, planning will see the PO item as below:
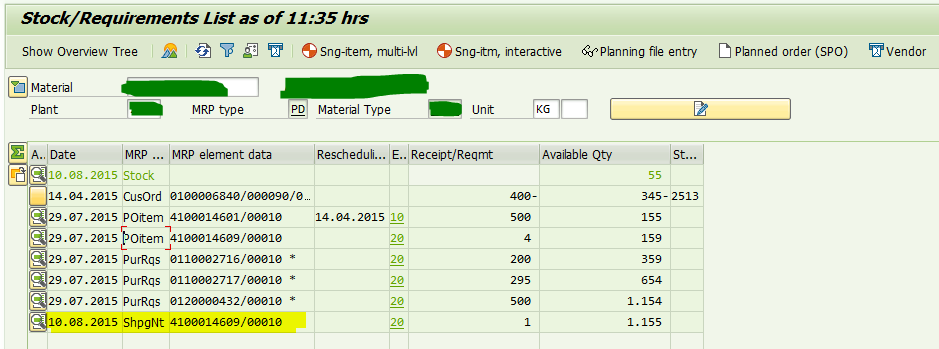
It turns out that item will be available for production on 10.08.2015 (01.11.2012 + 0 days for material checks). Since this will affect production plans, it is important to inform planning department about such change before or just after entering the confirmation data. For import PO, confirmation data which are stored in this way again represents the item’s delivery date to Evyap stocks. But, this time this date is an estimated date because it depends on freight period, custom clearance operations and in-land freight periods.
After all, if all confirmation data is set, then by clicking button, changes are saved.
4. Displaying PO
This transaction is used to display a previously created PO.
Following SAP Menu | Logistics -> Materials Management -> Purchasing -> Purchase Order -> Display |
Transaction Code | ME23N |

By typing above transaction code in transaction box, below screen is opened:

Always, last created/saved PO will be brought in the screen. To display a different PO, by clicking button, required PO number is written and
 button is clicked.
Prepared By Beste Şahin.
3 Comments
Related Content
- Change header field of purchase order on save in Technology Q&A
- What's new with Collaborative Maintenance? in Supply Chain Management Blogs by SAP
- Manage Supply Shortage and Excess Supply with MRP Material Coverage Apps in Enterprise Resource Planning Blogs by SAP
- Portfolio Management – Enhanced Financial Planning integration in Enterprise Resource Planning Blogs by SAP
- Enterprise Portfolio and Project Management in SAP S/4HANA Cloud, Private Edition 2023 FPS1 in Enterprise Resource Planning Blogs by SAP