
- SAP Community
- Products and Technology
- Technology
- Technology Blogs by SAP
- Creating and deploying SAP Fiori app with SAP Web ...
Technology Blogs by SAP
Learn how to extend and personalize SAP applications. Follow the SAP technology blog for insights into SAP BTP, ABAP, SAP Analytics Cloud, SAP HANA, and more.
Turn on suggestions
Auto-suggest helps you quickly narrow down your search results by suggesting possible matches as you type.
Showing results for
Advisor
Options
- Subscribe to RSS Feed
- Mark as New
- Mark as Read
- Bookmark
- Subscribe
- Printer Friendly Page
- Report Inappropriate Content
07-27-2015
4:15 PM
This is the continuation of the blog presented here.
This blog has been split in 3 parts:
| Link | Content |
|---|---|
| Part1 | Creating a new application with SAP Web IDE - Adding a new ObjectAttribute to the Detail view |
| Part2 | Running the application with mock data - Creating run configurations |
| Part3 | Deploying the app to HANA Cloud Platform - Deploying the app to SAP Fiori Launchpad (optional) |
In this third part we are going to see how to deploy the application to the HANA Cloud Platform. As an optional step I'll show you how to deploy the app to SAP Fiori Launchpad.
1.4 DEPLOYING THE APP TO HANA CLOUD PLATFORM
In this part of the exercise you will learn how to take the application you have built so far and deploy to the HCP. After deployment you can even run the app from HCP.
1. As a first step, since the HCP requires an index.html file to start an application, we need to create a file like this. So right click on the webapp folder inside your project and create a new file named index.html

2. Paste the following code inside the new file and save it. Just pay attention to the lines 13 and 23 where you need to properly specify the namespace (in this case "com.so") used for the project
<!DOCTYPE HTML>
<html>
<head>
<meta http-equiv="X-UA-Compatible" content="IE=edge" />
<meta charset="UTF-8">
<title>DCExercise</title>
<script id="sap-ui-bootstrap"
src="resources/sap-ui-core.js"
data-sap-ui-libs="sap.m"
data-sap-ui-theme="sap_bluecrystal"
data-sap-ui-xx-bindingSyntax="complex"
data-sap-ui-resourceroots='{"com.so": "../webapp/"}'>
</script>
<link rel="stylesheet" type="text/css" href="css/style.css">
<script>
sap.ui.getCore().attachInit(function() {
new sap.m.Shell({
app: new sap.ui.core.ComponentContainer({
height : "100%",
name : "com.so"
})
}).placeAt("content");
});
</script>
</head>
<body class="sapUiBody" id="content">
</body>
</html>
3. Open the neo-app.json file and add the line
"welcomeFile": "/webapp/index.html",
just after the first line so that, when the application is launched, it knows which is the file to execute first.

4. You can even select the index.html file and click on the Run button in the top toolbar to see if the application runs fine: this means that the file is correct.
5. Select the name of the project, right click on it and choose Deploy --> Application status. We are starting from this point so that you verify that so far we have never deployed to HCP

6. Enter your HCP password and click on Login
7. As you can see here, so far we have not yet deployed the app to HCP. So, since we want to do it right now, click on Deploy

8. Here you can enter the application name, its version and you can decide if you want to activate this version automatically as soon as the application has been deployed. All the fields come pre-filled. Leave all as by default and click on Deploy

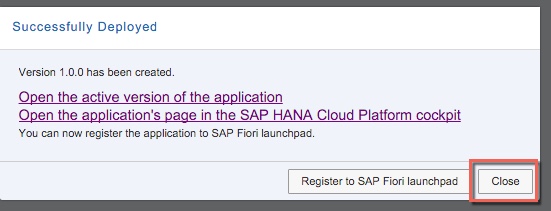
9. The application has been deployed to HPC and the first version has been created. Now you can do two things: the first one is to Open the active version of the application

10. Enter again the credentials for the ES1 system, if required, and click on Log In
11. The application is running directly on your HANA Platform. Notice the application’s URL, which is no longer tied to the SAP Web IDE tool

12. Alternatively, according to the screen shown at step 9, you can Open the application’s page in the SAP HANA Cloud Platform cockpit
13. In this case the following page is opened. Here you can administer your HANA applications. For example, here you can check the application’s URL and verify that the application is started

14. When finished, click on the Versioning tab. Here you can check all the versions that have been pushed to the HANA repository. You can activate or deactivate a specific version and do a lot of other administrative functions. You can now close this page

15. Once back here to this message you can click on the Close button. At moment we are not going yet to register the app to SAP Fiori Launchpad because we’ll do it in the next chapter
16. Refresh the SAP Web IDE tool

17. Now you can see some new fancy symbols on the left of each folder or file in the project explorer. In this case the green ball means that the file/folder has been committed and it is up to date with the one on HCP

18. If you search in the documentation you should be able to find a description for all the available decorations

1.5 DEPLOYING THE APP TO SAP FIORI LAUNCHPAD (optional step)
Finally, you can deploy your SAP Fiori application to the SAP Fiori Launchpad in order to be consumed by users. Please ensure that you have properly subscribed to the Fiori Launchpad Portal in the Trial Landscape as described in the Prerequisites chapter on the first part of this blog.
1. Select your project in the Project Explorer, right click on it and select Deploy --> Register to SAP Fiori Launchpad

2. Enter your SCN password if required
3. Enter a description for this new application and click on Next

4. Enter a Title and a Subtitle for your tile in the FLP and click on the Browse button to choose an icon for your app

5. Type “e-learn” in the search box, select the e-learning icon and click on OK

6. The new icon is assigned to the tile. Click on Next

7. Choose the Catalog and the Group for this application. The first two selections are made automatically by the system because they are mandatory. For the third you can choose the Sample Group and click on Next

8. Click on Finish
9. Your application has been successfully registered to FLP. Now you can open the registered application in your browser

10. The application is running fine. You might need to enter the ES4 credentials again
11. Alternatively, you can open your SAP Fiori Launchpad in another browser tab

12. This is how the tile for your app looks like. By clicking on this tile you can run your application

13. Congratulations! You have successfully deployed your first app to SAP Fiori Launchpad!
- SAP Managed Tags:
- SAPUI5,
- SAP Enterprise Portal
23 Comments
You must be a registered user to add a comment. If you've already registered, sign in. Otherwise, register and sign in.
Labels in this area
-
ABAP CDS Views - CDC (Change Data Capture)
2 -
AI
1 -
Analyze Workload Data
1 -
BTP
1 -
Business and IT Integration
2 -
Business application stu
1 -
Business Technology Platform
1 -
Business Trends
1,661 -
Business Trends
87 -
CAP
1 -
cf
1 -
Cloud Foundry
1 -
Confluent
1 -
Customer COE Basics and Fundamentals
1 -
Customer COE Latest and Greatest
3 -
Customer Data Browser app
1 -
Data Analysis Tool
1 -
data migration
1 -
data transfer
1 -
Datasphere
2 -
Event Information
1,400 -
Event Information
64 -
Expert
1 -
Expert Insights
178 -
Expert Insights
273 -
General
1 -
Google cloud
1 -
Google Next'24
1 -
Kafka
1 -
Life at SAP
784 -
Life at SAP
11 -
Migrate your Data App
1 -
MTA
1 -
Network Performance Analysis
1 -
NodeJS
1 -
PDF
1 -
POC
1 -
Product Updates
4,577 -
Product Updates
325 -
Replication Flow
1 -
RisewithSAP
1 -
SAP BTP
1 -
SAP BTP Cloud Foundry
1 -
SAP Cloud ALM
1 -
SAP Cloud Application Programming Model
1 -
SAP Datasphere
2 -
SAP S4HANA Cloud
1 -
SAP S4HANA Migration Cockpit
1 -
Technology Updates
6,886 -
Technology Updates
403 -
Workload Fluctuations
1
Related Content
- how to create destinations on mufti tenancy subscriber account with java cloud sdk in Technology Q&A
- Benchmarking in the data-driven era in Technology Blogs by SAP
- sh: 1: fiori: not found-> The most popular error for Fiori Developers in Technology Blogs by Members
- SAP Datasphere - Space, Data Integration, and Data Modeling Best Practices in Technology Blogs by SAP
- Deploying SAP S/4HANA Containers with Kubernetes in Technology Blogs by SAP
Top kudoed authors
| User | Count |
|---|---|
| 12 | |
| 10 | |
| 9 | |
| 7 | |
| 7 | |
| 7 | |
| 6 | |
| 6 | |
| 5 | |
| 4 |