Requirement : Adding Data to Z table using create Web Service & Link with Third Party SW
Steps :
Create Z table ( zpptest1 ) Create Remote-Enabled FM Create Web Service SOAMANAGER Configuration
Create Z table
Create Table with 3 fields,
NUM1 - Value Entered from Third Part SW
NUM2 - Value Entered from Third Part SW
TOT - Value Calculated from FM and pass it to Table Using Web service and RFC
Create Remote-Enabled FM
SE37---> Go to ---> Function Group --->Create Group ---> Create FM under Functional group.
1. Select "Remote-Enabled Module" in Radio Button as below.
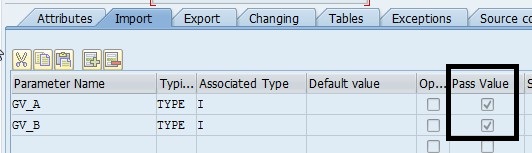
2. Tick on "Pass Value" option for All imports and exports Parameters.
3. Write Source code as below.
function zpptest.
*"----------------------------------------------------------------------
*"*"Local Interface:
*" IMPORTING
*" VALUE(GV_A) TYPE I
*" VALUE(GV_B) TYPE I
*" EXPORTING
*" VALUE(GV_TOT) TYPE I
*"----------------------------------------------------------------------
data : gs_save type zpptest1.
gv_tot = gv_a + gv_b.
gs_save- num1 = gv_a.
gs_save- num2 = gv_b.
gs_save- tot = gv_tot.
insert zpptest1 from gs_save.
clear gs_save.
endfunction .
Create Web Service
SE37---> Enter Functional module Name --> Change
utilities --> More Utilities -->Create Web Service --> From the Functional Module
Add service Definition & Description
Enter Functional Module Name , Tick Map Name , Click On Continue
Change Profile & Click on Continue..
Click On Local Object or Assign Request and Click on Continue
Now Web Service is Completely Created
Now go to T-code SE80. There you can see the Web service you have created under you package
name-> enterprise services folder.
SOAMANAGER Configuration
Go To SOAMANAGER
Search From Web Service Name
Double click on Highlighted ( Created Web Service )
Create Service
Fill Related Fields & Click On next to Create Service
Tick on No Authentication & enter User Name with Password
Click on Next
Click on Finish
Now Web Service is Created.
Click on below Icon & get WSDL URL for Binding. it can use link with third party Software.
Thank You
Pramod Pathirana