
- SAP Community
- Products and Technology
- Technology
- Technology Blogs by SAP
- How to install Hybrid Application Toolkit (HAT) on...
Technology Blogs by SAP
Learn how to extend and personalize SAP applications. Follow the SAP technology blog for insights into SAP BTP, ABAP, SAP Analytics Cloud, SAP HANA, and more.
Turn on suggestions
Auto-suggest helps you quickly narrow down your search results by suggesting possible matches as you type.
Showing results for
Advisor
Options
- Subscribe to RSS Feed
- Mark as New
- Mark as Read
- Bookmark
- Subscribe
- Printer Friendly Page
- Report Inappropriate Content
07-13-2015
4:46 PM
Introduction to part 3
This is the final part of this blog.
The entire blog has been split in 3 parts:
| Link | Content |
|---|---|
| Part1 | Install JDK, Android SDK and Apache ANT |
| Part2 | Install NodeJS, Cordova, Kapsel, Git, Plugman and configure environment variables |
| Part3 | Install HAT and test it |
All the prerequisites should have been successfully installed at this point if you have followed the previous two parts.
In this final part we are going to see the following things:
- Download HAT
- Setup HAT
- Run HAT and test its connectivity with SAP Web IDE
- Deploy your first Kapsel app to local Hybrid App Toolkit
Download HAT
Hybrid Application Toolkit can be downloaded for free from the SAP Store at this link.
As you already did for Kapsel, you just need to register, wait for the download links to be sent by email and download the product.
1) Once downloaded the package you should have a file named SAP_HAT_local. Right click on it and Extract All

2) Extract the file directly in the root of your C drive. A subfolder will be automatically created for you.
3) If you want you can rename this folder to something else, like for example to "hat"
Setup HAT
It's time now to start your Hybrid Application Toolkit installation.
1) Open your HAT folder and double click on the setup.cmd file. It's the one with Type=Windows Command Script

2) The installation process is launched. The setup script looks for another components, which we have not yet installed, but that the script automatically installs by itself. This component is "bower". It's a sort of tool which allows the script to easily install other missing libraries

3) It might happen that you are behind a proxy in your company and you have forgot to configure it for any of Npm, Git and Plugman tools. No worries! You can specify your proxy settings here and the HAT setup will manage all the needed configurations for you. The proxy must be entered in the form <http|https>://<host>:<port> (i.e. http://proxy:8080). This is what I'm doing right now.
If you are not behind a firewall, this step, of course, will not be required. If you want to manually configure Bower's proxy you can follow the procedure shown in the Appendix to this part.

4) After all the required packages have been all successfully installed by bower, the main page of HAT setup is opened. HAT setup is web based, so it's all managed by some web pages on a temporary web server automatically created by Node.js. This is how the main page looks like: it also reminds you to check if you have correctly matched all the basic prerequisites. Since we are good so far, we just need to click on the Check All button and all the other prerequisites will be checked by the script, which will also take care of installing all other missing things

5) Since we have already installed some components and configured all the environment variables, the first page of checks should go forward very smooth

6) Again you might get an error like this complaining that you are probably behind a proxy and you need to configure it. This time is for Gradle: you have here the chance to configure it during the installation. Just click on the first text box

7) A popup window appears and here you need to enter your proxy settings in the same format you did previously. Then click on Set

😎 The values are automatically set in the system
9) Go to the top left corner of the page and click again on the Check All button

10) The setup will restart, but this time you should pass that Gradle configuration test without any problem. When all the tests on the first page have been successfully completed a popup appears to inform you that you are going to be automatically redirected in a few seconds to the next page. If you are in hurry or tired to wait you can simply click on Next Step

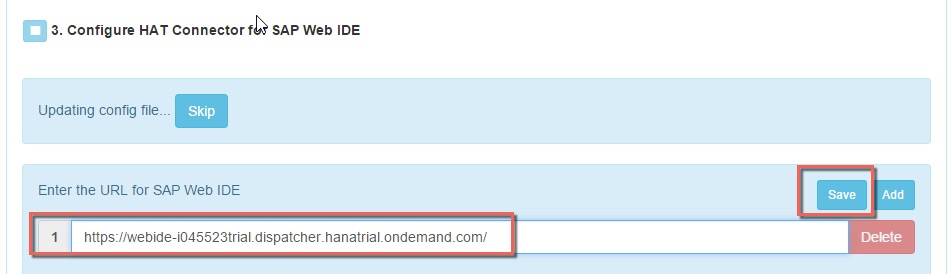
11) In this second page, at step 3, you are requested to provide the link to your SAP Web IDE instance (i.e. https://webide-<your_account>.dispatcher.hanatrial.ondemand.com/). You can enter of course more than one, but for this H2G we are fine with just one single link. In particular, here I'm using my SAP Web IDE from the HANA Trial Landscape. Once you have copied the link in the text box, simply click on Save
12) Here you can specify the path to the custom Cordova plugins folder. At moment we don't want to use any custom plugins so you can press Skip to skip this step

13) In the next step you are requested to provide a password for the local keystore, which is going to be created on your machine in order to host all the passwords required for HAT. Just enter twice the password you have chosen and click on Generate
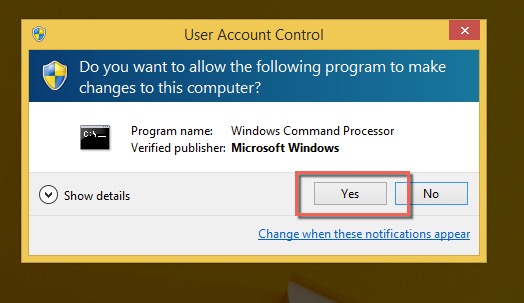
14) Click on Yes, if you get the User Access Control popup
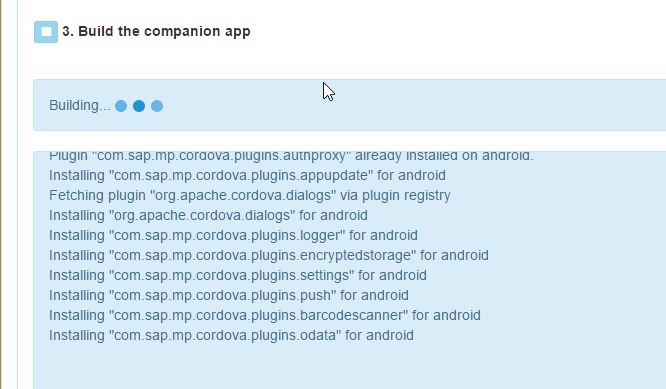
15) You are redirected now to page 3. At step 2 you need to provide some information regarding the Companion app. Fields are already pre-filled for you, so you can leave the proposed values and click on Save. The only thing that you have to specify are the custom Cordova plugins that you want to include in the companion app if any. We don't have any of them in this guide.
16) The Companion app is getting built. You need to wait a little bit depending on your hardware's power
17) When this process ends you are invited to close the page because setup completed successfully!

Run HAT and test its connectivity with SAP Web IDE
1) Open your HAT folder and double click on the run.cmd file
2) Enter your keystore password (the one you have previously defined)

3) HAT starts to listen on port 9010.

4) This port can be changed, of course, but you will need to edit the config.json file in the HAT folder and then put the same port number in SAP Web IDE under Tools --> Preferences --> Hybrid Application Toolkit. In this screen you can also test HAT connectivity by clicking on the Test Connection button.You should get the message that the connection is available

NOTE: If you are using Firefox it might happen that the connectivity is not working at the first attempt: this because of the https protocol on localhost. So you might get the following error:

What you have to do is just to add the https://localost:9010 site to your browser exceptions by following the steps listed in the APPENDIX to this part under the chapter Fix HAT connectivity issue with Firefox.
Deploy your first Kapsel app to local Hybrid App Toolkit
You are ready now to deploy your first Kapsel application to your local Hybrid App Toolkit
1) Open SAP Web IDE and create a new Kapsel app (if you don't have one yet) based on one of the Kapsel templates
2) Right click on the name of the project and choose Project Settings
3) Configure project settings according to your needs. In particular since you are on a Windows platform you can only specify Android as deployment platform. When you have finished click on Save

4) Right click on the name of the project and choose Deploy --> Deploy to local Hybrid App Toolkit

3) The application is downloaded from the Cloud and "mobilised" by HAT. You can follow the process in the background by opening the SAP Web IDE console window through the menu View --> Console
4) When the process finishes, you get a completion message; click on OK to close it
5) If you go on your file system, you should have a subfolder named SAPHybrid under your user folder. This subfolder contains another subfolder for each project you have deployed to your local HAT. In this case I have just one project

6) You can now run the deployed application on your device/emulator.

Congratulations! You have successfully installed and tested your Hybrid Application Toolkit!
APPENDIX
How to configure proxy for Bower
1) Create a new file named ".bowerrc" under the path C:\Users\<your_user>
2) Add to this file the following lines containing your proxy information
{

  "proxy":"http://proxy:8080",

  "https-proxy":"http://proxy:8080"

}

Fix HAT connectivity issue with Firefox
1) Open another page on your browser and enter the URL address https://localhost:9010
2) Click on I Understand the Risks --> Add Exception

3) Click on Confirm Security Exception

4) You get this message. Don't ask me why it mentions "Chrome" even though you are on Firefox

5) Retest your connection now, it should be fine
- SAP Managed Tags:
- SAPUI5,
- SAP Enterprise Portal,
- Mobile
95 Comments
- « Previous
-
- 1
- 2
- Next »
You must be a registered user to add a comment. If you've already registered, sign in. Otherwise, register and sign in.
Labels in this area
-
ABAP CDS Views - CDC (Change Data Capture)
2 -
AI
1 -
Analyze Workload Data
1 -
BTP
1 -
Business and IT Integration
2 -
Business application stu
1 -
Business Technology Platform
1 -
Business Trends
1,658 -
Business Trends
91 -
CAP
1 -
cf
1 -
Cloud Foundry
1 -
Confluent
1 -
Customer COE Basics and Fundamentals
1 -
Customer COE Latest and Greatest
3 -
Customer Data Browser app
1 -
Data Analysis Tool
1 -
data migration
1 -
data transfer
1 -
Datasphere
2 -
Event Information
1,400 -
Event Information
66 -
Expert
1 -
Expert Insights
177 -
Expert Insights
293 -
General
1 -
Google cloud
1 -
Google Next'24
1 -
Kafka
1 -
Life at SAP
780 -
Life at SAP
12 -
Migrate your Data App
1 -
MTA
1 -
Network Performance Analysis
1 -
NodeJS
1 -
PDF
1 -
POC
1 -
Product Updates
4,577 -
Product Updates
340 -
Replication Flow
1 -
RisewithSAP
1 -
SAP BTP
1 -
SAP BTP Cloud Foundry
1 -
SAP Cloud ALM
1 -
SAP Cloud Application Programming Model
1 -
SAP Datasphere
2 -
SAP S4HANA Cloud
1 -
SAP S4HANA Migration Cockpit
1 -
Technology Updates
6,873 -
Technology Updates
416 -
Workload Fluctuations
1
Related Content
- Menu not getting created in Technology Q&A
- SAP HANA Cloud Vector Engine: Quick FAQ Reference in Technology Blogs by SAP
- explore the business continuity recovery sap solutions on AWS DRS in Technology Blogs by Members
- SAP SABRIX UPGRADE in Technology Blogs by Members
- How to test a Windows Failover cluster? in Technology Blogs by SAP
Top kudoed authors
| User | Count |
|---|---|
| 31 | |
| 24 | |
| 10 | |
| 7 | |
| 6 | |
| 6 | |
| 5 | |
| 5 | |
| 5 | |
| 4 |