
- SAP Community
- Products and Technology
- Technology
- Technology Blogs by SAP
- How to install Hybrid Application Toolkit (HAT) on...
Technology Blogs by SAP
Learn how to extend and personalize SAP applications. Follow the SAP technology blog for insights into SAP BTP, ABAP, SAP Analytics Cloud, SAP HANA, and more.
Turn on suggestions
Auto-suggest helps you quickly narrow down your search results by suggesting possible matches as you type.
Showing results for
Advisor
Options
- Subscribe to RSS Feed
- Mark as New
- Mark as Read
- Bookmark
- Subscribe
- Printer Friendly Page
- Report Inappropriate Content
07-13-2015
4:45 PM
Introduction to part 2
This is the continuation of this blog.
The entire blog has been split in 3 parts:
| Link | Content |
|---|---|
| Part1 | Install JDK, Android SDK and Apache ANT |
| Part2 | Install NodeJS, Cordova, Kapsel, Git, Plugman and configure environment variables |
| Part3 | Install HAT and test it |
At the end of this series of parts, you should be able to successfully install your Hybrid Application Toolkit with minimum effort. In the previous part we have already seen how to install JDK, Android SDK and Apache Ant.
Now I'm going to show you how to install Kapsel, how to configure some environment variables and how to install a bunch of other components like GIT, Node.js, Kapsel CLI, Cordova and Plugman. This is the complete list of the steps we will go through in this part:
- Download and install SAP Kapsel Plugin
- Configure some environment variables (JAVA_HOME, ANT_HOME, KAPSEL_HOME, ANDROID_HOME and PATH)
- Install a GIT client
- Install Node.js
- Install Kapsel CLI
- Install Apache Cordova
- Install Plugman
Download and install SAP Kapsel Plugin
SAP Kapsel Plugin is included in the SAP Mobile Platform SDK package, which can be downloaded from the SAP Store at this link. Download is free.
1) Click on Trial Version. Once you have filled the contact form and sent it, you will receive an email with the download link

2) Once downloaded the package you can extract it. You can do it in the current folder because we won't need the entire package, but just a small part
3) Navigate to the extracted folder down to the path \modules\KapselSDK. You will find another zip file. Right click on it and select Extract all

4) Just extract it in the C:\KapselSDK folder: this is what you should get at the end

Configure some environment variables (JAVA_HOME, ANT_HOME, KAPSEL_HOME, ANDROID_HOME and PATH)
Let's now configure a bunch of system variables.
First of all, let's set the JAVA_HOME. The steps listed here for setting the JAVA_HOME variable are the same for all the other 3 variables. For the PATH variable you just need to append a new string to the existing PATH. You will see this later.
These are the variables you need to configure:
| VARIABLE | VALUE |
|---|---|
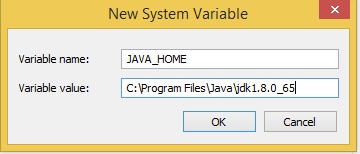
| JAVA_HOME | C:\Program Files\Java\jdk1.8.0_65 (pay attention to the correct path here!!!) |
| ANT_HOME | C:\apache-ant |
| KAPSEL_HOME | C:\KapselSDK |
| ANDROID_HOME | C:\Users\Winuser\AppData\Local\Android\android-sdk |
NOTE: Of course, in your case the paths can be different, if you have specified different folders during the previous steps.
NOTE: The ANDROID_HOME variable is NOT mandatory, but it's better to have it because it's much easier to set up the PATH variable for the Android tools.
So let's see how to configure the JAVA_HOME: then you can do the same also for the other variables.
1) Right click on the Start button and choose System. Alternatively you can open the Control Panel and navigate to System and Security --> System

2) Click on Advanced System Settings

3) Click on Environment Variables
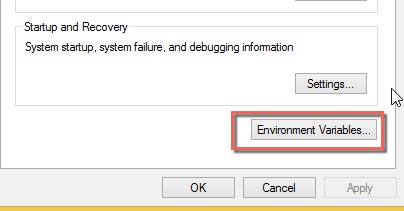
4) In the System Variables panel click on New

5) Enter the variable name JAVA_HOME and its value according to the table above and click on OK
6) Do the same for all the other variables.
7) Once all the 4 environment variables have been set up we can configure the path. In the System Variables panel, select the PATH variable and click on Edit

😎 Append to the PATH variable the following string(including the first semicolon) and click on OK
;%JAVA_HOME%\bin;%ANT_HOME%\bin;%ANDROID_HOME%\tools;%ANDROID_HOME%\platform-tools
9) At the end, you can check if you have done all correctly by typing one by one the following commands
echo %JAVA_HOME%
echo %ANT_HOME%
echo %ANDROID_HOME%
echo %KAPSEL_HOME%
path
You should get something like this

For each variable you receive the related path. Check that they are all correct. All the environment variables have been properly configured.
Install a GIT client
A GIT client is another very important tool for HAT: it's used to manage source code on the GIT server. There are many GIT clients available on the web, what we really need is a GIT client which works in the Terminal window. You can check if you have such a Git client installed on your machine by opening a Terminal window, typing the word "git" and hitting ENTER. You should get something like this

This means that the Git client is installed. If you don't have the Git installed you can follow this procedure to install it.
1) Download the Git client from here Git. Feel free to download the latest version
2) Start the installation process by double clicking on the installation file
3) Click on Next at the Welcome screen
4) Click on Next at the License information
5) Choose the path where you want to install it or leave the proposed one and click on Next
6) At the Select Components screen simply click on Next
7) Click again on Next to create a shortcut in the Start Menu
😎 You come now to an important step: here you need to choose how you would like to use Git from the command line. Choose the second option and click on Next

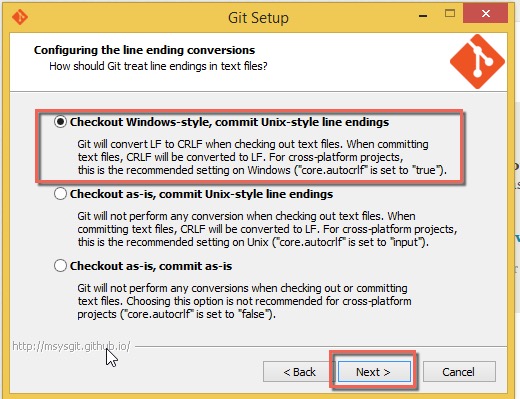
9) At next screen you are called to decide how Git client needs to deal with the line ending conversions. Let's choose the first option and click on Next
10) At the screen named "Configuring the terminal emulator to use with Git Bash" keep the "Use MinTTY" option selected and click on Next
11) At the screen named "Configuring experimental performance tweaks" keep the "Enable file system caching" option unselected and click on Next
12) The installation starts. At the end simply click on Finish
13) Close any open Terminal window and reopen a new one and issue again the "git" command. You should see that the Git client is now installed
14) In case you are behind a proxy firewall and you need to manually configure the proxy settings for Git, you can do it by following the steps listed in the APPENDIX to this part under the chapter How to configure proxy for Git
Install Node.js
Node.js is the main tool for HAT setup: the script which installs HAT uses this tool for executing the installation instructions.
It can be freely downloaded from https://nodejs.org/
The installation of Node.js brings in bundle a package manager which is called "npm" and can be used from the command line. This package manager is an important tool here for next steps. The "npm" tool is able to connect to some remote repository and install the package specified in the command line. For this reason, since it needs to connect to the internet network, it might be required to configure the proxy settings for it, in case your machine is behind a proxy firewall. The HAT installation will automatically ask you for proxy information and will set the npm configuration for you. In case you need to do it manually you can by following the steps listed in the APPENDIX to this part under the chapter How to configure proxy for npm
NOTE: You MUST NOT install the latest version, but just a specific version which is 10.4x. In this guide I'm going to install the 10.40 - 64bit.
1) Download the application
2) Double click on the download file to launch the installation process
3) Click on Next at the Welcome screen
4) Accept the license agreement and click on Next
5) For the destination folder you can leave the proposed one (the default for 64bit should be C:\Program Files\nodejs\) and click on Next
6) Click on Next again on the screen named Custom Setup
7) Click on Install to start the installation
😎 If you get the User Access Control popup, click on Yes to install the "node.js" program
9) Click on Finish when the installation finishes
10) If you close and reopen the terminal window now you should be able to check the versions of the two new commands "npm" and "node"

NOTE: if the npm command is not recognised in the Terminal window at the end of the installation, you might require to reboot your PC.
Install Kapsel CLI
This step will install the Command Line Interface for Kapsel. This is a very short step. All you have to do is just to run the following command in a Terminal window:
npm install -g c:\KapselSDK\cli (of course if you have installed the Kapsel plugin in a different folder you have to adapt this line)
You should get something like this:

NOTE: If you get errors here it's because most likely you have not properly configured your proxy settings for npm. Please follow the steps listed in the APPENDIX to this part under the chapter How to configure proxy for npm
Install Apache Cordova 5.2.0
Apache Cordova can be even installed during the HAT setup, but for sake of simplicity I'm going to install it here. It's important to mention that if you want to install Cordova during the HAT setup, you don't have to take care of the version to install, because the HAT setup will automatically propose you the right version: doing it in this phase requires that you know exactly which is the right version to install. For the HAT version I'm going to install in the 3rd part of this blog, the right Cordova version is 5.2.0 and this is exactly what I'm going to install here.
The installation is pretty simple: it's done through the "npm" command. You need just to open a Terminal window and run the command:
npm install -g cordova@5.2.0

NOTE: If you get errors here it's because most likely you have not properly configured your proxy settings for npm. Please follow the steps listed in the APPENDIX to this part under the chapter How to configure proxy for npm
Install Plugman
Plugman is a tool for installing/uninstalling plugins for Apache Cordova.
The installation of Plugman is achieved through an npm command as well:
npm install -g plugman

In case you are behind a proxy firewall and you need to manually configure the proxy settings for Plugman, you can do it by following the steps listed in the APPENDIX to this part under the chapter How to configure proxy for Plugman
Let's continue now with the third and last part!
APPENDIX
How to configure proxy for npm
These are the steps if you want to manually configure the proxy for the "npm" command:
1) Run the command
npm config list
to check that there is any proxy set for npm. Should you need to delete any old proxy information from npm configuration you can use the two commands:
npm config del proxy
npm config del https-proxy
2) Run
npm config set proxy <protocol>:://<proxyhost>:<proxyport>
to set the http proxy
3) Run
npm config set https-proxy <protocol>:://<proxyhost>:<proxyport>
to set the https proxy
4) Run again the
npm config list
command
5) Check that now the proxy information is set correctly

How to configure proxy for Git client
These are the steps if you want to manually configure the proxy for the "git" command:
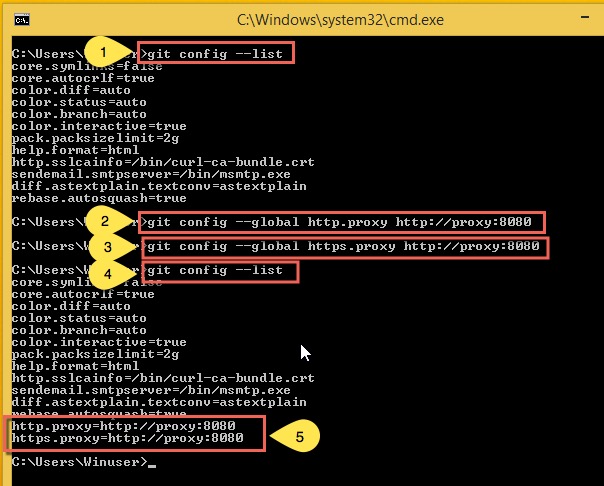
1) Run the command
git config --list
to check that there is any proxy set for Git. Should you need to delete any old proxy information from Git configuration you can use the two commands:
git config --global --unset http.proxy
git config --global --unset https.proxy
2) Run
git config --global http.proxy <protocol>:://<proxyhost>:<proxyport>
to set the http proxy
3) Run
git config --global https.proxy <protocol>:://<proxyhost>:<proxyport>
to set the https proxy
4) Run again the
git config --list
command
5) Check that now the proxy information is set correctly
How to configure proxy for Plugman
These are the steps if you want to manually configure the proxy for the "plugman" command:
1) Run the command
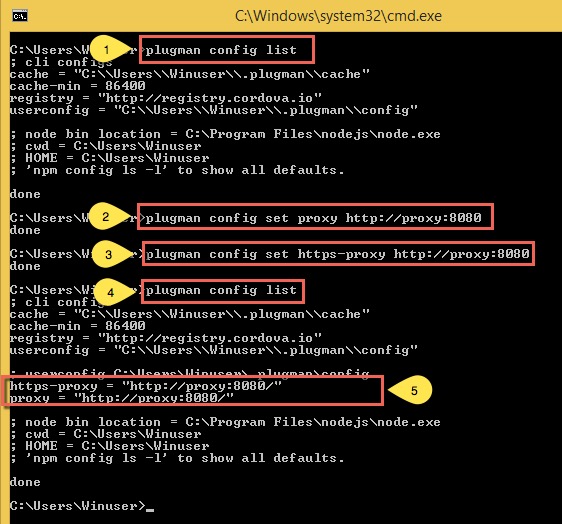
plugman config list
to check that there is any proxy set for Plugman. Should you need to delete any old proxy information from Plugman configuration you can use the two commands:
plugman config del proxy
plugman config del https-proxy
2) Run
plugman config set proxy <protocol>:://<proxyhost>:<proxyport>
to set the http proxy
3) Run
plugman config set https-proxy <protocol>:://<proxyhost>:<proxyport>
to set the https proxy
4) Run again the
plugman config list
command
5) Check that now the proxy information is set correctly
- SAP Managed Tags:
- SAPUI5,
- SAP Enterprise Portal,
- Mobile
20 Comments
You must be a registered user to add a comment. If you've already registered, sign in. Otherwise, register and sign in.
Labels in this area
-
ABAP CDS Views - CDC (Change Data Capture)
2 -
AI
1 -
Analyze Workload Data
1 -
BTP
1 -
Business and IT Integration
2 -
Business application stu
1 -
Business Technology Platform
1 -
Business Trends
1,661 -
Business Trends
87 -
CAP
1 -
cf
1 -
Cloud Foundry
1 -
Confluent
1 -
Customer COE Basics and Fundamentals
1 -
Customer COE Latest and Greatest
3 -
Customer Data Browser app
1 -
Data Analysis Tool
1 -
data migration
1 -
data transfer
1 -
Datasphere
2 -
Event Information
1,400 -
Event Information
64 -
Expert
1 -
Expert Insights
178 -
Expert Insights
273 -
General
1 -
Google cloud
1 -
Google Next'24
1 -
Kafka
1 -
Life at SAP
784 -
Life at SAP
11 -
Migrate your Data App
1 -
MTA
1 -
Network Performance Analysis
1 -
NodeJS
1 -
PDF
1 -
POC
1 -
Product Updates
4,577 -
Product Updates
324 -
Replication Flow
1 -
RisewithSAP
1 -
SAP BTP
1 -
SAP BTP Cloud Foundry
1 -
SAP Cloud ALM
1 -
SAP Cloud Application Programming Model
1 -
SAP Datasphere
2 -
SAP S4HANA Cloud
1 -
SAP S4HANA Migration Cockpit
1 -
Technology Updates
6,886 -
Technology Updates
401 -
Workload Fluctuations
1
Related Content
- explore the business continuity recovery sap solutions on AWS DRS in Technology Blogs by Members
- SAP SABRIX UPGRADE in Technology Blogs by Members
- How to test a Windows Failover cluster? in Technology Blogs by SAP
- Gamifying SAP C4C with BTP, the Flutter or Build Apps way. in Technology Blogs by SAP
- AI Foundation on SAP BTP: Q1 2024 Release Highlights in Technology Blogs by SAP
Top kudoed authors
| User | Count |
|---|---|
| 11 | |
| 10 | |
| 9 | |
| 9 | |
| 7 | |
| 7 | |
| 7 | |
| 6 | |
| 6 | |
| 5 |