Would you believe, if I said that the screen below, is a selection screen and not a dynpro?

I could find a lot of posts on the web, on how to include a selection screen, inside a dynpro.
http://scn.sap.com/thread/199048
http://scn.sap.com/thread/1340932
http://scn.sap.com/message/6804269
and so on….
But, I couldn’t find any posts on how to include a dynpro inside a selection screen. Standard way of working with this is, by using a tabbed block on selection screen and including the dynpro inside one of the tabs.
http://scn.sap.com/thread/1384476
Dynpro have capabilities to have table controls, custom controls, subscreen etc, which are not available on selection screen. Thus, an option to add a dynpro to the selection screen, can give you endless possibilities to play around on the selection screen.
A dynpro can be included in another dynpro, using a subscreen area. So, a dynpro can be included on a selection screen, if there is a way to create a subscreen area on the selection screen.
The way to create a subscreen area on the selection screen, is by creating a tabbed block.
SAP help gives the sample code to create a tabbed block, as:
SELECTION-SCREEN: BEGIN OF TABBED BLOCK mytab FOR 10 LINES,
TAB (20) button1 USER-COMMAND push1 DEFAULT SCREEN 100,
TAB (20) button2 USER-COMMAND push2 DEFAULT SCREEN 200,
END OF BLOCK mytab.
What this does is, it creates a subscreen area named mytab on the selection screen, with two tabs named button1 and button2. What this also does is, it creates a workarea inside the program, with name mytab, containing 3 fields, namely PROG, DYNNR and ACTIVETAB. When the 1st pushbutton is pressed, mytab-dynnr is assigned 100 and when the 2nd pushbutton is pressed, mytab-dynnr is assigned 200. Thus, when a person presses on each tab, the subscreen called in the subscreen area is different.
A sample output may look like

Now, I may include the dynpro in one of those tabs and the output may look like

In many cases, I do not have more than one dynpro to include on the selection screen. So, I don't need more than one tab. So, if I remove the unwanted tabs and keep the dynpro in one of the tabs, the output may look like.

Needless to say, this looks a bit akward.
So, I remove the final tab also, and just keep the frame, i.e., my code is reduced to just
SELECTION-SCREEN: BEGIN OF TABBED BLOCK mytab FOR 10 LINES,
END OF BLOCK mytab.
If I just execute the program now, it will result in a dump
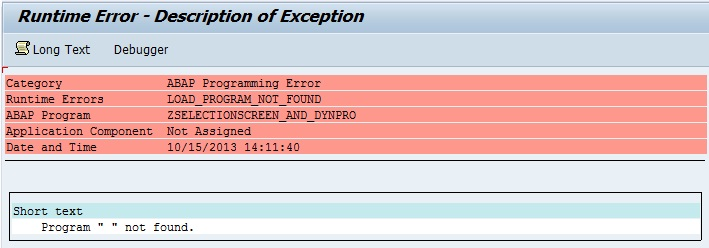
This because, the program doesn’t know which subscreen needs to be called.
Note that, in the code,
SELECTION-SCREEN: BEGIN OF TABBED BLOCK mytab FOR 10 LINES,
TAB (20) button1 USER-COMMAND push1 DEFAULT SCREEN 100,
TAB (20) button2 USER-COMMAND push2 DEFAULT SCREEN 200,
END OF BLOCK mytab.
The bold portion creates the subscreen area named mytab and the other portion creates the two tabs. So, when I remove the code for tabs, the subscreen area is not removed from the selection screen.
In order to avoid the dump, I must say what is the subscreen to be included in the subscreen area. Since mytab is also a workarea in the program, I can assign the subscreen number to that workarea, from within the program. To do that, in the INITIALIZATION or AT SELECTION-SCREEN OUTPUT event, I can assign mytab-prog = sy-cprog and mytab-dynnr = 100 or the dynpro screen number.
My final output will look like

Thus, using just the subscreen area, and not using the tabs, I can include a dynpro screen on a selection screen. Since I can have many other complex screen elements on a dynpro screen, I can have all those elements on the selection screen also.
