In this blog, I will try to explain the testing of SOAP Web Service using
Altova XMLSpy.
Step1: Creation of WebService is based on function module. Since the blog is all about testing, I will not cover the details on how the web service is created, rather will focus on configuration steps in SOAP and some authentication details.
Step2: Once the WebService is created, I will change the Authentication to Medium, As any way we are testing the web service based on SSO. So here we are not compromising on security by changing the authentication to Medium, it’s just to avoid providing User-ID and Password that may require on top of SSO details.
 Step3:
 Tcode: soamanager - > Here we will configure the service based on ‘
Simplified Web Service Configuration’.
 Step4:
Change the URL and remove the PORT details from WSDL URL and change The URL from http to https.
WSDL :
https://<SERVER_NAME>/sap/bc/srt/wsdl/flv_10002A111AD1/srvc_url/sap/bc/srt/scs/sap/<Service_name>?sap-client=001
Step5:
Login to Altova XMLSpy and create the new SOAP Request and provide the WSDL link and then select the service and SOAP Operation.
 Step6:
Double click on the link below “WSDL for Validation” and change the Server details to the Main server in case the landscape has Multiple Application Server.
Step6:
Double click on the link below “WSDL for Validation” and change the Server details to the Main server in case the landscape has Multiple Application Server.

 Step7:
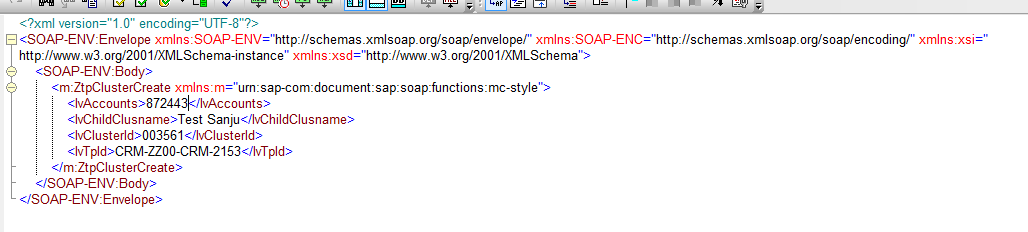
Provide the details in the payload.
 Step8:
Send request to the server.

In Address and SOAP Setting, specify the consume web service endpoint. These details are automatically filled, but in case it's missing, you can specify the one below.
Address:
https:// <SERVER_NAME>/sap/bc/srt/scs/sap/<service_name>?sap-client=001
SOAP Setting:
urn:sap-com:document:sap:soap:functions:mc-style:<service_name in CAPS>:<servicename>
HTTP Security Setting
Specify the SSO details from Select Option


Step9:
You will get the response back from the server once the call is successful.
