- SAP Community
- Products and Technology
- Technology
- Technology Blogs by SAP
- App Update: Deploy a hybrid application to SAP HAN...
- Subscribe to RSS Feed
- Mark as New
- Mark as Read
- Bookmark
- Subscribe
- Printer Friendly Page
- Report Inappropriate Content
Introduction
SAP Web IDE is an Integrated Development Environment for SAPUI5 and Fiori applications.
In this blog we shall see how to use Kapsel plugin App Update for a SAP UI5 mobile app. (along with Kapsel plugin Logon Manager)
(Note: This feature is not available for Web IDE local installation. Users should log on to a Web IDE application at HANA Cloud Platform.)
Objective
In this blog we shall see how to deploy an app to SAP HCPms with latest updates of the App.
The below steps show how to deploy a SAP UI5 mobile app along with latest updates first to HCPms and then onto a device on which it is installed. For this we will use Kapsel Plugin AppUpdate in SAP Web IDE.
We will follow the below steps,
- Create an app on HCPms
- Create SAPUI5 App in SAP Web IDE
- Develop a simple SAPUI5 Master-Detail application from one of the standard templates, in SAP Web IDE. This sample app takes data from ES1 via the service http://sapes1.sapdevcenter.com:8080/sap/opu/odata/sap/ZGWSAMPLE_SRV/ for getting the Products and Supplier information
- Setup Device Configuration
- Enable Kapsel plugin App Update and enter HCPms details
- Deploy and Run the app on an Android Device via local HAT (just for making it look like an existing app on device)
- Now, Update the app with necessary changes in SAP Web IDE
- Add a test button onto the search bar as an update to the existing app
- Deploy app to HCPms
- Check for updates of the app on the device
The updates for the app is seen as soon as we start the existing app and will look like this
Prerequisites
- SAP Web IDE 1.11 and later (you can register at SAP HANA Cloud Platform to get your development environment)
- Hybrid Application Toolkit 1.4.2 downloadable from here
- An HCPms account configurable as described here
- Valid User for ES1. Procedure to get access information is described here
- An Android device which is recognizable using your PC. To connect an Android device to the PC to test your applications you need to install the appropriate USB driver. Follow the link for steps.
- Please also ensure: (For these preparation steps please check at the end of this blog. For further info, You can also refer to the help document here )
- Destination is setup (to ES1),
- HAT Connector is started,
- HAT Plugin is enabled in SAP Web IDE,
- Kapsel SDK cli is installed
Steps
1. Create an application on HCPms
Logon to https://hcpmsadmin-<your_user>trial.dispatcher.hanatrial.ondemand.com where you need to replace the string "<your_user>" with your user account
Click on Applications Tile

At the bottom press button Add (with plus symbol), to create a new Application

Enter the following values:
Application ID | com.test.prods |
Version | 1.0 (default) |
Name | Products |
Type | Hybrid |
Description | Products |
Vendor | SAP |

Save the settings
Select tab Backend and enter the following:
Backend URL | http://sapes1.sapdevcenter.com:8080/sap/opu/odata/sap/ZGWSAMPLE_SRV/ |
Authentication Type | No Authentication |
Proxy Type | Internet |
Leave the rest of the default values as is.

Ping the Connection to verify a successful Ping Result
2. Create SAPUI5 App
Create an SAPUI5 Master Detail App, for Products consuming services from ES1
In SAP Web IDE, go to File --> New --> Project from Template

Select SAPUI5 Master Detail Kapsel Application. Press Next
Enter a valid Project Name: Example ProductsAppUpdate, Press Next
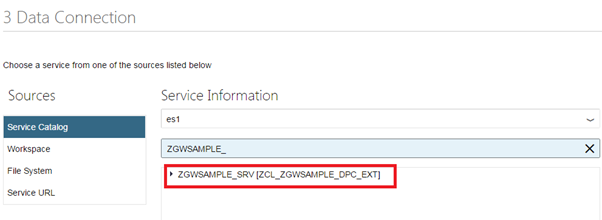
In the Data Connection, chose es1 from the dropdown of Service Catalog.
If asked for authentication provide UserID/Pwd for es1 
Search for service ZGWSAMPLE_SRV. Select it and Press Next
Enter the following into the fields:
Project Namespace: Products
Master Section
Title: Products
Odata Collection: ProductCollection
Search Field: ProductId
Main Data Fields
Item Title: ProductId
Numeric Attribute: Price
Units Attribute: Currency Code
Detail Section
Title: Products
Additional Attribute1: Description
Additional Attribute2: Category
Information Section
OData Navigations: Supplier
Navigation Attribute1: CompanyName
Navigation Attribute2: PhoneNumber
NavigationAttribute3: EmailAddress


Press Next
Press Finish
Optionally, Test the app as Web app. In SAP Web IDE open the newly created project ProductsAppUpdate. Right click on the index.html. Run --> Run as --> Web Application

3. Device Configuration
In SAP Web IDE, Right click on Project ProductsAppUpdate. Go to the Project Settings

Go to Device Configuration and enter the following:
App Name | Products |
App ID | com.test.prods (this should match the Id given in HCPms for Application) |
Description | Products |
Version | 1.0.0 |
Platforms | Android |

From Plugins, select Kapsel Plugin Logon Manager and App Update
Enter the HCPms host : hcpms-<you_user>trial.hanatrial.ondemand.com

Save the Settings
4. Deploy and Run on Device
Right click on the Project ProductsAppUpdate. Deploy -->Deploy to Local HAT

On a successful deployment a success message appears

Right click on the index.html. Run -->Run on Android Device. Ensure the device is connected
On the Android device, a screen appears to launch the app.
Enter the Logon info for ES1 and press Register

Disable Passcode and press Submit

The Main View with all the products should appear

5. Update the app with necessary changes in SAP WebIDE
Go back to SAP Web IDE. Go to folder ProductsAppUpdate. Open view Master.view.xml. Add the following code to add a button on the search bar. Immediately after the <contentMiddle> of the searchbar
<contentRight>
<Button id="btnTest" icon="sap-icon://customer" tooltip="TestButton"></Button>
</contentRight>
Save the content

Optionally, Run the index.html as a Web app to test the added button

6. Deploy app to HCPms
In order to get the updates to the device on which the app is already installed, follow the steps below
Open Web IDE Console View via Menu View --> Console,to check errors if any.

Right click the project ProductsAppUpdate and select Deploy -> Deploy to HCP Mobile Services menu

If authentication popup appears, enter the Hana Cloud Platform mobile services(HCPms) login info. Press LogIn

Click the Next button on the pop-up.

The project will be sent to local HAT for packaging. You can see the progress in the Console View.
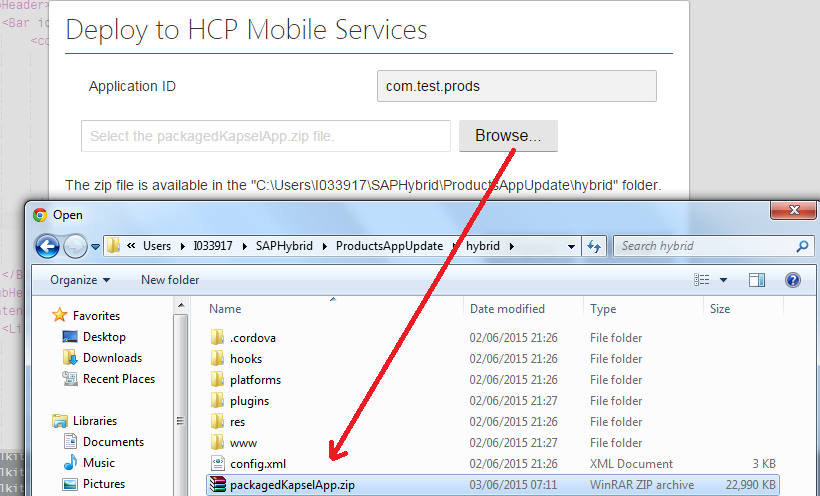
Once the packaging succeeds, on the popup that appears click the Browse... button, navigate to the suggested folder and select the packagedKapselApp.zip file

Press button Deploy

The upload progress and result will be shown in the pop-up. In case of an error, follow the given hint to correct the error

Click the Close button
Logon to Hana Cloud Platform mobile services(HCPms). Go to the application com.test.prods and press button Configure

Navigate to tab App Specific Settings. The most recent deployment should be seen. Select it and press the Deploy button

7. Check for updates for the app on the Device
Logon to the device on which the app is installed. Open the app.

A New Update available message pops up. Press Relaunch Now to get the latest updates on the device.

You should now be able to see the newly added button

That’s it for today!
====================================================================================
====================================================================================
====================================================================================
Preparation Steps:
1. Setup Destination
Login to your hanatrial account and set up destination configuration for ES1 (to consume services).
In a browser login to https://account.hanatrial.ondemand.com/ --> Cockpit
Go to Destinations --> New Destination…
Enter the following Destination Configuration parameters:
Name | es1 |
Description | es1 |
Type | HTTP |
URL | |
ProxyType | Internet |
CloudConnectorVersion | 2 |
Authentication | NoAuthentication |
And Additional Properties:
WebIDEUsage | odata_abap |
WebIDEEnabled | true |
WebIDESystem | es1 |
Save the configuration settings
2. Start the HAT Connector
To allow Web IDE to interact with Hybrid App Toolkit add-on components on your local machine over HTTPS, start Hybrid App Toolkit Connector.
From the SAP_HAT_local-<version> folder: On Windows, double-click run.cmd, or type this command in a command window. On Macintosh, in a terminal window, first run chmod +x *.sh and then ./run.sh.
At the prompt, enter the keystore password. This password is the same one entered during the HAT setup procedure. The Hybrid App Toolkit Connector starts and listens for requests from Web IDE.
3. Enable HAT Plugin in SAP Web IDE and Verify
Login to SAP Web IDE. Ensure that Hybrid App Toolkit is enabled. Test and verify that the connection is up.
In a browser login to https://webide-<your_user>trial.dispatcher.hanatrial.ondemand.com/ where you need to replace the string "<your_user>" with your user account
- Go to Tools --> Preferences
- Select Plugins --> Optional Plugins. Select Hybrid App Toolkit.
Next select Hybrid Application Toolkit from the left Pane. Press button Test Connection. Ensure that Connection is up
4. Install Kapsel SDK cli
Windows Installation
To install the CLI, open a terminal window and navigate to the Kapsel CLI folder. On Windows, the SDK installer installs the SDK by default in c:\SAP\MobileSDK3\, so the Kapsel CLI can be found in c:\SAP\MobileSDK3\KapselSDK\cli. With a terminal window open to the cli folder, issue the following command:
npm -g install
Macintosh OS X Installation
To install the CLI, open a terminal window and navigate to the Kapsel CLI folder. On OS X, the SDK installer installs the SDK by default in /users/user_name/SAP/MobileSDK3/ (replacing user_name with the login name for the user performing the installation), so the Kapsel CLI can usually be found in /users/user_name/SAP/MobileSDK3/KapselSDK\cli. With a terminal window open to the cli folder, issue the following command:
sudo npm -g install
- SAP Managed Tags:
- SAPUI5,
- SAP Enterprise Portal
You must be a registered user to add a comment. If you've already registered, sign in. Otherwise, register and sign in.
-
ABAP CDS Views - CDC (Change Data Capture)
2 -
AI
1 -
Analyze Workload Data
1 -
BTP
1 -
Business and IT Integration
2 -
Business application stu
1 -
Business Technology Platform
1 -
Business Trends
1,661 -
Business Trends
85 -
CAP
1 -
cf
1 -
Cloud Foundry
1 -
Confluent
1 -
Customer COE Basics and Fundamentals
1 -
Customer COE Latest and Greatest
3 -
Customer Data Browser app
1 -
Data Analysis Tool
1 -
data migration
1 -
data transfer
1 -
Datasphere
2 -
Event Information
1,400 -
Event Information
64 -
Expert
1 -
Expert Insights
178 -
Expert Insights
267 -
General
1 -
Google cloud
1 -
Google Next'24
1 -
Kafka
1 -
Life at SAP
784 -
Life at SAP
10 -
Migrate your Data App
1 -
MTA
1 -
Network Performance Analysis
1 -
NodeJS
1 -
PDF
1 -
POC
1 -
Product Updates
4,579 -
Product Updates
315 -
Replication Flow
1 -
RisewithSAP
1 -
SAP BTP
1 -
SAP BTP Cloud Foundry
1 -
SAP Cloud ALM
1 -
SAP Cloud Application Programming Model
1 -
SAP Datasphere
2 -
SAP S4HANA Cloud
1 -
SAP S4HANA Migration Cockpit
1 -
Technology Updates
6,886 -
Technology Updates
388 -
Workload Fluctuations
1
- Deep dive into Q4 2023, What’s New in SAP Cloud ALM for Implementation Blog Series in Technology Blogs by SAP
- How can I ensure that a leading Business Object Fiori application uses Attachment Service component? in Technology Q&A
- Best practice how to deal with action parameters in RAP service in Technology Q&A
- CAP LLM Plugin – Empowering Developers for rapid Gen AI-CAP App Development in Technology Blogs by SAP
- Launching an application built with SAP Mobile Services directly through SAP Mobile Start in Technology Q&A
| User | Count |
|---|---|
| 18 | |
| 15 | |
| 11 | |
| 10 | |
| 9 | |
| 9 | |
| 9 | |
| 9 | |
| 9 | |
| 8 |