
- SAP Community
- Groups
- Interest Groups
- Application Development
- Blog Posts
- Read Access Logging - Dynpro Configuration Step-by...
Application Development Blog Posts
Learn and share on deeper, cross technology development topics such as integration and connectivity, automation, cloud extensibility, developing at scale, and security.
Turn on suggestions
Auto-suggest helps you quickly narrow down your search results by suggesting possible matches as you type.
Showing results for
naveen_inuganti
Active Contributor
Options
- Subscribe to RSS Feed
- Mark as New
- Mark as Read
- Bookmark
- Subscribe
- Printer Friendly Page
- Report Inappropriate Content
05-15-2015
6:36 PM
Introduction:
Read access logging is one of the powerful tool to secure data. With help of this SAP out-of-the box solution, you can monitor data that is being accessed via SAP Dynpro, WebDynpro, RFC and Web-service channels.
In this document, I would like to share step-by-step guide to configure Dynpro application. Please check SAP Note 1969086 for release information of Read access logging. You need to have specific roles to configure the application.
Steps to configure Dynpro application:
1. Access Read access logging screen with SRALMANAGER transaction code

2. Click on Logging Purposes
Note: A way to classify each log entry. For example, “Privacy” or “Finance records”.
3. Click on “Create”
4. Enter data and click on “Create” to close pup-up
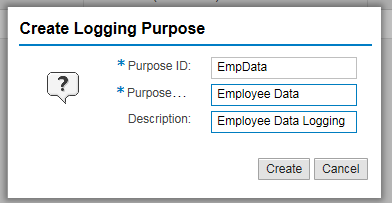
5. You can see new purpose in “Purposes” screen. You can delete it or change name and description of it.
Note: You may want to re-use existing “purpose” for your configuration.

6. Come to home screen and click on “Log domains”

7. Click on “Create”
Note: This is where you define semantic identification of data, before the actual fields and rules are
defined
8. Enter data in below fields and click on “Create” to close pop-up

9. You will see newly created domain in “Log Domains” screen

10. Come back to the home screen.
11. If you want to configure Read access logging for “SAP GUI screens” or “WebDynpro” screens then you should record fields of those screens – before actual configuration. To do that, click on “Recordings”
Note: This step is not required for RFC or Web-service channel.

12. Click on “Create” to start new recording.
13. Select the “Channel” from drop down and any new name for recording as shown below.

14. Click on “Create” to close the pop-up. As you can see under “State” column – Recording is active for system (all SAP GUI transactions/screens)

| 15. | Go to the application (SAP Dynpro) to which you want to enable read access logging. In this guide, we are going to configure RAL for small application where we can see Salary/PII data for given Employee ID. |
| 16. | Input Screen: Do “Ctrl+Right Click” on the field input to record the field. |

| 17. | Output screen: Do “Ctrl+Right Click” on each field that you want to record. |

| 18. | You can use “Remove field from Recording” option to remove the field from recording. |
Note: You need not to press “Ctrl” for table columns. Also, there is no additional configuration/development required to get “Record Field” option in context menu.
| 19. | Go back to SRALMANAGER or “Recordings” screen of the Read Access Logging and turn of “Recording” by clicking on “stop” icon (State will be modified to “Finished”) |

| 20. | You can click on icon to start recording once again. |
| 21. | Click on “Open Recording” or icon. You will notice all fields that you recorded are now available here along with technical paths. |

| 22. | Come back to home screen and click on “Configuration” |

| 23. | Select “Dynpro” for channel drop down |

| 24. | Click on “Create” to create new configuration. Select the new recording that you created and click on “create” to close this pop-up |

| 25. | You will see screen like below |

| 25.1. | Log Context: |
The log context is the UI element that other UI elements within the logging session depend on.
SAP help link for more details:
https://help.sap.com/saphelp_nw74/helpdata/en/fd/4d2551b7dd2314e10000000a44176d/content.htm
| 25.2. | Log Groups: |
List of fields for which you want to enable read access logging
| 25.3. | Conditions: |
You can apply conditions for read logging. Ex: Exclude user ABCUSER from logging
| 25.4. | Field List: |
List of fields that you recorded (or list of interface parameters in case of RFC or Webservice), Messages, Ok Codes and system fields for user name, screen title and transaction code
| 26. | Create new context by clicking on “create” icon |
| 27. | Enter below details and click on ‘create’ to close popup |

| 28. | Drag and drop the fields from “Field list” to Log context |

Select ‘Input’ from dropdown (or whichever is appropriate for your application)

| 29. | Click on ‘Save as Inactive’ |
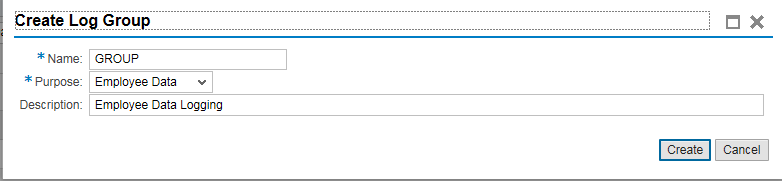
| 30. | Click on “create” under Log Group section to create new log group |
| 31. | Enter below data and select Log purpose that you created (or an existing one). Click on create to close popup. |
| 32. | Drag and drop the fields that you want log. You can do it for all the fields that you records and system fields. |
| Note: You need not to log fields that added to Log Context here. |

| • | As shown above, you can select “Without Value” if you don’t want to log the data that was accessed. | |
| • | Set the field type based on the application UI field. | |
| • | Choose correct Log Domain. | |
| • | “Exclude if initial” the field is not logged if its value is initial to save space in the database. |
| 33. | Click on “Save as active” button |

| 34. | Now, click on “create” button under “Conditions” section |
| 35. | Enter below data and click on “create” to close |

| 36. | Click on ‘create’ button under “Expressions”. Enter name and click on ‘create’ |
| 37. | Drag & drop the fields from ‘Field List’ and create condition |

| 38. | After creating one or more conditions based on the fields available in field list, you can “Save and Activate” the whole configuration |
| 39. | Go to “Monitor” tab and click on “Read Access Log” link |

| 40. | Select the ‘Raw Database’ from data source drop down. You can select 'Expanded database' when you want to access logs from other systems/clients (this require additional configuration) |
.

| 41. | You can leverage flexible search criteria that is available with ‘save’ option to see your log details |

| 42. | You will see logs under ‘Search Result’ |
| 43. | Select one of the log to see log data details |

Conclusion:
This is E2E basic configuration for sample application. However, we can increase the scope of configuration with log context, log groups and conditions based on the application that we are dealing with. You can configure the webdynpro application with same approach.
Regards,
Naveen Inuganti
- SAP Managed Tags:
- Security
7 Comments
You must be a registered user to add a comment. If you've already registered, sign in. Otherwise, register and sign in.
Labels in this area
-
A Dynamic Memory Allocation Tool
1 -
ABAP
8 -
abap cds
1 -
ABAP CDS Views
14 -
ABAP class
1 -
ABAP Cloud
1 -
ABAP Development
4 -
ABAP in Eclipse
1 -
ABAP Keyword Documentation
2 -
ABAP OOABAP
2 -
ABAP Programming
1 -
abap technical
1 -
ABAP test cockpit
7 -
ABAP test cokpit
1 -
ADT
1 -
Advanced Event Mesh
1 -
AEM
1 -
AI
1 -
API and Integration
1 -
APIs
8 -
APIs ABAP
1 -
App Dev and Integration
1 -
Application Development
2 -
application job
1 -
archivelinks
1 -
Automation
4 -
BTP
1 -
CAP
1 -
CAPM
1 -
Career Development
3 -
CL_GUI_FRONTEND_SERVICES
1 -
CL_SALV_TABLE
1 -
Cloud Extensibility
8 -
Cloud Native
7 -
Cloud Platform Integration
1 -
CloudEvents
2 -
CMIS
1 -
Connection
1 -
container
1 -
Debugging
2 -
Developer extensibility
1 -
Developing at Scale
4 -
DMS
1 -
dynamic logpoints
1 -
Eclipse ADT ABAP Development Tools
1 -
EDA
1 -
Event Mesh
1 -
Expert
1 -
Field Symbols in ABAP
1 -
Fiori
1 -
Fiori App Extension
1 -
Forms & Templates
1 -
General
1 -
Getting Started
1 -
IBM watsonx
1 -
Integration & Connectivity
10 -
Introduction
1 -
JavaScripts used by Adobe Forms
1 -
joule
1 -
NodeJS
1 -
ODATA
3 -
OOABAP
3 -
Outbound queue
1 -
Product Updates
1 -
Programming Models
13 -
Restful webservices Using POST MAN
1 -
RFC
1 -
RFFOEDI1
1 -
SAP BAS
1 -
SAP BTP
1 -
SAP Build
1 -
SAP Build apps
1 -
SAP Build CodeJam
1 -
SAP CodeTalk
1 -
SAP Odata
1 -
SAP UI5
1 -
SAP UI5 Custom Library
1 -
SAPEnhancements
1 -
SapMachine
1 -
security
3 -
text editor
1 -
Tools
17 -
User Experience
5
Top kudoed authors
| User | Count |
|---|---|
| 3 | |
| 3 | |
| 3 | |
| 2 | |
| 2 | |
| 2 | |
| 2 | |
| 1 | |
| 1 | |
| 1 |