Introduction
This blog post describes the SAP Web IDE Git Client features, from the very simple ones to the most complex. I’ll explain how to use it in the most beneficial way.
The first thing you have to do to work with Git, is to have a Git repository in your SAP Web IDE workspace, which you obtain by cloning (or you can deploy an application to SAP HANA Cloud Platform (HCP), which creates a Git repository for you, but in this post I’ll explain it from the clone option). The SAP Web IDE Git Client can work with any Git server, I’ll use the SAP HCP Git server.
Cloning the Git Repository
When you create an HTML5 application in the SAP HCP cockpit, you get a Git repository.
To clone this repository, click on the created application, select Versioning from the menu on the right [1], and click Edit Online [2]. SAP Web IDE opens showing an external command confirmation dialog box (telling you that the Git repository will be cloned).
Click OK. The Clone Repository dialog box appears. Enter your HCP credentials and click OK. If you select Remember Me, your credentials are saved until the next time you refresh your browser.

Once the repository has been cloned, you will see it in your workspace [4]. To follow the operation status, from the View menu, select Console.
Publish Changes to Work Collaboratively
So you’ve worked on your files and saved the changes. You now need to publish your changes so that your colleague, we’ll call him Bob, can see them and continue to work on top of your change. For this, you must push your changes.
First, open the Git pane (by clicking the Git pane button on the right menu bar [5]). You will see the modified, added, or deleted files on the staging table. Select the checkbox for the files that you want to publish [6], enter a description for the commit [7] and click Commit [8]. Your changes are committed and ready to be pushed to the Git server.

The repository status changes to indicate that your branch contains one change that the remote branch does not [9].
To push your commit, select Push > origin/master [10]. You could also press the commit and push button [11] instead of pressing commit and then push. Your commit is merged in the Git server (if there are no conflicts).

Update Workspace with the Latest Changes
Now Bob wants to get your changes.

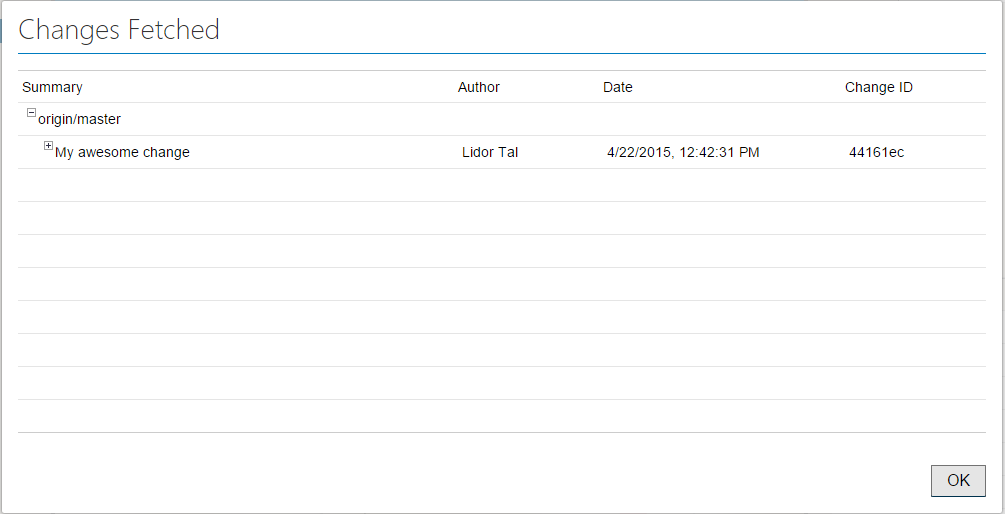
He must click Fetch. His origin/master branch is updated with the changes. He can see the fetched changes on the Changes Fetched dialog box that appears when the fetch is complete. On the Git status area [9] he’ll see that his branch is one commit behind the remote branch – which means that his remote branch contains changes that his local branch does not.
But Bob’s workspace still does not contain your changes. He has to rebase his local branch by clicking Rebase and then selecting origin/master when prompted.
After pressing OK, if there are no conflicts, the rebase operation is completed and Bob will get your changes. Now he can continue to work on the most updated code.
I recommend you fetch and rebase before performing push in order to avoid merge issues.
Staging Table in Detail and the Amend Magic
All your changes appear in the staging table [12] until you commit them. These can be added, deleted or modified files, and also files with conflicts. To see the changes made to the files, double click the line in the table. You can ignore new files – which means that the Git repository will not track changes on those files, and you will not be able to commit them. For the other files, you can open the file in the editor by selecting Edit from the context menu.
If you have any changes you want to discard, click Discard [13] or Discard All [14]. You can also stage all your changes by selecting the Stage All checkbox [15] – this means that the next commit will contain all these files.
If you committed some change but still didn’t push it, and you want to add more changes to the same commit, stage the files that you want to add to the commit, select the Amend Changes checkbox [16] and commit. You don’t need to enter a commit description since the commit you are amending to, already has one.
There are a lot cases to use the Amend option. Let’s say you developed something that works only partially. You still cannot push it, but you want to save it in its current state. In this case, you can commit without pushing and continue with your development. The diff will be only with your new development. In other words, it compares the current state to the committed one. When ready, you can stage your files, amend the commit, and then commit.

The amend option is very powerful but it can also cause trouble if you don’t use it correctly. For example, amending changes to a commit that was already pushed and merged will cause your next push to fail.
In the next blog I will explain how to work with multiple branches and how to use the Git History pane.
