
- SAP Community
- Products and Technology
- Technology
- Technology Blogs by SAP
- [Kapsel] How to use the Push plugin on iOS
Technology Blogs by SAP
Learn how to extend and personalize SAP applications. Follow the SAP technology blog for insights into SAP BTP, ABAP, SAP Analytics Cloud, SAP HANA, and more.
Turn on suggestions
Auto-suggest helps you quickly narrow down your search results by suggesting possible matches as you type.
Showing results for
Advisor
Options
- Subscribe to RSS Feed
- Mark as New
- Mark as Read
- Bookmark
- Subscribe
- Printer Friendly Page
- Report Inappropriate Content
04-27-2015
6:11 PM
As very well described by Dan van Leeuwen at Getting Started with Kapsel - Part 4 -- Push, "push messages provide a way to inform or remind a user that an action should be taken by delivering a short message that appears as a notification on the device. When clicked on, the app that is associated with the message is opened. The Kapsel push plugin provides an abstraction layer over the Google Cloud Messaging for Android (GCM), Windows Push Notification Services (WNS) and Apple Push Notification Service (APNS). A notification can be sent to a device registered with an application via a REST call to http://SMP_3.0_SERVER:8080/Notifications/application_registration_id. The REST call should either contain a header named X-SMP-DATA or X-SMP-GCM-DATA which includes values for the title and message content to be displayed or the values can be included in the URL."
There are three agents working on the push notification feature:
This plugin allows users or developers to register the developed app for receiving push notifications. It is also possible to process notification in the background.
The Push API offers tasks to:
Proxy settings should be set in the Administration and Monitoring tool, under Settings > System > HTTP Proxy Settings in case you are using an SMP Server in a network that uses a proxy in order to have your SMP Server accessing GCM, WNS and APNS servers. Do not forget to remove these settings if the network, where your SMP Server is, is not using a proxy.
Also, do not forget to open the right ports if you are using an SMP Server in a corporate network to have push notifications working. For GCM, the 5228 and 5230 ports should be open. Check here what ports should be open for APNS.
As recommended by Dan, "for additional details see the JavaScript file in a project that includes this plugin at project_name\www\plugins\com.sap.mp.cordova.plugins.push\www\push.js or the JS Documentation at Kapsel Push API Reference."
This document is focused on Kapsel push plugin used on iOS (APNS). So, if you wish to have an example and a good document about how to use the Kapsel push plugin on Android (GCM), I strongly recommend Dan's document: Getting Started with Kapsel - Part 4 -- Push. For Windows Push Notification Services (WNS), I recommend my SCN document: [Kapsel] How to use the Push plugin on Windows.
Also note that iPhone or iPad simulators do not support push notifications, so you will need a real iOS device.
Let's go through the steps to get it working:
"If the status is 403, this indicates a permission problem. Double check that that the correct user id and password for the Notification security profile were correctly entered. Also double check that the correct role name of Notification User was assigned to the Roles of the authentication provider for the Notification security profile.
If the status is 404, this may indicate that the app did not successfully register for notifications. Try pressing the Register for Push button again and verify that the Successfully registered alert displays."
There are three agents working on the push notification feature:
- The SAP Mobile Platform Server. It is responsible for gathering push notifications and device IDs from the client using the notification service provider.
- The Kapsel app running on the device, which is responsible for receiving the notifications.
- The notification service provider (APNS, GCM or WNS).
This plugin allows users or developers to register the developed app for receiving push notifications. It is also possible to process notification in the background.
The Push API offers tasks to:
- Register or unregister for push notifications.
- Handle push notifications.
- Configure push notifications.
- Handle error messages.
Proxy settings should be set in the Administration and Monitoring tool, under Settings > System > HTTP Proxy Settings in case you are using an SMP Server in a network that uses a proxy in order to have your SMP Server accessing GCM, WNS and APNS servers. Do not forget to remove these settings if the network, where your SMP Server is, is not using a proxy.
Also, do not forget to open the right ports if you are using an SMP Server in a corporate network to have push notifications working. For GCM, the 5228 and 5230 ports should be open. Check here what ports should be open for APNS.
As recommended by Dan, "for additional details see the JavaScript file in a project that includes this plugin at project_name\www\plugins\com.sap.mp.cordova.plugins.push\www\push.js or the JS Documentation at Kapsel Push API Reference."
This document is focused on Kapsel push plugin used on iOS (APNS). So, if you wish to have an example and a good document about how to use the Kapsel push plugin on Android (GCM), I strongly recommend Dan's document: Getting Started with Kapsel - Part 4 -- Push. For Windows Push Notification Services (WNS), I recommend my SCN document: [Kapsel] How to use the Push plugin on Windows.
Also note that iPhone or iPad simulators do not support push notifications, so you will need a real iOS device.
Let's go through the steps to get it working:
- First of all, we need to go to the Apple Developer Member Center accessing the following URL: Member Center - Apple Developer
- To do the following steps you will need to belong to a Development Team in the Apple Developer Member Center and to be an Admin of this team.
- Use Safari for that, because there are problems using Chrome or Firefox.
- For more info, check Development Team.
- Under Developer Program Resources, clickon the Certificate image.
- Then click on Devices.
- You will need to register your device.
- Connect your iOS device to you Mac to check its UDID.
- If it is not open automatically, open iTunes.
- Click on the device icon on the top of iTunes screen. In my case, iPad icon.

- On the right side of your screen, click on Serial Number to see the UDID of your device.
- Right-click this number and copy it.
- Back to Apple Developer Member Center, add your device.
- Click on the Plus button at the top of screen, close to the Add iOS Devices title.
- Fill in a name for your device.
- Paste your device's UDID to the UDID field.

- Click on Continue > Register > Done.
- On Apple Developer Member Center, add a new App ID.
- Click on the Plus button at the top of screen, close to the iOS App IDs title.
- Give a name to your App ID.
- Under App ID Suffix, set the Bundle ID with the Explicit App ID option selected. This Bundle ID needs to be unique, so choose one.

- Under App Services, select the Push Notifications option.
- Click on Continue > Submit > Done.
- Before creating an iOS certificate, you will need to create a Certificate Signing Request (CSR) file.
- In the Applications folder of your Mac, open the Utilities folder and launch Keychain Access.
- Within the Keychain Access drop down menu, select Keychain Access > Certificate Assistant > Request a Certificate from a Certificate Authority.
- In the Certificate Information window, enter the following information:
- In the User Email Address field, enter your email address.
- In the Common Name field, create a name for your private key (e.g., John Doe Dev Key).
- The CA Email Address field should be left empty.
- In the Request is group, select the Saved to disk option.
- Click Continue within Keychain Access to complete the CSR generating process.

- Now you need to create an iOS certificate.
- On Apple Developer Member Center, click on Certificates > Development.
- Click on the Plus button at the top of screen, close to the iOS Certificates (Development) title.
- Because we are not creating this sample for production, under Development, select Apple Push Notification service SSL (Sandbox).
- Click on Continue.

- From the list, select the App ID you have created.
- Click on Continue > Continue.
- Click on Browse File... and select the CSR file you have generated.
- Click on Generate.
- Click on Download to save you iOS certificate locally.
- Press Done.
- The next step is to add an iOS Provisioning Profile.
- On Apple Developer Member Center, click on Provisioning Profiles > Development.
- Click on the Plus button at the top of screen, close to the iOS Provisioning Profiles (Development) title.
- Select iOS App Development under Development.
- Select the App ID you have created.
- Click on Continue.
- Select the certificate you have created.
- Click on Continue.
- Select the device(s) you have added.
- Click on Continue.
- Give a name to your iOS Provisioning Profile.

- Click on Generate.
- Download you provisioning profile.
- Finally click on Done.
- Add the provisioning profile to Xcode by double-clicking it or dragging it onto the Xcode icon.
- Now you need to convert you iOS certificate file to P12 format in order to use it with SMP.
- In the Applications folder on your Mac, open the Utilities folder and launch Keychain Access.
- Select File > Import Items... .
- Navigate to the iOS certificate file (the .cer file) you have downloaded.
- Select the Keys category in Keychain Access.
- Select the private key associated with your iPhone Development Certificate (you gave a name to it 3 steps before).

- Select File > Export Items... .
- Save your key in the Personal Information Exchange (.p12) file format.
- You will be prompted to create a password that is used when you attempt to import this key to SMP.
- Go through Dan's instructions at Configuring a Kapsel App in the Management Cockpit to create an app in the Administration and Monitoring tool using the app ID name you have chosen before.
- Do not forget that this should be also your app ID when you are creating it in the Apple website.
- Set any URL as your OData endpoint, since we are not going to consume data at this sample app.
- Use Basic SSO mechanism and the Default security provider.
- Go to the Push tab. Under Apple, select Sandbox if you are testing or developing an app. Select Production if you are in a production environment.
- For your sample app, select Sandbox.
- Press the Browse button.
- Select the certificate generated two steps before.
- Press the Open button.
- Enter the password you set for your certificate.
- Save the configuration.

- Now you need to add a System Login (Admin Only) authentication provider to the Notification security provider.
- Go to Settings > Security Profiles.
- Click on Notification.
- Click on the Add button.
- Set Authentication Provider as System Login (Admin Only).
- Set the Username field as smpPushUser, the Password field as smpPushPwd and the Roles field as Notification User.
- Click on Save > Save.
- Restart your SMP Server.
- This user and password will be used later to send a push notification to your device.

- Create your Cordova project and add the iOS platform to it.
- Open a Terminal.
- If you do not have one, create a Kapsel_projects folder inside your Development folder.
- Run the following commands in yout terminal shell, remembering to use as <APP_ID> the unique Bundle ID you registered in the Apple Developer Member Center:
- cordova -d create <DEVELOPMENT_PATH>/Kapsel_Projects/PushDemo <APP_ID> PushDemo
- cd <DEVELOPMENT_PATH>/Kapsel_Projects/PushDemo
- cordova -d platform add ios
- Add the push plugin to your Cordova project, running the following command in your terminal shell:
- cordova -d plugin add com.sap.mp.cordova.plugins.push --searchpath <SMP_SDK_PATH>/KapselSDK/plugins/
- In your Cordova project, replace the www/index.html by the following:
<html>
<head>
<script src="cordova.js"></script>
<script>
applicationContext = null;
appId = "com.mycompany.push"; // Change this to app id on server
// Optional initial connection context
var context = {
"serverHost": "172.25.82.195", //Place your SMP 3.0 server name here
"https": "false",
"serverPort": "8080",
"user": "i828888", //Place your user name for the OData Endpoint here
"password": "xxxxxxx", //Place your password for the OData Endpoint here
"communicatorId": "REST",
"passcode": "password", //note hardcoding passwords and unlock passcodes are strictly for ease of use during development
"unlockPasscode": "password",
"passcode_CONFIRM":"password"
};
window.onerror = onError;
function onError(msg, url, line) {
var idx = url.lastIndexOf("/");
var file = "unknown";
if (idx > -1) {
file = url.substring(idx + 1);
}
alert("An error occurred in " + file + " (at line # " + line + "): " + msg);
return false; //suppressErrorAlert;
}
function init() {
if (sap.Logger) {
sap.Logger.setLogLevel(sap.Logger.DEBUG); //enables the display of debug log messages from the Kapsel plugins.
sap.Logger.debug("Log level set to DEBUG");
}
sap.Logon.init(logonSuccessCallback, logonErrorCallback, appId, context);
}
function register() {
sap.Logon.init(logonSuccessCallback, logonErrorCallback, appId, context);
}
function logonErrorCallback(error) {
console.log("An error occurred: " + JSON.stringify(error));
if (device.platform == "Android") { //Not supported on iOS
navigator.app.exitApp();
}
}
function unRegister() {
try {
sap.Logon.core.deleteRegistration(logonUnregisterSuccessCallback, errorCallback);
}
catch (e) {
alert("problem with unregister");
}
}
function logonSuccessCallback(result) {
console.log("logonSuccessCallback " + JSON.stringify(result));
applicationContext = result;
}
function logonUnregisterSuccessCallback(result) {
alert("Logon Unregistration success");
applicationContext = null;
}
function errorCallback(e) {
alert("An error occurred " + JSON.stringify(e));
}
function registerForPush() {
var nTypes = sap.Push.notificationType.SOUNDS | sap.Push.notificationType.ALERT;
sap.Push.registerForNotificationTypes(nTypes, regSuccess, regFailure, processNotification, ""); //GCM Sender ID, null for APNS
}
function unregisterForPush() {
var nTypes = sap.Push.notificationType.SOUNDS | sap.Push.notificationType.ALERT;
sap.Push.unregisterForNotificationTypes(unregCallback);
}
function regSuccess(result) {
alert("Successfully registered: " + JSON.stringify(result));
}
function regFailure(errorInfo) {
alert("Error while registering. " + JSON.stringify(errorInfo));
console.log("Error while registering. " + JSON.stringify(errorInfo));
}
function unregCallback(result) {
alert("Successfully unregistered: " + JSON.stringify(result));
}
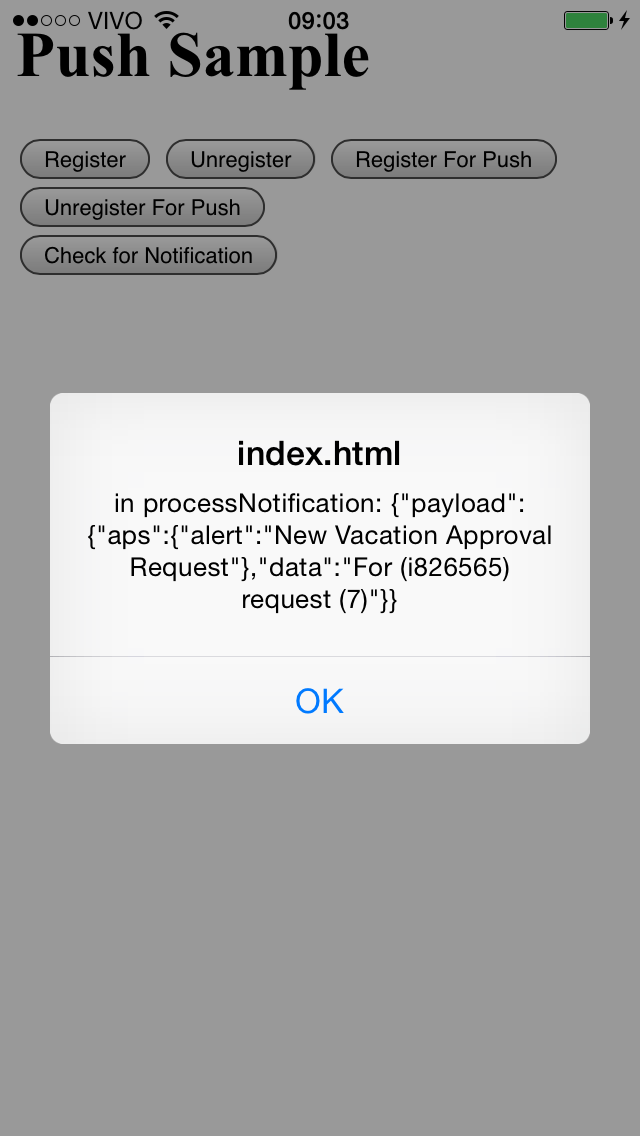
function processNotification(notification) {
alert("in processNotification: " + JSON.stringify(notification));
console.log("Received a notifcation: " + JSON.stringify(notification));
}
function processMissedNotification(notification) {
alert("In processMissedNotification " + JSON.stringify(notification));
console.log("In processMissedNotification");
console.log("Received a missed notification: " + JSON.stringify(notification));
}
function checkForNotification() {
sap.Push.checkForNotification(processMissedNotification);
}
/*function showRegistrationInfo() {
xmlhttp = new XMLHttpRequest();
var url = applicationContext.applicationEndpointURL + "/odata/applications/latest/" + appId + "/Connections('" + applicationContext.applicationConnectionId + "')";
alert(url);
xmlhttp.open("GET", url, false);
xmlhttp.setRequestHeader("X-SMP-APPCID", applicationContext.applicationConnectionId);
//xmlhttp.setRequestHeader("Authorization", "Basic " + btoa(applicationContext.registrationContext.user + ":" + applicationContext.registrationContext.password));
xmlhttp.send();
var responseText = xmlhttp.responseText;
alert(responseText);
console.log(responseText);
} */
document.addEventListener("deviceready", init, false);
</script>
</head>
<body>
<h1>Push Sample</h1>
<button id="register" onclick="register()">Register</button>
<button id="unregister" onclick="unRegister()">Unregister</button>
<button onclick="registerForPush()">Register For Push</button><br>
<button onclick="unregisterForPush()">Unregister For Push</button><br>
<button onclick="checkForNotification()">Check for Notification</button><br>
<!--<button onclick="showRegistrationInfo()">Registration Info</button><br>-->
</body>
</html>- In line 10 of the copied index.html file, set serverHost as your SMP Server's hostname or IP address.
- Copy your www files to the iOS platform folder, running the following command in your terminal shell:
- cordova -d prepare ios
- Go to the <DEVELOPMENT_PATH>/Kapsel_Projects/PushDemo/platforms/ios, and open the PushDemo.xcodeproj with Xcode.
- Use Ccode to deploy and run the project. This is how this app looks like:

- Click on Register for Push.

- Dan warns us that "when reopening the app, the Register For Push button must be pressed again or in a non-sample app, it should be called in the logonSuccessCallback method which would be called each time the application starts".
- The next step is to test your app. For this, you will need to send a REST request to your Kapsel app via SMP Server. So, open SMP cockpit and go to Applications > Registrations. In the Registrations table, you will find the Registration ID of your app. Take note of that ID.

- The URL you should use to send the REST request is: http://<SMP_SERVER>:8080/restnotification/registration/<REGISTRATION_ID>. The following payload: {"alert":"<ALERT_TITLe>", "data":"<ALERT_DATA>" }. Set also the Content-Type as application/json.
- When prompted for a User Name and Password enter smpPushUser and smpPushPwd.
- Using the Advanced Rest Client chrome app, this is the result you should have:

- Note, this example may not work if the forward slash is missing from the end of the URL.
- This is the result at you Kapsel app when it is in the foreground:
- When your app is in background, this is how the push notification will be shown:

- You can also send push notification to all devices registered for a specific app or to all the devices of a specific user. Please find more details here Notification Data Sent Using Push API.
- Dan van Leeuwen also talks about some error codes you may have when you are sending a REST request to your app:
"If the status is 403, this indicates a permission problem. Double check that that the correct user id and password for the Notification security profile were correctly entered. Also double check that the correct role name of Notification User was assigned to the Roles of the authentication provider for the Notification security profile.
If the status is 404, this may indicate that the app did not successfully register for notifications. Try pressing the Register for Push button again and verify that the Successfully registered alert displays."
- SAP Managed Tags:
- SAP Mobile Platform,
- SAP Mobile Platform SDK,
- SAP Business Technology Platform
30 Comments
You must be a registered user to add a comment. If you've already registered, sign in. Otherwise, register and sign in.
Labels in this area
-
ABAP CDS Views - CDC (Change Data Capture)
2 -
AI
1 -
Analyze Workload Data
1 -
BTP
1 -
Business and IT Integration
2 -
Business application stu
1 -
Business Technology Platform
1 -
Business Trends
1,661 -
Business Trends
87 -
CAP
1 -
cf
1 -
Cloud Foundry
1 -
Confluent
1 -
Customer COE Basics and Fundamentals
1 -
Customer COE Latest and Greatest
3 -
Customer Data Browser app
1 -
Data Analysis Tool
1 -
data migration
1 -
data transfer
1 -
Datasphere
2 -
Event Information
1,400 -
Event Information
64 -
Expert
1 -
Expert Insights
178 -
Expert Insights
273 -
General
1 -
Google cloud
1 -
Google Next'24
1 -
Kafka
1 -
Life at SAP
784 -
Life at SAP
11 -
Migrate your Data App
1 -
MTA
1 -
Network Performance Analysis
1 -
NodeJS
1 -
PDF
1 -
POC
1 -
Product Updates
4,577 -
Product Updates
325 -
Replication Flow
1 -
RisewithSAP
1 -
SAP BTP
1 -
SAP BTP Cloud Foundry
1 -
SAP Cloud ALM
1 -
SAP Cloud Application Programming Model
1 -
SAP Datasphere
2 -
SAP S4HANA Cloud
1 -
SAP S4HANA Migration Cockpit
1 -
Technology Updates
6,886 -
Technology Updates
403 -
Workload Fluctuations
1
Related Content
- SAP Cloud Logging Serviceでコンテナメトリクスを監視する in Technology Blogs by SAP
- Extend Upload Set to Fiori Elements and utilize Document Management Service in Technology Blogs by Members
- SAP BTP Command Line Setup and Cloud Foundry Setup in Technology Blogs by Members
- Error deploying react.js application to cloudfoundry using piper in Technology Q&A
- Fiori launchpad integrated GPT assistant: UI in Technology Blogs by Members
Top kudoed authors
| User | Count |
|---|---|
| 12 | |
| 10 | |
| 9 | |
| 7 | |
| 7 | |
| 7 | |
| 6 | |
| 6 | |
| 5 | |
| 4 |