
- SAP Community
- Products and Technology
- Enterprise Resource Planning
- ERP Blogs by Members
- Inspection Points: Key settings and Usage
Enterprise Resource Planning Blogs by Members
Gain new perspectives and knowledge about enterprise resource planning in blog posts from community members. Share your own comments and ERP insights today!
Turn on suggestions
Auto-suggest helps you quickly narrow down your search results by suggesting possible matches as you type.
Showing results for
nitin_jinagal
Active Contributor
Options
- Subscribe to RSS Feed
- Mark as New
- Mark as Read
- Bookmark
- Subscribe
- Printer Friendly Page
- Report Inappropriate Content
03-14-2015
6:39 AM
Inspection point is a wonderful tool which can be used to carry out inspection on the basis of several factors i.e Time frame, Quantity based, Sample Management, Calibration, or any other factor called as a POINT. In simple words, Inspection points can be applied to any scenario where multiple results are captured for a common inspection lot.
SAP has defined different Inspection points in standard itself and given additional provision to define our own process. I have tried to put my best efforts to write this document to identify the basic settings required to be done, relevant master data and execution of Inspection points in an inspection lot.
Since there are already system defined identifiers available, I'm going to adopt a customized approach for Inspection points.
Process: I have taken a scenario where business needs to record multiple results for a single inspection lot on the basis of Lab name, Shift name and Sample sequence. There are ten laboratories, which are analyzing samples round the clock shift wise. It's like recording the individual result per sample/lab/shift.
Configuration settings: QCC0> Quality Planning> Inspection planning> General> Define Identifier for Inspection points.
I have defined an Inspection point Z06 with reference of Shift, Laboratory and Sample detail.
1. In the following snap shot, Keywords are defined against respective User fields with Field Active. You need to provide a number into that to activate the respective User field. This also need to be consider that any Two fields each for Char type and Num type can be defined and one each for date and time in respective formats as indicated clearly below.
So whenever I go to record my result, I need to provide details in the sequence of Shift>Lab>Sample

2. Next step is to define the Valuation. Go the next tab 'Valuation' and assign the usage decision selected set along with Acceptance and Rejection criteria.
Following snap shot indicates the UD selected set Z01 defined in Plant 1100 along with A (Accepted) and R (Rejected) codes as per valuation. This valuation is basically done once you go to save the result for each Inspection point (Explained in later part of this document).

3. Next step is to Assign this inspection point into the header of Inspection plan.

Above settings are well enough to use the Inspection points. There could Sampling scenario also be in the picture where SP would need to be created wrt Inspection points. If it is not into use, then no need to create one.
Execution of Inspection points.
One GR is being everyday for the PO number 3500001413. System will create three inspection lots in three days (as shown below) and multiple analysis would be done daily and respective results would be recorded for each inspection lot using Inspection points.

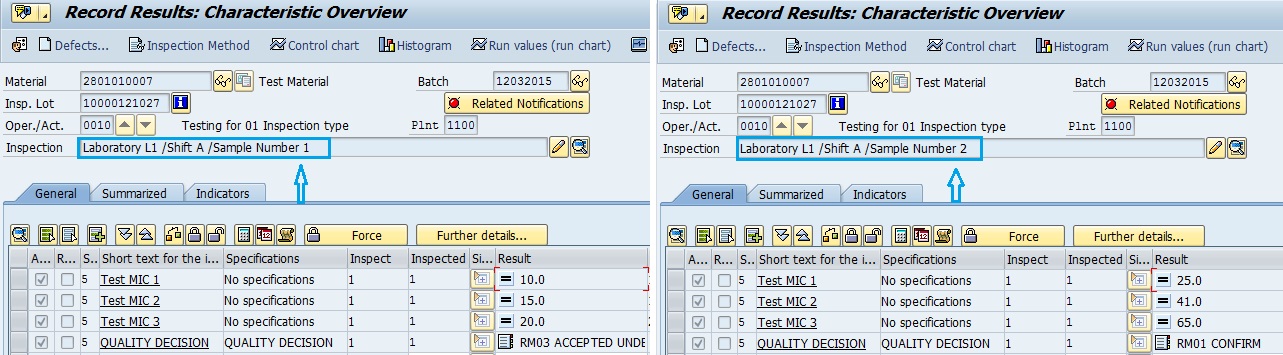
When user go to record the result against first inspection lot 10000121027, system will pop up a screen asking the Shift, Lab and Sample details. Refer following snapshot where input for Shift, Lab and sample is provided. This indicates the first sample analyzed in Lab 1 during Shift A.

Following snapshot reflects the multiple results against the same inspection lot, or different sample analysis carried out in same shift and laboratory using different point.
Similarly, there could be different combinations. Following is another case of multiple inspection points for a different inspection lot number.

This way, several combination can be made and result recording can be done following different points. If user provides the same combination, system will show the screen with already filled results.
As soon as you enter the result, system will ask for the valuation before saving them. It will give its own valuation (based on your predefined settings) but you can always change the valuation. Valuation against each inspection point is visible in the UD screen of the respective inspection lot.
Refer following snapshot,

Please note that if there is any class characteristic linking done, transfer of inspection results would take place on the basis of latest valuation.
At last, it is always fair to close the inspection lot which can be done by completing UD and releasing the stock out of QI.
Multiple results against a single inspection lot are stored in table QASR. This can be used directly or to generate any customized report to download the data.

I hope this document will come handy for all those who need step by step procedure to implement inspection points and those as well who haven't worked on IP for long time.
Any feedback pertaining a correction, update or in general is highly appreciable to strengthen this document.
Regards,
Nitin Jinagal
- SAP Managed Tags:
- PLM Quality Management (QM)
22 Comments
You must be a registered user to add a comment. If you've already registered, sign in. Otherwise, register and sign in.
Labels in this area
-
"mm02"
1 -
A_PurchaseOrderItem additional fields
1 -
ABAP
1 -
ABAP Extensibility
1 -
ACCOSTRATE
1 -
ACDOCP
1 -
Adding your country in SPRO - Project Administration
1 -
Advance Return Management
1 -
AI and RPA in SAP Upgrades
1 -
Approval Workflows
1 -
Ariba
1 -
ARM
1 -
ASN
1 -
Asset Management
1 -
Associations in CDS Views
1 -
auditlog
1 -
Authorization
1 -
Availability date
1 -
Azure Center for SAP Solutions
1 -
AzureSentinel
2 -
Bank
1 -
BAPI_SALESORDER_CREATEFROMDAT2
1 -
BRF+
1 -
BRFPLUS
1 -
Bundled Cloud Services
1 -
business participation
1 -
Business Processes
1 -
CAPM
1 -
Carbon
1 -
Cental Finance
1 -
CFIN
1 -
CFIN Document Splitting
1 -
Cloud ALM
1 -
Cloud Integration
1 -
condition contract management
1 -
Connection - The default connection string cannot be used.
1 -
Custom Table Creation
1 -
Customer Screen in Production Order
1 -
Data Quality Management
1 -
Date required
1 -
Decisions
1 -
desafios4hana
1 -
Developing with SAP Integration Suite
1 -
Direct Outbound Delivery
1 -
DMOVE2S4
1 -
EAM
1 -
EDI
3 -
EDI 850
1 -
EDI 856
1 -
edocument
1 -
EHS Product Structure
1 -
Emergency Access Management
1 -
Energy
1 -
EPC
1 -
Financial Operations
1 -
Find
1 -
FINSSKF
1 -
Fiori
1 -
Flexible Workflow
1 -
Gas
1 -
Gen AI enabled SAP Upgrades
1 -
General
1 -
generate_xlsx_file
1 -
Getting Started
1 -
HomogeneousDMO
1 -
IDOC
2 -
Integration
1 -
Learning Content
2 -
LogicApps
2 -
low touchproject
1 -
Maintenance
1 -
management
1 -
Material creation
1 -
Material Management
1 -
MD04
1 -
MD61
1 -
methodology
1 -
Microsoft
2 -
MicrosoftSentinel
2 -
Migration
1 -
mm purchasing
1 -
MRP
1 -
MS Teams
2 -
MT940
1 -
Newcomer
1 -
Notifications
1 -
Oil
1 -
open connectors
1 -
Order Change Log
1 -
ORDERS
2 -
OSS Note 390635
1 -
outbound delivery
1 -
outsourcing
1 -
PCE
1 -
Permit to Work
1 -
PIR Consumption Mode
1 -
PIR's
1 -
PIRs
1 -
PIRs Consumption
1 -
PIRs Reduction
1 -
Plan Independent Requirement
1 -
Premium Plus
1 -
pricing
1 -
Primavera P6
1 -
Process Excellence
1 -
Process Management
1 -
Process Order Change Log
1 -
Process purchase requisitions
1 -
Product Information
1 -
Production Order Change Log
1 -
purchase order
1 -
Purchase requisition
1 -
Purchasing Lead Time
1 -
Redwood for SAP Job execution Setup
1 -
RISE with SAP
1 -
RisewithSAP
1 -
Rizing
1 -
S4 Cost Center Planning
1 -
S4 HANA
1 -
S4HANA
3 -
Sales and Distribution
1 -
Sales Commission
1 -
sales order
1 -
SAP
2 -
SAP Best Practices
1 -
SAP Build
1 -
SAP Build apps
1 -
SAP Cloud ALM
1 -
SAP Data Quality Management
1 -
SAP Maintenance resource scheduling
2 -
SAP Note 390635
1 -
SAP S4HANA
2 -
SAP S4HANA Cloud private edition
1 -
SAP Upgrade Automation
1 -
SAP WCM
1 -
SAP Work Clearance Management
1 -
Schedule Agreement
1 -
SDM
1 -
security
2 -
Settlement Management
1 -
soar
2 -
Sourcing and Procurement
1 -
SSIS
1 -
SU01
1 -
SUM2.0SP17
1 -
SUMDMO
1 -
Teams
2 -
User Administration
1 -
User Participation
1 -
Utilities
1 -
va01
1 -
vendor
1 -
vl01n
1 -
vl02n
1 -
WCM
1 -
X12 850
1 -
xlsx_file_abap
1 -
YTD|MTD|QTD in CDs views using Date Function
1
- « Previous
- Next »
Related Content
- Advance Return Management complete configuration(SAP ARM) in Enterprise Resource Planning Blogs by Members
- Quick Start guide for PLM system integration 3.0 Implementation/Installation in Enterprise Resource Planning Blogs by SAP
- Output Type SPED trigger Inbound Delivery after PGI for Inter-Company STO's Outbound delivery in Enterprise Resource Planning Blogs by Members
- Asset Management in SAP S/4HANA Cloud Private Edition | 2023 FPS01 Release in Enterprise Resource Planning Blogs by SAP
- There any option in standared SAP to create inspection point as masters in In-process inspection(03) in Enterprise Resource Planning Q&A
Top kudoed authors
| User | Count |
|---|---|
| 5 | |
| 2 | |
| 2 | |
| 2 | |
| 2 | |
| 2 | |
| 1 | |
| 1 | |
| 1 | |
| 1 |