
- SAP Community
- Products and Technology
- Technology
- Technology Blogs by SAP
- OAuth2 Authentication using HANA XS – XS OAuth cli...
Technology Blogs by SAP
Learn how to extend and personalize SAP applications. Follow the SAP technology blog for insights into SAP BTP, ABAP, SAP Analytics Cloud, SAP HANA, and more.
Turn on suggestions
Auto-suggest helps you quickly narrow down your search results by suggesting possible matches as you type.
Showing results for
kai-christoph_m
Participant
Options
- Subscribe to RSS Feed
- Mark as New
- Mark as Read
- Bookmark
- Subscribe
- Printer Friendly Page
- Report Inappropriate Content
02-25-2015
4:06 PM
Intro
Welcome to the second post in a series showing you how to use the OAuth2 authentication mechanism in HANA XS. The mechanism enables you to use APIs from providers like Google, Facebook, Twitter or others offering this this authentication. Of course you will also learn how to authenticate against the HANA Cloud Platform and an ABAP server.
In this particular post we are going to implement step by step an end to end XS application calling a Google API.
Currently the series contains following posts:
- OAuth2 Authentication using HANA XS – Basics (1) (start off with this one, if you are new to OAuth)
- OAuth2 Authentication using HANA XS – XS OAuth client lib calling Google's API (2) (end to end description in a step by step manner)
Overview
In order to get the whole scenario running I am using a productive HANA cloud instance with revision 91. The instance can be reached from Google servers. This is a necessary prerequisite for Google’s web server application scenario. It is also possible to use OAuth2 with an on premise HANA box, which cannot be reached from the Internet.
We are going to perform the following steps:
- Create a Google project and an OAuth application via Google’s developer console
- Configure a trust store
- Create required XS artifacts (xshttpdest, xsoauthclientconfig, xsoauthappconfig, …)
- Create a xsjs calling a Google API
So let’s start!
Authorization Server configuration (Google)
In order to make Google API calls later on, we first of all have to register our client application at Google’s developer console. During the registration we receive credentials, we later use to register instances of our application. This means every user has to grant access to his own data - nevertheless all application instances share the same basic client ID and secret.
This is achieved by:
- Go to the Google developer console
- Log on (you need to create a Google account if you want to user their API)
- Create a project

- Navigate into the project, section credentials (below APIs & auth)
- Click the ‘Create new Client ID’ button

- Leave the default ‘Web application’ and click continue
- Provide your email address and a description
- In the following popup you need to configure the connection from Google to HANA XS
- Authorized JavaScript origins: Provide the publically available fully qualified hostname of your HANA instance
- e.g.: https://superoauth.hana.ondemand.com
- Authorized redirect URIS:
- Google calls this URI to prevent attacks and to hand over control back to the calling application
- You can implement your own handler or use SAPs delivered generic handler available at
- <YOUR HOST>/sap/hana/xs/oAuth/lib/runtime/tokenRequest.xsjs
- Authorized JavaScript origins: Provide the publically available fully qualified hostname of your HANA instance

Your Google client configuration should now look like this:

Later on we need the client ID and secret. The other information is already deployed in your HANA XS box for Google as an authorization provider. The developer console provides a convenient ‘Download JSON’ button to save this information to your local machine.
Enable the Google+ API
Another thing we can do right now is the enablement of the API we want to call later on. In this post we will use the Google+ API and this is the way to enable it:
- Navigate to the API link below ‘APIs & auth’
- Search for ‘+’
- Enable the API via the button in the status column

HANA XS configuration
If you want to configure OAuth authentication in XS, several configuration aspects come into play. There are well-known ones as XS HTTP destinations and XS Trust Stores, but also some new ones, namely XS OAuth configuration packages. We are going to create everything from scratch in a package called googleAPI. The only thing being reused is the configuration for calling the Google API (more on this later).
To perform all the tasks your user needs to have several roles:
- RuntimeConfAdministrator
- HTTPDestAdministrator
- oAuthAdmin
- and some standard developer roles
- sap.hana.ide.roles::EditorDeveloper
- sap.hana.xs.debugger::Debugger
- sap.hana.ide.roles::CatalogDeveloper
- sap.hana.ide.roles::SecurityAdmin
- sap.hana.ide.roles::TraceViewerNote
Setting up the Trust Store
Google only allows secure calls to their APIs (via HTTPS). So we have to set up a XS HTTP destination using a Trust Store. This Trust Store holds the server certificate – signed by a certification authority. We have to retrieve this certificate and import it into a trust store.
- If your HANA box needs to be security enabled check Outbound httpS with HANA XS (part 1) - set up your HANA box to use SSL/TLSfor instructions.
To retrieve the certificate
(I am using Chrome under Windows 7 in this example)
- browse to: https://www.googleapis.com/
- click the green lock next to the URL
- switch to the tab ‘Connection’
- open the ‘certificate information’

- switch to tab ‘certification path’
- select ‘Geo Trust Global CA’
- click ‘view certificate’
- switch to ‘details’
- click ‘copy to file’

- keep the first option ‘DER encoded binary X.509 (.CER)

- save the file to your local machine
To import the certificate
- Switch over to the XS Admin at: <your host>/sap/hana/xs/admin/
- Change to the Trust Manager

- Add a new trust store via the 'Add' link below the list of trust stores
- Give it a name (e.g. googleAPI)
- Switch to the tab ‘certificate list’
- Click 'Import Certificate'

- Select the exported certificate and import it
- If it looks like this, you are good to continue

Basic application setup
We want to have a folder containing everything we configure and are going to do so via the web IDE:
- open the web IDE <your host>/sap/hana/xs/ide/editor/
- right click on ‘content’
- select ‘Create Application’ with the following parameters
- Template: ‘Empty application’
- Package: ‘googleAPI’ (or something else you prefer and are willing to remember)

Disable security checks for this application
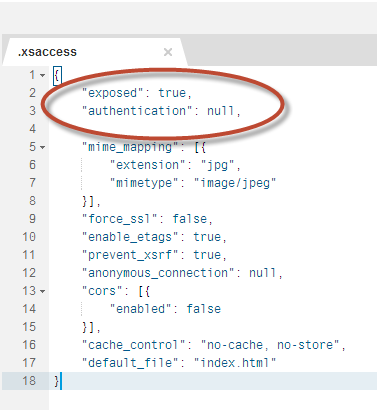
For reasons of demonstration we make things as simple as possible and switch off authentication:
- Open the .xsaccess file in the new application and change the authentication
FROM
"authentication": [{

"method": "Form"

  }]
TO
"authentication": null,
it looks like
XS HTTP destination
We already created the trust store and imported Google's certificate. Now we link this trust store to the HTTP destination so we retrieve a HTTPS destination.
Using the Web IDE, we do this by creating a new file in our package called
googleAPIdestination.xshttpdest
with following content:
host = "www.googleapis.com";

port = 443;

pathPrefix = "";

proxyType = none;

authType = none;

useSSL = true;

timeout = 0;

To connect the http destination to the trust store, we go to the XS Admin again.
- Open the XS Admin: <your host>/sap/hana/xs/admin/
- Navigate to your package (googleAPI) via the right arrow next to it
- Select the .xshttpdest file and click the ‘edit’ button
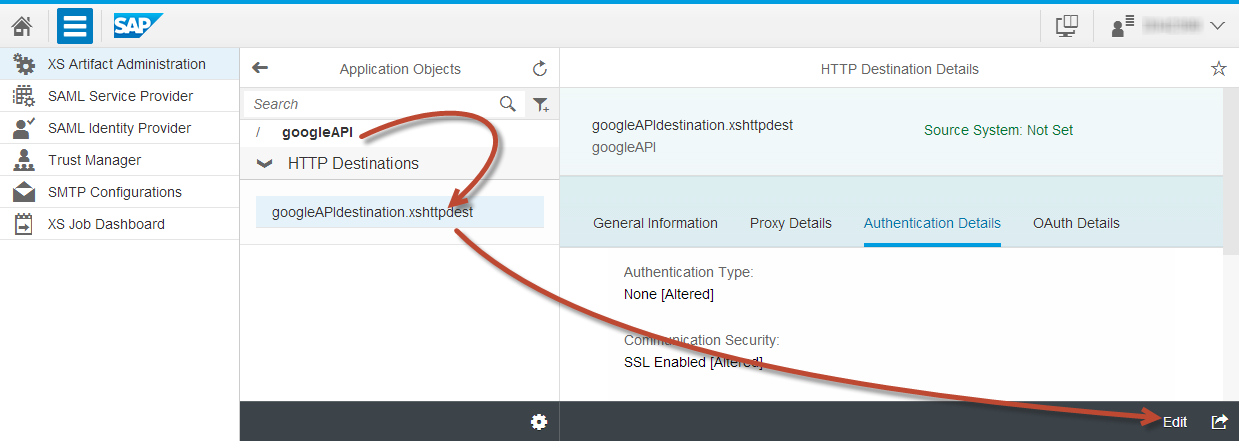
- In the tab ‘authentication details’
- Select ‘SSL enabled’
- TrustStore: your configured trust store (googleAPI)
- ‘SSL authentication type’: ‘Anonymous’

- Save the destination for the moment – we’ll come back to it later on
OAuth Configuration Package
Background
OAuth is an open standard. Due to the fact that it has been in a draft version for quite some time, different providers implemented slightly different solutions. They all are standard compliant, but use e.g. different names for parameters and the like.
HANA XS provides a mechanism to meet the requirements of this fact by providing a basic framework and provider specific configurations. These configurations consist of:
- OAuth client configuration (.xsoauthclientconfig)
here you find: client ID, authentication type, endpoints, …
- OAuth client flavor configuration (.xsoauthclientflavor)
here you find: protocol steps, parameter names and http request location (header, body, …)
To link the metadata (config & flavor) to an actual XS application there is a final piece in the puzzle - completing an XS OAuth configuration package:
- OAuth application configuration (.xsoauthappconfig)
Links metadata to runtime data
SAP delivered content
SAP delivers templates for some providers (at the time of writing Google, HANA Cloud platform, SAP Jam, SAP ABAP). Of course it is possible to create further OAuth client configurations and I strongly would like to encourage to do so.
Create a XS OAuth client configuration package
Use the Web IDE and create a file with the suffix .xsoauthappconfig in our application package. Details will be configured via the XS admin.
Let’s name the file googleOAconfig.xsoauthappconfig and give it the minimum content required:
{

"clientConfig"    : "sap.hana.xs.oAuth.lib.providerconfig.providermodel:googleV1"

}
Now our XS application is linked to the SAP delivered Google provider model.
- If you are curious, you might want to check the package sap.hana.xs.oAuth.lib.providerconfig.providermodel
- It contains SAP predelivered OAuth configurations (currently HCP, Jam, ABAP, Google) and gives you an idea of how to develop own OAuth configuration packages
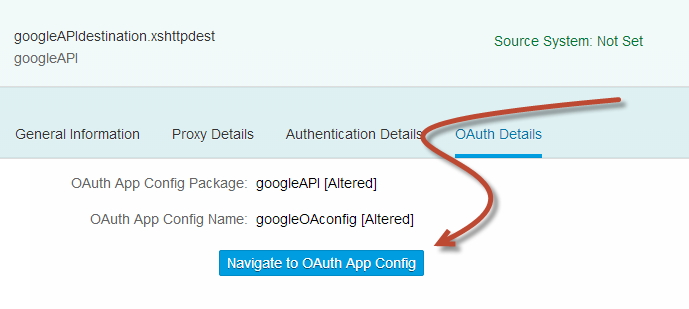
To provide the missing content of the OAuth configuration we switch over to the HANA XS Admin again:
- Open the Admin UI at <your host>/sap/hana/xs/admin/
- Navigate into our package
- Select the HTTP destination configuration (googleAPIdestination.xshttpdest)
- Change to the ‘OAuth details’ tab
- Click ‘Edit’ in the lower right corner
- Click ‘Browse OAuth App Configs’

- In the popup: select our fresh OAuth configuration (googleOAconfig.xsoauthappconfig)
- Save your work
Now this particular HTTP destination will use the OAuth authentication. We still are using the pre delivered default Google configuration, which is not aware of our client ID and secret (which we set up at Google's developer console). Even though it is possible, it is not a good idea to provide this information in the default configuration, as an upgrade of the HANA revision will overwrite our details. This is where the extension mechanism comes in handy:
- In the ‘OAuth Details’ tab of the HTTP destination click: ‘Navigate to OAuth App Config’
As we want to call the Google Plus API later on, we need to tell the app configuration which scopes (authorizations) we require. To add the scope
- Hit the ‘Edit’ button
- Click the + icon above ‘mandatory scopes’
- In the popup add ‘https://www.googleapis.com/auth/plus.me’
- I’ll explain later on, where the scope value is coming from
- In the popup add ‘https://www.googleapis.com/auth/plus.me’

- Save the XS OAuth application configuration
- And click ‘Navigate to Client Config’

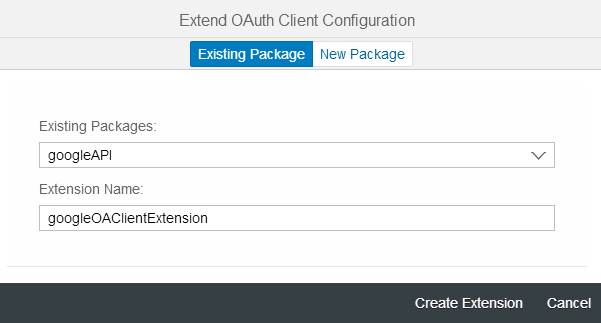
- You will see the default client configuration, which we are going to extend now: click ‘Extend’
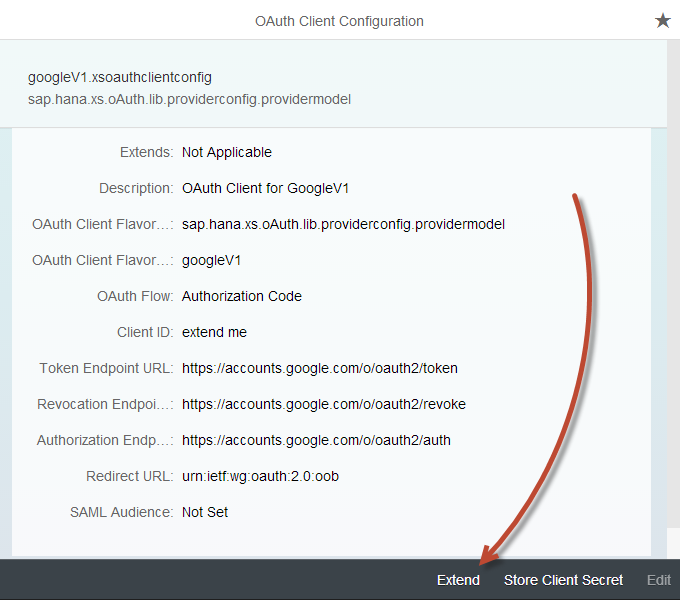
- Choose our package and give the extension a meaningful name like: googleOAClientExtension
- Now it is time to provide our Google client credentials and a meaningful redirect URL
- Click edit and provide the Client ID you downloaded as JSON from Google’s developer console
- Set the redirect URL to <your host>/sap/hana/xs/oAuth/lib/runtime/tokenRequest.xsjs
- Save
- Now click the ‘Store client secret’ link in the lower right corner
- Provide the client secret from Google’s developer console
That’s it for the configuration part – a no brainer, wasn’t it :wink: ?
Let’s go ahead and use the configured HTTP destination in a xsjs.
HANA XS OAuth client
Oauth client library
HANA XS SPS9 comes with an OAuth client library. It is a hidden a little bid… but maybe you want to have a look into package: sap.hana.xs.oAuth.lib and particularly at file oAuthClient.xsjslib ?
You will find useful HANA XS OAuth client for the OAuth scenario over there. I’d suggest you briefly look at the following table and use it as a reference later on so we can use the remainder of this post to finish our end to end scenario by an implementation.
// Example on how to load and initialize the library:

  var oAuthClientLib = $.import("sap.hana.xs.oAuth.lib", "oAuthClient");

// The constructor requires package name and file name of configured HTTP destination

var oaC = new oAuthClientLib.OAuthClient (<folder>, <destfilename>);
Following methods are available:
| Step description | Method | Comment | |
|---|---|---|---|
| Check for valid access token | boolean oaC.hasValidAccessToken() |
| |
| Check for valid refresh token | boolean oaC.hasValidRefreshToken() | returns true if refresh token is available and the scope set of the application configuration is included in the set of the granted scopes | |
| Get URI for user authorization | String oaC.userAuthorizeUri(<redirectURL>); | authCode flow only. Returns URI for user authorization on oauth sever. Such call causes a creation of State-cookie which is later used within GrantAccess Step. Parameter redirectURL is required as an end target after acquiring of access token. | |
| Get Token(s) from Code | int oaC.userGrantAccess(code) | authCode flow only. Exchange the authorization code into a token set. This call is usually executed by a generic redirect implemented at https:/<server>:<port>/sap/hana/xs/oAuth/lib/runtime/tokenRequest.xsjs. | |
| Get Accestoken from Refresh token | int oaC.userRefreshAccess() | authCode flow only. Uses the refresh to acquire a new Access token. Return a HTTP Status code of the used connection | |
| Get Accesstoken from Saml Assertion | int oaC.samlAccess() | SAML Flow only. Exchange a SAML assertion into an token set | |
| Data Processing | response oaC.processData(oHttpClient, request, googleDriveDest); | Implements a connection to the target server enriching the request with OAuth AccessToken. | |
| Revokes Access Token | int oaC.userRevokeAccess() | Connects to the revocation end point and revokes available access and refresh tokens. Even if such connect fails tokens a removed from local database afterwords. HTTP return code of the executed call ( 200 Success etc.) |
Example xsjs calling the Google API
Before we go into the implementation, remember we chose to use the Google Plus API by
- Enabling the API in the Google developer console
- Adding the required scope (https://www.googleapis.com/auth/plus.me) to the XS OAuth app configuration above

Where the scope comes from
Scopes define fine granular access permissions. Depending on the API you want to use, you need to use a particular scope. There are several ways to discover the perfect scopes for the task. I like using Google’s OAuth playground (https://developers.google.com/oauthplayground/ . This is also a very good resource to get a feeling for this API and the OAuth authorization flow itself. Other good resources are Google’s API explorer ( https://developers.google.com/apis-explorer/#p/ ) and of course the corresponding documentation https://developers.google.com/+/api/#auth.
Show me the code!
Okay this was a lot of setup work. Stay tuned just a little longer before we finally implement and execute the application.
For this API, you need to get your google ID. To do so:
- Go to https://plus.google.com/
- Navigate to your profile

- Look at the resulting URL and extract the long number
- In my case this is: https://plus.google.com/101287807282311627286/posts
- So my ID is 101287807282311627286
- Paste this ID into the code for the variable ‘yourGoogleID’
And finally: let's code!
- Please check the comments in the code if you are asking yourself what is going on
- Using the Web IDE, create a file called ‘callGooglePlusAPI.xsjs’
- Paste the following code and execute it via the green arrow or F8
Please enjoy the code – you really deserve it now:
var callGoogle = function() {

    // you need to add yourGoogleID right here (get it via https://plus.google.com/ -> Profile -> copy the long number)

    var yourGoogleID = "101287807282311627286";

    var response;

    // the HTTP client to send requests

    var oHttpClient = new $.net.http.Client();

    // load the library handling the OAuth protocol

    var oAuthClientLib = $.import("sap.hana.xs.oAuth.lib", "oAuthClient");

    // Google + API specific endpoints

    var suffix = "/plus/v1/people/";

    suffix += yourGoogleID;

    // where we want to go

    var request = new $.net.http.Request($.net.http.GET, suffix);

    // initialize the HTTP destination and OAuth client

    var myDestObj = $.net.http.readDestination("googleAPI", "googleAPIdestination");

    var oaC = new oAuthClientLib.OAuthClient("googleAPI", "googleAPIdestination");

    // SCOPES -> configure via XS Admin in the OAuth configuration package

    //https://www.googleapis.com/auth/plus.me

    // if you want to start from scratch, just set a breakpoint here and call this method

    // oaC.userRevokeAccess();

    // initialize the OAuth authorization code flow (and trace a debug message)

    // do you know what happens if you call this URL via your Browser?

    var url = oaC.userAuthorizeUri("https://sapgolf.hana.ondemand.com/googleAPI/callGooglePlusAPI.xsjs");

    $.trace.debug("Auth URL is: " + url);

    // if you called the URL via your browser paste the authorization code response into the 'code' variable (after uncommenting of course)

    // var code;

    // this is an alternative way to get the access tokens

    // oaC.userGrantAccess(code);

    // is our access token still valid, do we need to refresh it or didn't we receive anyone at all?

    var validAT = oaC.hasValidAccessToken();

    if (validAT) {

        // call the API

        response = oaC.processData(oHttpClient, request, myDestObj);

    } else {

        var validRT = oaC.hasValidRefreshToken();

        if (validRT) {

            var refreshStatus = oaC.userRefreshAccess();

            if (refreshStatus === 200) {

                // call the API

                response = oaC.processData(oHttpClient, request, myDestObj);

            }

        } else {

            $.response.setBody(JSON.stringify({

                error: false,

                errorDescription: "There are no tokens (access or refresh) for this application/user context available",

                solution: "Authorize yourself via the following authorization URL",

                authorizationURL: url

            }));

            return;

        }

    }

    if (response) {

        // display googles response

        var myBody;

        if (response.body)

            try {

                myBody = JSON.parse(response.body.asString());

            } catch (e) {

                myBody = response.body.asString();

            }

        $.response.contentType = "application/json";

        $.response.status = 200;

        $.response.setBody(JSON.stringify({

            "status": response.status,

            "body": myBody

        }));

    }

};

try {

    callGoogle();

} catch (err) {

    $.response.setBody("Failed to execute action: " + err.toString());

}
The first time you execute the application you will get something like:

The reason for this is the missing access token. We trigger the authorization flow by sending the required scopes, client id & secret and some more information to Google. Google sends us an authorization code back, which we finally exchange against access and refresh tokens. The access token will be stored in the OAuth secure store and used for upcoming API calls.
- click the provided authorizationURL
After you have approved the client request, you will see the well known Google OAuth log on UI

Log on to this one and grant access to the client

you will be redirected to the very same application you came from – this time showing you the JSON returned by the API call:

Conclusion
There are many configuration steps to carry out, before you can finally use OAuth authentication in you application. I hope you successfully completed all of them and most of all hope you see the potential you got at hand right now.
There will be some follow up posts dealing with the usage of the other pre delivered configuration packages, but also some going for even more advanced topics i.e. explaining how to create own configurations, how to debug outgoing requests and the like.
I would like to thank michael.engler and klaus.herter for their great support of this post!
I hope you all stay tuned and are looking forward the next posts.
Resources
- https://console.developers.google.com/project
- https://developers.google.com/oauthplayground/
- https://developers.google.com/apis-explorer/#p/
- https://developers.google.com/+/api/latest/people/get
- https://developers.google.com/+/api/#auth
- https://developers.google.com/accounts/docs/OAuth2
- https://security.google.com/settings/security/permissions?hl=de&pli=1
SAP documentation
- Application configuration syntax
- Client configuration syntax
- Client flavor syntax
- HTTP destinations
Misc
- SAP Managed Tags:
- SAP HANA
20 Comments
You must be a registered user to add a comment. If you've already registered, sign in. Otherwise, register and sign in.
Labels in this area
-
ABAP CDS Views - CDC (Change Data Capture)
2 -
AI
1 -
Analyze Workload Data
1 -
BTP
1 -
Business and IT Integration
2 -
Business application stu
1 -
Business Technology Platform
1 -
Business Trends
1,658 -
Business Trends
91 -
CAP
1 -
cf
1 -
Cloud Foundry
1 -
Confluent
1 -
Customer COE Basics and Fundamentals
1 -
Customer COE Latest and Greatest
3 -
Customer Data Browser app
1 -
Data Analysis Tool
1 -
data migration
1 -
data transfer
1 -
Datasphere
2 -
Event Information
1,400 -
Event Information
66 -
Expert
1 -
Expert Insights
177 -
Expert Insights
293 -
General
1 -
Google cloud
1 -
Google Next'24
1 -
Kafka
1 -
Life at SAP
780 -
Life at SAP
12 -
Migrate your Data App
1 -
MTA
1 -
Network Performance Analysis
1 -
NodeJS
1 -
PDF
1 -
POC
1 -
Product Updates
4,577 -
Product Updates
340 -
Replication Flow
1 -
RisewithSAP
1 -
SAP BTP
1 -
SAP BTP Cloud Foundry
1 -
SAP Cloud ALM
1 -
SAP Cloud Application Programming Model
1 -
SAP Datasphere
2 -
SAP S4HANA Cloud
1 -
SAP S4HANA Migration Cockpit
1 -
Technology Updates
6,873 -
Technology Updates
417 -
Workload Fluctuations
1
Related Content
- How to configure 2 Factor Authentication in C4C using Google Authenticator? in Technology Q&A
- CSRF Token for API_CV_ATTACHMENT_SRV via OAUTH in Technology Q&A
- Integrating with SAP Datasphere Consumption APIs using SAML Bearer Assertion in Technology Blogs by SAP
- Advanced Event Mesh Connectors and Easy Event-Driven Example of S/4HANA with Amazon S3 Integration in Technology Blogs by Members
- Create an xP&A Business Flow with SAP Analytics Cloud, SAP Datasphere & SAP Cloud Integration in Technology Blogs by SAP
Top kudoed authors
| User | Count |
|---|---|
| 32 | |
| 24 | |
| 8 | |
| 7 | |
| 7 | |
| 6 | |
| 6 | |
| 6 | |
| 5 | |
| 4 |