Hello All,
In this document, I would like to familiarize all the readers on how we can customize Journal Entry Voucher Excel template to add extension fields or existing fields from WSDL.
- Prerequisite
- Adding Existing Fields
- Adding Extension Fields
- Appendix
1) Prerequisite
To modify Journal entry Voucher template, we will nee following or similar tools
- A Zip tool (i.e WinRar, WinZip,7-Zip)
- A tool to Modify XML Files
First we will need to download the journal entry voucher excel from the system. to Understand how excel works, Open the Template with Excel.
Then switch to Developer tab and click on "Source".
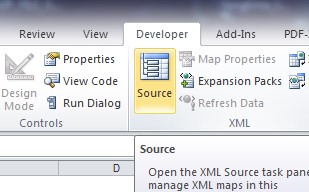 If you don’t have the developer tab in your Excel, please go to “File” -> “Options” -> “Customize Ribbon” and enable the check box for developer:
 Now you should be able to see the underlying data structure on the right side. Please choose the XML Map “SAP_BYD_MAIN” to see the correct structure:

The Structure shows all fields which are currently available in the data source of the excel sheet. Note that this is only a subset of the data structure of the web service. So if we want to add additional fields of the service , we will need to adjust this structure first.
The bold attributes are mapped to cells in the sheet. To determine which cell and attribute is mapped to, simply click the corresponding attribute and excel will select the cell on the sheet. This works also vice versa. To Bind or unbind a cell, right click on an attribute and select "Map element" or "Remove element". You can also Drag and drop to map attributes to specific cells on the sheet.
 2) Adding Existing fields
To adjust the data structure and the template, the data structure needs to be enhanced first. To do this, find the Excel sheet on your hard drive and change its extension to .zip. Then, open it with your preferred Zip-Tool and change to the folder “xl”:
2) Adding Existing fields
To adjust the data structure and the template, the data structure needs to be enhanced first. To do this, find the Excel sheet on your hard drive and change its extension to .zip. Then, open it with your preferred Zip-Tool and change to the folder “xl”:
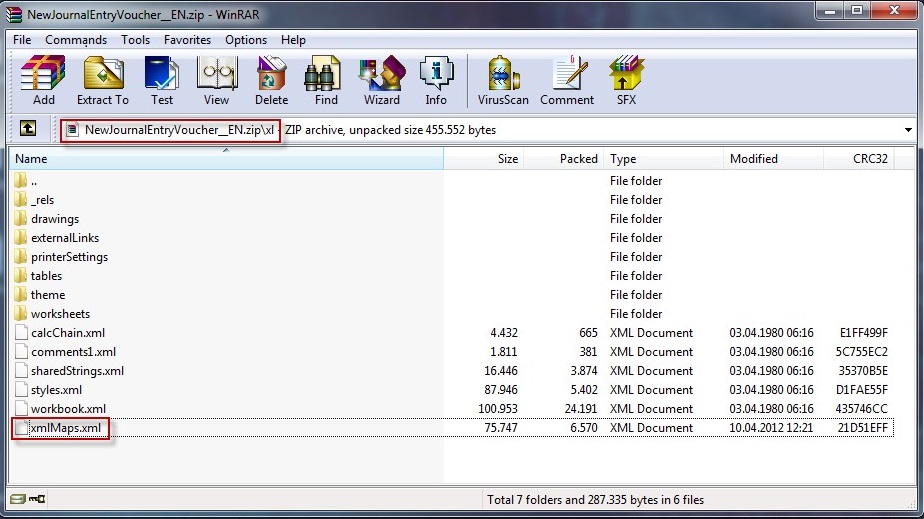 Please extract the file “xmlMaps.xml” and open it with your preferred XML-editor (Notepad++ in this case). This file is very long as it contains many type definitions. The part which is interesting for this guide is the definition of the complex type “AccountingEntryFlatType”, around line 1350:
 As you can see, this structure represents the tree in the Excel sheet, for example:
 In this context, new fields can now be added. As an example the field “DraftIndicator” should be added, which controls if the created Journal Entry Voucher is created in draft mode or posted directly (the default is posted directly). This field is of the type “Indicator”, which is already defined in the schema, therefore we can use it without further customization. If you want to use a field whose data type is not present in the schema, you need to add it manually or use another compatible data type (eg. Note for string types).
To add this indicator, you add the following line (e.g. after ExternalID):
<xs:element maxOccurs="1" minOccurs="0" name="DraftIndicator" type="tns:Indicator"/>
This adds a new field to the data structure, which will be transferred “as is” to the underlying web service. If we want to add more complex logic behind a field, you can also use XML transformations before the upload to the service is done. In this case please search for the element “<Transformation direction="in">” in the xmlMaps.xml.
As this is a simple boolean field, process is now finished. Save the xml-File and re-add it to the zip-File (which was the Excel sheet before) – make sure you replace the existing file. If this is successful, rename the file ending to “xlsx” again and open it in Excel. As we can see, the DraftIndicator now appears in the tree listing.
The last step which is now necessary to make this field functional, is to add it to the sheet – map it to a cell.To do this, simply drag the field to a desired cell on header level. The field is now bound and – after specifying a proper heading – ready to use.
In this context, new fields can now be added. As an example the field “DraftIndicator” should be added, which controls if the created Journal Entry Voucher is created in draft mode or posted directly (the default is posted directly). This field is of the type “Indicator”, which is already defined in the schema, therefore we can use it without further customization. If you want to use a field whose data type is not present in the schema, you need to add it manually or use another compatible data type (eg. Note for string types).
To add this indicator, you add the following line (e.g. after ExternalID):
<xs:element maxOccurs="1" minOccurs="0" name="DraftIndicator" type="tns:Indicator"/>
This adds a new field to the data structure, which will be transferred “as is” to the underlying web service. If we want to add more complex logic behind a field, you can also use XML transformations before the upload to the service is done. In this case please search for the element “<Transformation direction="in">” in the xmlMaps.xml.
As this is a simple boolean field, process is now finished. Save the xml-File and re-add it to the zip-File (which was the Excel sheet before) – make sure you replace the existing file. If this is successful, rename the file ending to “xlsx” again and open it in Excel. As we can see, the DraftIndicator now appears in the tree listing.
The last step which is now necessary to make this field functional, is to add it to the sheet – map it to a cell.To do this, simply drag the field to a desired cell on header level. The field is now bound and – after specifying a proper heading – ready to use.
 Please note: This field is of type “Indicator”, so you will need to supply a bool value (true, false).
3) Adding Extension Fields
To add extension fields to the Excel sheet is a little bit more complicated, but possible. First, we'll need to create an extension field in the adaptation mode for the Journal Entry Voucher. Please read the system documentation for details on this topic.
To add this field to the Excel sheet, follow the first steps of adding an existing field, extract the xmlMaps.xml and open it in your editor. Now, depending on the place where we added the field (Header or Item level), we either need to add a field in the Header structure AccountingEntryFlatType or in the Item sub-node. In this example, we are going for a header field. Add a field to this structure with a name we can identify later, ideally named after the field:
<xs:element minOccurs="0" name="ExcelExtensionOnRoot" type="xs:string" />
As this field is handled differently in the system, there is one more change in the xmlMaps.xml necessary, in the transformations section.

Please find the element

and add the following code snipplet before this element:
<xsl:template match="ExcelExtensionOnRoot">
<xsl:element name = ”ExcelExtensionOnRoot” namespace= ”http://sap.com/xi/AP/CustomerExtension/BYD/A0014">
<xsl:value-of select="."/>
</xsl:element>
</xsl:template>
Please make sure to replace the values with your specific values. In the first line, replace the value in the match-attribute with the element name you used in the step above. Now we can save the XML file and integrate it back into the Excel sheet.
In the last step you need to bind the field to an Excel cell, please see the second chapter for an explanation of this process.
4) Appendix
4.1) Journal Entry Voucher Excel Template
- Go to General Ledger work center
- Select Journal Entry Voucher view
- Click on New and select Journal Entry Voucher from Microsoft Excel
- Save the template as Local Copy
4.2) WSDL File
Replace the stars you’re your actual system number:
https://my******.sapbydesign.com/sap/bc/srt/wsdl/sdef_MANAGEACCOUNTINGENTRYIN/wsdl11/ws_policy/docum...
Or
- Go to Application and user management work center
- Service explorer View
- Search for Service name : ManageJournalEntryIn
- Click on Download WSDL
