
- SAP Community
- Groups
- Interest Groups
- Application Development
- Blog Posts
- E2E: BOPF-SADL-GW-SAPUI5 - Modifying Associated Da...
Application Development Blog Posts
Learn and share on deeper, cross technology development topics such as integration and connectivity, automation, cloud extensibility, developing at scale, and security.
Turn on suggestions
Auto-suggest helps you quickly narrow down your search results by suggesting possible matches as you type.
Showing results for
Former Member
Options
- Subscribe to RSS Feed
- Mark as New
- Mark as Read
- Bookmark
- Subscribe
- Printer Friendly Page
- Report Inappropriate Content
02-24-2015
2:49 PM
This is the fifth step of the series. You'll find an overview in the document Introduction.
Up to now we have modified or created a product root node in the Gateway Client. But looking closely to the results we notice that there are some challenges. When it comes to modifications on joined data - like the product name - or on associated data - like the business partner - we have to pay attention to the service calls. Let's have a look on the effects and then on how to deal with them.
The following video illustrates this step.
Update along an association path
Symptom
In the previous step, we have seen that we can follow an association to navigate form a product instance to the business partner details without having to know how to join the data. This is quite comfortable. And we can easily believe it to be possible to use the navigation property also for updating the business partner details.
Try it and you will end with a dump in the backend.

The update using the direct addressing via the business partner entity set works fine.

And this is already the way how to solve the problem.
Solution
The OData specification does not precisely specify updates along navigation paths. So the SAP OData library does not support it. You have to use the direct addressing via the association target entity set, hence the business partner entity set in our case. This sounds uglier than it is in reality: you do not have to know how the data is related neither in this case as the response of a navigation request contains the direct link to the navigation target.

Just take it from the response metadata and use it in the modification request.
OData specifies clearly the create method along association paths: this is supported and we will use it later on.
Update of Implicit Views
Creating the entity types ProductHeader and BusinessPartner entity sets we used the capability of SADL to join data of associated nodes. We called that implicit view building. This was quite nice but it does not work in modification scenarios. Currently we face a SADL limitation in 7.40.
But let me first illustrate the symptom.
Symptom
In the fourth step we modified the product, but only the price. If you modify the product name - you will see that the modification is just ignored.

In the modification request, we change the price and the product name. And here we are with the result:

The modification of the price works well the modification of the name is just ignored.
If you create a new product, it works for the data mapped to the product root node but not for the product name.

As I already mentioned, this is a limitation of SADL in 7.40.
Solution
The solution to this issue is to introduce new entity sets for each joined node - hence the product name node and the business partner address node and to relate them with an association in the gateway service.

Now you can handle the updates on the product name and the business partner address data like the update on the business partner root node: navigate to the association target and get the direct link from the metadata of the service. Use this link to update the secondary node's data.
Creation of Secondary Nodes
Creating a new product in our example means that we not only create the root node but also the product name node. But how can we do this? We do not find the links in some meta data files, as they do not yet exist. They are only created in the backend.
The OData specification says to use "deep create" using the navigation properties. This means that in the create case, you can use the associations.
Note that you can use the SADL features from 7.40 SP08 on. But the deep creation is only supported by SADL in 7.40 SP10.
Use of Implicit View Building with SADL
In the beginning it looked quite comfortable to use the implicit view building capabilities of SADL. We worked only with three entity sets, which seemed to be quite natural. Now we have to deal with five and they are mirroring the BOPF BOs. In addition we have the attributes twice in the entity types. So you may ask why to use SADL implicit view building at all.
Don't throw out the baby with the bath water. SADL implicit view building is very comfortable for all read only scenarios, like object work lists or factsheets. That's already half the battle or even more. But if you have to work on update scenarios, mirror the BOPF nodes in entity sets and the necessary BOPF associations in OData navigation properties; and keep the entity types normalized to avoid redundant definitions. (Don't worry, we are not going through a refactoring step now - but in a real application this should be done for supportability reasons.)
Enhancing the SAPUI5 page
If you prefer to follow this step in a video go here:
Using these findings in the SAPUI5 page needs some preparations because we have to introduce edit features. Just let me show, where we want to go with the UI before we step into the code.
We will introduce edit buttons on the product details page.

If you press edit or create product, the form is replaced by a product edit form.
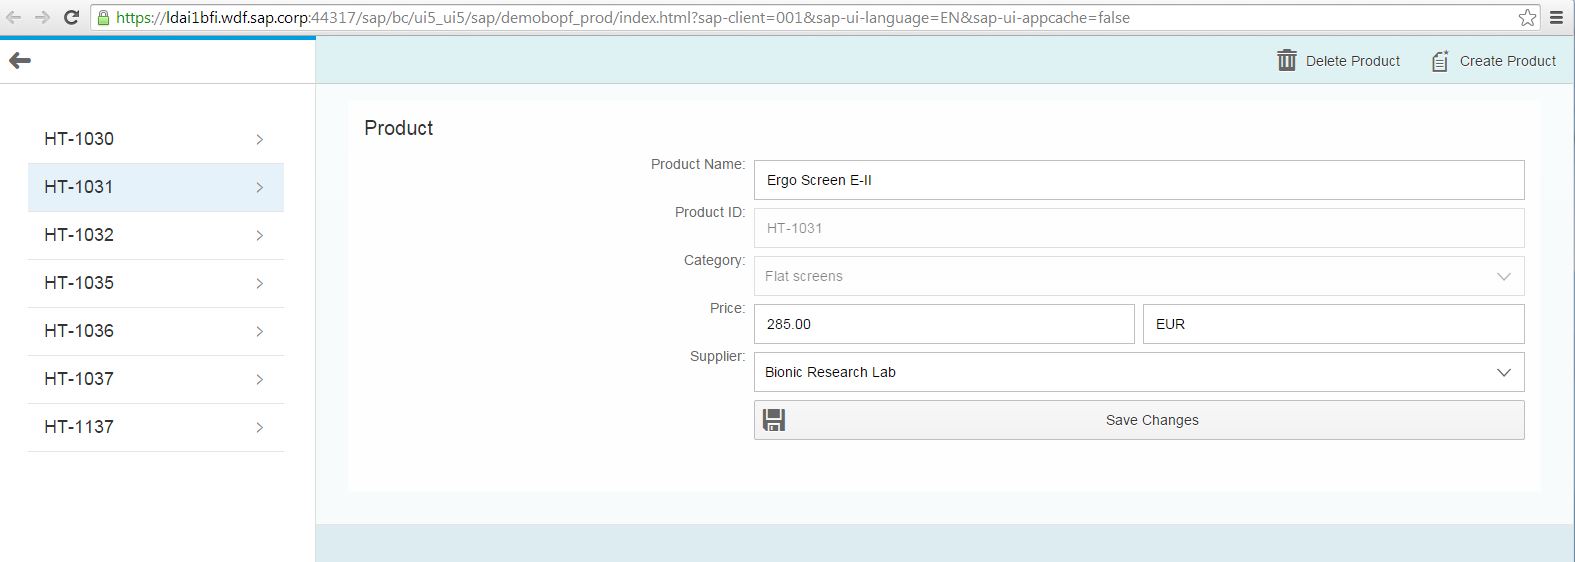
The same for the business partner edit button: if you press the button, the form is replaced by a business partner edit from.
The save button updates the respective changes.
You can change the view dynamically, but this gets soon confusing. On the display form, we have for example one text element displaying street and house number. In edit mode this would be quite cumbersome as you would have to guess the correct separator. So we want to use two input elements, one for the street and one for the house number.
To avoid too much logic in the view we are going to use the fragment technique: we put some parts of the UI in separate files which we include dynamically into the content of the view accordingly to the mode.
So we first start with a glance at the view and the fragments.
The Details View
As we outsourced the content of the view into fragments, the code of the view is quite simple:

We put a toolbar on top with the Create and Delete button and the registration of the related callback functions. Otherwise the main part of the view definition, the content tag is empty.
Now we have to create the two fragments.
The Product Display Fragment
The display fragment contains now the code formerly placed between the content tag.

The enclosing tag is the FragmentDefinition one.
The Product Edit Fragment
The product edit fragment contains the edit form for the product - not really a surprise.

You will see the difference: we have to use <Input> tags instead of <Text>. There is a save button and instead of price and currency in one text element, we have two input fields.
There is also a dynamic adaptation of the view: if the create button has been pressed on the initial page (without any category selected) the category input field is enabled. If a category has been selected it is read only.
The Business Partner Edit Fragment
The same applies for the business partner fragment.

So far for the fragment definitions. The switch of fragments is handled in the details controller. But first we check the product controller.
The Product Controller
We have to set the initial fragment in the product controller, when we select a product (callback listItemTriggered).

In our callback listItemTriggered we set the Display fragment using a function of the details controller - which we have to define later on.
As we discussed in the beginning, we cannot use navigation paths for update operations. We must address the respective entity sets directly. Therefore we have to enhance the expand attribute by two new navigation properties to the new entity sets: BusinessPartner/BPAddress and ProductName02.
By the way: the code line 41 cares for initially selecting a product.
The Details Controller
In the details controller we have to care for the callback functions of the button events. That's a piece of work. We do not go through the whole code, just through one example to get an impression.
But first we have to complete the fragment handling in the onInit function...

... and in the callback function assigned to the button pressed event.

In this piece of code there are also some examples on how to change the attributes of a field dynamically. For example in line 57, the input field ProductId is enabled in the create mode.
Now to the save event: line 86 distinguishes between the update and the create case: the context is set to the selected product in the update case. In the create case the context is not defined hence the expression (oContext) is false.

So we are looking closer to the update branch. We get the path to the selected product form the context object. Then we update the model using the data binding to the input fields of the view. We register two anonymous callback functions: in case of a successful execution of the http request, we set a flag fo the closure. In case of an error the callback function shows an error message. The OData method is a merge.
That's it for the update of the product ROOT node. If the product has been updated successfully we have to care for the update of the product name. The metadata of the OData service contains the path to the product name via the ProductName entity set directly. Get it and use it for updating the data. It's the same procedure as for the product ROOT node: we get the modified name form the input field and register two anonymous functions. This time we send a success message in case of successful execution.
The complete code is quite lengthy but I hope that you got an idea of how to update data via OData.
The next part of the code shows some helper functions to compose the fragment name and to display the correct fragment according to the status.

Our application lacks now some beautification. Most of it can be done purely on the UI but one requires that we modify the OData service again. Our end users want to see the location of the business partner in a map. Therefore we need more data to display the map. And that is the topic of the next step: Enhancing Entity Types.
Need for some background, visit the spaces BOPF Application Framework, SAP Gateway or SAPUI5 Developer Center.
- SAP Managed Tags:
- ABAP Development
2 Comments
You must be a registered user to add a comment. If you've already registered, sign in. Otherwise, register and sign in.
Labels in this area
-
A Dynamic Memory Allocation Tool
1 -
ABAP
8 -
abap cds
1 -
ABAP CDS Views
14 -
ABAP class
1 -
ABAP Cloud
1 -
ABAP Development
4 -
ABAP in Eclipse
1 -
ABAP Keyword Documentation
2 -
ABAP OOABAP
2 -
ABAP Programming
1 -
abap technical
1 -
ABAP test cockpit
7 -
ABAP test cokpit
1 -
ADT
1 -
Advanced Event Mesh
1 -
AEM
1 -
AI
1 -
API and Integration
1 -
APIs
8 -
APIs ABAP
1 -
App Dev and Integration
1 -
Application Development
2 -
application job
1 -
archivelinks
1 -
Automation
4 -
BTP
1 -
CAP
1 -
CAPM
1 -
Career Development
3 -
CL_GUI_FRONTEND_SERVICES
1 -
CL_SALV_TABLE
1 -
Cloud Extensibility
8 -
Cloud Native
7 -
Cloud Platform Integration
1 -
CloudEvents
2 -
CMIS
1 -
Connection
1 -
container
1 -
Debugging
2 -
Developer extensibility
1 -
Developing at Scale
4 -
DMS
1 -
dynamic logpoints
1 -
Eclipse ADT ABAP Development Tools
1 -
EDA
1 -
Event Mesh
1 -
Expert
1 -
Field Symbols in ABAP
1 -
Fiori
1 -
Fiori App Extension
1 -
Forms & Templates
1 -
IBM watsonx
1 -
Integration & Connectivity
10 -
JavaScripts used by Adobe Forms
1 -
joule
1 -
NodeJS
1 -
ODATA
3 -
OOABAP
3 -
Outbound queue
1 -
Product Updates
1 -
Programming Models
13 -
Restful webservices Using POST MAN
1 -
RFC
1 -
RFFOEDI1
1 -
SAP BAS
1 -
SAP BTP
1 -
SAP Build
1 -
SAP Build apps
1 -
SAP Build CodeJam
1 -
SAP CodeTalk
1 -
SAP Odata
1 -
SAP UI5
1 -
SAP UI5 Custom Library
1 -
SAPEnhancements
1 -
SapMachine
1 -
security
3 -
text editor
1 -
Tools
16 -
User Experience
5
Top kudoed authors
| User | Count |
|---|---|
| 6 | |
| 5 | |
| 3 | |
| 3 | |
| 2 | |
| 2 | |
| 2 | |
| 2 | |
| 1 | |
| 1 |