
- SAP Community
- Products and Technology
- Technology
- Technology Blogs by SAP
- Integration Gateway: Preparing my Eclipse for Groo...
Technology Blogs by SAP
Learn how to extend and personalize SAP applications. Follow the SAP technology blog for insights into SAP BTP, ABAP, SAP Analytics Cloud, SAP HANA, and more.
Turn on suggestions
Auto-suggest helps you quickly narrow down your search results by suggesting possible matches as you type.
Showing results for
Product and Topic Expert
Options
- Subscribe to RSS Feed
- Mark as New
- Mark as Read
- Bookmark
- Subscribe
- Printer Friendly Page
- Report Inappropriate Content
02-04-2015
5:18 PM
1 Introduction
The background for this document is the development of OData services using Integration Gateway in SAP Mobile Platform 3.0.
The development of such an OData service is done in Eclipse with SAP Mobile Platform Tools.
The API toolkit for SAP Mobile Platform enables us to create an OData Service that is bound to a Data Source that is supported by Integration Gateway.
In order to extend the default capabilities of the Integration Gateway Framework, the toolkit allows to add own implementation in so-called Custom Code.
This custom code can be implemented either in JavaScript or as Groovy script.
The script files are created using context menu and the toolkit generates some skeleton and sample code based on the selected scripting language.
When I tried it for the first time, I was rather disappointed about the development experience, because after creating the file, the script was presented in a pure text editor as default. I was missing typical editor capabilities like:
highlighting,
code-completion,
compilation errors.
After investigating some time, I found some means to arrange myself with Eclipse to have a convenient development environment for scripting based on Groovy.
And now I’d like to share my findings with you.
This Blog is created based on the SAP Mobile Platform 3.0 SP 05
Please note: this is not an official guide. It is my personal working mode.
For your convenience, I’m providing the info in 2 versions:
- Detailed description and explanation of every step (for First-Timers)
- Minimal mode, just for copy&paste
Don’t worry: it is quick, after you’ve done it for the first time…;-)
1.1 Prerequisites
If you need more information about setting up the development environment check the Links section below.
Environment:
- Install SAP Mobile Platform 3.0 (SMP) server on your local file system (check Appendix if this isn’t viable)
- Install Eclipse Kepler
- Install SAP Mobile Platform Tools into Eclipse
Preparation:
In Eclipse, open the OData perspective
Create a SAP Mobile Platform OData Implementation Project
Define a data source binding (no matter which data source)
Create custom script for Groovy.
Open the script file: it is displayed in the simple text editor. Look at it and feel disappointed...;-)

1.2 Overview
1. Install Groovy plugins
2. Set target platform
3. Add Groovy nature
4. Add Groovy libraries
5. Add more dependencies
2 Detailed Description
2.1. Install Groovy Plugins
Fortunately, there’s some toolkit in the internet that adds Groovy development support to Eclipse, I’m using the following one.
How to install:
Within Eclipse, go to Help -> Install New Software
In the “Work with” field, enter the following URL:
For Kepler:
http://dist.springsource.org/release/GRECLIPSE/e4.3/
For Luna:
http://dist.springsource.org/release/GRECLIPSE/e4.4/
Press "Enter".
Select the feature “Groovy-Eclipse (Required)”

Step through the wizard and finish it.
As usual after installing plugins, Eclipse requires a restart.
During restart, if you’re not familiar with Eclipse you might find the following document helpful: http://scn.sap.com/docs/DOC-52356
After installing the Groovy toolkit, when selecting a Groovy script file, there’s a context menu entry available that opens the Groovy editor.
Check it out:
Expand the folder "src.main.resources.script"
select the script file
open the context menu and choose Open With->Groovy Editor

This opens an editor that fulfilles (almost) all wishes of a developer’s heart.
In fact, the editor is the default Java editor, which has been tweaked by Groovy
You can see that the code is now nicely highlighted. The colors of the highlighting can be configured in the Groovy preferences at Window->preferences->Groovy

Now we can finally see the compilation errors that we missed so much...
2.2. Set Target Platform
Within the following steps, we’ll set up our environment to manage the classpath of our project, such that we get rid of undesired compilation errors.
What does "target platform" mean?
When writing code, this code will typically use other classes.
These are defined in the corresponding classpath, typically packaged in jar file.
When writing a plug-in for Eclipse, it compiles against the code that is located inside other plug-ins.
These other plug-ins are contained in a Target Platform.
Typically, when writing a plug-in for Eclipse, it compiles against the current Eclipse itself (and all its plug-ins), so nothing has to be configured in such case.
Let's check it out:
To view the current target platform of your Eclipse, go to Window -> Preferences-> Plug-in Development -> Target Platform
As you can see below, the currently running Eclipse instance is currently the active target platform:

This means that every plug-in that you write in your Eclipse will compile against the plug-ins that are installed inside the running Eclipse.
You can view the plug-ins by selecting the entry “Running Platform” and then pressing the "Edit" button.
On the subsequent dialog, you have to enable the checkbox “Show location content”:
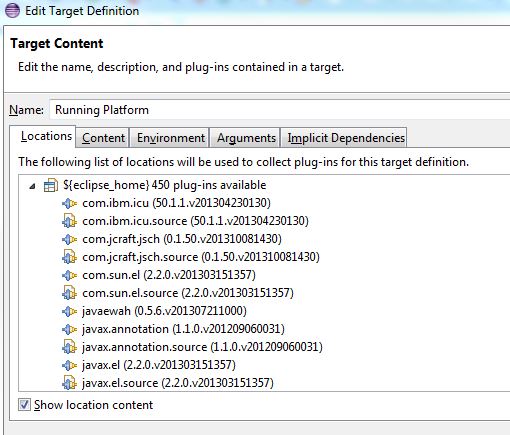
These are the plug-ins contained in the target platform, resp. in the "plugins" folder of the current Eclipse installation.
Now, if you want to write a plug-in that compiles against a different set of plug-ins, you can either import all those plug-ins into your Eclipse, or - which is better - define a new target platform and mark it as active.
Why I’m explaining it?
The OData Implementation Project is not an Eclipse plug-in project. But after deploying it to SMP it gets converted to a bundle. Bundle is the generic term for plug-in. And SMP is based on OSGi, like Eclipse. So the SMP is basically a set of running bundles, like Eclipse.
A bundle is described by a descriptor file which is called "MANIFEST.MF".
The OData Implementation Project also contains a manifest file, it is required after deployment, once the bundle runs in SMP.
In the manifest, the dependencies of the bundle are specified. The dependencies point to other bundles in a specific version.
During our development we not only want to be free of compilation errors, but we also want to be sure that we’re compiling against exactly the same bundles, which will be present when our OData service bundle runs on SMP.
Therefore, we set the SMP itself as our Target Platform.
This is a very simple and perfect solution.
Why do we need it?
During development of our script, we’re dealing with classes that are provided by the Integration Gateway framework, amongst others.
Furthermore, we might want to use other functionality, e.g. parsing of xml, helper classes of e.g. apache.commons packages, etc
In order to use such functionality, we have to declare a dependency to it in our bundle, otherwise it will fail at runtime.
We declare such dependency in the manifest in our designtime, but if we want our project to be compilation-error free, we need such helper bundles to be available in our target platform.
You can read my OSGi blog if you’re interested in learning a bit more about OSGi: http://scn.sap.com/docs/DOC-52346
How to set the Target Platform?
You’ve already seen the “Add” button in the screenshot above, I guess. It is used to add a new target platform definition.
The steps are:
Open the Target Platform preference page at Window->Preferences->Plug-in Development->Target Platform
Press "Add".
Select “Nothing” and press "Next".
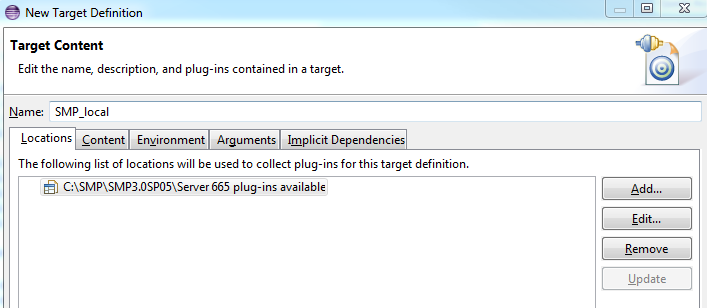
Enter an arbitrary name for this target e.g. “SMP_local”
Press “Add”.
Choose “Installation”.
“Browse” to the location of the locally installed SMP e.g. C:\SMP \server
The chosen path has to point to exactly that folder that is the parent folder of the “configuration” directory.
Press “Finish”.
Back in the preference page, now you have to enable this newly created Target Platform to be the active one.

Press "OK".
From now on, all bundle-projects in your Eclipse workspace will compile against the bundles that can be found in the SMP.
Note:
Once you have chosen and activated the target platform, afterwards all eclipse projects (bundle projects) will compile against this target.
This might not always be desired, since you might have other projects which have to compile against the running Eclipse instance, or the versions of some required bundles may be different.
Solutions for this case would be:
Switch between target platforms and close the unrelated projects.
Or create a separate workspace for the new target platform and start Eclipse with this workspace when developing against it.
2.3. Add Groovy nature
After installing the Groovy toolkit, Eclipse is able to create and recognize “Groovy Projects” (see the "New Project" wizard).
What does this mean?
Eclipse adds tags to projects in order to distinguish their specialties.
Such tags are the so-called “natures”.
For example, a Java-Project has the java-nature and an SMP OData Implementation Project has the smpnature.
And a Groovy project has the groovynature.
Only if a project has the groovy nature, only then the specialties coming with the Groovy toolkit will be active.
In our case, the specialties that we’re interested in are the Groovy compiler, the Groovy libraries and the Groovy editor.
The natures are defined in the .project file that is contained in every project in eclipse.
After creating an SMP OData Implementation Project, it doesn’t have the Groovy nature.
In order to manually add the Groovy nature to your SMP OData Implementation Project, you have to open the .project file contained in the project.

In case you don’t see it, this is because it is hidden by a filter.
Enabling the display of the .project file
In order to view the .project file, you have to remove the default filter from your Project Explorer tree.
In case you don’t see the “Project Explorer View”, it is time to change to the OData perspective (Window -> Open Perspective)
Open the View-menu of the Project Explorer View by clicking on the little drop-down arrow (see below)

From the view-menu, choose “Customize View” in order to modify the filter settings.
Deselect the checkbox of *.resources

After removing the filter, all resource files contained in the project can be seen.
Editing the .project file
Open the .project file with double-click, change to the text editor (source tab) and add the following entry:
<nature>org.eclipse.jdt.groovy.core.groovyNature</nature>
It should look like this:

2.4. Add Groovy libraries
After adding the groovy-nature to the project, there’s a new context menu entry in the context menu of the project:
“Groovy”
Open it, and from the sub-menu, choose “Add Groovy Libraries to classpath”

The result of this action can be verified in the project tree, where the libraries are displayed:

Sometimes, I faced problems here, such I had to restart Eclipse to get the settings applied.
Sometimes, close&reopen project was sufficient to get the changes active.
After having the Groovy libs in the classpath of our project, we can write some code and the Groovy classes are now known to the editor.
We can enjoy of code completion and the automated organizing of import statements (Ctrl + Shift + O):

Do you agree that this is a fantastic feeling?
Let's enjoy it for an instance...
...
However, we soon recognize that it only works for Groovy classes, not for those which we're primarily interested in.
2.5. Add more dependencies
Obviously, in our code we’re dealing with other libs, so adding the Groovy libs to our classpath is not sufficient.
You can verify it by pressing Ctr. + Shift + F in the editor:
The Organize Imports tool tries to generate an import statement for e.g. the "Message" class (which is used in the generated script).
In my case, there are possible 2 choices for imports, so that the Organize Imports dialog is displayed, asking me to select the right one.
But the correct "Message" class is not offered in the dialog.

The reason is that it isn’t contained in the classpath of the project.
At this point, we remember what we’ve learned in the target platform section:
what we have to do is to add dependencies to those bundles that contain the desired classes.
But there's a precondition: first, our project has to learn to resolve bundles.
Background: our OData project is not a plug-in project. So even if we add dependencies to other bundles, it wouldn’t help.
So the next thing we need to do is to make our project think that it is a plug-in.
Although this might sound a bit dirty... it is even not fully a fraud, because our project will become a bundle after deployment…;-)
What we need to do is to adapt the classpath, such that it recognizes bundle-dependencies.
This time, we make use of another wizard (we could have done this for adding Groovy libs as well, you’ll see the “Groovy Runtime Libraries” below)
Prepare for adding dependencies to bundles
Open the context menu on your OData project
select Build Path -> Configure Build Path…
On the dialog, select the “Libraries” tab
Press “Add Library”
Select “Plug-in Dependencies”

Press “Next” , the “Resolved classpath” is probably empty, because your project doesn’t have dependencies to other bundles yet.
Press "Finish".
Now let’s add a second library: repeat these steps for the “JRE System Library”.
Afterwards, your build path looks as follows:

Please remember that it might be necessary to close/reopen the project or restart Eclipse in order to apply the changes.
Add dependencies to bundles
Now we’re ready to define bundle dependencies.
Open the bundle descriptor file at META-INF/MANIFEST.MF with double-click.

The file is opened with the manifest editor.
Select the “Dependencies” tab in the bottom of the editor.
In the left section, we can add the required dependencies on plug-in level, on the right side, we can add dependencies on package-level.

The second variant is more fine-granular and therefore the preferable approach.
In this tutorial we specify plug-in dependencies, which is easier to handle here.
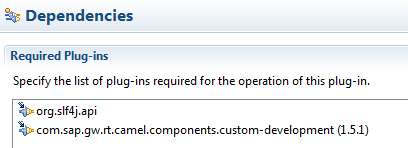
Press the left “Add” button.
In the “Select a Plug-in” field, which is a filter field, type “custom-dev”
The proper Plug-in is displayed:

Select it and press "OK".
It is added to the list of Plug-ins (Bundles), on which our SMP OData Implementation Project depends.
Save the manifest editor.
We can be sure that this bundle in this version is available at runtime on the SMP, because we’ve specified our SMP as target platform in the beginning of this tutorial.
Back in the Groovy Script, press Ctrl + Shift + O in order to “organize imports”.
The dialog now offers the right imports,e.g.
com.sap.gateway.ip.core.customdev.util.Message
That's it.
BTW:
Other dependencies that you’ll probably need and that you have to add in the manifest editor:
olingo-odata2-api
com.sap.it.commons.logging.slf4j
It might be the case that you also need to add other bundles here, in order to remove all compile errors.
For example:
org.apache.camel.core
com.sap.it.commons
After adding these dependencies, you can use code completion for classes like Message, UriInfo, ILogger, etc
Furthermore, those ugly underlines for variables and methods that couldn’t be resolved, are finally gone.
Example:

Enjoy!
BTW: steps 3 to 5 have to be done for each OData service that you create
3 Quick Steps
Here are copy&paste ready snippets.
Note that we don’t really need the Groovy nature in order to get the script compiled. We just copy the classpath entries.
1. Groovy Plugins updatesite:
Kepler: http://dist.springsource.org/release/GRECLIPSE/e4.3/
Luna: http://dist.springsource.org/release/GRECLIPSE/e4.4/
2. Set Target Platform
3. Adapt classpath
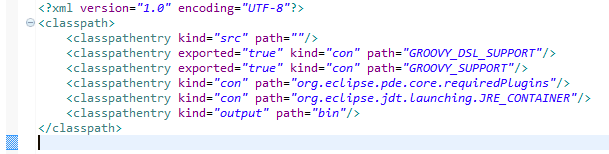
Add the following entries to .classpath file:
<classpathentry exported="true" kind="con" path="GROOVY_SUPPORT"/>

<classpathentry kind="con" path="org.eclipse.pde.core.requiredPlugins"/>

<classpathentry kind="con" path="org.eclipse.jdt.launching.JRE_CONTAINER"/>
4. Add bundle dependencies
Require-Bundle: org.slf4j.api;visibility:=private, olingo-odata2-api;bundle-version="2.0.0",
org.apache.camel.camel-core;bundle-version="2.12.4",
com.sap.gw.rt.camel.components.custom-development;bundle-version="1.3.2",
com.sap.it.commons.logging.slf4j;bundle-version="1.11.0"
Note:
These dependencies are valid only for SP05.
For other releases you have to use the formbased editor to add each single dependency via the Add button.
Notes:
If you don’t see the .classpath file, you have to remove the filter, or you have to use the Build Path dialog at least once.
After paste into manifest.mf there shouldn't be any empty line in the file, otherwise the file can’t be properly parsed
Also make sure to overwrite an existing “Require-Bundle” key, there shouldn’t be duplicate key entries in the manifest.
And every line for bundles has to start with a white space, otherwise the line is interpreted as key.
After the last required bundle, no comma is allowed.
4 APPENDIX
4.1 Links
Blog about SAP Mobile Platform Tools http://scn.sap.com/community/gateway/blog/2014/07/04/sap-gateway-developer-tools-bridging-the-past-p...
Info about installing the tools: https://tools.hana.ondemand.com/#gateway
The update site: https://tools.hana.ondemand.com/kepler
Groovy-Eclipse WIKI: https://github.com/groovy/groovy-eclipse/wiki
Docu: https://help.hana.ondemand.com/api_toolkit_for_sap_mobile_platform_documentation/frameset.htm
Eclipse blog: Getting started with GWPA: Eclipse Preparation
Eclipse tips: Getting started with GWPA: Eclipse Tips & Tips
OSGi intro: Getting started with GWPA: OSGi Introduction
OSGi tutorial1: http://scn.sap.com/docs/DOC-52455
OSGi tutorial2:Getting started with GWPA: OSGi Introduction Exercise 2
4.2 Alternative way of adapting classpath
In the above description, I intended to give detailed explanations about each step.
However, there’s one easier way of changing classpath and nature:
Open the context menu on the project and choose Configure->Convert to Groovy Project
And then Configure->Convert to Plug-in Project

This will add nature and libraries.
However, it doesn’t add the JRE library, which then has to be done manually.
It also has a drawback: this action adds the plugin-builders to the .project file and it might not always be welcome.
4.3 Working with Target Definition files
For our use case, the target platform is very easily described: it is simply a path to a local folder.
However, the normal use case is to specify multiple locations.
Such a definition of a target platform can be stored in a so-called target definition file.
Here’s a little description, for those of you who are interested in using it:
Creating a Target Definition
First create a simple project in order to host the target definition file.
Then create the target definition via:
File -> New -> Other -> Plug-in Development -> Target Definition
Specify the parent project, specify a name for the file and press "Finish".
The target definition editor opens.
In the “Locations” section, press “Add”.
You can select single features (e.g. Integration Gateway) or the whole SMP installation.
In order to activate the target platform, click the hyperlink in the right upper corner:

You can find this defined target platform also in the preferences:
Window->Preferences->PluginDevelopment->Target Platform
You can have as many target definition files as you like in your workspace and you can switch between them whenever you like.
You may want to reuse such target definitions, in order to share with colleagues, or to store in GIT and perforce, etc
Export Target definition
Since the target definition is only a file, it doesn’t need to be exported, it can be simply be copied as a file and stored on file system or in GIT or perforce or similar.
The next time you install a new Eclipse, you can easily reuse the target definition file.
Import Target definition
Again, since the target definition is only a file, it can be simply copied into Eclipse.
For example, it can be copied into an SMP Odata Implementation Project.
It can then be activated when working with this project.
4.4 Bundles
Here are some additional bundle dependencies that might be useful for your development:
| com.sap.it.commons | there are implicit dependencies to it, so this is required to be fully error-free |
| org.apache.camel.camel-core | again there are implicit dependencies, so this is required to be fully error-free |
| apache.commons.io | lot of useful helpers, e.g. for parsing xml |
| com.google.gson | for parsing json |
| olingo.core | required in some cases |
Here’s the copy&paste-ready section for the manifest.mf file
Require-Bundle:

  org.slf4j.api;visibility:=private,

   com.sap.gw.rt.camel.components.custom-development;bundle-version="1.3.2",

   com.sap.gw.rt.ip.commons.camel-commons;bundle-version="1.3.2",

   org.apache.camel.camel-core;bundle-version="2.12.4",

   com.sap.it.commons;bundle-version="1.11.0",

   com.sap.it.commons.logging.slf4j;bundle-version="1.11.0",

   com.google.gson;bundle-version="2.2.2",

   com.springsource.org.apache.commons.io;bundle-version="1.4.0",

   olingo-odata2-api;bundle-version="2.0.0",

   olingo-odata2-core;bundle-version="2.0.0"
Again: after copy&paste, be sure to remove empty rows in the manifest.mf file
4.5 Remote SMP
In case you aren’t working with local SMP installation, you can consider 2 workarounds:
Make the required folders available locally, in order to compile against them
Copy the required jars into your project and add them to your build path via “Add External JARs”
4.6 Screenshots
How it looks at my end:
The MANIFEST.MF file:

The dependencies section as displayed in the manifest editor:

The .project file:

The .classpath file:
- SAP Managed Tags:
- SAP Mobile Platform
1 Comment
You must be a registered user to add a comment. If you've already registered, sign in. Otherwise, register and sign in.
Labels in this area
-
ABAP CDS Views - CDC (Change Data Capture)
2 -
AI
1 -
Analyze Workload Data
1 -
BTP
1 -
Business and IT Integration
2 -
Business application stu
1 -
Business Technology Platform
1 -
Business Trends
1,658 -
Business Trends
91 -
CAP
1 -
cf
1 -
Cloud Foundry
1 -
Confluent
1 -
Customer COE Basics and Fundamentals
1 -
Customer COE Latest and Greatest
3 -
Customer Data Browser app
1 -
Data Analysis Tool
1 -
data migration
1 -
data transfer
1 -
Datasphere
2 -
Event Information
1,400 -
Event Information
66 -
Expert
1 -
Expert Insights
177 -
Expert Insights
293 -
General
1 -
Google cloud
1 -
Google Next'24
1 -
Kafka
1 -
Life at SAP
780 -
Life at SAP
12 -
Migrate your Data App
1 -
MTA
1 -
Network Performance Analysis
1 -
NodeJS
1 -
PDF
1 -
POC
1 -
Product Updates
4,577 -
Product Updates
340 -
Replication Flow
1 -
RisewithSAP
1 -
SAP BTP
1 -
SAP BTP Cloud Foundry
1 -
SAP Cloud ALM
1 -
SAP Cloud Application Programming Model
1 -
SAP Datasphere
2 -
SAP S4HANA Cloud
1 -
SAP S4HANA Migration Cockpit
1 -
Technology Updates
6,873 -
Technology Updates
417 -
Workload Fluctuations
1
Related Content
- how to read the name of groovy script sap cloud integration cpi in Technology Q&A
- Magic Numbers : A Solution to Foreign Characters in SAP CPI in Technology Blogs by Members
- 10+ ways to reshape your SAP landscape with SAP Business Technology Platform - Blog 7 in Technology Blogs by SAP
- SAP GUI for Java 8.10 on the Horizon in Technology Blogs by SAP
- SAP Datasphere - Space, Data Integration, and Data Modeling Best Practices in Technology Blogs by SAP
Top kudoed authors
| User | Count |
|---|---|
| 34 | |
| 25 | |
| 12 | |
| 7 | |
| 7 | |
| 6 | |
| 6 | |
| 6 | |
| 5 | |
| 4 |